Keycloak
Keycloak is an open source identity and access management tool. It provides user federation, strong authentication, user management, and fine-grained authorization for modern applications and services. In this guide, we integrate the KeyCloak IdP to authenticate users into the Wazuh platform.
There are three stages in the single sign-on integration:
KeyCloak configuration
Create a new realm. Log in to the Keycloak admin console, expand the master drop-down menu and click Add Realm. Input a name in the Realm name field; in our case, this is named
Wazuh. Click on Create to apply this configuration.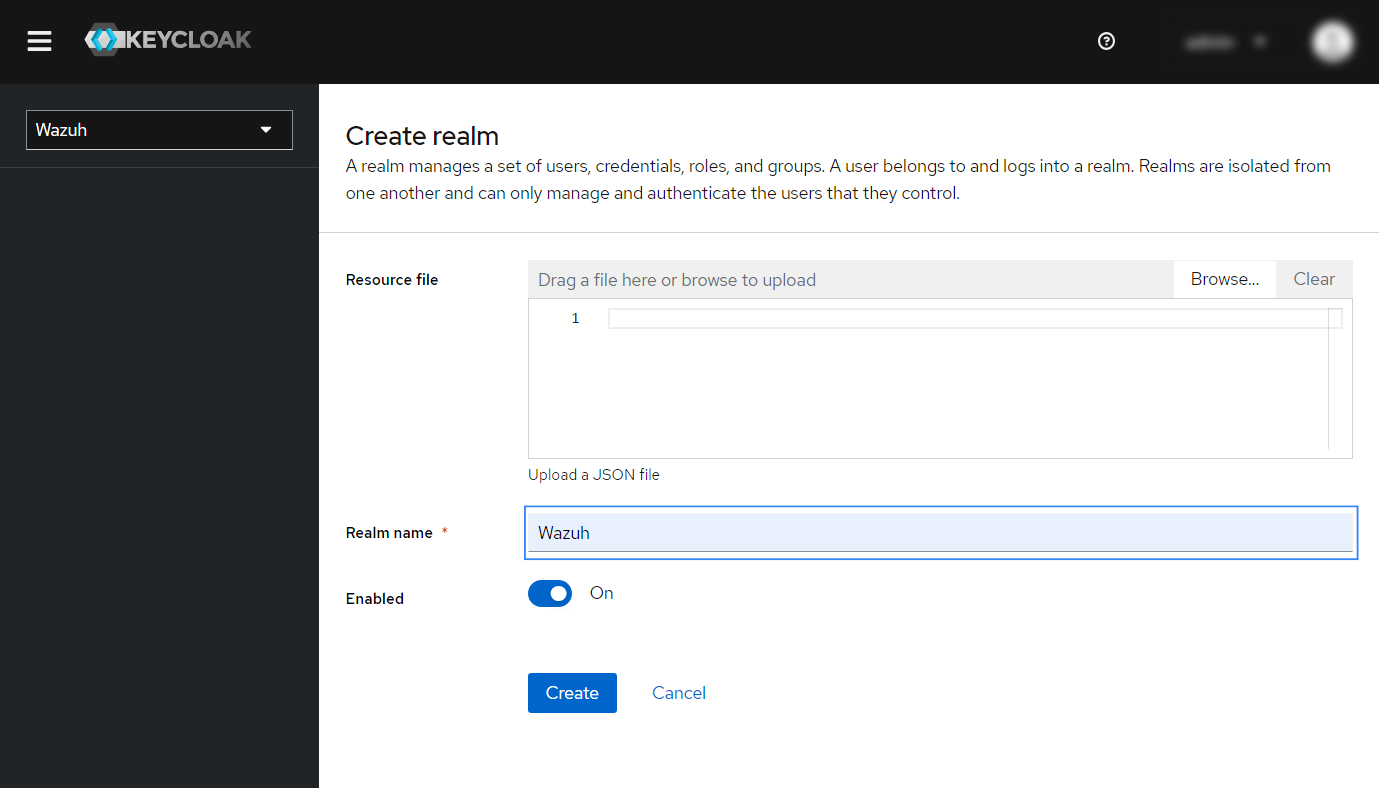
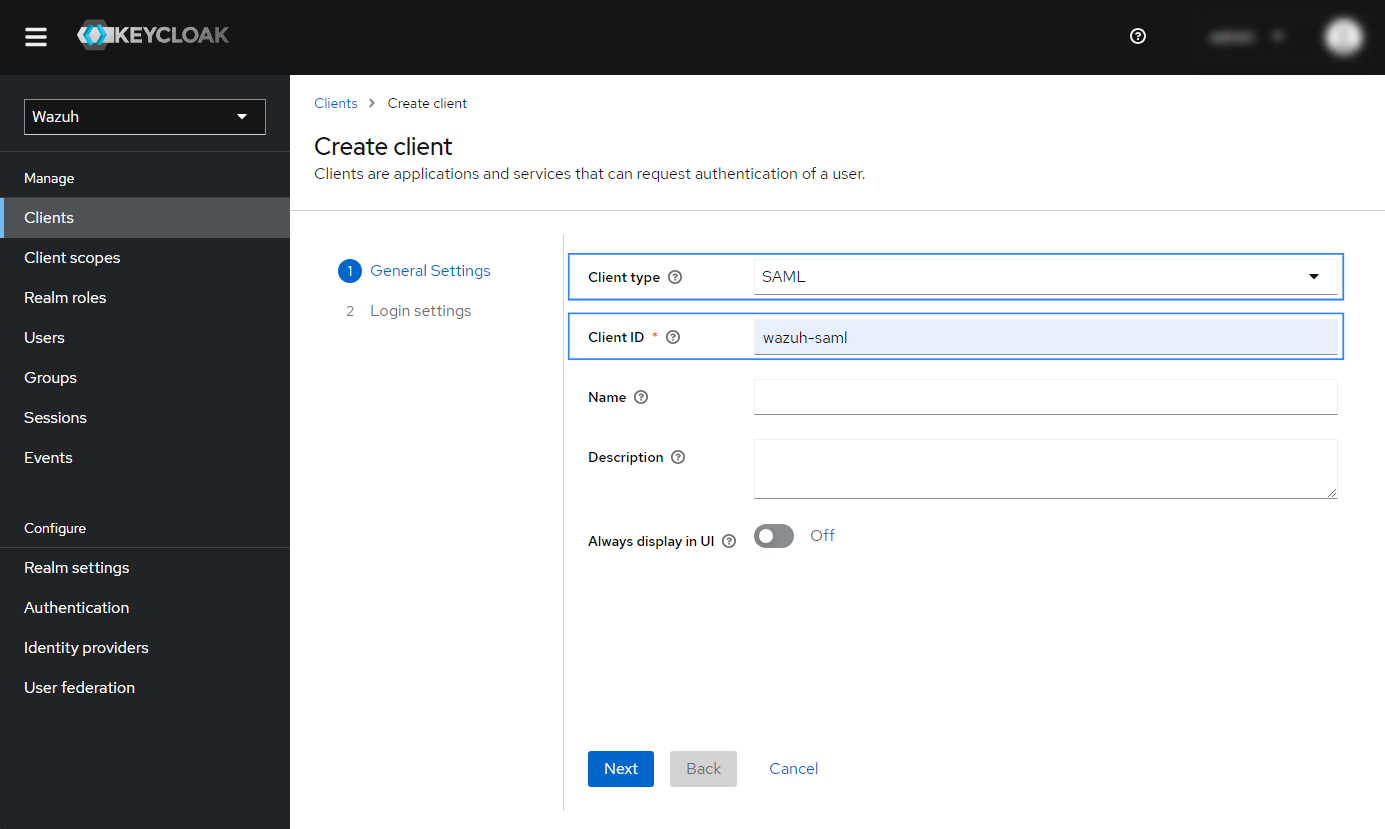
Create a new client. In the newly created realm, navigate to Clients > Create Client and modify the following parameters:
Client type: select
SAMLfrom the drop-down menu.Client ID: input
wazuh-saml. This is theSP Entity IDvalue which will be used later in theconfig.ymlon the Wazuh indexer instance.
You can leave the rest of the values as default. Click Save to apply the configuration.
Configure client settings.
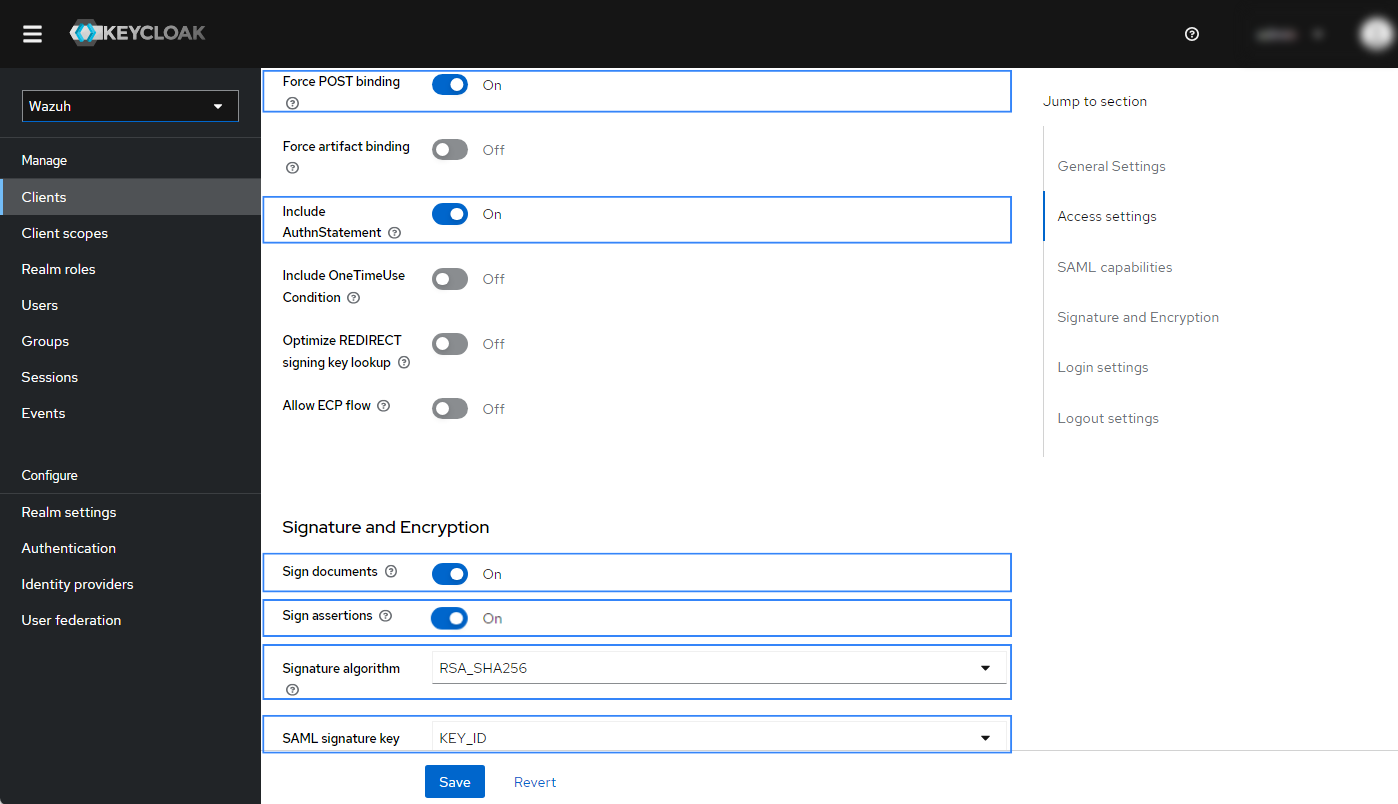
Navigate to Clients > Settings and ensure the Enabled button is turned on. Complete the section with these parameters:
Client ID:
wazuh-samlName:
Wazuh SSOValid redirect URIs:
https://<WAZUH_DASHBOARD_URL>/*IDP-Initiated SSO URL name:
wazuh-dashboardName ID format:
usernameForce POST binding:
ONInclude AuthnStatement:
ONSign documents:
ONSign assertions:
ONSignature algorithm:
RSA_SHA256SAML signature key name:
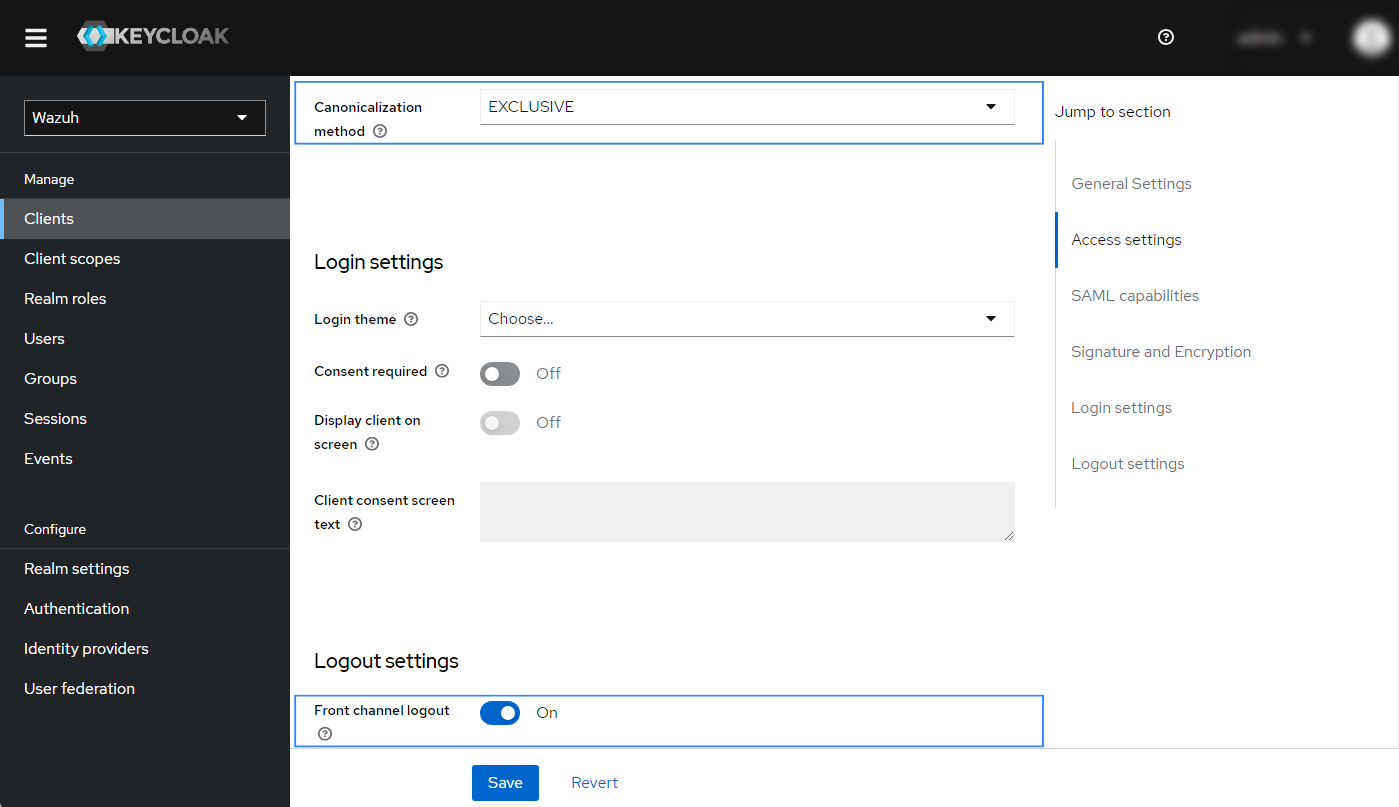
KEY_IDCanonicalization method:
EXCLUSIVEFront channel logout:
ON
Replace the
<WAZUH_DASHBOARD_URL>field with the corresponding URL of your Wazuh dashboard instance.The configuration must be similar to the highlighted blue rectangles:
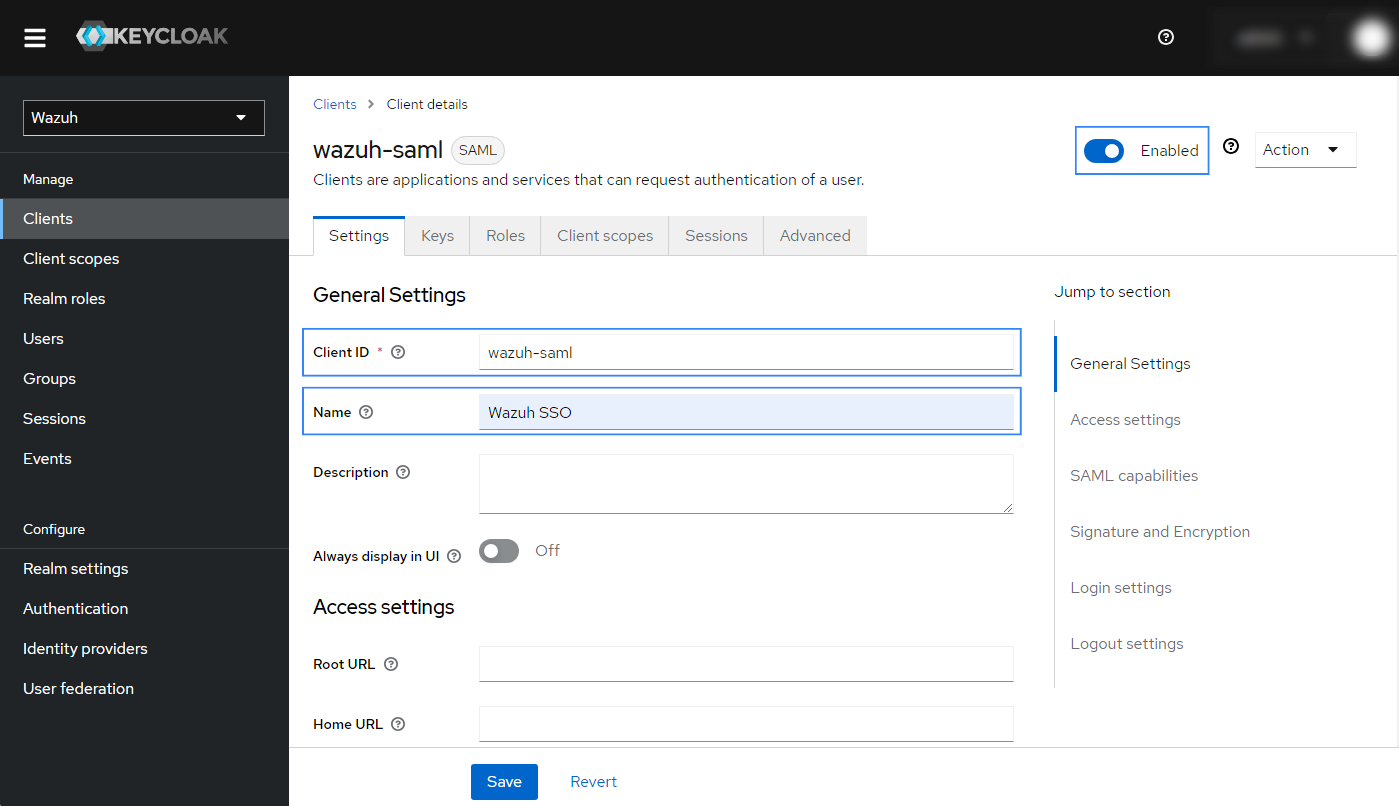
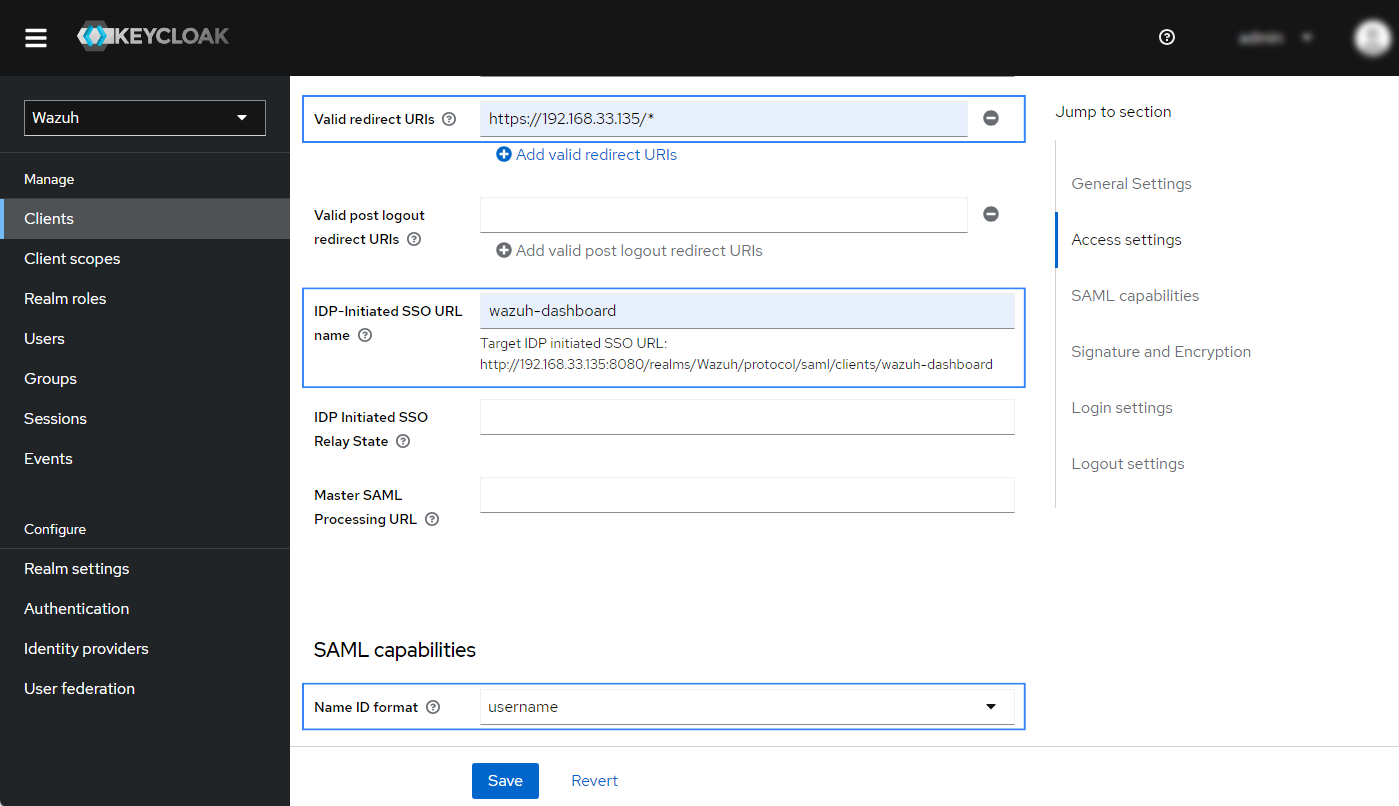
You can leave the rest of the values as default. Click Save to apply the configuration.
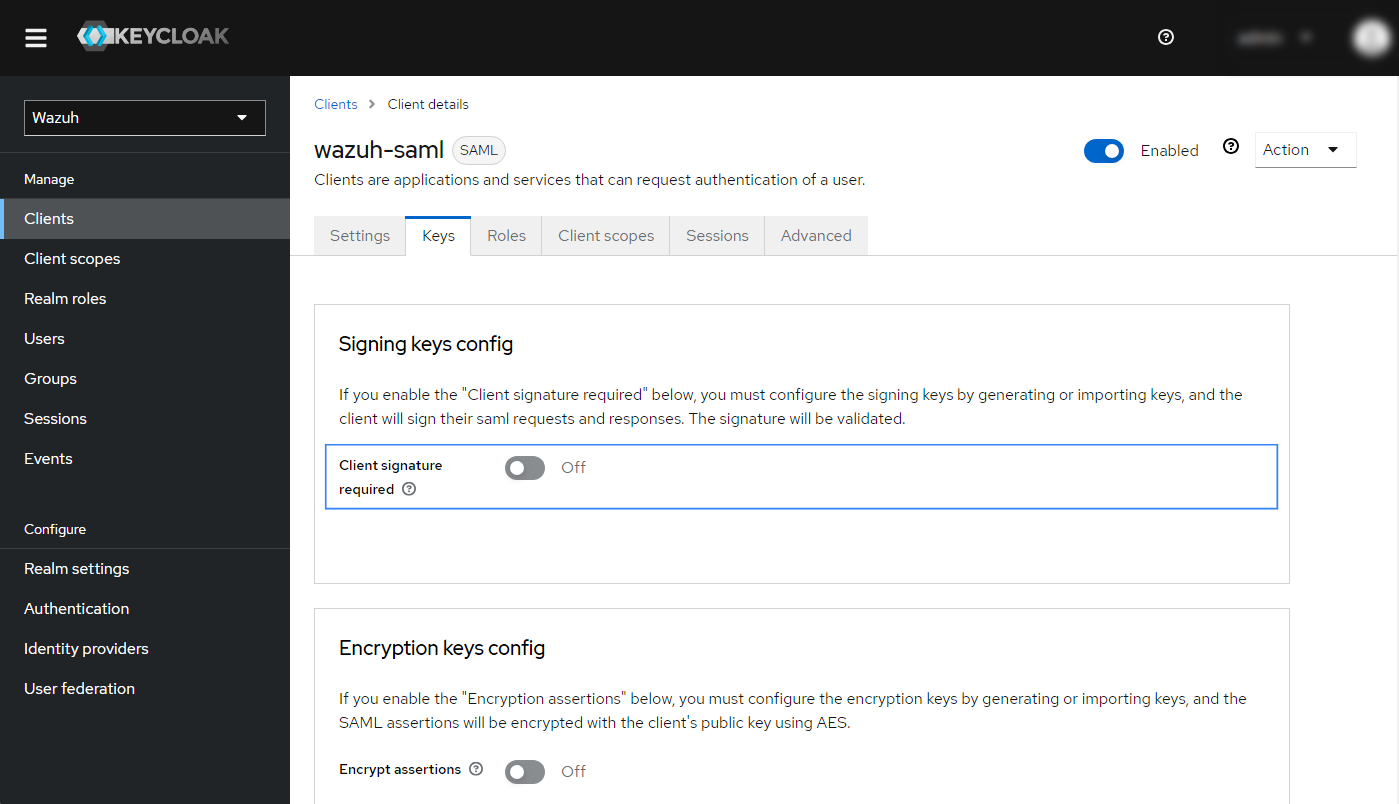
Navigate to Clients > Keys and complete the section with these parameters:
Client signature required:
Off
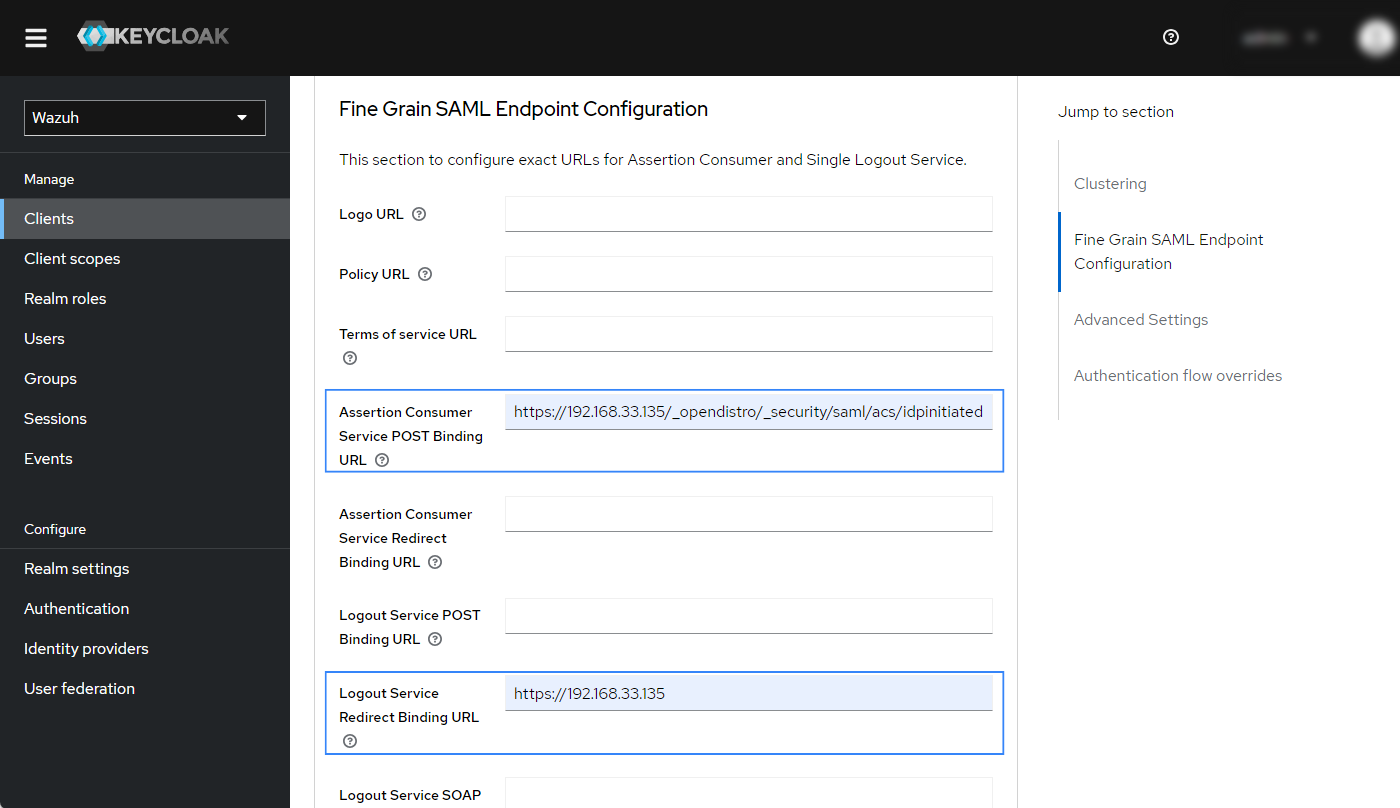
Navigate to Clients > Advanced > Fine Grain SAML Endpoint Configuration and complete the section with these parameters:
Assertion Consumer Service POST Binding URL:
https://<WAZUH_DASHBOARD_URL>/_opendistro/_security/saml/acs/idpinitiatedLogout Service Redirect Binding URL:
https://<WAZUH_DASHBOARD_URL>
You can leave the rest of the values as default. Click Save to apply the configuration.
Create a new role. Navigate to Realm roles > Create role and complete the section with these parameters:
Role name: Input
wazuh-readonly. This will be our backend role in the Wazuh indexer configuration.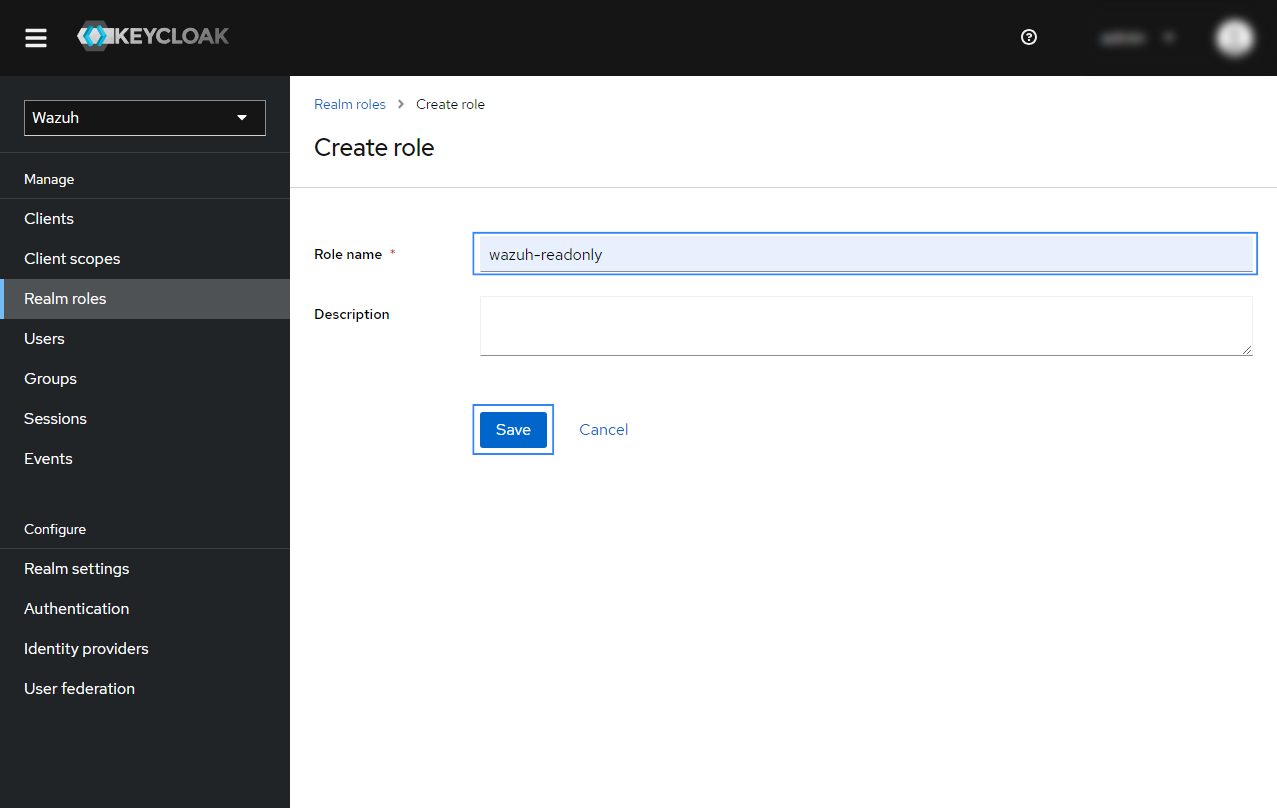
Click on Save to apply the configuration.
Create a new user.
Navigate to Users > Add user and fill in the required information.
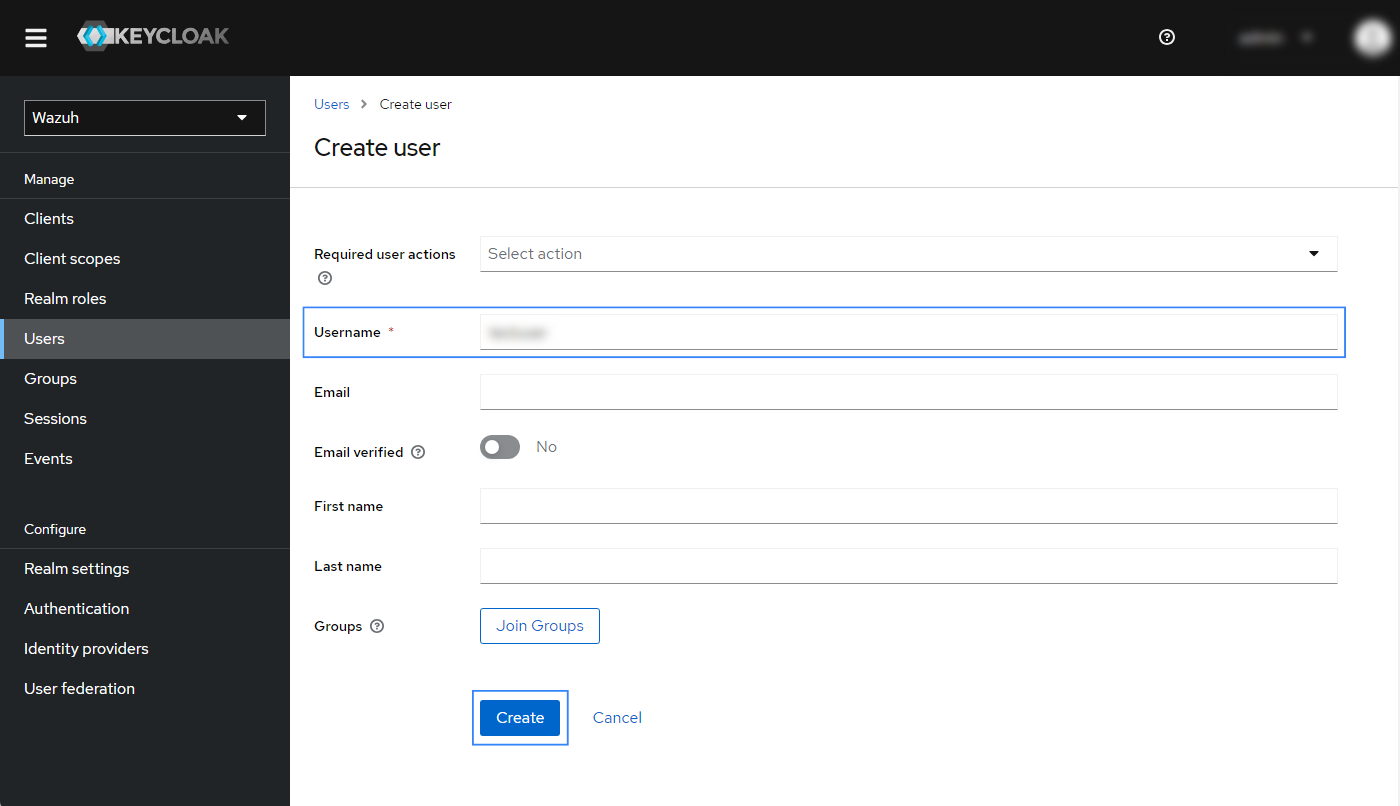
Click on Create to apply the configuration.
Navigate to Users > Credentials > Set password and input a password for the newly created user. You will use these credentials to log in to the Wazuh dashboard.
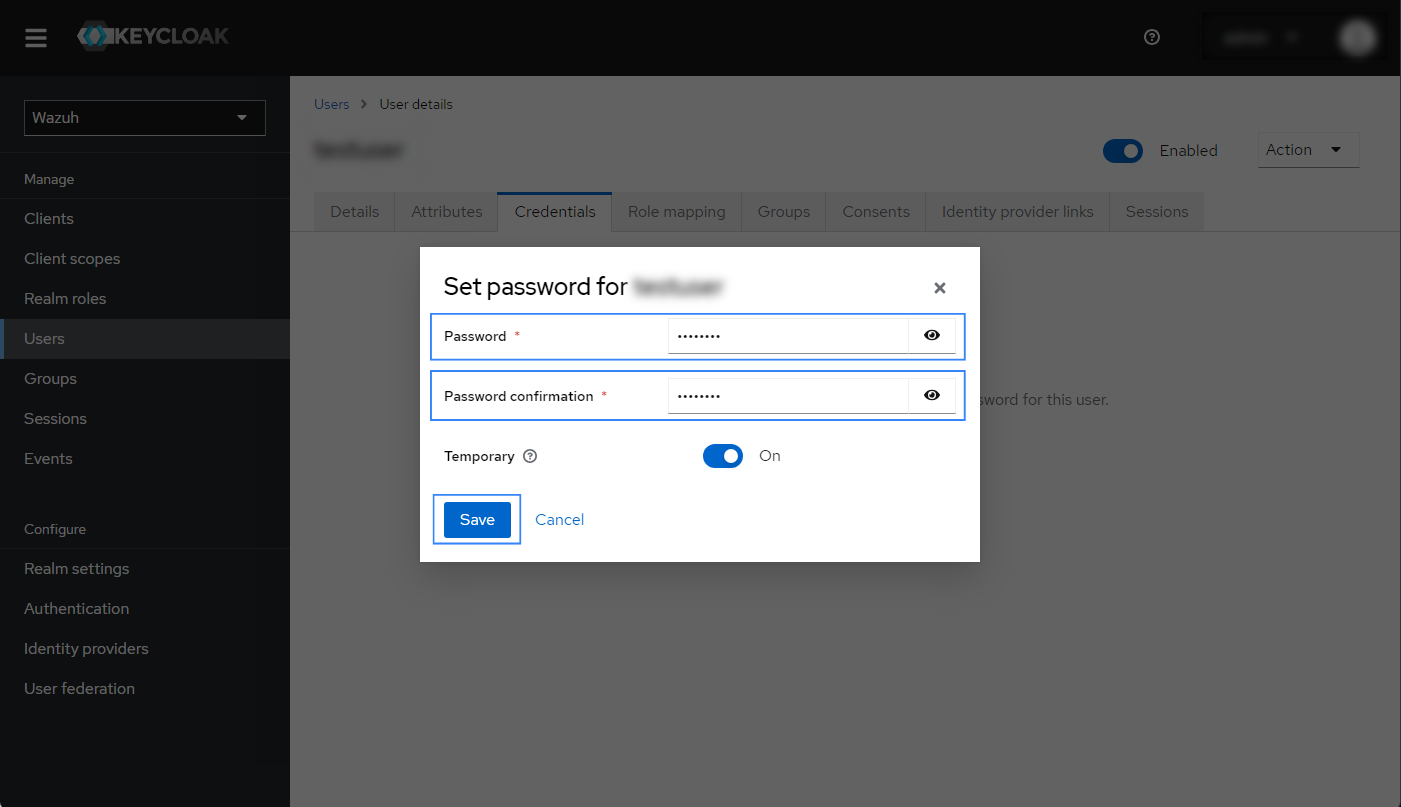
Click on Save to apply the configuration.
Create a new group and assign the user.
Go to Groups > Create group and assign a name to the group. In our case, this is Wazuh read only.
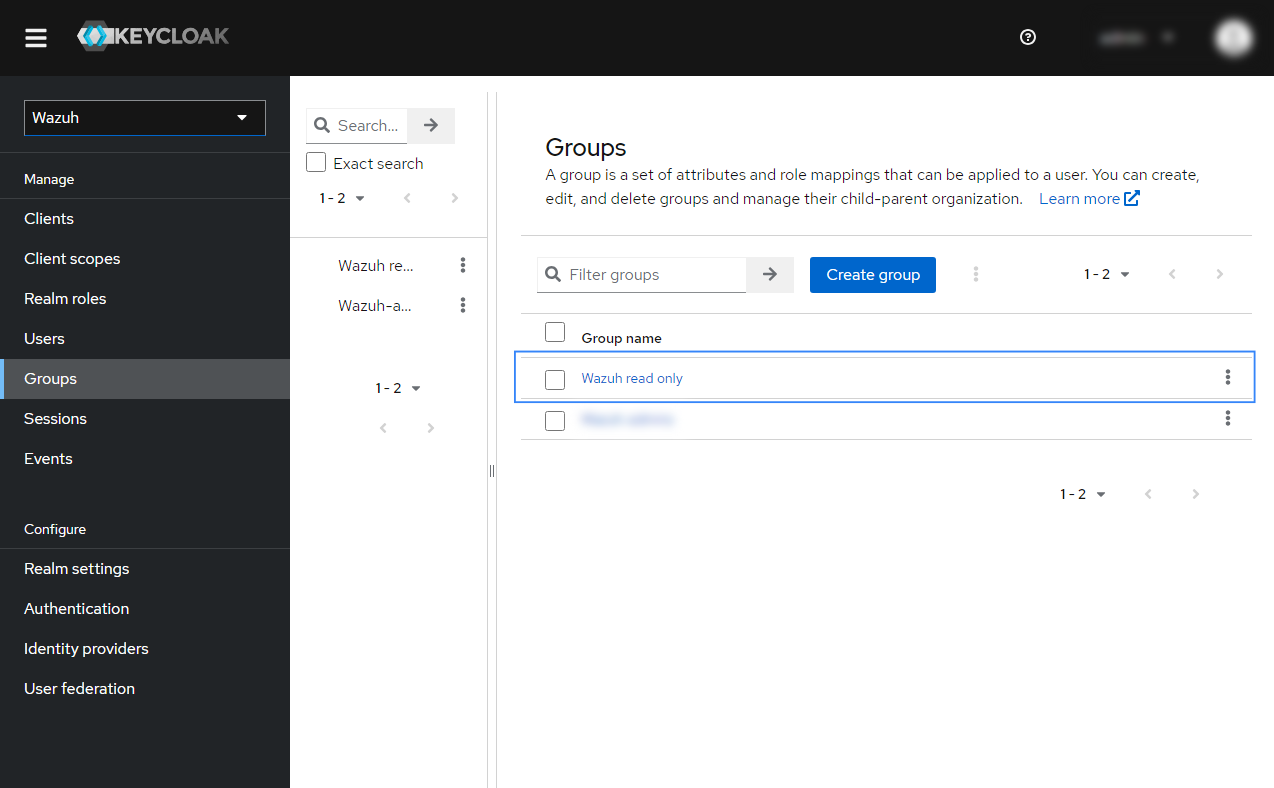
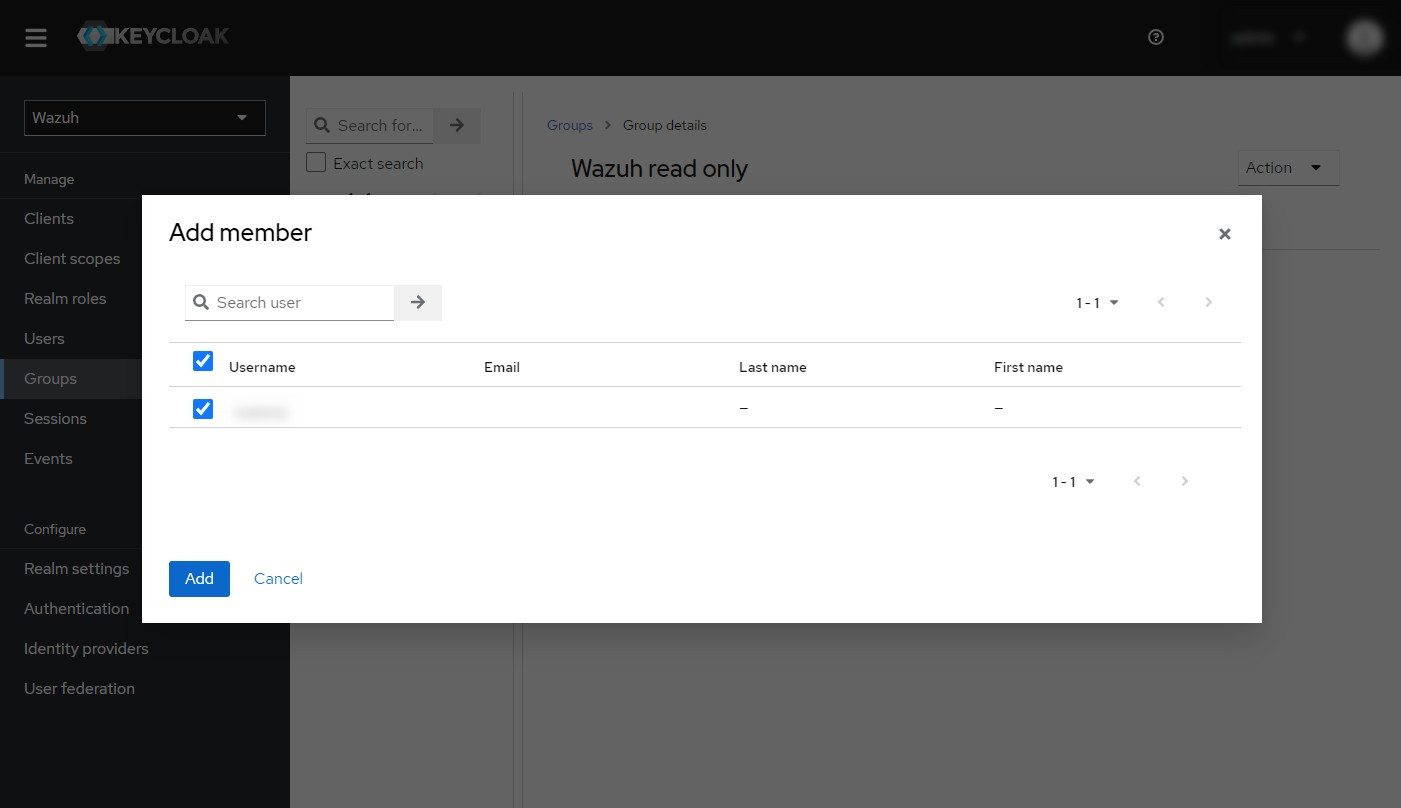
Click on the newly created group, navigate to Members > Add member and select the user created in the previous step. Click on Add to add it to the group.
In the newly created group details, go to Role Mapping > Assign role and select the
wazuh-readonlyrole created in step 3. Click on Assign to apply the configuration.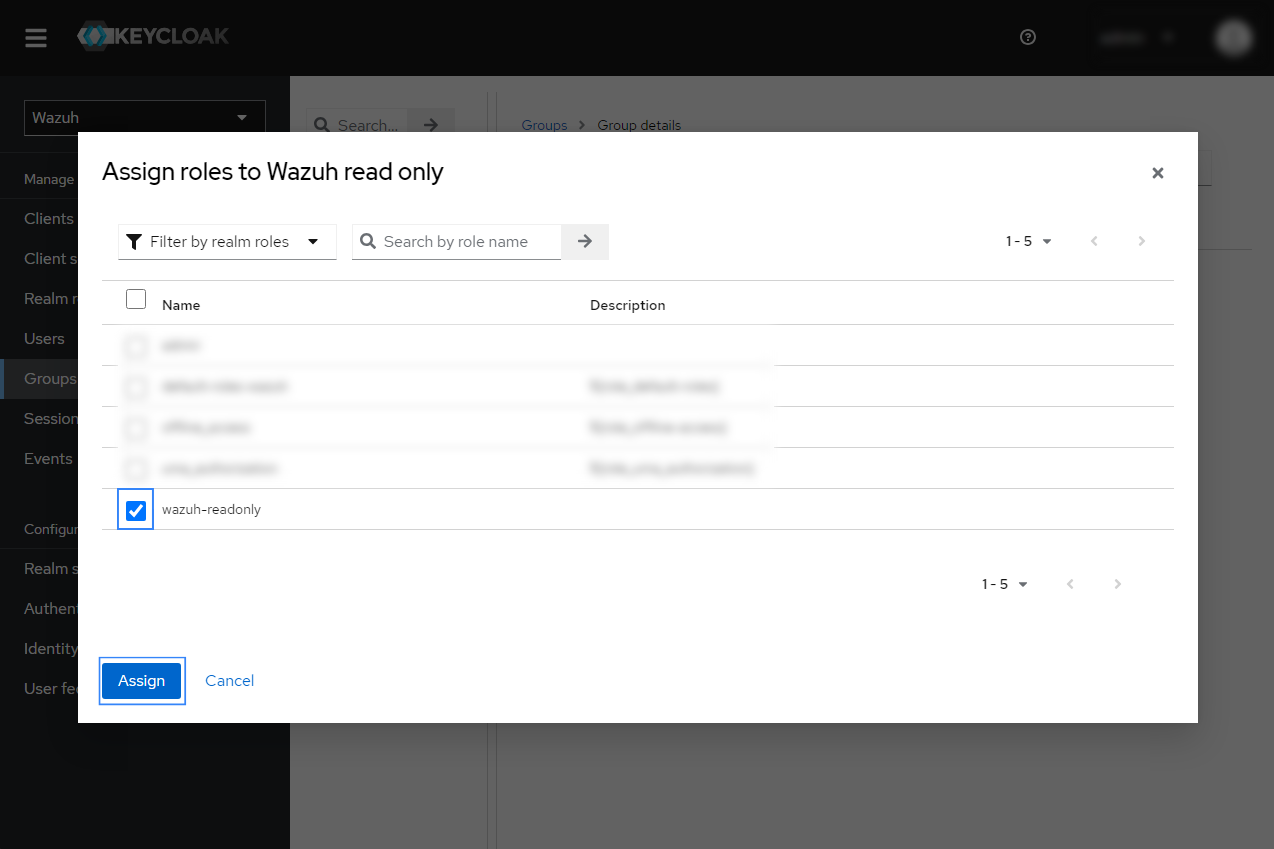
Configure protocol mapper.
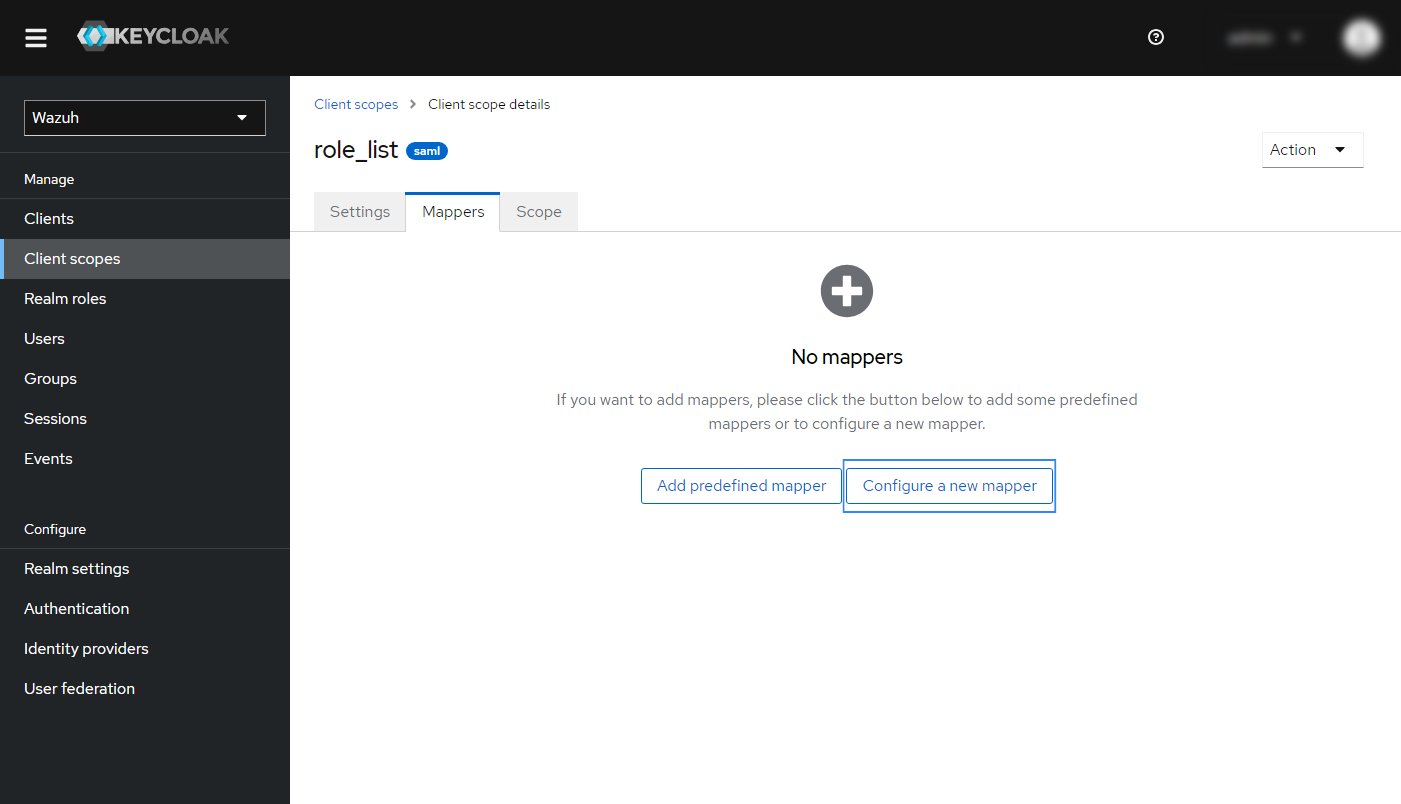
Navigate to Client scopes > role_list > Mappers > Configure a new mapper.
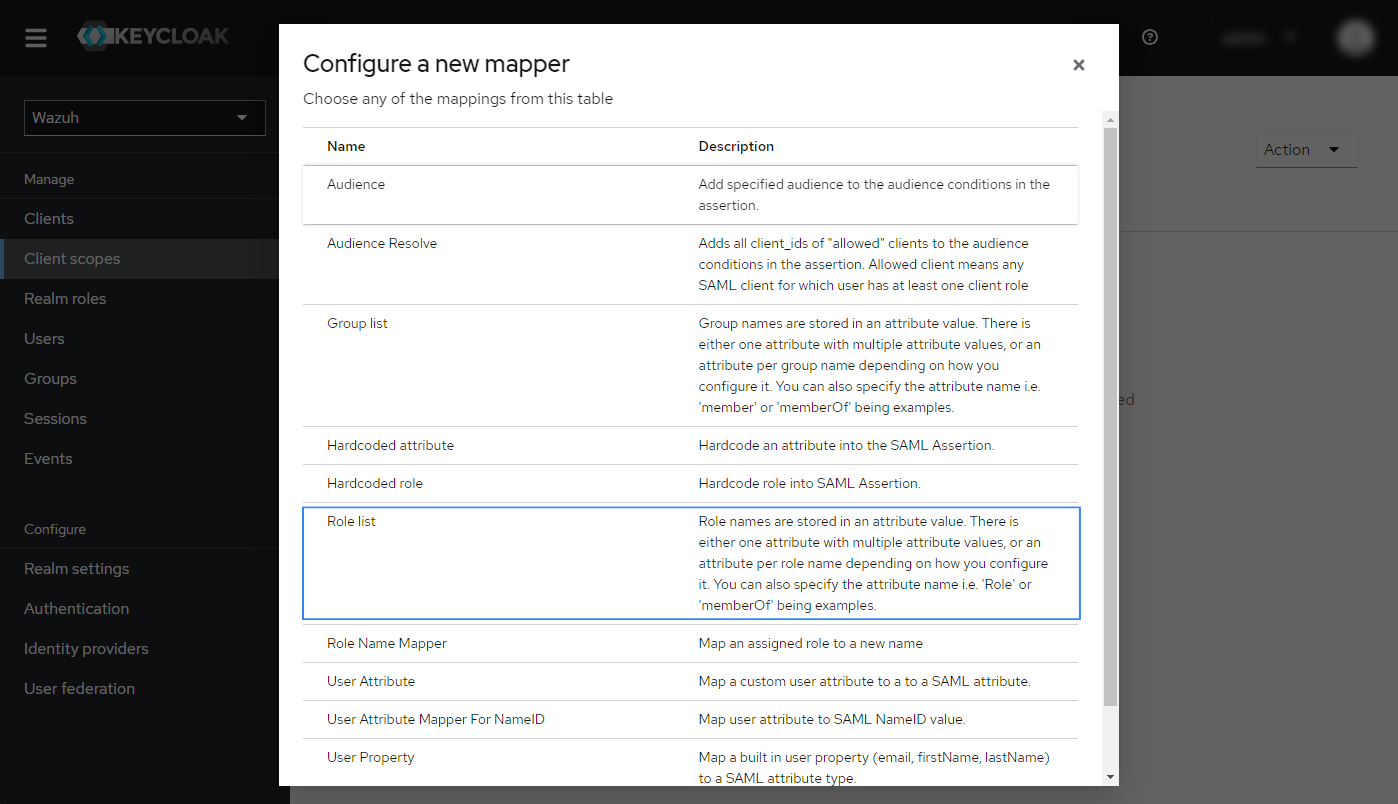
Select Role list from the list as seen below:
Complete the Add mapper section with these parameters:
Mapper type:
Role listName:
wazuhRoleKey. You can use any name here.Role attribute name:
Roles. This will be theroles_keyon the Wazuh indexer configuration.SAML Attribute NameFormat:
BasicSingle Role Attribute:
On
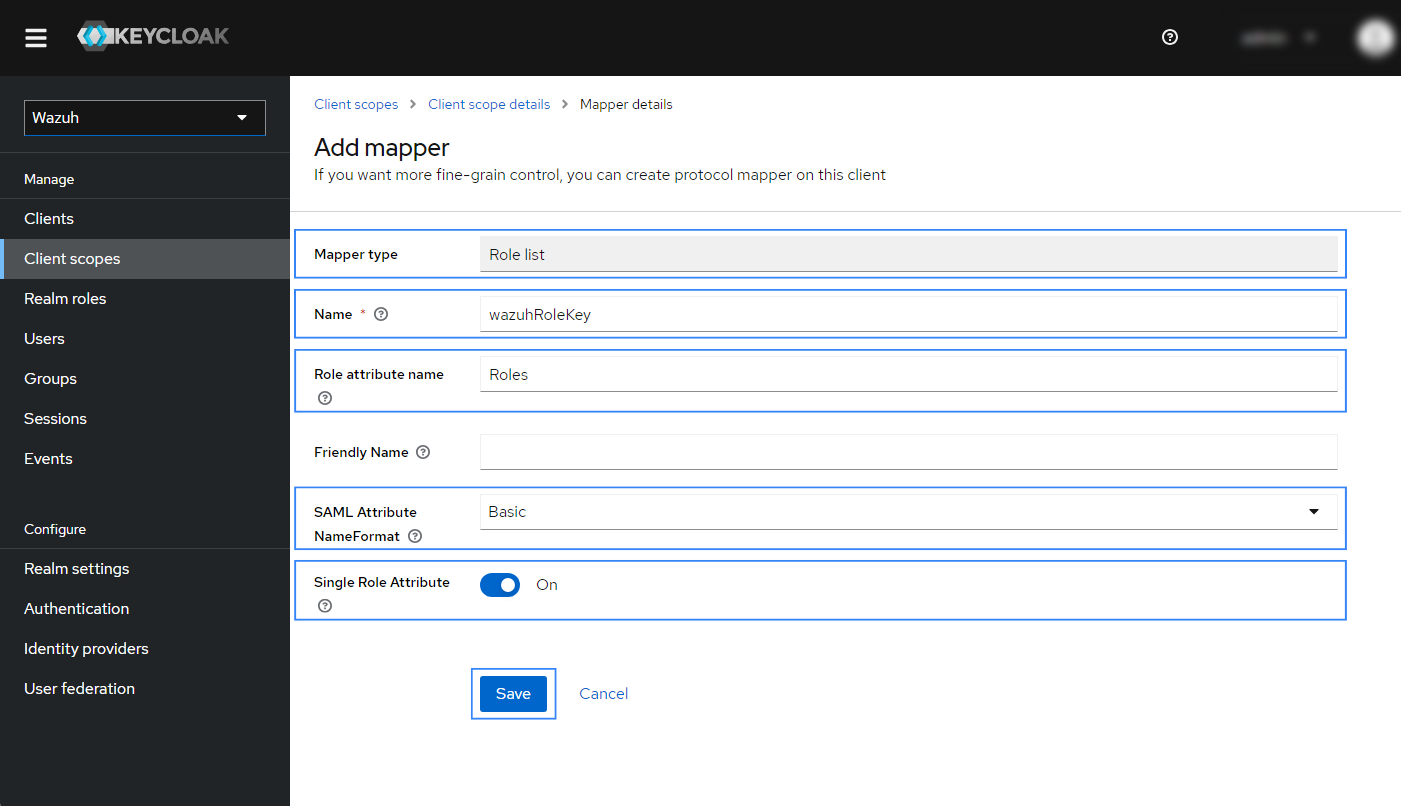
Click on Save to apply the configuration.
Note the necessary parameters from the SAML settings of Keycloak.
The parameters already obtained during the integration are:
sp.entity_id:wazuh-samlroles_key:Roleskibana_url:https://<WAZUH_DASHBOARD_URL>
To obtain the remaining parameters.
Navigate to Clients and select the name of your client. In our case, this is wazuh-saml.
Navigate to Action > Download adapter config, and ensure the Format option is Mod Auth Mellon files.
Click on Download to download the remaining files.
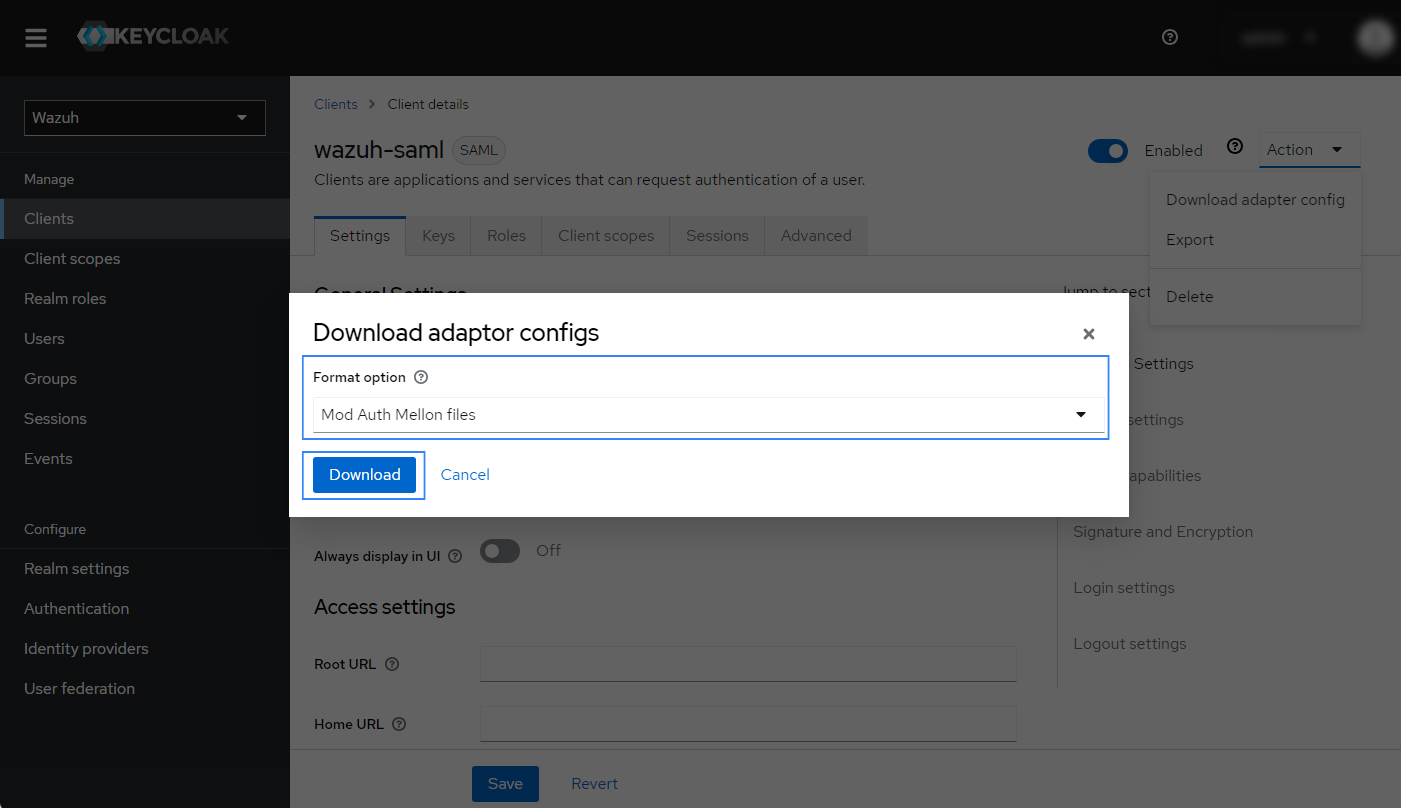
The downloaded files contain the
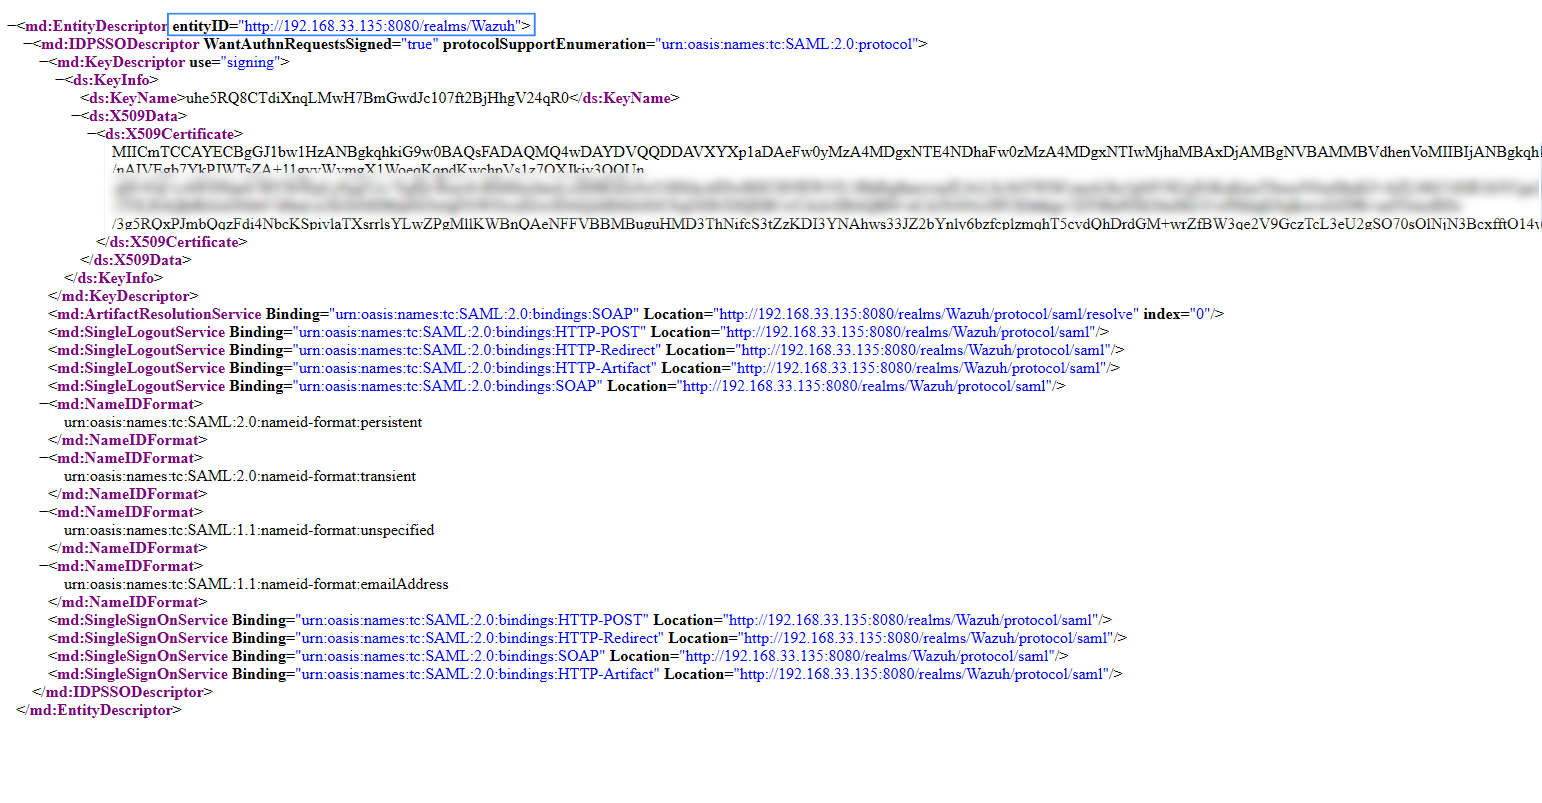
idp.metadata.xmlfile and thesp.metadata.xmlfile.The
idp.entityIDparameter is in theidp.metadata.xmlfile.
Wazuh indexer configuration
Edit the Wazuh indexer security configuration files. We recommend that you back up these files before you carry out the configuration.
Generate a 64-character long random key using the following command.
openssl rand -hex 32The output will be used as the
exchange_keyin the/etc/wazuh-indexer/opensearch-security/config.ymlfile.Place the
idp.metadata.xmlandsp.metadata.xmlfiles within the/etc/wazuh-indexer/opensearch-security/directory. Set the file ownership to wazuh-indexer using the following command:chown wazuh-indexer:wazuh-indexer /etc/wazuh-indexer/opensearch-security/idp.metadata.xml chown wazuh-indexer:wazuh-indexer /etc/wazuh-indexer/opensearch-security/sp.metadata.xml
Edit the
/etc/wazuh-indexer/opensearch-security/config.ymlfile and change the following values:Set the
orderinbasic_internal_auth_domainto0, and set thechallengeflag tofalse.Include a
saml_auth_domainconfiguration under theauthcsection similar to the following:
    authc:
...
      basic_internal_auth_domain:
        description: "Authenticate via HTTP Basic against internal users database"
        http_enabled: true
        transport_enabled: true
        order: 0
        http_authenticator:
          type: "basic"
          challenge: false
        authentication_backend:
          type: "intern"
      saml_auth_domain:
        http_enabled: true
        transport_enabled: false
        order: 1
        http_authenticator:
          type: saml
          challenge: true
          config:
            idp:
              metadata_file: '/etc/wazuh-indexer/opensearch-security/idp.metadata.xml'
              entity_id: 'http://192.168.XX.XX:8080/realms/Wazuh'
            sp:
              entity_id: wazuh-saml
              metadata_file: '/etc/wazuh-indexer/opensearch-security/sp.metadata.xml'
            kibana_url: https://<WAZUH_DASHBOARD_ADDRESS>
            roles_key: Roles
            exchange_key: 'b1d6dd32753374557dcf92e241.......'
        authentication_backend:
          type: noop
Ensure to change the following parameters to their corresponding value:
idp.metadata_fileidp.entity_idsp.entity_idsp.metadata_filekibana_urlroles_keyexchange_key
Run the
securityadminscript to load the configuration changes made in theconfig.ymlfile.# export JAVA_HOME=/usr/share/wazuh-indexer/jdk/ && bash /usr/share/wazuh-indexer/plugins/opensearch-security/tools/securityadmin.sh -f /etc/wazuh-indexer/opensearch-security/config.yml -icl -key /etc/wazuh-indexer/certs/admin-key.pem -cert /etc/wazuh-indexer/certs/admin.pem -cacert /etc/wazuh-indexer/certs/root-ca.pem -h 127.0.0.1 -nhnv
The
-hflag specifies the hostname or the IP address of the Wazuh indexer node. Note that this command uses 127.0.0.1, set your Wazuh indexer address if necessary.The command output must be similar to the following:
Security Admin v7
Will connect to 127.0.0.1:9200 ... done
Connected as "CN=admin,OU=Wazuh,O=Wazuh,L=California,C=US"
OpenSearch Version: 2.10.0
Contacting opensearch cluster 'opensearch' and wait for YELLOW clusterstate ...
Clustername: wazuh-cluster
Clusterstate: GREEN
Number of nodes: 1
Number of data nodes: 1
.opendistro_security index already exists, so we do not need to create one.
Populate config from /etc/wazuh-indexer/opensearch-security
Will update '/config' with /etc/wazuh-indexer/opensearch-security/config.yml
   SUCC: Configuration for 'config' created or updated
SUCC: Expected 1 config types for node {"updated_config_types":["config"],"updated_config_size":1,"message":null} is 1 (["config"]) due to: null
Done with success
Wazuh dashboard configuration
Create a new role mapping for the backend role. Follow these steps to create a new role mapping, and grant read-only permissions to the backend role.
Log into the Wazuh dashboard as administrator.
Click the upper-left menu icon ☰ to open the options, go to Indexer management > Security, and then Roles to open the roles page.
Click Create role, complete the empty fields with the following parameters, and then click Create to complete the task.
Name: Assign a name to the role.
Cluster permissions:
cluster_composite_ops_roIndex:
*Index permissions:
readTenant permissions: Select
global_tenantand theRead onlyoption.
Select the newly created role.
Select the Mapped users tab and click Manage mapping.
Under Backend roles, add the value of the Role name attribute in Keycloak configuration and click Map to confirm the action. In our case, the backend role is
wazuh-readonly.
Check the value of
run_asin the/usr/share/wazuh-dashboard/data/wazuh/config/wazuh.ymlconfiguration file. Ifrun_asis set tofalse, proceed to the next step.hosts: - default: url: https://127.0.0.1 port: 55000 username: wazuh-wui password: "<WAZUH_WUI_PASSWORD>" run_as: false
If
run_asis set totrue, you need to add a role mapping on the Wazuh dashboard. To map the backend role to Wazuh, follow these steps:Click ☰ to open the menu on the Wazuh dashboard, go to Server management > Security, and then Roles mapping to open the page.
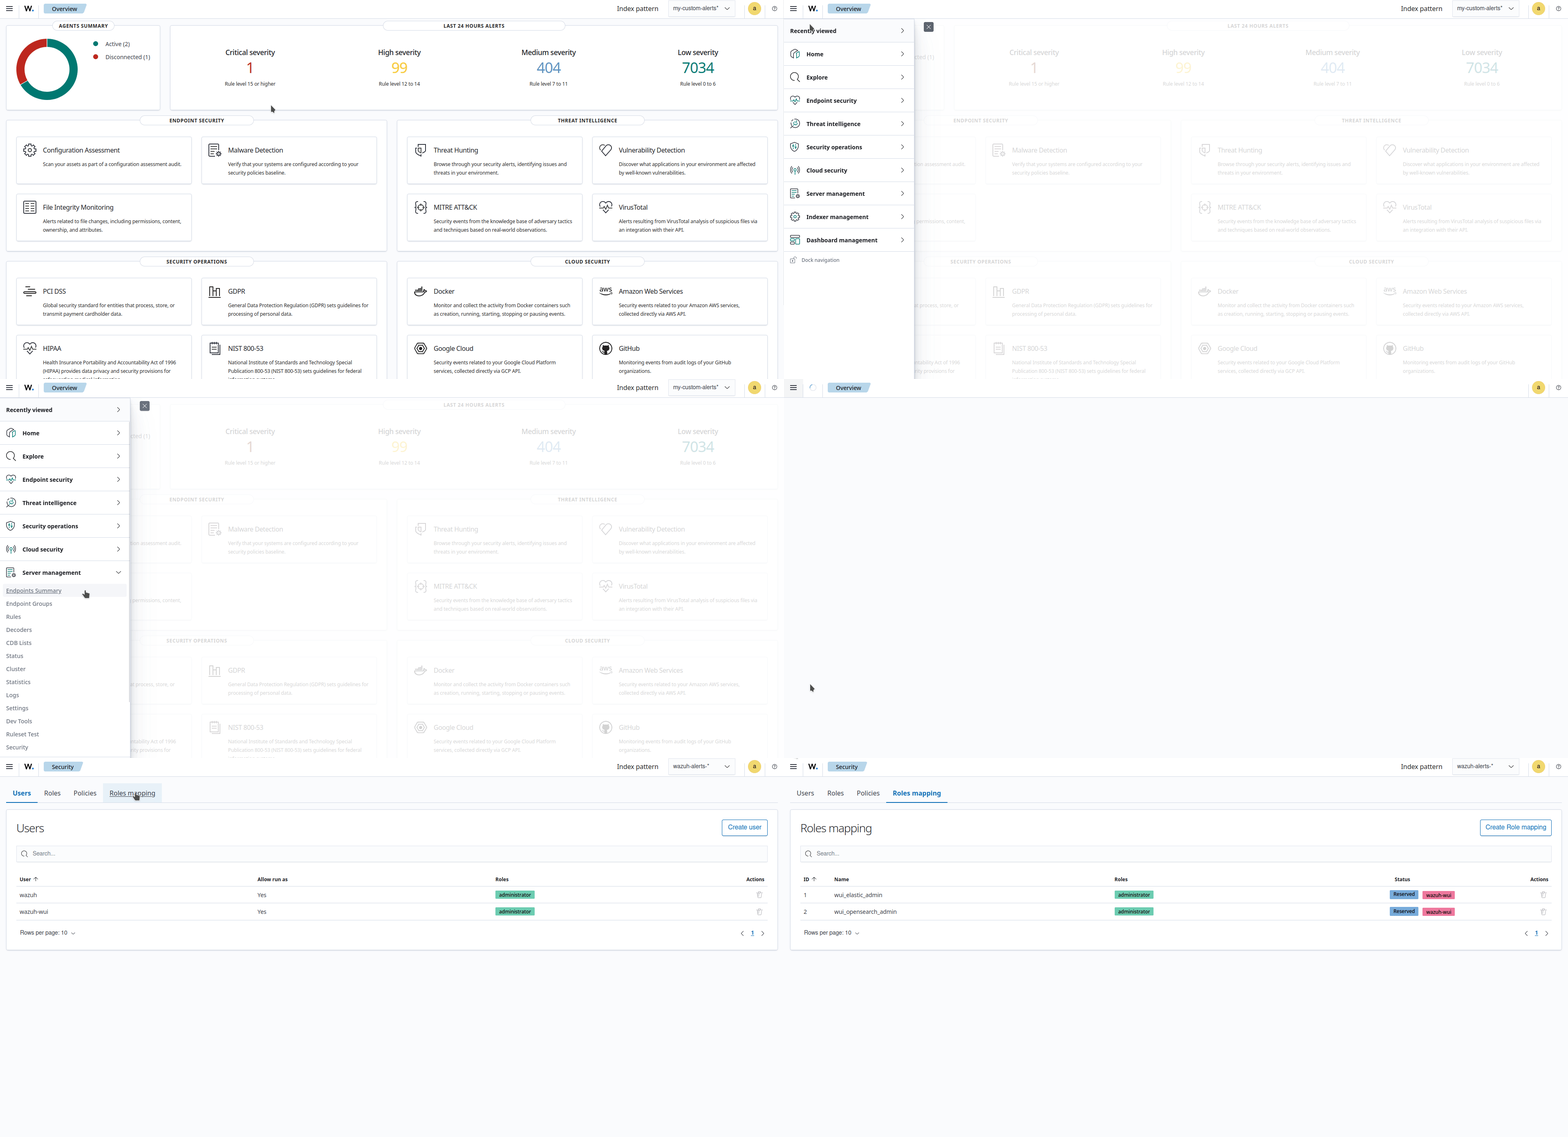
Click Create Role mapping and complete the empty fields with the following parameters:
Role mapping name: Assign a name to the role mapping.
Roles: Select
readonly.Custom rules: Click Add new rule to expand this field.
User field:
backend_rolesSearch operation:
FINDValue: Assign the value of the realm role in Keycloak configuration. In our case, this is
wazuh-readonly.
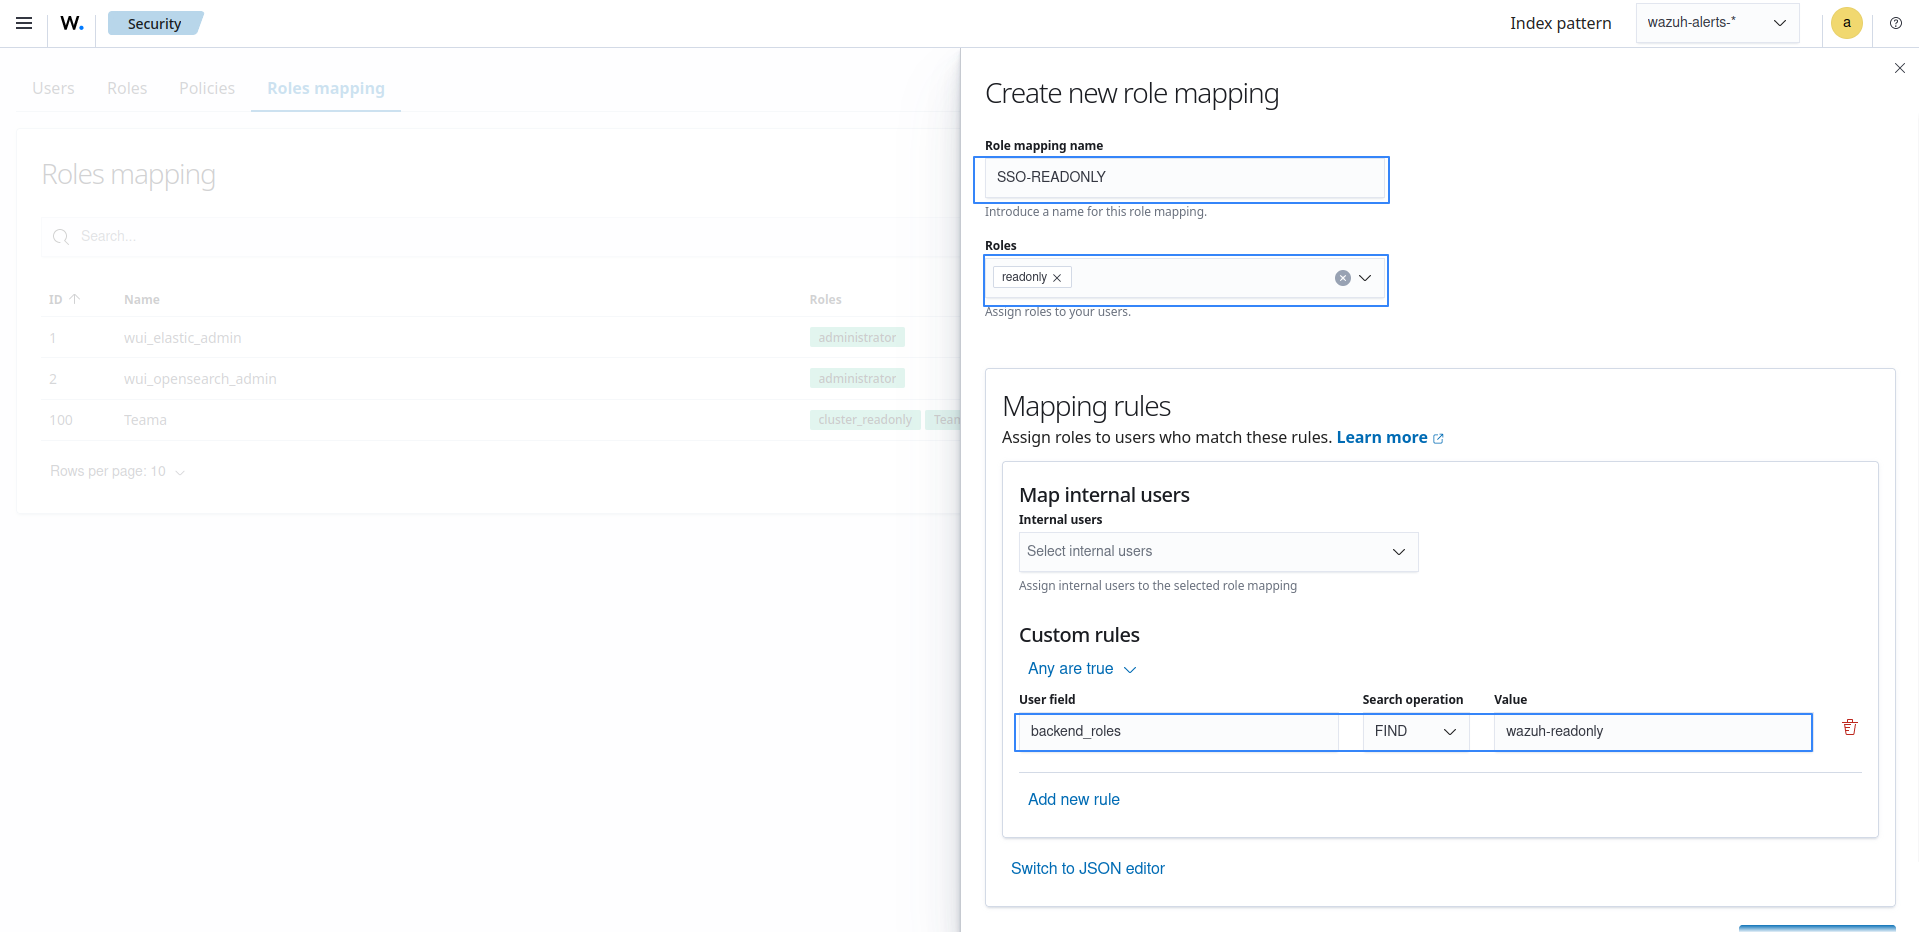
Click Save role mapping to save and map the backend role with Wazuh as read-only.
Edit the Wazuh dashboard configuration file. Add these configurations to
/etc/wazuh-dashboard/opensearch_dashboards.yml. We recommend that you back up these files before you carry out the configuration.opensearch_security.auth.type: "saml" server.xsrf.allowlist: ["/_opendistro/_security/saml/acs", "/_opendistro/_security/saml/logout", "/_opendistro/_security/saml/acs/idpinitiated"] opensearch_security.session.keepalive: false
Restart the Wazuh dashboard service using this command:
# systemctl restart wazuh-dashboard
# service wazuh-dashboard restart
Test the configuration. Go to your Wazuh dashboard URL and log in with your Keycloak account.