Expose hiding processes
In this exercise you will safely implement a kernel-mode rootkit on your lab machine as a proof-of-concept for Wazuh rootkit detection.
This rootkit is able to hide itself from the kernel module list as well as hide selected processes from being visible
to ps.
However, Wazuh will sill detect it using the system calls setsid(), getpid(), and kill(). This makes
Wazuh a very effective Linux rootkit detection application by looking for general low-level hiding behavior.
Log on to your Linux Agent instance and become root.
[root@linux-agent centos]$ sudo su -
Update your kernel and reboot. This is necessary for the rootkit build process.
[root@linux-agent centos]# yum -y update
[root@linux-agent centos]# shutdown -r now
Log back into linux-agent and become root again.
[root@linux-agent centos]$ sudo su -
In your linux-agent's
/var/ossec/etc/local_internal_options.conffile, enable debug logging and speed up the rate at which rootcheck commences its first scan for the sake of this lab.# echo "syscheck.debug=2" > /var/ossec/etc/local_internal_options.conf # echo "agent.debug=2" >> /var/ossec/etc/local_internal_options.conf # echo "rootcheck.sleep=0" >> /var/ossec/etc/local_internal_options.conf # echo "syscheck.sleep=0" >> /var/ossec/etc/local_internal_options.conf # systemctl restart wazuh-agent
Note
The /var/ossec/etc/internal_options.conf file contains all possible internal options that
you can change, along with explanations. While you can edit this file directly, it gets overwritten during
Wazuh upgrades, so it is recommended that you copy the sections you want to customize from
/var/ossec/etc/internal_options.conf to /var/ossec/etc/local_internal_options.conf where the changes
will not be overwritten.
The settings in local_internal_options.conf always take precedence over the
settings in internal_options.conf, so editing the local_internal_options.conf file will ensure your
changes will not be overridden.
Install certain packages required for building the rootkit:
# yum -y install kernel-devel libgcc gcc git
Fetch the Diamorphine rootkit source code from GitHub
# git clone https://github.com/wazuh/Diamorphine.git
Change into the Diamorphine directory and compile the source code:
# cd Diamorphine
# make
Load the rootkit kernel module and put it to use
# insmod diamorphine.ko
Note
Depending on the environment the module will sometimes fail to load or function properly. If you receive the errors
insmod: ERROR: could not insert module diamorphine.ko: Invalid parametersorbash: kill: (509) - No such processin the next step, you can restart the linux-agent machine and try again. Sometimes it will take several tries to work.The kernel-level rootkit “Diamorphine” is now installed on this system! By default it is hidden so we are not able to detect it by running “lsmod”. Only with a special "kill" signal can we make Diamorphine unhide itself. Try it out:
# lsmod | grep diamorphine
# kill -63 509
# lsmod | grep diamorphine
diamorphine 13155 0# kill -63 509 # lsmod | grep diamorphine
When using these last commands, an empty output is expected.
In the case of Diamorphine, any attempt to send a kill signal
-63to any process whether it exists or not, will toggle whether the Diamorphine kernel module hides itself.This rootkit also allows you to hide a selected processes from being seen by the "ps" command for example. Run the following commands to see how the rsyslog process is first visible, then send the
-31signal to its pid and observe how the process is no longer visible.# ps auxw | grep rsyslogd | grep -v grep
root 732 0.0 0.7 214452 3572 ? Ssl 14:53 0:00 /usr/sbin/rsyslogd -n# kill -31 $(pidof rsyslogd) # ps auxw | grep rsyslog | grep -v grep
When using these last commands, an empty output is expected.
Next configure linux-agent to run rootcheck scans every 5 minutes setting the
frequencyoption the<rootcheck>section of your agent's/var/ossec/etc/ossec.conffile to 300 with the following:<rootcheck> <disabled>no</disabled> <check_files>yes</check_files> <check_trojans>yes</check_trojans> <check_dev>yes</check_dev> <check_sys>yes</check_sys> <check_pids>yes</check_pids> <check_ports>yes</check_ports> <check_if>yes</check_if> <!-- Frequency that rootcheck is executed - every 12 hours by default--> <frequency>300</frequency> <rootkit_files>/var/ossec/etc/shared/rootkit_files.txt</rootkit_files> <rootkit_trojans>/var/ossec/etc/shared/rootkit_trojans.txt</rootkit_trojans> <skip_nfs>yes</skip_nfs> </rootcheck>
Restart the agent.
For Systemd:
# systemctl restart wazuh-agent
For SysV Init:
# service wazuh-agent restart
The next rootcheck scan should run shortly and it will alert about the rsyslogd process which we hid with Diamorphine.
Watch
ossec.logon linux-agent for rootcheck activity that should start within 5 minutes of the agent restart.# tailf /var/ossec/logs/ossec.log | grep rootcheck
You should see something like this shortly:
2019/10/18 14:47:05 rootcheck[464] rootcheck.c:197 at rootcheck_init(): DEBUG: Starting ...
2019/10/18 14:47:05 rootcheck[464] rootcheck.c:246 at rootcheck_connect(): DEBUG: Starting queue ...
2019/10/18 14:47:07 rootcheck[464] syscheck.c:467 at main(): INFO: Started (pid: 472).
2019/10/18 14:47:17 rootcheck[464] run_rk_check.c:105 at run_rk_check(): INFO: Starting rootcheck scan.
2019/10/18 14:47:17 rootcheck[464] check_rc_files.c:31 at check_rc_files(): DEBUG: Starting on check_rc_files
2019/10/18 14:47:17 rootcheck[464] check_rc_trojans.c:32 at check_rc_trojans(): DEBUG: Starting on check_rc_trojans
2019/10/18 14:47:18 rootcheck[464] run_rk_check.c:232 at run_rk_check(): DEBUG: Going into check_rc_dev
2019/10/18 14:47:18 rootcheck[464] check_rc_dev.c:154 at check_rc_dev(): DEBUG: Starting on check_rc_dev
2019/10/18 14:47:18 rootcheck[464] run_rk_check.c:238 at run_rk_check(): DEBUG: Going into check_rc_sys
2019/10/18 14:47:18 rootcheck[464] check_rc_sys.c:334 at check_rc_sys(): DEBUG: Starting on check_rc_sys
2019/10/18 14:47:26 rootcheck[464] run_rk_check.c:244 at run_rk_check(): DEBUG: Going into check_rc_pids
2019/10/18 14:47:28 rootcheck[464] run_rk_check.c:250 at run_rk_check(): DEBUG: Going into check_rc_ports
2019/10/18 14:47:29 rootcheck[464] run_rk_check.c:254 at run_rk_check(): DEBUG: Going into check_open_ports
2019/10/18 14:47:29 rootcheck[464] run_rk_check.c:260 at run_rk_check(): DEBUG: Going into check_rc_if
2019/10/18 14:47:29 rootcheck[464] run_rk_check.c:264 at run_rk_check(): DEBUG: Completed with all checks.
2019/10/18 14:47:34 rootcheck[464] run_rk_check.c:293 at run_rk_check(): INFO: Ending rootcheck scan.
2019/10/18 14:47:34 rootcheck[464] run_rk_check.c:296 at run_rk_check(): DEBUG: Leaving run_rk_check
We see various rootkit scanning measures taking place that correspond to the various
<check_...>options specified in the<rootkit>section ofossec.conf. The check_rc_pids scan is the one that will catch Diamorphine.
Now switch back to the manager, and look for alerts in
/var/ossec/logs/alerts/alerts.logsimilar to these ones:
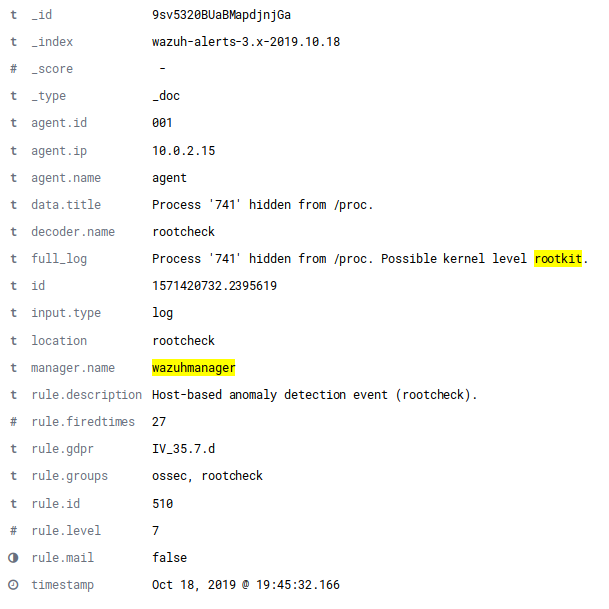
** Alert 1571420732.2395049: - ossec,rootcheck,gdpr_IV_35.7.d,
       2019 Oct 18 17:45:32 (agent) any->rootcheck
       Rule: 510 (level 7) -> 'Host-based anomaly detection event (rootcheck).'
       Process '732' hidden from /proc. Possible kernel level rootkit.
       title: Process '732' hidden from /proc.

       ** Alert 1571420732.2395334: - ossec,rootcheck,gdpr_IV_35.7.d,
       2019 Oct 18 17:45:32 (agent) any->rootcheck
       Rule: 510 (level 7) -> 'Host-based anomaly detection event (rootcheck).'
       Process '740' hidden from /proc. Possible kernel level rootkit.
       title: Process '740' hidden from /proc.

       ** Alert 1571420732.2395619: - ossec,rootcheck,gdpr_IV_35.7.d,
       2019 Oct 18 17:45:32 (agent) any->rootcheck
       Rule: 510 (level 7) -> 'Host-based anomaly detection event (rootcheck).'
       Process '741' hidden from /proc. Possible kernel level rootkit.
       title: Process '741' hidden from /proc.
It is also possible to find the same event in Kibana by searching for "rootkit".
Remember, if you run the same
kill -31command as before against rsyslogd, the rsyslogd process will become visible again. The subsequent rootcheck scan would no longer alert about it.Remove the rootkit from linux-agent since we don’t need it any longer.
# rmmod diamorphine
# kill -63 509
# rmmod diamorphine
Remove the custom internal options on linux-agent's that we used for this lab.
# rm -f /var/ossec/etc/local_internal_options.conf
In the
<rootcheck>section of linux-agent's/var/ossec/etc/ossec.conffile, disable rootcheck for now.<disabled>yes</disabled>
Restart the Wazuh agent on linux-agent
For Systemd:
# systemctl restart wazuh-agent
For SysV Init:
# service wazuh-agent restart
Now that you have finished this lab exercise you may be interested in reading the Anomaly and Malware detection section of our documentation for more details.