Grouping agents
Added in version 3.0.0.
There are two methods for configuring registered agents. They can either be configured locally with the ossec.conf file or remotely using the centralized configuration. If the centralized configuration is used, agents may be assigned to groups with each group possessing a unique configuration. This greatly simplifies the overall configuration process.
Unless otherwise assigned, all new agents automatically belong to the 'default' group. This group is created during the installation process with the configuration files placed in the /var/ossec/etc/shared/default/ folder. These files will be pushed from the manager to all agents belonging to this group.
Below are the steps to assign agents to a group with a specific configuration:
Once an agent has been added to the manager, assign it to a group using the agent_groups tool or the API. Below are examples of how to assign an agent with ID 002 to the group 'dbms' using these methods:
Using agent_groups:
Note
The group must be created and configured before assigning agents.
Note
This behaviour corresponds to
v3.7.0and later.# /var/ossec/bin/agent_groups -a -i 002 -g dbms
Using the API:
# curl -u foo:bar -X PUT "http://localhost:55000/agents/002/group/dbms?pretty"
An agent's group assignment can be checked using one of the following commands:
Using agent_groups:
# /var/ossec/bin/agent_groups -l -g dbms

  5 agent(s) in group 'dbms':
    ID: 002  Name: agent-dbms-e1.
    ID: 003  Name: agent-dbms-e2.
    ID: 004  Name: agent-dbms-a1.
    ID: 005  Name: agent-dbms-a2.
    ID: 006  Name: agent-dbms-a3.
Using the API:
# curl -u foo:bar -X GET "http://localhost:55000/agents/groups/dbms?pretty"
Once a group is created, its
agent.conffile can be edited to include the specific configuration you wish to assign to this group. For this example, the file to be edited is located at/var/ossec/etc/shared/dbms/agent.confand each agent belonging to this group will receive this file.Within 20 minutes of connecting to the manager, each agent assigned to a group will receive the files contained in the 'dbms' folder from the manager, including the
agent.conffile that was modified in the previous step. The length of time it takes for the manager to push these files to the agents depends on the size of the files, the number of agents in the group and the connection protocol used. For example, depending on network bandwidth and performance, it may take 8 minutes to receive a 10 MB folder (excluding merged.mg file) on 100 agents using UDP, however if TCP is used, this may move along much faster.Once a specific agent belongs to a group, it will be automatically reassigned to this group even if it is registered under another name or ID. This happens because, when the agent is re-registered, the checksum of
merged.mgsent by the agent is compared with that of the other agents registered with the manager. However, this is not the default behaviour, and, if needed, it must be explicitely activated by the user inlocal_internal_options.confby adding the optionremoted.guess_agent_group=1(see sectionremotedin internal options).
Multiple groups
Added in version 3.7.0.
Since Wazuh v3.7.0, agents have the ability to belong to multiple groups. The agents will receive all the configuration files from each group. Configuration received from the last assigned group has more priority than the other ones.
Managing multiple groups
This capability is focused to customize the agents' configuration with a higher level of granularity. The API and agent_groups help to manage groups by listing them and also by allowing to assign/change/unassign groups to agents. Let see three use cases where managing multiple groups over existing agents.
Assigning multiple groups to an agent
Setting multiple groups to an agent is simple, there are three different ways to assign an agent to one or more groups: Registration, CLI and API.
In this example, the agent 001 has been added to webserver and apache groups. First of all, using the API:
# curl -u foo:bar -X PUT "http://localhost:55000/agents/001/group/webserver?pretty"
{
    "error": 0,
    "data": "Group 'webserver' added to agent '001'."
}
# curl -u foo:bar -X PUT "http://localhost:55000/agents/001/group/apache?pretty"
{
    "error": 0,
    "data": "Group 'apache' added to agent '001'."
}
After that, we can ask the API about groups which an agent belongs:
# curl -u foo:bar -X GET "http://localhost:55000/agents/001?pretty"
{
    "error": 0,
    "data": {
        "status": "Active",
        "configSum": "f993610d3e6d7bfd7c008b4fb6deb8a5",
        "group": [
            "default",
            "webserver",
            "apache"
        ],
        "name": "ag-windows-12",
        "internal_key": "fd2fdb0e97895d6d8a8529685d043c14dfeb386359bb46ac2ed70c68ffeb1b55",
        "mergedSum": "b7fbc0c6db018a8347aa60803777f780",
        "ip": "192.168.1.82",
        "dateAdd": "2018-10-02 02:54:28",
        "node_name": "node01",
        "manager": "ubuntu",
        "version": "Wazuh v3.7.0",
        "lastKeepAlive": "2018-10-02 03:05:32",
        "os": {
            "major": "6",
            "name": "Microsoft Windows Server 2012 R2 Standard",
            "uname": "Microsoft Windows Server 2012 R2 Standard",
            "platform": "windows",
            "version": "6.3.9600",
            "build": "9600",
            "minor": "3"
        },
        "id": "001"
    }
}
In this case, the remote configuration for the group apache is the most priority of the three groups when there exists conflicts on any configuration parameter.
With the agent_groups CLI, agents can be registered to groups on the same way:
$ /var/ossec/bin/agent_groups -a -i 001 -g webserver
Do you want to add the group 'webserver' to the agent '001'? [y/N]: y
Group 'webserver' added to agent '001'.

$ /var/ossec/bin/agent_groups -a -i 001 -g apache
Do you want to add the group 'apache' to the agent '001'? [y/N]: y
Group 'apache' added to agent '001'.
To assign the agent to one or more groups on the registration process, register the agent setting the groups where the agent will be included with the -G option:
# /var/ossec/bin/agent-auth -m MANAGER_IP -G webserver,apache
Listing groups and configuration
It is possible to know agents belonging to groups in real-time, as well as the configuration and shared files applied to each one depending on which groups it belongs.
For example, to list the groups available for now, we could run the following query to agent_groups:
# /var/ossec/bin/agent_groups -l -g webserver
3 agent(s) in group 'webserver':
  ID: 001 Name: ag-windows-12.
  ID: 003 Name: ag-windows-east.
  ID: 004 Name: centos-7-apache
Same easy to query which groups are assigned to the agent 001:
# /var/ossec/bin/agent_groups -s -i 001
The agent 'ag-windows-12' with ID '001' has the group: '[u'webserver', u'apache']'.
The priority of the groups increases from the left to the right, being the last one the highest priority one.
Making changes on multiple groups
The same way it is possible to assign multiple groups to agents, it is possible to revert assignments and switch between available groups. Below is shown how to unset the group apache for the agent 001:
# /var/ossec/bin/agent_groups -r -i 001 -g apache -q
Group 'apache' unset for agent '001'.

# /var/ossec/bin/agent_groups -s -i 001
The agent 'ag-windows-12' with ID '001' has the group: '[u'webserver']'.
It is also possible to switch between groups overwriting the existing assignment:
# /var/ossec/bin/agent_groups -s -i 001
The agent 'ag-windows-12' with ID '001' has the group: '[u'default', u'webserver']'.
# /var/ossec/bin/agent_groups -a -f -i 001 -g apache
Group 'apache' set to agent '001'.
# /var/ossec/bin/agent_groups -s -i 001
The agent 'ag-windows-12' with ID '001' has the group: '[u'apache']'.
The -f parameter resets groups assigned to the agent and forces it to only belong to the new group.
Finally, to check the synchronization status of the group configuration for a single agent, the both following methods are available:
# /var/ossec/bin/agent_groups -S -i 001
The agent '008' sync status is: Agent configuration is synced.

# curl -u foo:bar -X GET "http://localhost:55000/agents/001/group/is_sync?pretty"
{
    "error": 0,
    "data": {
        "synced": "Agent configuration is synced."
    }
}
The rest of the capabilities of agent_groups can be found at its reference section. The same for the API which offers calls with the similar behavior.
Shared files behavior
As it was explained above, traditionally the manager shared configuration files with its agents according to the group they belong to.
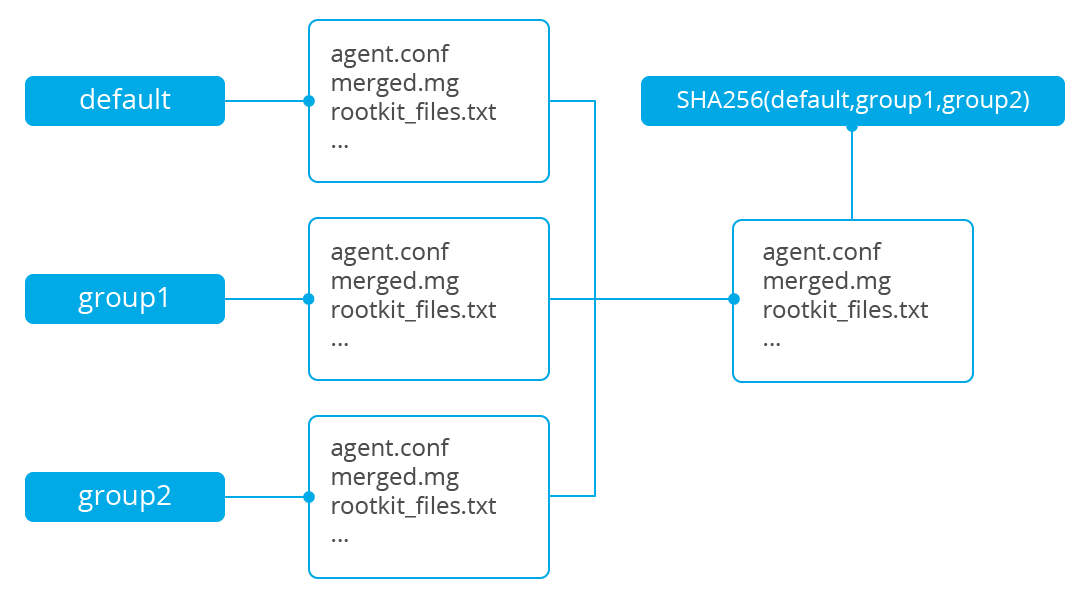
In case of belonging to multiple groups, the configuration files of every group are merged into one following the next criteria:
Shared files such as CIS benchmarks for the rootkit detection are joined in the shared folder, if repeated files, the last one added overwrites old ones.
The new
agent.conffile added is appended to the existing one. When two groups have conflicting configuration, the last group assigned to the agent will be the leading one. Learn more about the configuration precedence in Centralized configuration manual.Custom shared files set from the user to a particular group are also joined to send them to the agents.