Install Splunk in multi-instance mode
This document will guide you through the installation process for a multi-instance distributed architecture, recommended for larger environments with huge amounts of data (in this case, Wazuh alerts) and users.
Note
Many of the commands described below need to be executed with root user privileges.
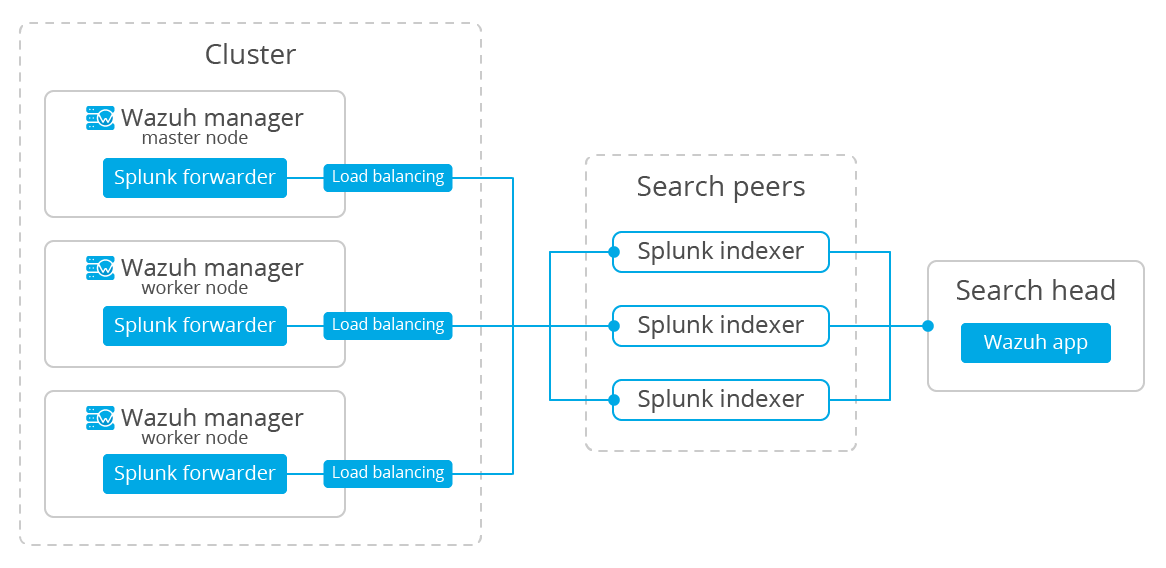
We're going to perform the most basic installation for a multi-instance deployment. We'll use two instances of Splunk Enterprise, one of them being the search head and the other one, a search peer (commonly known as an indexer); we'll also need a Splunk forwarder.
The search head instance will be in charge of all the searching functionality, and it will look for data on the search peers' indexes. This instance won't have any indexes at all.
The search peer instance (or indexer) collects all the Wazuh data and stores it in the form of indexes. This instance is connected to the search head so it can consult the peer's indexes.
The forwarder runs on the Wazuh manager instance, it reads local data and sends it to the indexer.
You can have multiple search peer instances, but in this case we're going to stick with the essentials.
Warning
This documentation will install Splunk using the multi-instance deployment schema. If you want a simpler installation, check out the single-instance deployment schema.
Install Splunk Enterprise instances
Each instance can be installed on different hosts following the same steps described below:
Download Splunk v7.2.1 package from its official website.
Note
Splunk is not open source software and it requires a registered user and license in order to work. You can also use a free trial license.
Install the Splunk v7.2.1 package:
For RPM based distributions:
# yum install splunk-enterprise-package.rpm
For Debian/Ubuntu distributions:
# dpkg --install splunk-enterprise-package.deb
Ensure Splunk v7.2.1 is installed in
/opt/splunkand start the service:
# /opt/splunk/bin/splunk startNote
You will be prompted for a name and password for the administrator user.
After this step the Splunk Web service will be listening to port 8000. You can browse
http://<your-instance-ip>:8000in order to access the Web GUI.
Optional. If you additionally want the Splunk service to start at boot time, please execute the following command:
# /opt/splunk/bin/splunk enable boot-start
Configuring the Splunk instances
Now that we finished installing the Splunk instances, it's time to choose which one will be the search head and the search peer.
On the search head instance run the following command to add a search peer:
# /opt/splunk/bin/splunk add search-server <host>:<port> -auth <user>:<password> -remoteUsername <user> -remotePassword <passremote>You must run this command for each search peer that you want to add.
Note the following:
<host>is the host name or IP address of the search peer's host machine.
<port>is the management port of the search peer. By default it's 8089.The
-authflag is used to provide credentials for the search head.The
-remoteUsernameandremotePasswordflags are used to provide the credentials for the search peer. The remote credentials must be for an admin-level user on the search peer.Warning
If there are login issues when trying to add the search peer, add the
allowRemoteLogin = alwaysoption under the[general]section on the/opt/splunk/etc/system/local/server.conffile, and then restart the search peer.
On the search peer instance we need to add the files to configure the Wazuh indexes:
Download and insert the
inputs.conftemplate to configure where the data will come from:# curl -so /opt/splunk/etc/system/local/inputs.conf https://raw.githubusercontent.com/wazuh/wazuh/3.7/extensions/splunk/peer-inputs.conf
Download and insert the
indexes.conftemplate to configure the indexes:# curl -so /opt/splunk/etc/system/local/indexes.conf https://raw.githubusercontent.com/wazuh/wazuh/3.7/extensions/splunk/peer-indexes.confAnd finally, we need to restart the search peer:
# /opt/splunk/bin/splunk restart
Now that you've finished installing Splunk on a multi-instance mode, you can proceed with the next step and install the Wazuh app for Splunk.
Additional links
You can find useful Splunk CLI commands in the official documentation .
To learn more about the Splunk distributed search, check out this article from the official documentation.