Configuring a cluster
Added in version 3.0.0.
Introduction
The cluster extends the managers into a cluster of managers to enhance the availability and scalability of the service.
Reasons for using a cluster
Horizontal scalability
It multiplies Wazuh's event processing capacity and allows to have thousands of agents reporting. Adding a new node to the cluster is very simple (just add the master's address in the configuration) and it can be automated easily, giving the user the ability to implement auto-scaling.
High availability
Server eventually fail: hardware can be broken, a human can turn them off, the system can go down... And while the server is restored, you won't be able to see what is happening in your agents. Using a cluster you make sure your agents will always have a manager to report to.
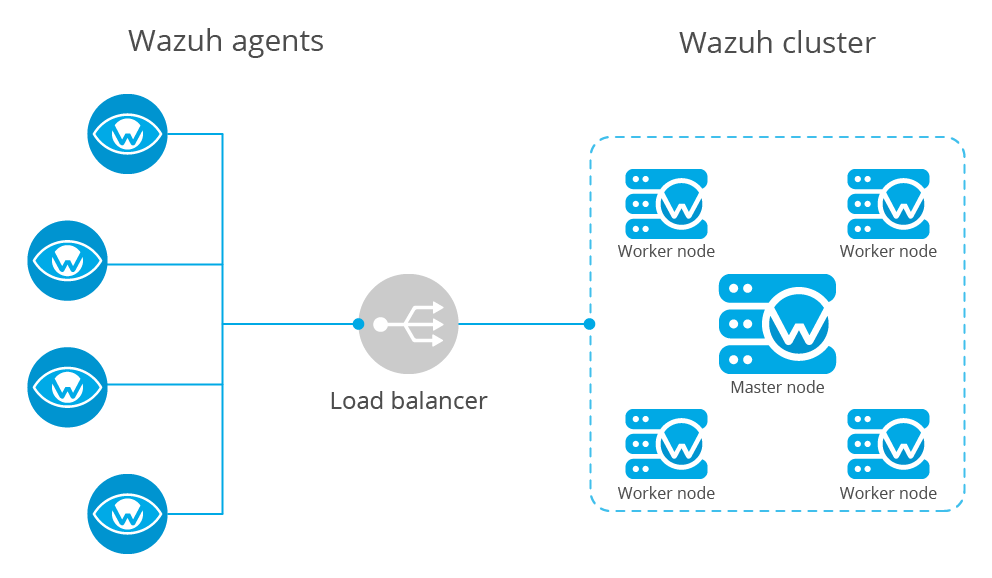
Types of nodes
Master
The master node centralizes and coordinates worker nodes, making sure the critical and required data is consistent across all nodes. It provides the centralization of the following:
Agent registration.
Agent deletion.
Rules, decoders and CDB lists synchronization.
Configuration of agents grouping.
Warning
The master doesn't send its local configuration file to the workers. If the configuration is changed in the master node, it should be changed manually in the workers. Take care of not overwriting the cluster section in the local configuration of each worker.
Warning
When rules, decoders or CDB lists are synchronized, the worker nodes are not restarted. They must be restarted manually in order to apply the received configuration.
All communications among nodes in the cluster are encrypted using AES algorithm.
Worker
Worker nodes are responsible of two main tasks:
Synchronizing integrity files from the master node.
Sending agent status updates to the master.
Getting started
Deploying a Wazuh cluster
Note
To run the cluster, Python 2.7 or higher is required. In case you're using CentOS 6, please refer to Running the cluster in CentOS 6 for instructions on how to update to and use Python 2.7.
Follow these steps to deploy a Wazuh cluster:
Install dependencies
For RPM-based distributions:
# yum install python-setuptools python-cryptography
For Debian-based distributions:
# apt-get install python-cryptography
Set the cluster configuration
Using the
<cluster>section in the Local configuration, set the cluster configuration as below:
<node_type>: Set the node type.
<key>: The key must be 32 characters long and should be the same for all of the nodes of the cluster. You may use the following command to generate a random one:# openssl rand -hex 16
<disabled>: Set this field tonoin order to enable the cluster.
<nodes>: The address of the master must be specified in all nodes (including the master itself). The address can be either an IP or a DNS.The following is an example of the configuration of a worker node:
<cluster>
    <name>wazuh</name>
    <node_name>node02</node_name>
    <key>c98b62a9b6169ac5f67dae55ae4a9088</key>
    <node_type>worker</node_type>
    <port>1516</port>
    <bind_addr>0.0.0.0</bind_addr>
    <nodes>
      <node>master</node>
    </nodes>
    <hidden>no</hidden>
    <disabled>no</disabled>
</cluster>
And the following is an example of the configuration of a master node:
<cluster>
    <name>wazuh</name>
    <node_name>node01</node_name>
    <key>c98b62a9b6169ac5f67dae55ae4a9088</key>
    <node_type>master</node_type>
    <port>1516</port>
    <bind_addr>0.0.0.0</bind_addr>
    <nodes>
      <node>master</node>
    </nodes>
    <hidden>no</hidden>
    <disabled>no</disabled>
</cluster>
Restart the node
# systemctl restart wazuh-manager
Agent registration in the cluster
All agents must be registered in the master node. The master is responsible for replicating the new agent's information across all worker nodes. If an agent is registered in a worker node, it will be deleted by the master node.
Configuring the Wazuh app for Kibana/Splunk
The following must be considered when configuring a Wazuh app:
The apps must be configured to point to the master's API.
All worker nodes need an event forwarder in order to send data to Elasticsearch or Splunk. Install Filebeat if you're using the Elastic stack or Splunk forwarder if you're using Splunk. This is only necessary if the node is in a separated instance from Elasticsearch or Splunk.
Installing Filebeat:
Type
Description
Install Filebeat on CentOS/RHEL/Fedora.
Install Filebeat on Debian/Ubuntu.
Installing Splunk forwarder:
Type
Description
Install Splunk forwarder for RPM or DEB based OS.
Pointing agents to the cluster with a load balancer
The best setup to report agents' events to a cluster is a load balancer. Keep in mind the following considerations:
It is recommended to use TCP protocol instead of UDP. Permanent connections and stickiness are needed in order to make sure agent data is consistent. In order to use the TCP protocol, you should configure both your agents and your nodes.
Disable the option use_source_ip in your authd configuration. When using a LB, the cluster nodes will only see the LB's IP and no the agents'. This will make the agents unable to connect to the cluster.
Running the cluster in CentOS 6
Python 2.6 is the default python version in CentOS 6. Since Python 2.7 is required to run the cluster, follow these steps to install and use this version:
Install Python 2.7 as follows:
# yum install -y centos-release-scl
# yum install -y python27
Install the Python package
cryptographyvia pip:
# export LD_LIBRARY_PATH=$LD_LIBRARY_PATH:/opt/rh/python27/root/usr/lib64:/opt/rh/python27/root/usr/lib
# /opt/rh/python27/root/usr/bin/pip2.7 install cryptography
Since the cluster doesn't use the default python version in CentOS 6, the service file should be modified to load the correct python version when
wazuh-managerservice starts:
# sed -i 's#echo -n "Starting OSSEC: "#echo -n "Starting OSSEC (EL6): "; source /opt/rh/python27/enable; export LD_LIBRARY_PATH=$LD_LIBRARY_PATH:/var/ossec/framework/lib#' /etc/init.d/wazuh-manager
Use the
servicecommand instead of/var/ossec/bin/ossec-controlto start, stop and restart Wazuh:
# service wazuh-manager restart
Stopping OSSEC:                                            [  OK  ]
Starting OSSEC (EL6):                                      [  OK  ]
Finally, check the cluster is running:
# ps aux | grep cluster
ossec     9725  0.1  1.3 137364 14216 ?        S    14:22   0:00 python /var/ossec/bin/wazuh-clusterd
root      9767  0.0  0.0 103340   904 pts/0    S+   14:22   0:00 grep cluster
Running the cluster in Ubuntu Trusty (14.04)
In order to run the Wazuh cluster in Ubuntu Trusty, ensure that Python 2.7 is installed in your machine. After that, to run the cluster follow these steps:
Install the following packages:
# apt-get install python-pip libssl-dev python-dev libffi-dev
Install the latests version of setuptools package using pip:
# pip install setuptools --upgrade
Install cryptography module, its dependencies and ipaddress:
# pip install enum34 six cffi cryptography ipaddress
Once you have executed all these commands, you can set the cluster configuration and run the cluster.
Upgrading from older versions
If you already have a cluster installation from a version older or equal to 3.2.2, you should do some changes in your cluster configuration:
Remove
<interval>section.Remove worker nodes from
<nodes>section. Only the master node is allowed.
The cluster will work with an old configuration but it is recommended to update it.
How the cluster works
The cluster is managed by a daemon, called wazuh-clusterd, which communicates all the nodes following a master-worker architecture. Refer to the Daemons section for more information about its use.
The image below shows the communications between a worker and a master node. Each worker-master communication is independent from each other, since workers are the ones who start the communication with the master.
There are different independent threads running, each one is framed in the image:
Keep alive thread: Responsible of sending a keep alive to the master every so often.
Agent info thread: Responsible of sending the statuses of the agents that are reporting to that node.
Integrity thread: Responsible of synchronizing the files sent by the master.
All cluster logs are written in the file logs/cluster.log.
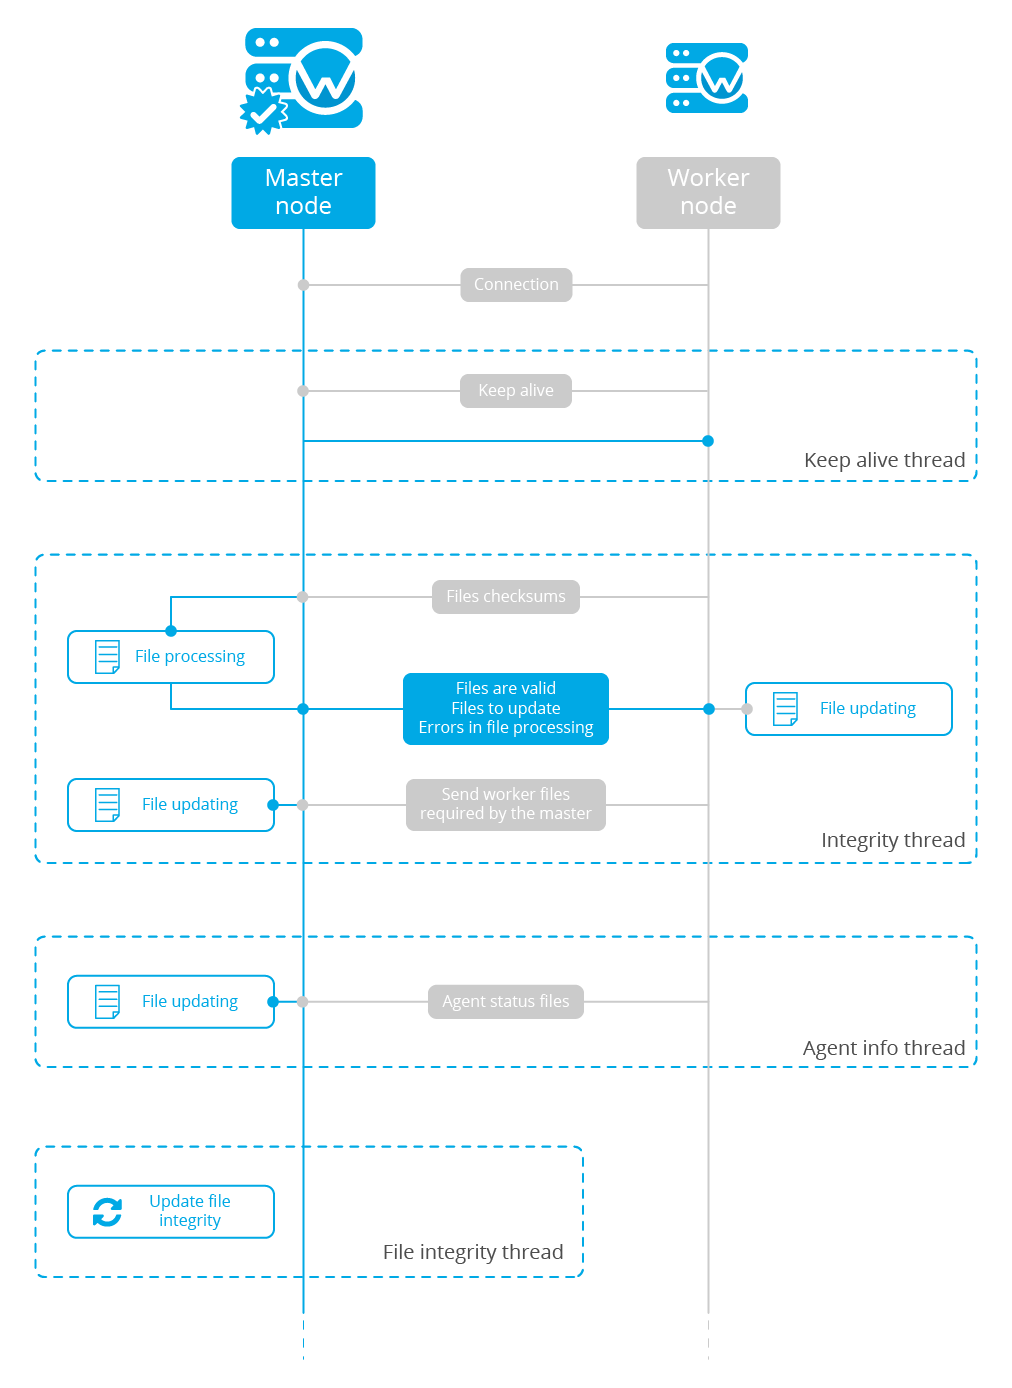
Keep alive thread
The keep alive thread sends a keep-alive to the master every so often. It is necessary to keep the connection opened between master and worker, since the cluster uses permanent connections.
Agent info thread
The agent info thread sends the statuses of the agents that are reporting to the worker node. The master checks the modification date of each received agent status file and keeps the most recent one.
The master also checks whether the agent exists or not before saving its status update. This is done to prevent the master to store unnecessary information. For example, this situation is very common when an agent is removed but the master hasn't notified worker nodes yet.
Integrity thread
The integrity thread is in charge of synchrozing the files sent by the master node to the workers. Those files are:
Usually, the master is responsible for sending group assignments, but just in case a new agent starts reporting in a worker node, the worker will send the new agent's group assignment to the master.
File Integrity Thread
The integrity of each file is calculated using its MD5 checksum and its modification time. To avoid calculating the integrity with each worker connection, the integrity is calculated in a different thread, called File integrity thread, in the master node every so often.
Cluster management
The cluster_control tool allows you to obtain real-time information about the cluster health, connected nodes and the agents reporting to the cluster. This information can also be obtained using the API requests.
For example, the following snippet shows the connected nodes in the cluster:
# /var/ossec/bin/cluster_control -l
---------------------------------------
Name    Address         Type    Version
---------------------------------------
node01  192.168.56.101  master  3.7.2
node02  192.168.56.103  worker  3.7.2
node03  192.168.56.105  worker  3.7.2
---------------------------------------
This information can also be obtained using the Restful API:
# curl -u foo:bar -X GET "http://localhost:55000/cluster/nodes?pretty"
{
   "error": 0,
   "data": {
      "totalItems": 3,
      "items": [
         {
            "ip": "192.168.56.103",
            "version": "3.7.2",
            "type": "worker",
            "name": "node02"
         },
         {
            "ip": "192.168.56.105",
            "version": "3.7.2",
            "type": "worker",
            "name": "node03"
         },
         {
            "ip": "192.168.56.101",
            "version": "3.7.2",
            "type": "master",
            "name": "node01"
         }
      ]
   }
}
If you want to see more examples and check all its options, refer to the cluster_control manual or the API requests.