Installing & Configuring Splunk Cluster
This document will guide the users through the installation process for a multi-instance distributed architecture, recommended for larger environments with huge amounts of data (in this case, Wazuh alerts) and users.
Note
Many of the commands described below need to be executed with root user privileges.
Note
To know how to deploy a Splunk cluster, visit the Official Splunk Documentation.
Warning
By following this guide,users will learn how to install and configure Wazuh in an already created Splunk Cluster, so all the configuration related with Splunk is in their Official Documentation, and its assumed that an Splunk installation and configuration has been already done.
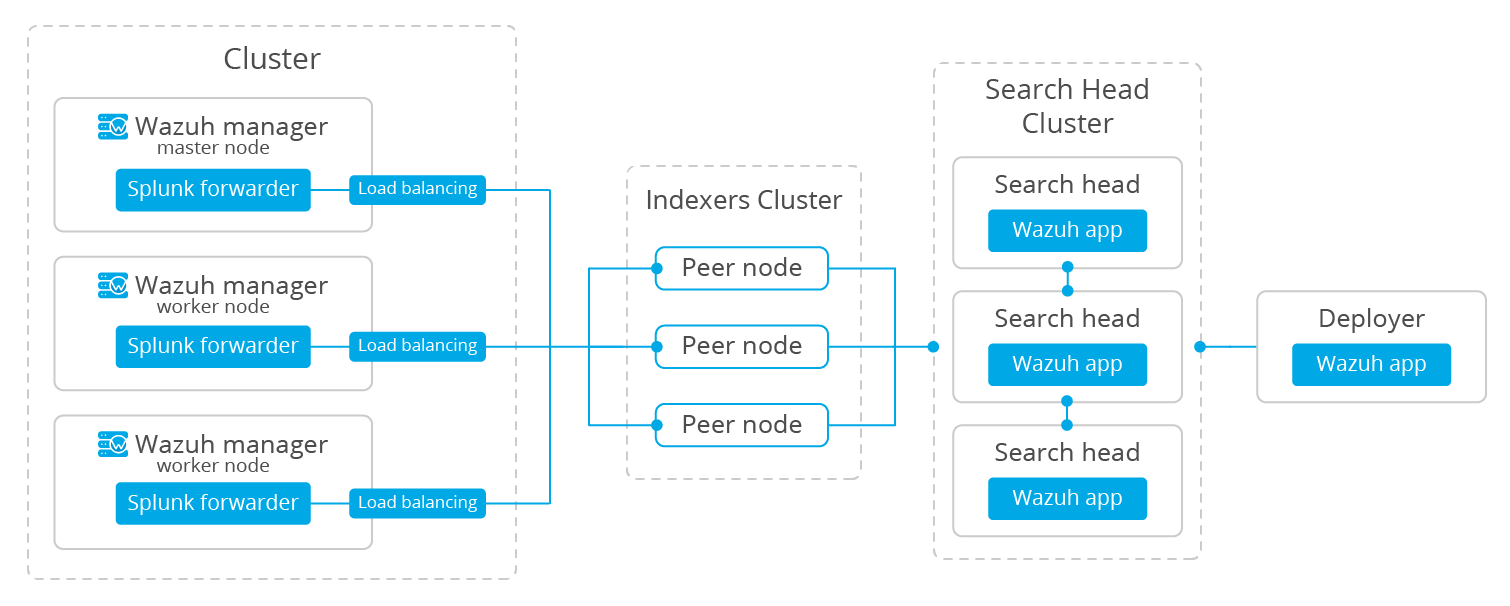
This is the structure of a basic Splunk Cluster, that's formed by the next elements:
The search head instances will be in charge of all the searching functionality, and they will look for data on the search peers' indexes. This instances won't have any indexes at all. The Wazuh App will be installed in this instances.
The search peer instances (or indexers) collect all the Wazuh data and stores it in the form of indexes. This instances are connected to the search heads so they can consult the peer's indexes.
The forwarder runs on the Wazuh manager instance, it reads local data and sends it to the indexer.
The deployer instance installs and configures the Wazuh App into every search head instance at the same time.

Install Splunk Enterprise instances
Each instance can be installed on different hosts following the same steps described below:
Download Splunk v7.3.0 package from its official website.
Note
Splunk is not open source software and it requires a registered user and license in order to work. Users can also use a free trial license.
Install the Splunk v7.3.0 package:
For RPM based distributions:
# yum install splunk-enterprise-package.rpm
For Debian/Ubuntu distributions:
# dpkg --install splunk-enterprise-package.deb
Ensure Splunk v7.3.0 is installed in
/opt/splunkand start the service:# /opt/splunk/bin/splunk start
Note
You will be prompted for a name and password for the administrator user.
After this step the Splunk Web service will be listening to port 8000. You can browse
http://<your-instance-ip>:8000in order to access the Web GUI.Optional. Additionally, if the Splunk service is required to start at boot time, execute the following command.
# /opt/splunk/bin/splunk enable boot-start
Configuring the Splunk instances
Indexers:
In the master instance users will make the configuration that will be pushed to the rest of the indexers.
For this configuration is necessary to create the following two files and paste them into the following blocks of code respectively:
# touch /opt/splunk/etc/master-apps/_cluster/local/inputs.conf
[splunktcp://9997]
connection_host = ip
Now, to create and configure the indexes.conf file, execute the following command:
# curl -so /opt/splunk/etc/system/local/indexes.conf https://raw.githubusercontent.com/wazuh/wazuh/3.7/extensions/splunk/peer-indexes.conf
This is the content of that file:
[wazuh]
coldPath = $SPLUNK_DB/wazuh/colddb
enableDataIntegrityControl = 1
enableTsidxReduction = 1
homePath = $SPLUNK_DB/wazuh/db
maxTotalDataSizeMB = 512000
thawedPath = $SPLUNK_DB/wazuh/thaweddb
timePeriodInSecBeforeTsidxReduction = 15552000
tsidxReductionCheckPeriodInSec =
Now, restart the Splunk Service:
# /opt/splunk/bin/splunk restart
Note
Check the state of the cluster executing:
# /opt/splunk/bin/splunk show cluster-bundle-status
Next step is installing the Wazuh App into the search heads instances to start using the services.
You can find useful Splunk CLI commands in the official documentation .
To learn more about the Splunk distributed search, check out this article from the official documentation.