Blocking a malicious actor
In this POC, you are able to identify the monitored Windows endpoint IP address as a bad reputation one. To do this, you need to log into the Windows endpoint as the attacker and try connecting to the victim's Apache server running on a CentOS 8 system.
Prerequisites
You need an Apache server running on the monitored CentOS 8 system.
Configure the Wazuh CentOS 8 host to monitor the Apache access logs in the
/var/ossec/etc/ossec.confconfiguration file.<localfile> <log_format>apache</log_format> <location>/var/log/httpd/access_log</location> </localfile>
Configuration
Configure your environment as follows to test the POC.
Download the Alienvault IP reputation database to your Wazuh manager.
# wget https://raw.githubusercontent.com/firehol/blocklist-ipsets/master/alienvault_reputation.ipset -O /var/ossec/etc/lists/alienvault_reputation.ipset
Run the following command at the Wazuh manager (the attacker), replacing
<your_windows_ip_address>with the monitored Windows endpoint's IP address.# echo "<your_windows_ip_address>" >> /var/ossec/etc/lists/alienvault_reputation.ipset
Download the script to convert from the ipset format to the cdb list format.
# wget https://wazuh.com/resources/iplist-to-cdblist.py -O /tmp/iplist-to-cdblist.py
Convert the
alienvault_reputation.ipsetfile to a .cdb format using the previously downloaded script.# python /tmp/iplist-to-cdblist.py /var/ossec/etc/lists/alienvault_reputation.ipset /var/ossec/etc/lists/blacklist-alienvault
Optionally, remove the
alienvault_reputation.ipsetfile and theiplist-to-cdblist.pyscript, as they are no longer needed.# rm -rf /var/ossec/etc/lists/alienvault_reputation.ipset # rm -rf /var/ossec/etc/lists/iplist-to-cdblist.py
Assign the right permissions and ownership to the generated file.
# chown ossec:ossec /var/ossec/etc/lists/blacklist-alienvault
# chmod 660 /var/ossec/etc/lists/blacklist-alienvault
Add a custom rule to trigger the active response. This can be done in the
/var/ossec/etc/rules/local_rules.xmlfile at the Wazuh manager.<group name="attack,"> <rule id="100100" level="10"> <if_group>web|attack|attacks</if_group> <list field="srcip" lookup="address_match_key">etc/lists/blacklist-alienvault</list> <description>IP address found in AlienVault reputation database.</description> </rule> </group>
Add the appropriate active response settings to the
rulesetsection of the/var/ossec/etc/ossec.conffile at the Wazuh manager.<ossec_config> <ruleset> <!-- Default ruleset --> <decoder_dir>ruleset/decoders</decoder_dir> <rule_dir>ruleset/rules</rule_dir> <rule_exclude>0215-policy_rules.xml</rule_exclude> <list>etc/lists/audit-keys</list> <list>etc/lists/blacklist-alienvault</list> <!-- User-defined ruleset --> <decoder_dir>etc/decoders</decoder_dir> <rule_dir>etc/rules</rule_dir> </ruleset> <command> <name>firewall-drop</name> <executable>firewall-drop</executable> <timeout_allowed>yes</timeout_allowed> </command> <active-response> <command>firewall-drop</command> <location>local</location> <rules_id>100100</rules_id> <timeout>60</timeout> </active-response> </ossec_config>
Restart the Wazuh Manager.
# systemctl restart wazuh-manager
Steps to generate the alerts
Log into the attacker's system (the monitored Windows endpoint).
Connect to the victim's system (the Apache server in the monitored CentOS 8 endpoint) from a web browser.
The custom firewall rule will temporarily block any connection from the attacker system for 60 seconds.
Query the alerts
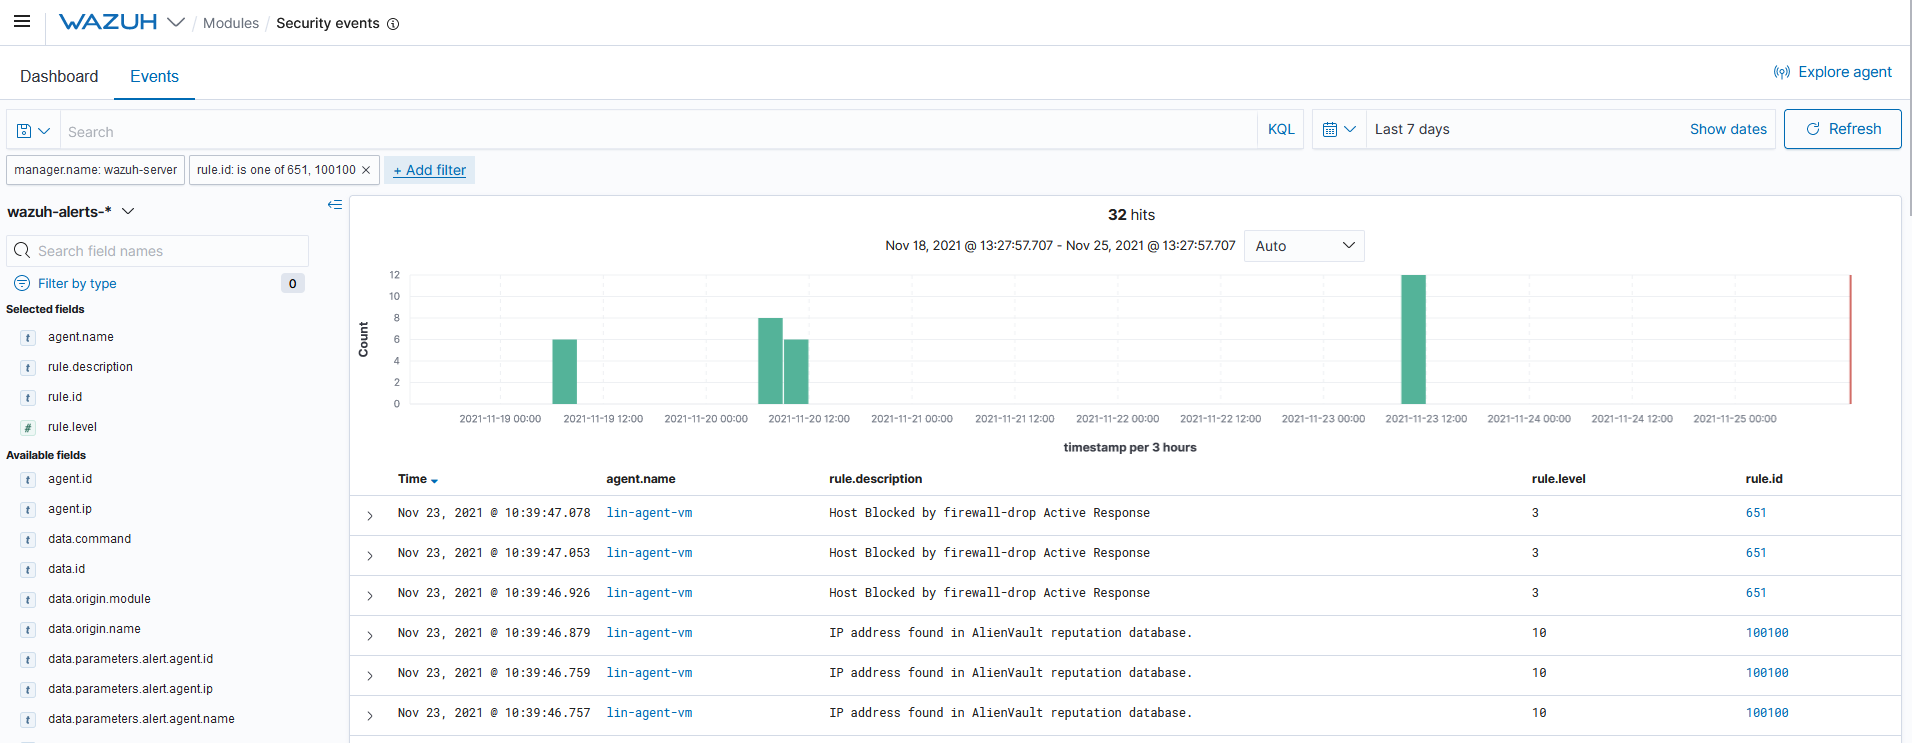
You can visualize the alert data in the Wazuh Kibana plugin. To do this, go to the Security events module and add the filters in the search bar to query the alerts.
rule.id:(651 OR 100100)
Troubleshooting
Python command not working during step 4.
This can be solved by creating a symbolic link.
# ln -s /usr/bin/python3 /usr/bin/python