Detecting malware using Yara integration
Wazuh can be integrated with YARA, a tool aimed at, but not limited to, helping identify and classify malware artifacts. With this integration, we are able to scan files added or modified and check if they contain malware.
To learn more about this integration with Wazuh, see the How to integrate Wazuh with YARA section of the documentation.
Configuration
Configure your environment as follows to test the POC.
Add the following rules to the
/var/ossec/etc/rules/local_rules.xmlconfiguration file at the Wazuh manager. This is to alert about files added or modified in/tmpat the CentOS 8 endpoint and to alert about malware being found there.<group name="syscheck,"> <rule id="100300" level="7"> <if_sid>550</if_sid> <field name="file">/tmp</field> <description>File modified in /tmp directory.</description> </rule> <rule id="100301" level="7"> <if_sid>554</if_sid> <field name="file">/tmp</field> <description>File added to /tmp directory.</description> </rule> </group> <group name="yara,"> <rule id="108000" level="0"> <decoded_as>yara_decoder</decoded_as> <description>Yara grouping rule</description> </rule> <rule id="108001" level="12"> <if_sid>108000</if_sid> <match>wazuh-yara: INFO - Scan result: </match> <description>File "$(yara_scanned_file)" is a positive match. Yara rule: $(yara_rule)</description> </rule> </group>
Add the following decoders to
/var/ossec/etc/decoders/local_decoders.xmlat the Wazuh manager. This is to extract the information from Yara scan resuts.<decoder name="yara_decoder"> <prematch>wazuh-yara:</prematch> </decoder> <decoder name="yara_decoder1"> <parent>yara_decoder</parent> <regex>wazuh-yara: (\S+) - Scan result: (\S+) (\S+)</regex> <order>log_type, yara_rule, yara_scanned_file</order> </decoder>
Add the following configuration to
/var/ossec/etc/ossec.confat the Wazuh manager.<ossec_config> <command> <name>yara</name> <executable>yara.sh</executable> <extra_args>-yara_path /usr/local/bin -yara_rules ~/yara_rules.yar</extra_args> <timeout_allowed>no</timeout_allowed> </command> <active-response> <command>yara</command> <location>local</location> <rules_id>100300,100301</rules_id> </active-response> </ossec_config>
Restart the Wazuh manager to apply the configuration changes.
# systemctl restart wazuh-manager
Compile and install Yara at the monitored CentOS 8 endpoint.
# yum -y install make gcc autoconf libtool openssl-devel
# curl -LO https://github.com/VirusTotal/yara/archive/v4.0.2.tar.gz
# tar -xvzf v4.0.2.tar.gz -C /usr/local/bin/
# cd /usr/local/bin/yara-4.0.2
# ./bootstrap.sh && ./configure && make && sudo make install && make check
Download Yara rules.
curl 'https://valhalla.nextron-systems.com/api/v1/get' \
-H 'Accept: text/html,application/xhtml+xml,application/xml;q=0.9,*/*;q=0.8' \
-H 'Accept-Language: en-US,en;q=0.5' \
--compressed \
-H 'Referer: https://valhalla.nextron-systems.com/' \
-H 'Content-Type: application/x-www-form-urlencoded' \
-H 'DNT: 1' -H 'Connection: keep-alive' -H 'Upgrade-Insecure-Requests: 1' \
--data 'demo=demo&apikey=1111111111111111111111111111111111111111111111111111111111111111&format=text' \
-o ~/yara_rules.yar
Download a malware sample (this is a real malware artifact) and run a Yara scan.
Note
For testing purposes, we install Mirai, a malware that turns networked devices running Linux into remotely controlled bots. Mirai is considered dangerous so do not install it on production environments.
# curl -L https://wazuh-demo.s3-us-west-1.amazonaws.com/mirai -o /tmp/mirai
# /usr/local/bin/yara ~/yara_rules.yar /tmp/mirai
Create the
yara.shscript in/var/ossec/active-response/bin/at the monitored CentOS 8 endpoint. This is necessary for the Wazuh-Yara active response scans.#!/bin/bash # Wazuh - Yara active response # Copyright (C) 2015-2022, Wazuh Inc. # # This program is free software; you can redistribute it # and/or modify it under the terms of the GNU General Public # License (version 2) as published by the FSF - Free Software # Foundation. #------------------------- Gather parameters -------------------------# # Extra arguments read INPUT_JSON YARA_PATH=$(echo $INPUT_JSON | jq -r .parameters.extra_args[1]) YARA_RULES=$(echo $INPUT_JSON | jq -r .parameters.extra_args[3]) FILENAME=$(echo $INPUT_JSON | jq -r .parameters.alert.syscheck.path) # Set LOG_FILE path LOG_FILE="logs/active-responses.log" #----------------------- Analyze parameters -----------------------# if [[ ! $YARA_PATH ]] || [[ ! $YARA_RULES ]] then echo "wazuh-yara: ERROR - Yara active response error. Yara path and rules parameters are mandatory." >> ${LOG_FILE} exit 1 fi #------------------------- Main workflow --------------------------# # Execute Yara scan on the specified filename yara_output="$("${YARA_PATH}"/yara -w -r "$YARA_RULES" "$FILENAME")" if [[ $yara_output != "" ]] then # Iterate every detected rule and append it to the LOG_FILE while read -r line; do echo "wazuh-yara: INFO - Scan result: $line" >> ${LOG_FILE} done <<< "$yara_output" fi exit 0;
Change
yara.shfile owner toroot:ossecand file permissions to0750.# chown root:ossec /var/ossec/active-response/bin/yara.sh # chmod 750 /var/ossec/active-response/bin/yara.sh
Run
yum install jqif jq is missing. This allows theyara.shscript to process the JSON input.Change the file integrity monitoring settings in the
/var/ossec/etc/ossec.conffile at the monitored CentOS 8 endpoint to monitor the/tmpdirectory in real time.<syscheck> <directories whodata="yes" realtime="yes">/tmp</directories> </syscheck>
Restart the Wazuh agent to apply the configuration changes.
# systemctl restart wazuh-agent
Steps to generate the alerts
Create the script
/tmp/malware_downloader.shat the monitored CentOS 8 endpoint to automatically download malware samples.#!/bin/bash # Wazuh - Malware Downloader for test purposes # Copyright (C) 2015-2022, Wazuh Inc. # # This program is free software; you can redistribute it # and/or modify it under the terms of the GNU General Public # License (version 2) as published by the FSF - Free Software # Foundation. function fetch_sample(){ curl -s -XGET "$1" -o "$2" } echo "WARNING: Downloading Malware samples, please use this script with caution." read -p " Do you want to continue? (y/n)" -n 1 -r ANSWER echo if [[ $ANSWER =~ ^[Yy]$ ]] then echo # Mirai echo "# Mirai: https://en.wikipedia.org/wiki/Mirai_(malware)" echo "Downloading malware sample..." fetch_sample "https://wazuh-demo.s3-us-west-1.amazonaws.com/mirai" "/tmp/mirai" && echo "Done!" || echo "Error while downloading." echo # Xbash echo "# Xbash: https://unit42.paloaltonetworks.com/unit42-xbash-combines-botnet-ransomware-coinmining-worm-targets-linux-windows/" echo "Downloading malware sample..." fetch_sample "https://wazuh-demo.s3-us-west-1.amazonaws.com/xbash" "/tmp/xbash" && echo "Done!" || echo "Error while downloading." echo # VPNFilter echo "# VPNFilter: https://news.sophos.com/en-us/2018/05/24/vpnfilter-botnet-a-sophoslabs-analysis/" echo "Downloading malware sample..." fetch_sample "https://wazuh-demo.s3-us-west-1.amazonaws.com/vpn_filter" "/tmp/vpn_filter" && echo "Done!" || echo "Error while downloading." echo # Webshell echo "# WebShell: https://github.com/SecWiki/WebShell-2/blob/master/Php/Worse%20Linux%20Shell.php" echo "Downloading malware sample..." fetch_sample "https://wazuh-demo.s3-us-west-1.amazonaws.com/webshell" "/tmp/webshell" && echo "Done!" || echo "Error while downloading." echo fi
Download malware samples to
/tmpdirectory by running the following script.# bash /tmp/malware_downloader.sh
Optionally, check the results of the Wazuh-Yara scan in
/var/ossec/logs/active-responses.logat the monitored CentOS 8 endpoint.# tail -f /var/ossec/logs/active-responses.log wazuh-yara: INFO - Scan result: SUSP_XORed_Mozilla_RID2DB4 /tmp/mirai wazuh-yara: INFO - Scan result: MAL_ELF_LNX_Mirai_Oct10_2_RID2F3A /tmp/mirai wazuh-yara: INFO - Scan result: Mirai_Botnet_Malware_RID2EF6 /tmp/mirai wazuh-yara: INFO - Scan result: MAL_ELF_VPNFilter_3_RID2D6C /tmp/vpn_filter wazuh-yara: INFO - Scan result: Webshell_Worse_Linux_Shell_php_RID3323 /tmp/webshell wazuh-yara: INFO - Scan result: Webshell_Worse_Linux_Shell_1_RID320C /tmp/webshell
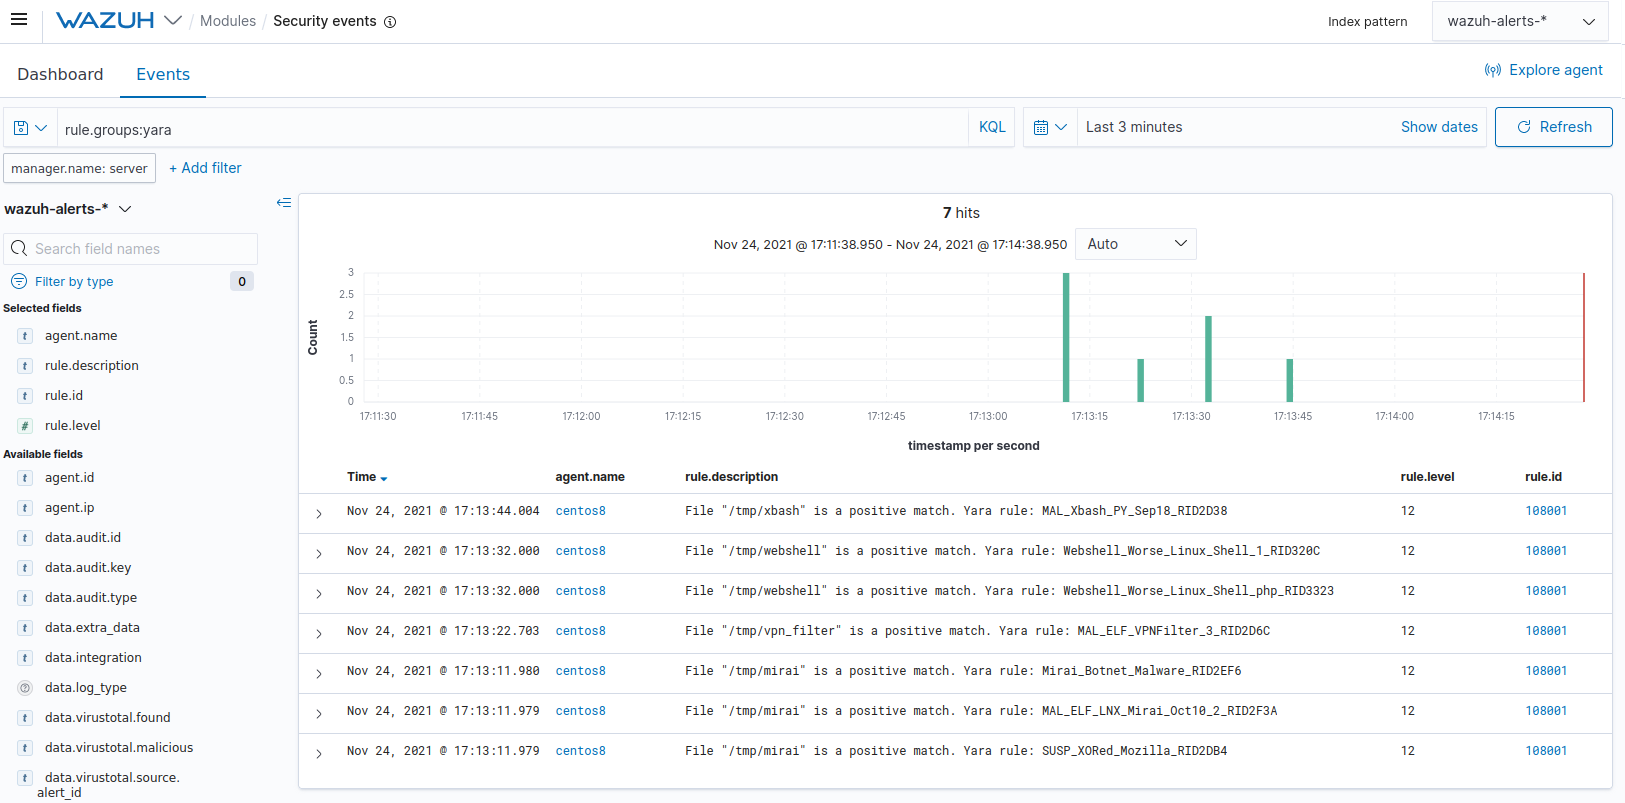
Query the alerts
You can visualize the alert data in the Wazuh Kibana plugin. To do this, go to the Security events module and add the filters in the search bar to query the alerts.
rule.groups:yara