Install Splunk in a multi-instance cluster
This document will guide the users through the installation process for a multi-tier server, recommended for larger environments with huge amounts of data (in this case, Wazuh alerts) and users.
Prerequisites
A Wazuh manager cluster.
A Splunk cluster.
Note
You need root user privileges to run all the commands described below.
Note
To deploy a Splunk cluster, visit the Official Splunk Documentation.
Warning
By following this guide, users will learn how to install and configure Wazuh in an already created Splunk cluster. All Splunk related configuration is in their Official Documentation, and it is assumed that a Splunk cluster installation and configuration has already been done.
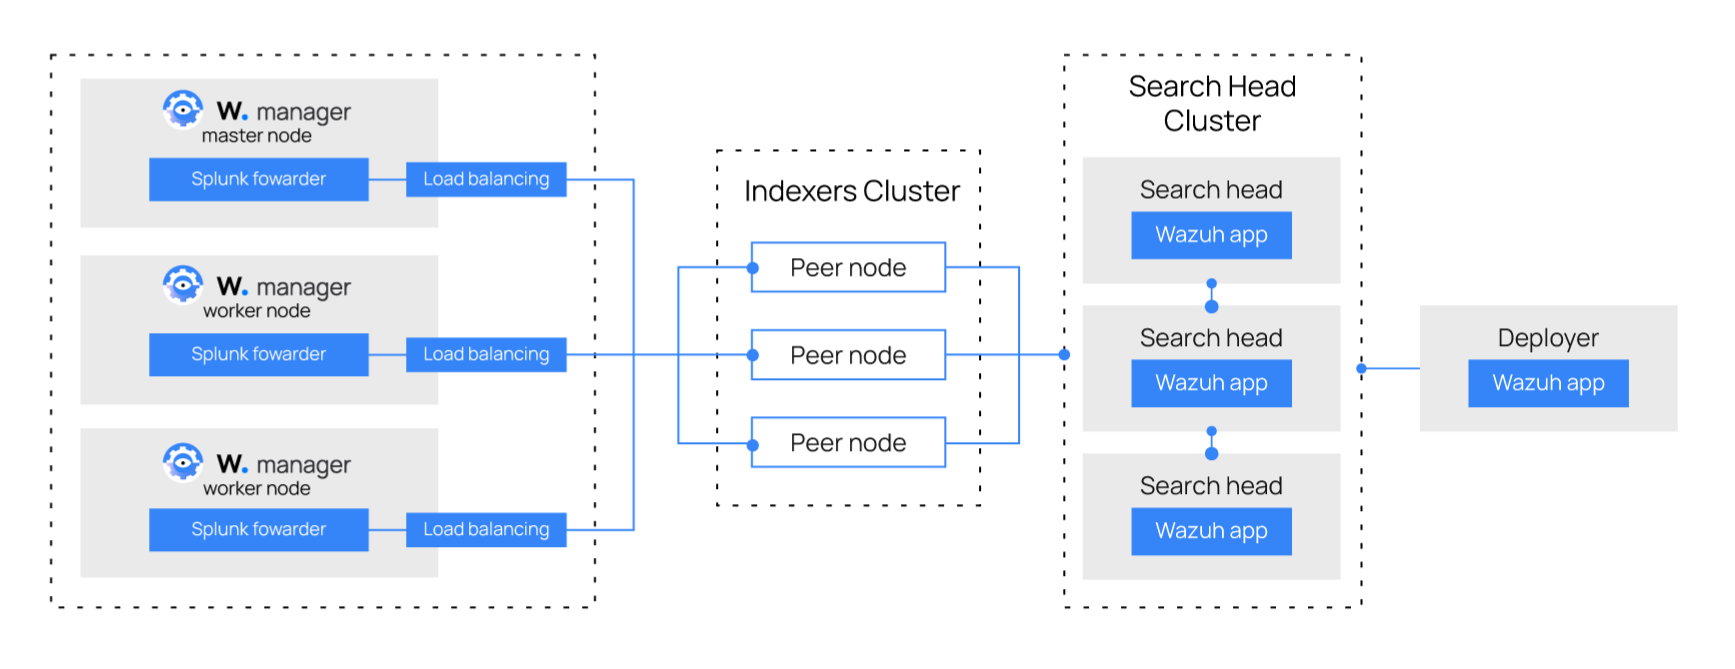
The structure of a basic Splunk Cluster is formed by the following elements:
The search head instances will be in charge of all the searching functionality, and they will look for data on the search peers’ indexes. These instances won’t have any indexes at all. The Wazuh App will be installed in these instances.
The search peer instances (or indexers) collect all the Wazuh data and store it in the form of indexes. These instances are connected to the search heads so they can consult the peer’s indexes.
The forwarder runs on the Wazuh manager instance, it reads local data and sends it to the indexer.
The deployer instance installs and configures the Wazuh App into every search head instance at the same time.
Note
Splunk is not open source software, and it requires a registered user and license in order to work. You can also use a free trial license.
This guide configures Wazuh with Splunk 8.2. If you intend to configure it with another version of Splunk, such as 8.1, change the Splunk version number in the requests for the configuration files and the Wazuh app for Splunk. For example:
# curl -so /opt/splunk/etc/system/local/indexes.conf https://raw.githubusercontent.com/wazuh/wazuh-splunk/v4.4.5-8.2/setup/indexer/indexes.conf
Becomes
# curl -so /opt/splunk/etc/system/local/indexes.conf https://raw.githubusercontent.com/wazuh/wazuh-splunk/v4.4.5-8.1/setup/indexer/indexes.conf
Install and configure Splunk enterprise indexer instances
Each instance can be configured on different hosts following the steps described below:
Ensure Splunk is already installed in /opt/splunk and start the service:
# /opt/splunk/bin/splunk start
Note
You will be prompted for a username and password for the administrator user.
After this step, the Splunk Web service will be listening to port 8000. You can browse http://<your-instance-ip>:8000 in order to access the Web GUI.
Configuring the Splunk indexer instances
In the Splunk master instance, users will make the configuration that will be pushed to the rest of the indexers.
Create the files inputs.conf:
# touch /opt/splunk/etc/master-apps/_cluster/local/inputs.conf
Paste the following block of code in inputs.conf
[splunktcp://<INDEXER_PORT>]
connection_host = ip
disabled = 0

[SSL]
serverCert = $SPLUNK_HOME/etc/auth/server.pem
sslPassword = password
INDEXER_PORTis the receiving port of the Splunk indexer earlier configured in receiving.serverCertis the path to the Splunk default server certificate.$SPLUNK_HOMEis the Splunk installation directory. The default directory is /opt/splunk.sslPasswordis the password of the certificate. The default password is “password”.
To create and configure the indexes.conf file, execute the following command:
# curl -so /opt/splunk/etc/master-apps/_cluster/local/indexes.conf https://raw.githubusercontent.com/wazuh/wazuh-splunk/v4.4.5-8.2/setup/indexer/indexes.conf
Apply the cluster bundle:
# /opt/splunk/bin/splunk apply cluster-bundle
Restart the Splunk Service:
# /opt/splunk/bin/splunk restart
Install and configure Splunk forwarder instances
A Splunk forwarder is required in order to send alerts to the Splunk indexers. Depending on the type of architecture that you’re installing, the Splunk forwarder is configured differently.
Download the Splunk package from its official website. The versions of Splunk compatible with Wazuh and the Wazuh app for Splunk can be found here.
Install the Splunk forwarder package on all the Wazuh manager nodes:
# yum install splunkforwarder-package.rpm
# dpkg --install splunkforwarder-package.deb
Configuring the Splunk forwarder instances
The following files will be configured on all forwarder instances:
inputs.conf: This file specifies the options for reading alerts from the alerts.json file.
outputs.conf: This file is for pointing events to indexers. It can be a single indexer or a cluster of indexers. If it is a cluster of indexers, load balancing has to be configured for the forwarders.
props.conf: This file provides the format and transforming options on the fields of the data to be indexed.
Creating the configuration files
Download and insert the
inputs.conftemplate:# curl -so /opt/splunkforwarder/etc/system/local/inputs.conf https://raw.githubusercontent.com/wazuh/wazuh-splunk/v4.4.5-8.2/setup/forwarder/inputs.conf
Set the Wazuh manager hostname:
# sed -i "s:MANAGER_HOSTNAME:$(hostname):g" /opt/splunkforwarder/etc/system/local/inputs.conf
Create outputs.conf:
# touch /opt/splunkforwarder/etc/system/local/outputs.conf
Fill outputs.conf with the code block below:
[indexer_discovery:cluster1]
pass4SymmKey = changeme
master_uri = https://<master_ip>:<port>

[tcpout:cluster1_tcp]
indexerDiscovery = cluster1
clientCert = /opt/splunkforwarder/etc/auth/server.pem
sslRootCAPath = /opt/splunkforwarder/etc/auth/ca.pem
sslPassword = password

[tcpout]
defaultGroup = cluster1_tcp
Where:
<master_ip>references the indexer master IP address.<port>references the indexers master management port.changemereferences the security key used with communication between the cluster master and the forwarders..cluster1references the <name> set in the indexerDiscovery attribute in the [tcpout:<target_group>] stanza.In the [tcpout:<target_group>] stanza, set the indexerDiscovery attribute, instead of the server attribute that you would use to specify the receiving peer nodes if you were not enabling indexer discovery. With indexer discovery, the forwarders get their list of receiving peer nodes from the master, not from the server attribute. If both attributes are set, indexerDiscovery takes precedence.Download and insert the
props.conftemplate:# curl -so /opt/splunkforwarder/etc/system/local/props.conf https://raw.githubusercontent.com/wazuh/wazuh-splunk/v4.4.5-8.2/setup/forwarder/props.conf
To save all the changes, start the Splunk forwarder:
# /opt/splunkforwarder/bin/splunk start
Note
This command will make a Splunk General Terms appear that will have to be accepted, and then, will ask for a series of information such as:
Administrator name
Password
Note
You can check the state of the cluster executing from the cluster master node:
# /opt/splunk/bin/splunk show cluster-bundle-status
Set up data forwarding
Point each Splunk forwarder output to a Splunk indexer with the following command:
# /opt/splunkforwarder/bin/splunk add forward-server <INDEXER_IP>:<INDEXER_PORT>INDEXER_IPis the IP address of the Splunk indexer cluster master.INDEXER_PORTis the port of the Splunk indexer earlier configured in receiving.
Note
This command will ask for a series of information such as:
Splunk username (created previously)
Password of Splunk username
Start the Splunk forwarder service:
# /opt/splunkforwarder/bin/splunk start
The next step is installing the Wazuh App in the search heads instances and configuring them to use the Splunk services.
You can find useful Splunk CLI commands in the official documentation.
To learn more about the Splunk distributed search, check out this article from the official documentation.