Blocking a known malicious actor
In this use case, we demonstrate how to block malicious IP addresses from accessing web resources on a web server. You set up Apache web servers on Ubuntu and Windows endpoints, and try to access them from an RHEL endpoint.
This case uses a public IP reputation database that contains the IP addresses of some malicious actors. An IP reputation database is a collection of IP addresses that have been flagged as malicious. The RHEL endpoint plays the role of the malicious actor here, therefore you add its IP address to the reputation database. Then, configure Wazuh to block the RHEL endpoint from accessing web resources on the Apache web servers for 60 seconds. It’s a way of discouraging attackers from continuing to carry out their malicious activities.
In this use case, you use the Wazuh CDB list and active response capabilities.
Infrastructure
Endpoint |
Description |
|---|---|
RHEL 9.0 |
Attacker endpoint connecting to the victim's web server on which you use Wazuh CDB list capability to flag its IP address as malicious. |
Ubuntu 22.04 |
Victim endpoint running an Apache 2.4.54 web server. Here, you use the Wazuh active response module to automatically block connections from the attacker endpoint. |
Windows 11 |
Victim endpoint running an Apache 2.4.54 web server. Here, you use the Wazuh active response module to automatically block connections from the attacker endpoint. |
Configuration
Ubuntu endpoint
Perform the following steps to install an Apache web server and monitor its logs with the Wazuh agent.
Update local packages and install the Apache web server:
$ sudo apt update
$ sudo apt install apache2
If the firewall is enabled, modify the firewall to allow external access to web ports. Skip this step if the firewall is disabled:
$ sudo ufw status
$ sudo ufw app list
$ sudo ufw allow 'Apache'
Check the status of the Apache service to verify that the web server is running:
$ sudo systemctl status apache2
Use the
curlcommand or openhttp://<UBUNTU_IP>in a browser to view the Apache landing page and verify the installation:$ curl http://<UBUNTU_IP>
Add the following to
/var/ossec/etc/ossec.conffile to configure the Wazuh agent and monitor the Apache access logs:<localfile> <log_format>syslog</log_format> <location>/var/log/apache2/access.log</location> </localfile>
Restart the Wazuh agent to apply the changes:
$ sudo systemctl restart wazuh-agent
Windows endpoint
Install the Apache web server
Perform the following steps to install and configure an Apache web server.
Install the latest Visual C++ Redistributable package.
Download the Apache web server ZIP installation file. This is an already compiled binary for Windows operating systems.
Unzip the contents of the Apache web server zip file and copy the extracted
Apache24folder to theC:directory.Navigate to the
C:\Apache24\binfolder and run the following command in a PowerShell terminal with administrator privileges:> C:\Apache24\bin>httpd.exe
The first time you run the Apache binary a Windows Defender Firewall pops up.
Click on Allow Access. This allows the Apache HTTP server to communicate on your private or public networks depending on your network setting. It creates an inbound rule in your firewall to allow incoming traffic on port 80.
Open
http://<WINDOWS_IP>in a browser to view the Apache landing page and verify the installation. Also, verify that this URL can be reached from the attacker endpoint.
Configure the Wazuh agent
Perform the steps below to configure the Wazuh agent to monitor Apache web server logs.
Add the following to
C:\Program Files (x86)\ossec-agent\ossec.confto configure the Wazuh agent and monitor the Apache access logs:<localfile> <log_format>syslog</log_format> <location>C:\Apache24\logs\access_log</location> </localfile>
Restart the Wazuh agent in a PowerShell terminal with administrator privileges to apply the changes:
> Restart-Service -Name wazuh
Wazuh server
You need to perform the following steps on the Wazuh server to add the IP address of the RHEL endpoint to a CDB list, and then configure rules and active response.
Download the utilities and configure the CDB list
Install the
wgetutility to download the necessary artifacts using the command line interface:$ sudo yum update && sudo yum install -y wget
Download the Alienvault IP reputation database:
$ sudo wget https://raw.githubusercontent.com/firehol/blocklist-ipsets/master/alienvault_reputation.ipset -O /var/ossec/etc/lists/alienvault_reputation.ipset
Append the IP address of the attacker endpoint to the IP reputation database. Replace
<ATTACKER_IP>with the RHEL IP address in the command below:$ sudo echo "<ATTACKER_IP>" >> /var/ossec/etc/lists/alienvault_reputation.ipset
Download a script to convert from the
.ipsetformat to the.cdblist format:$ sudo wget https://wazuh.com/resources/iplist-to-cdblist.py -O /tmp/iplist-to-cdblist.py
Convert the
alienvault_reputation.ipsetfile to a.cdbformat using the previously downloaded script:$ sudo /var/ossec/framework/python/bin/python3 /tmp/iplist-to-cdblist.py /var/ossec/etc/lists/alienvault_reputation.ipset /var/ossec/etc/lists/blacklist-alienvault
Optional: Remove the
alienvault_reputation.ipsetfile and theiplist-to-cdblist.pyscript, as they are no longer needed:$ sudo rm -rf /var/ossec/etc/lists/alienvault_reputation.ipset $ sudo rm -rf /tmp/iplist-to-cdblist.py
Assign the right permissions and ownership to the generated file:
$ sudo chown wazuh:wazuh /var/ossec/etc/lists/blacklist-alienvault
Configure the active response module to block the malicious IP address
Add a custom rule to trigger a Wazuh active response script. Do this in the Wazuh server
/var/ossec/etc/rules/local_rules.xmlcustom ruleset file:<group name="attack,"> <rule id="100100" level="10"> <if_group>web|attack|attacks</if_group> <list field="srcip" lookup="address_match_key">etc/lists/blacklist-alienvault</list> <description>IP address found in AlienVault reputation database.</description> </rule> </group>
Edit the Wazuh server
/var/ossec/etc/ossec.confconfiguration file and add theetc/lists/blacklist-alienvaultlist to the<ruleset>section:<ossec_config> <ruleset> <!-- Default ruleset --> <decoder_dir>ruleset/decoders</decoder_dir> <rule_dir>ruleset/rules</rule_dir> <rule_exclude>0215-policy_rules.xml</rule_exclude> <list>etc/lists/audit-keys</list> <list>etc/lists/amazon/aws-eventnames</list> <list>etc/lists/security-eventchannel</list> <list>etc/lists/blacklist-alienvault</list> <!-- User-defined ruleset --> <decoder_dir>etc/decoders</decoder_dir> <rule_dir>etc/rules</rule_dir> </ruleset> </ossec_config>
Add the active response block to the Wazuh server
/var/ossec/etc/ossec.conffile:For the Ubuntu endpoint
The
firewall-dropcommand integrates with the Ubuntu local iptables firewall and drops incoming network connection from the attacker endpoint for 60 seconds:<ossec_config> <active-response> <command>firewall-drop</command> <location>local</location> <rules_id>100100</rules_id> <timeout>60</timeout> </active-response> </ossec_config>
For the Windows endpoint
The active response script uses the
netshcommand to block the attacker's IP address on the Windows endpoint. It runs for 60 seconds:<ossec_config> <active-response> <command>netsh</command> <location>local</location> <rules_id>100100</rules_id> <timeout>60</timeout> </active-response> </ossec_config>
Restart the Wazuh manager to apply the changes:
$ sudo systemctl restart wazuh-manager
Attack emulation
Access any of the web servers from the RHEL endpoint using the corresponding IP address. Replace
<WEBSERVER_IP>with the appropriate value and execute the following command from the attacker endpoint:$ curl http://<WEBSERVER_IP>
The attacker endpoint connects to the victim's web servers the first time. After the first connection, the Wazuh active response module temporarily blocks any successive connection to the web servers for 60 seconds.
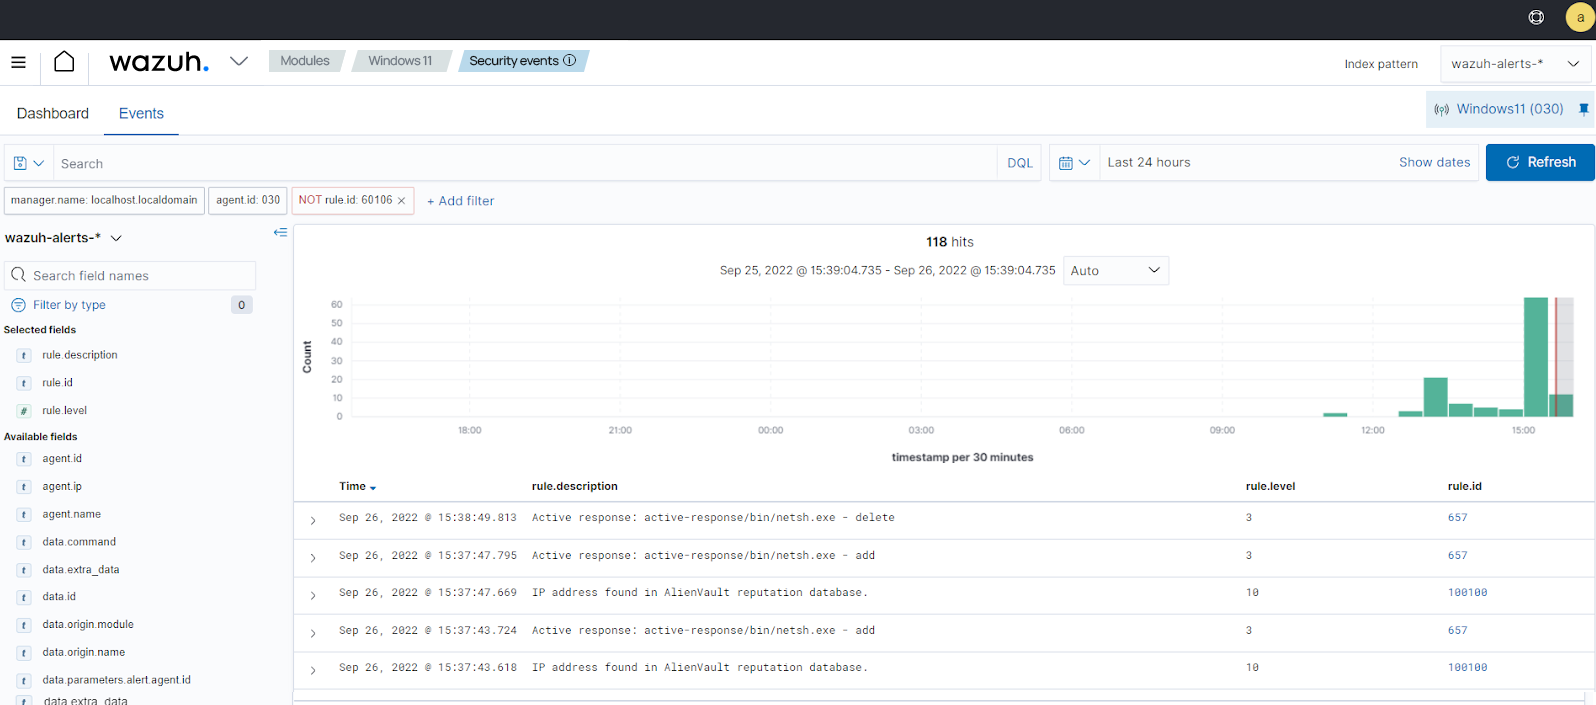
Visualize the alerts
You can visualize the alert data in the Wazuh dashboard. To do this, go to the Security events module and add the filters in the search bar to query the alerts.
Ubuntu -
rule.id:(651 OR 100100)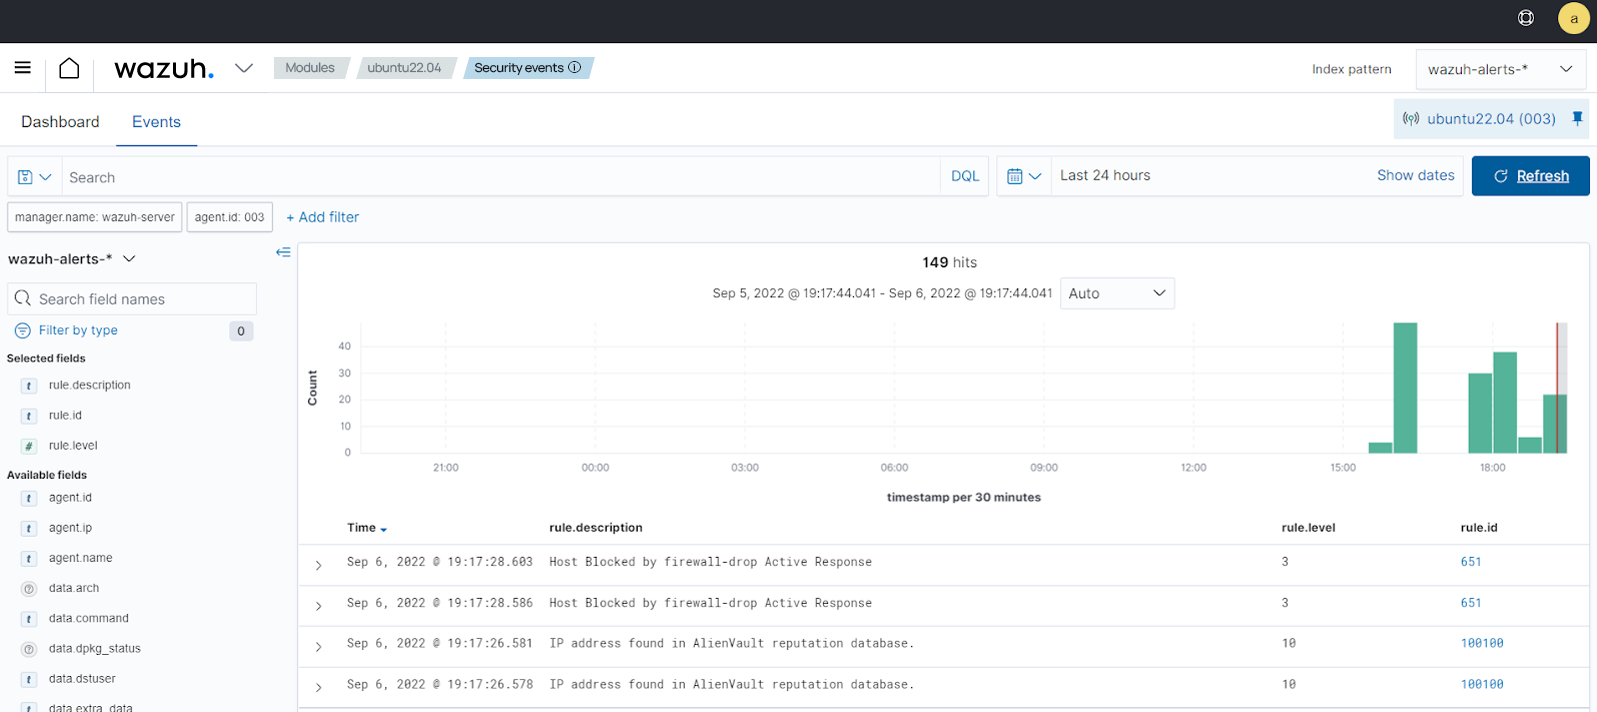
Windows -
rule.id:(657 OR 100100)