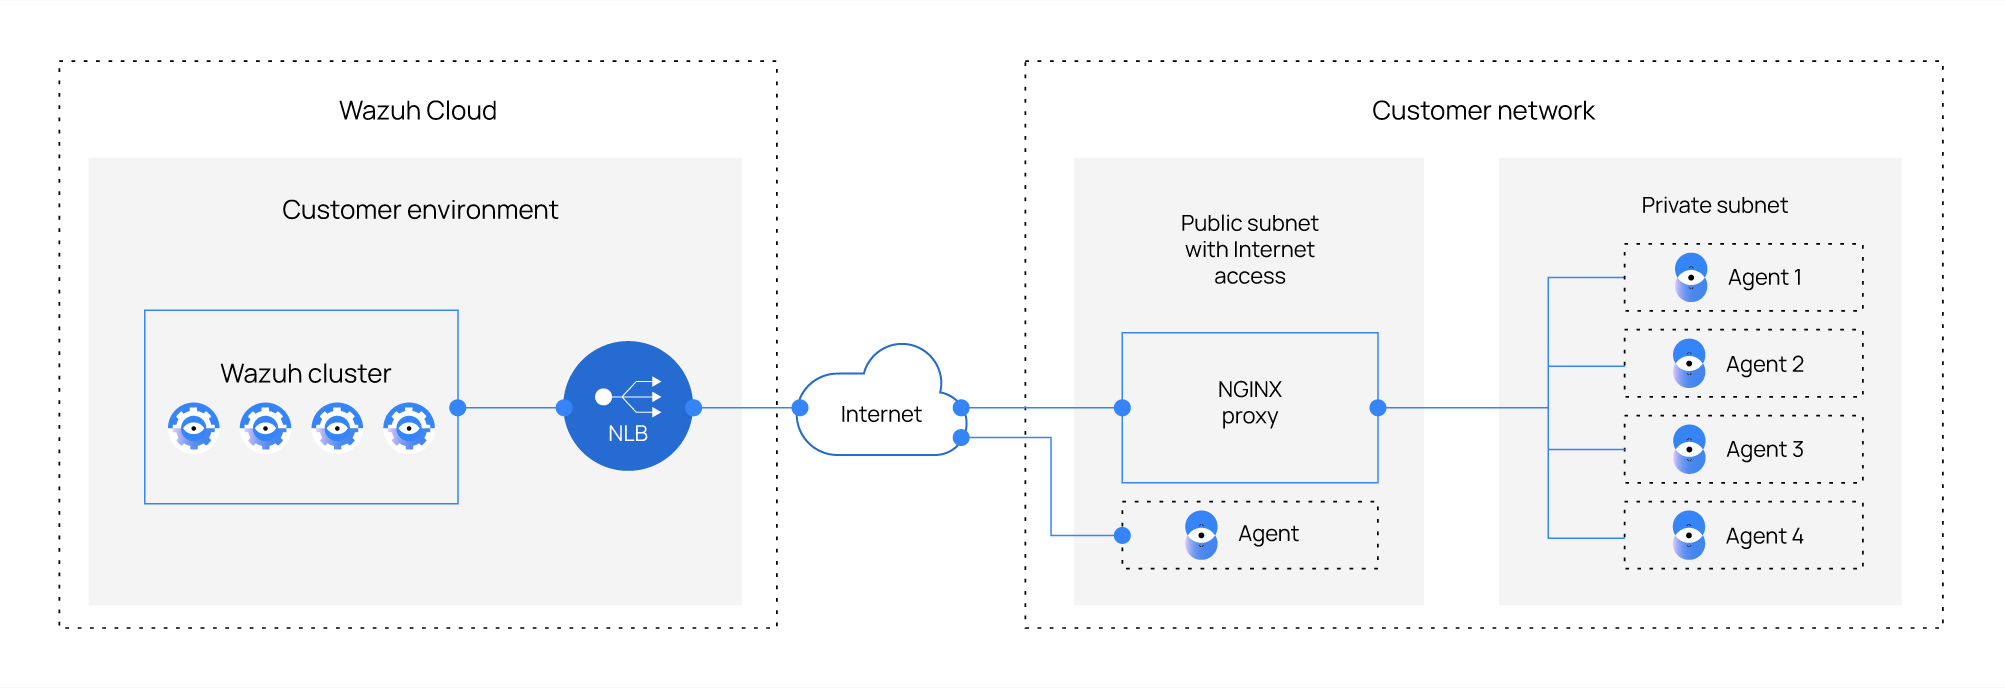
Agents without Internet access
Even if an agent does not have Internet access, Wazuh provides different approaches to securely connect your private network to your environment:
Using a forwarding proxy
It is possible to access your environment using an NGINX forwarding proxy.

To achieve this configuration, follow these steps:
Deploy a new instance in a public subnet with internet access.
Install NGINX on your instance following the NGINX documentation.
Configure NGINX.
Add the following lines to the HTTP section in your NGINX configuration, located in the
/etc/nginx/nginx.conffile. This configuration enables Nginx to extract and use the real client IP address from the X-Forwarded-For header and sets restrictions on which real IP addresses are accepted as valid.http{ ... real_ip_header X-Forwarded-For; set_real_ip_from nginx_ip; }
Add the following block to the end of the NGINX configuration file
/etc/nginx/nginx.confand replace<CLOUD_ID>with the Cloud ID of your environment. This configuration enables stream proxying, where incoming traffic on specific ports is forwarded to the corresponding upstream servers (master or mycluster). This is based on the port numbers, 1515 and 1514 specified in the listen directive.stream { upstream master { server <CLOUD_ID>.cloud.wazuh.com:1515; } upstream mycluster { server <CLOUD_ID>.cloud.wazuh.com:1514; } server { listen nginx_ip:1515; proxy_pass master; } server { listen nginx_ip:1514; proxy_pass mycluster; } }
Run the command to restart NGINX:
systemctl restart nginx.Enroll your agent with the IP address of the NGINX instance. To learn more about registering agents, see the Enroll agents section.
Example:
WAZUH_MANAGER_IP=<NGINX_IP> WAZUH_PROTOCOL="tcp" \
WAZUH_PASSWORD="<PASSWORD>" \
yum install wazuh-agent-4.7.5-1
Replace <PASSWORD> with your Wazuh server enrollment password.
Using AWS Private Link
In case your agents are located in AWS, you can access our Wazuh Cloud service securely by keeping your network traffic within the AWS network. For that purpose, we use AWS Private Link.
Log in to the Wazuh Cloud Console.
Go to the Help section to contact the Wazuh team requesting your VPC endpoint service name. It has this format:
com.amazonaws.vpce.<region>.vpce-svc-<aws-service-id>Select your endpoints in AWS:
Navigate to your AWS Console.
Select VPC.
Select Endpoints.
Create a new endpoint pointing to the endpoint service you requested from the Wazuh team. Keep in mind that the endpoint must be located in the same AWS Region as the endpoint service. For more information on AWS PrivateLink and VPC endpoints, see the AWS documentation.
After the endpoint is created, Wazuh approves the connection and sends a notification when it is ready to use.
You can now enroll your Wazuh agent but replace the WAZUH_MANAGER_IP value with the endpoint's DNS (
vpce-<aws-endpoint-id>.vpce-svc-<aws-service-id>.<region>.vpce.amazonaws.com).If the agents are located in a different region than your endpoint, use VPC Peerings to connect them to the endpoint service.
Example:
WAZUH_MANAGER_IP=vpce-<aws-endpoint-id>.vpce-svc-<aws-service-id>.<region>.vpce.amazonaws.com WAZUH_PROTOCOL="tcp" \
WAZUH_PASSWORD="<PASSWORD>>" \
yum install wazuh-agent-4.7.5-1
In this example, make sure to replace
<PASSWORD>with your actual password.