Deployment
Deploying the Wazuh central components
This section covers steps for deploying Wazuh central components on Kubernetes for Amazon EKS and local Kubernetes clusters, and to verify the deployment.
Amazon EKS deployment
Follow the steps below to deploy Wazuh central components on an Amazon EKS cluster.
Clone the Wazuh Kubernetes repository for the necessary services and pods:
$ git clone https://github.com/wazuh/wazuh-kubernetes.git -b v5.0.0-rc1 --depth=1
$ cd wazuh-kubernetes
Apply Traefik ingress controller
The Traefik ingress controller routes and load balances external traffic to the appropriate internal Kubernetes services. It is also used to expose the Wazuh services outside the EKS cluster.
Run the command below to deploy the Traefik CRD:
$ kubectl apply -f traefik/crd/kubernetes-crd-definition-v1.yml
The command output looks similar to this:
customresourcedefinition.apiextensions.k8s.io/ingressroutes.traefik.io created
customresourcedefinition.apiextensions.k8s.io/ingressroutetcps.traefik.io created
customresourcedefinition.apiextensions.k8s.io/ingressrouteudps.traefik.io created
customresourcedefinition.apiextensions.k8s.io/middlewares.traefik.io created
customresourcedefinition.apiextensions.k8s.io/middlewaretcps.traefik.io created
customresourcedefinition.apiextensions.k8s.io/serverstransports.traefik.io created
customresourcedefinition.apiextensions.k8s.io/serverstransporttcps.traefik.io created
customresourcedefinition.apiextensions.k8s.io/tlsoptions.traefik.io created
customresourcedefinition.apiextensions.k8s.io/tlsstores.traefik.io created
customresourcedefinition.apiextensions.k8s.io/traefikservices.traefik.io created
Deploy the Traefik runtime for the ingress controller:
$ kubectl apply -k traefik/runtime/
The command output looks similar to this:
namespace/traefik created
serviceaccount/traefik created
clusterrole.rbac.authorization.k8s.io/traefik created
clusterrolebinding.rbac.authorization.k8s.io/traefik created
service/traefik created
deployment.apps/traefik created
Run the command below to view all running services in the
traefiknamespace:$ kubectl -n traefik get svc
The command output looks similar to this:
NAME      TYPE           CLUSTER-IP     EXTERNAL-IP                                                              PORT(S)                                                      AGE
traefik   LoadBalancer   10.100.34.51   a7ffe29bfcf38420988fd52a698be422-862207742.us-west-1.elb.amazonaws.com   443:30725/TCP,1517:31485/TCP,1514:32036/TCP,1515:30354/TCP   6m29s
Wait until the
EXTERNAL-IPcolumn shows a value instead of<pending>, and note it. On Amazon EKS, it is the fully qualified domain name (FQDN) of the load balancer. It goes into the Wazuh dashboard certificate and into the agent listener certificate of the Wazuh manager.
Setup SSL certificates
Perform the steps below to generate the required certificates for the deployment:
Download the
wazuh-certs-tool.shandwazuh-credentials.shscript and theconfig.ymlconfiguration file. These files are used to create the certificates that encrypt communications between the Wazuh central components.$ cd wazuh $ curl -so wazuh-credentials.sh https://raw.githubusercontent.com/wazuh/wazuh-installation-assistant/5.0.0/credentials_lib/wazuh-credentials.sh $ curl -so wazuh-certs-tool.sh https://packages-staging.xdrsiem.wazuh.info/pre-release/5.x/installation-assistant/wazuh-certs-tool-5.0.0-rc1.sh $ curl -so config.yml https://packages-staging.xdrsiem.wazuh.info/pre-release/5.x/installation-assistant/config-5.0.0-rc1.yml
Edit
./config.ymland replace it with the following contents.nodes: indexer: - name: indexer dns: - "wazuh-indexer" - "wazuh-indexer.wazuh.svc.cluster.local" - "wazuh-indexer-0.wazuh-indexer" - "wazuh-indexer-1.wazuh-indexer" - "wazuh-indexer-2.wazuh-indexer" - "wazuh-indexer-0.wazuh-indexer.wazuh.svc.cluster.local" - "wazuh-indexer-1.wazuh-indexer.wazuh.svc.cluster.local" - "wazuh-indexer-2.wazuh-indexer.wazuh.svc.cluster.local" manager: - name: manager dns: - "wazuh-api" - "wazuh-api.wazuh.svc.cluster.local" - "wazuh-agents" - "wazuh-agents.wazuh.svc.cluster.local" - "wazuh-events" - "wazuh-events.wazuh.svc.cluster.local" - "wazuh-registration" - "wazuh-registration.wazuh.svc.cluster.local" dashboard: - name: dashboard dns: - "dashboard" - "dashboard.wazuh.svc.cluster.local" - "<EXTERNAL-IP>"
Replace
<EXTERNAL-IP>with the load balancer FQDN shown in theEXTERNAL-IPcolumn ofkubectl -n traefik get svc.
Run the
tools/utils/deployment/certificates-conf.shscript to create the certificates and copy them where thesecretGeneratorof thekustomization.ymlfile imports them. Replace<EXTERNAL-IP>with the same load balancer FQDN. The--agent-sanoption adds it to the agent listener certificate (manager-remoted.pem) so that Wazuh agents outside the cluster can verify the Wazuh manager on port1517. Repeat the option for every other address agents will use.$ sudo bash ../tools/utils/deployment/certificates-conf.sh --cert --copy --priv --agent-san <EXTERNAL-IP>
The command output looks similar to this:
Detected indexer nodes:   indexer
Detected manager nodes:   manager
Detected dashboard nodes: dashboard
Generating certificates
09/10/2026 09:50:10 INFO: Verbose logging redirected to .../wazuh-kubernetes/wazuh/wazuh-certificates-tool.log
09/10/2026 09:50:11 INFO: Generating the root certificate in /etc/wazuh/ca.
09/10/2026 09:50:11 WARNING: There is no root CA in /etc/wazuh/ca, so a new one is created. The certificates issued from it do not chain to the root CA of any existing deployment. To add nodes to an existing deployment, stop here and run the tool on the host that holds its root CA, or set WAZUH_CA_DIR to a directory with a copy of that root CA and its key.
09/10/2026 09:50:11 INFO: Generating Admin certificates.
09/10/2026 09:50:12 INFO: Admin certificates created.
09/10/2026 09:50:12 INFO: Generating Wazuh indexer certificates.
09/10/2026 09:50:13 INFO: Wazuh indexer certificates created.
09/10/2026 09:50:13 INFO: Generating Wazuh manager certificates.
09/10/2026 09:50:13 INFO: Wazuh manager certificates created.
09/10/2026 09:50:13 INFO: Generating Wazuh dashboard certificates.
09/10/2026 09:50:14 INFO: Wazuh dashboard certificates created.
Copying certificates for indexer: indexer -> config/indexer/certs/
Copying certificates for manager: manager -> config/manager/certs/
Copying certificates for dashboard: dashboard -> config/dashboard/certs/
Copying root-ca certificates -> config/root-ca/certs/
Setting ownership for indexer indexer (1001:1002)
Setting ownership for manager manager (1001:1002)
Setting ownership for dashboard dashboard (1001:1002)
Setting ownership for root-ca certificates (1001:1002)
Process completed.
The script keeps the root CA certificate and its private key in
/etc/wazuh/caon the machine where you run it, and reuses them on later runs. Protect this directory, because anyone with the key can issue certificates that the Wazuh components trust. To issue new certificates later, remove thewazuh-certificates/directory first. Otherwise, the script reports success without issuing new certificates.
Generate credentials
The Wazuh images ship with no default passwords. Each deployment generates its own before the first deployment. Perform the steps below to generate the required credentials.
Download the
wazuh-credentials.shlibrary. This file provides the credential generation functions used by the script in the next step.$ curl -o wazuh-credentials.sh https://raw.githubusercontent.com/wazuh/wazuh-installation-assistant/5.0.0/credentials_lib/wazuh-credentials.sh
Run the
credentials-conf.shscript to generate the credentials and import them viasecretGeneratorin thekustomization.ymlfile.$ sudo bash ../tools/utils/deployment/credentials-conf.sh
The command output looks similar to this:
WAZUH_INDEXER_ADMIN_PASSWORD: generated
WAZUH_INDEXER_KIBANASERVER_PASSWORD: generated
WAZUH_INDEXER_MANAGER_PASSWORD: generated
WAZUH_MANAGER_API_PASSWORD: generated
WAZUH_MANAGER_WUI_PASSWORD: generated
Credentials written to ./config/credentials: indexer.env, manager.env, dashboard.env
Log in to the Wazuh dashboard as 'admin'. Read its password with:
  grep '^WAZUH_INDEXER_ADMIN_PASSWORD=' ./config/credentials/indexer.env | cut -d= -f2-
The command creates the
indexer.env,manager.env, anddashboard.envin thewazuh/config/credentials/directory, holding only the credentials that each component needs. Keep these files for the life of the deployment; everykubectl apply -kandkubectl delete -kreads them, and a recreated indexer pod retrieves its credentials from them again.Return to the root of the repository and retrieve the generated password for the
adminuser. You need it to log in to the Wazuh dashboard after the deployment is completed.$ cd .. $ grep '^WAZUH_INDEXER_ADMIN_PASSWORD=' wazuh/config/credentials/indexer.env | cut -d= -f2-
Set the cluster key and the agent enrollment password
The repository ships wazuh/secrets/wazuh-cluster-key-secret.yaml and wazuh/secrets/wazuh-authd-pass-secret.yaml with placeholder values. These values must be replaced manually before the first deployment. Perform the steps below to create the cluster key and agent enrollment password.
Generate a
CLUSTER_KEY. It must be exactly 32 alphanumeric characters.$ openssl rand -hex 16
The command output looks similar to this:
e9e059de43c6631e0a52e8acb3738c21
Encode the key in base64.
$ echo -n "<CLUSTER_KEY>" | base64
Replace the
data.keyvalue inwazuh/secrets/wazuh-cluster-key-secret.yamlwith the encodedCLUSTER_KEY.# Copyright (C) 2019, Wazuh Inc. # # This program is a free software; you can redistribute it # and/or modify it under the terms of the GNU General Public # License (version 2) as published by the FSF - Free Software # Foundation. # Wazuh cluster key secret apiVersion: v1 kind: Secret metadata: name: wazuh-cluster-key namespace: wazuh data: key: <ENCODED_CLUSTER_KEY>
Warning
Every Wazuh manager master and worker presents its cluster key when joining the Wazuh manager cluster. A node whose key doesn't match the Wazuh manager master’s key cannot join the cluster.
Generate an agent enrollment password
ENROLLMENT_PASSWORD.$ openssl rand -base64 24 | tr -dc A-Za-z0-9 | head -c 24
The command output looks similar to this:
ul0GkIsq9zGa0lVpbB5WOKsF
Encode the
ENROLLMENT_PASSWORDin base64.$ echo -n "<ENROLLMENT_PASSWORD>" | base64
Replace the
data.authd.passvalue inwazuh/secrets/wazuh-authd-pass-secret.yamlwith the encodedENROLLMENT_PASSWORD.# Copyright (C) 2019, Wazuh Inc. # # This program is a free software; you can redistribute it # and/or modify it under the terms of the GNU General Public # License (version 2) as published by the FSF - Free Software # Foundation. # Wazuh authd password secret apiVersion: v1 kind: Secret metadata: name: wazuh-authd-pass namespace: wazuh data: authd.pass: <ENCODED_ENROLLMENT_PASSWORD>
Apply all manifests
The Wazuh Kubernetes cluster manifest for Amazon EKS clusters is located in envs/eks.
You can adjust cluster resources by editing patch files in envs/eks/ or envs/local-env/. These files override specific values in the base manifests for each environment, such as CPU, memory, and storage for persistent volumes.
Edit the
wazuh/base/ingressRoute-tcp-dashboard.yamlfile and replace the<UPDATE-WITH-THE-FQDN-OF-THE-INGRESS>placeholder with the fully qualified domain name (FQDN) of the external load balancer created for the Traefik service. This configures TLS pass-through for the Wazuh dashboard.apiVersion: traefik.io/v1alpha1 kind: IngressRouteTCP metadata: name: wazuh-dashboard namespace: wazuh spec: entryPoints: - websecure routes: - match: HostSNI(`<UPDATE-WITH-THE-FQDN-OF-THE-INGRESS>`) middlewares: - name: ip-allowlist services: - name: dashboard port: 443 tls: passthrough: true
Run the command
kubectl -n traefik get svcto get the FQDN of the load balancer created for the Traefik service.Deploy the Wazuh Kubernetes cluster using the
kustomizationfile:$ kubectl apply -k envs/eks/
Refer to the verifying the deployment section to confirm the deployment is successful.
Local cluster deployment
Follow the steps below to deploy a Wazuh Kubernetes cluster on a local Kubernetes cluster.
Clone the Wazuh Kubernetes repository for the necessary services and pods:
$ git clone https://github.com/wazuh/wazuh-kubernetes.git -b v5.0.0-rc1 --depth=1
$ cd wazuh-kubernetes
Edit the
wazuh/base/ingressRoute-tcp-dashboard.yamlfile and clear its contents for local deployments to prevent the EKS ingress configuration from being applied:$ echo "" > wazuh/base/ingressRoute-tcp-dashboard.yaml
Set up storage class
The storage class provisioner varies by cluster.
Check your storage class by running the command below:
$ kubectl get sc
The command output looks similar to this:
NAME                 PROVISIONER                RECLAIMPOLICY   VOLUMEBINDINGMODE   ALLOWVOLUMEEXPANSION   AGE
standard (default)   k8s.io/minikube-hostpath   Delete          Immediate           false                  10m
Edit the
envs/local-env/storage-class.yamlfile to set the provisioner that matches your cluster type.The provisioner column displays
k8s.io/minikube-hostpath.
Set up SSL certificates
Perform the steps below to generate the required certificates for the deployment:
Download the
wazuh-certs-tool.shandwazuh-credentials.shscript and theconfig.ymlconfiguration file. These files are used to generate certificates that encrypt communications between Wazuh's central components.$ cd wazuh $ curl -so wazuh-credentials.sh https://raw.githubusercontent.com/wazuh/wazuh-installation-assistant/5.0.0/credentials_lib/wazuh-credentials.sh $ curl -so wazuh-certs-tool.sh https://packages-staging.xdrsiem.wazuh.info/pre-release/5.x/installation-assistant/wazuh-certs-tool-5.0.0-rc1.sh $ curl -so config.yml https://packages-staging.xdrsiem.wazuh.info/pre-release/5.x/installation-assistant/config-5.0.0-rc1.yml
Edit
./config.ymland replace it with the following contents.nodes: indexer: - name: indexer dns: - "wazuh-indexer" - "wazuh-indexer.wazuh.svc.cluster.local" - "wazuh-indexer-0.wazuh-indexer" - "wazuh-indexer-1.wazuh-indexer" - "wazuh-indexer-2.wazuh-indexer" - "wazuh-indexer-0.wazuh-indexer.wazuh.svc.cluster.local" - "wazuh-indexer-1.wazuh-indexer.wazuh.svc.cluster.local" - "wazuh-indexer-2.wazuh-indexer.wazuh.svc.cluster.local" manager: - name: manager dns: - "wazuh-api" - "wazuh-api.wazuh.svc.cluster.local" - "wazuh-agents" - "wazuh-agents.wazuh.svc.cluster.local" - "wazuh-events" - "wazuh-events.wazuh.svc.cluster.local" - "wazuh-registration" - "wazuh-registration.wazuh.svc.cluster.local" dashboard: - name: dashboard dns: - "dashboard" - "dashboard.wazuh.svc.cluster.local" ip: - "<KUBERNETES_HOST_IP_ADDRESS>"
Replace
<KUBERNETES_HOST_IP_ADDRESS>with an IP address of the machine where you runkubectlthat your browser and your Wazuh agents can reach, for example its LAN IP address. You use the same address withkubectl port-forward --addressin the Apply all manifests section. Adding it as anipentry puts it in the Wazuh dashboard certificate, so the certificate matches the address you open the dashboard with. The browser still warns until you trust the deployment's root CA,wazuh/config/root-ca/certs/root-ca.pem.Run the
tools/utils/deployment/certificates-conf.shscript to create the certificates and copy them where thesecretGeneratorof thekustomization.ymlfile imports them. Replace<KUBERNETES_HOST_IP_ADDRESS>with the same address. The--agent-sanoption adds it to the agent listener certificate (manager-remoted.pem) so that Wazuh agents outside the cluster can verify the Wazuh manager on port1517through the port-forward. Repeat the option for every other address agents will use.$ sudo bash ../tools/utils/deployment/certificates-conf.sh --cert --copy --priv --agent-san <KUBERNETES_HOST_IP_ADDRESS>
The command output looks similar to this:
Detected indexer nodes:   indexer
Detected manager nodes:   manager
Detected dashboard nodes: dashboard
Generating certificates
09/10/2026 09:50:10 INFO: Verbose logging redirected to .../wazuh-kubernetes/wazuh/wazuh-certificates-tool.log
09/10/2026 09:50:11 INFO: Generating the root certificate in /etc/wazuh/ca.
09/10/2026 09:50:11 WARNING: There is no root CA in /etc/wazuh/ca, so a new one is created. The certificates issued from it do not chain to the root CA of any existing deployment. To add nodes to an existing deployment, stop here and run the tool on the host that holds its root CA, or set WAZUH_CA_DIR to a directory with a copy of that root CA and its key.
09/10/2026 09:50:11 INFO: Generating Admin certificates.
09/10/2026 09:50:12 INFO: Admin certificates created.
09/10/2026 09:50:12 INFO: Generating Wazuh indexer certificates.
09/10/2026 09:50:13 INFO: Wazuh indexer certificates created.
09/10/2026 09:50:13 INFO: Generating Wazuh manager certificates.
09/10/2026 09:50:13 INFO: Wazuh manager certificates created.
09/10/2026 09:50:13 INFO: Generating Wazuh dashboard certificates.
09/10/2026 09:50:14 INFO: Wazuh dashboard certificates created.
Copying certificates for indexer: indexer -> config/indexer/certs/
Copying certificates for manager: manager -> config/manager/certs/
Copying certificates for dashboard: dashboard -> config/dashboard/certs/
Copying root-ca certificates -> config/root-ca/certs/
Setting ownership for indexer indexer (1001:1002)
Setting ownership for manager manager (1001:1002)
Setting ownership for dashboard dashboard (1001:1002)
Setting ownership for root-ca certificates (1001:1002)
Process completed.
The script keeps the root CA certificate and its private key in
/etc/wazuh/caon the machine where you run it, and reuses them on later runs. Protect this directory, because anyone with the key can issue certificates that the Wazuh components trust. To issue new certificates later, remove thewazuh-certificates/directory first. Otherwise, the script reports success without issuing new certificates.
Generate credentials
The Wazuh images ship with no default passwords. Each deployment generates its own before the first deployment. Perform the steps below to generate the required credentials.
Download the
wazuh-credentials.shlibrary. This file provides the credential generation functions used by the script in the next step.$ curl -o wazuh-credentials.sh https://raw.githubusercontent.com/wazuh/wazuh-installation-assistant/5.0.0/credentials_lib/wazuh-credentials.sh
Run the
credentials-conf.shscript to generate the credentials and import them viasecretGeneratorin thekustomization.ymlfile.$ sudo bash ../tools/utils/deployment/credentials-conf.sh
The command output looks similar to this:
WAZUH_INDEXER_ADMIN_PASSWORD: generated
WAZUH_INDEXER_KIBANASERVER_PASSWORD: generated
WAZUH_INDEXER_MANAGER_PASSWORD: generated
WAZUH_MANAGER_API_PASSWORD: generated
WAZUH_MANAGER_WUI_PASSWORD: generated
Credentials written to ./config/credentials: indexer.env, manager.env, dashboard.env
Log in to the Wazuh dashboard as 'admin'. Read its password with:
  grep '^WAZUH_INDEXER_ADMIN_PASSWORD=' ./config/credentials/indexer.env | cut -d= -f2-
The command creates the
indexer.env,manager.env, anddashboard.envin thewazuh/config/credentials/directory, holding only the credentials that each component needs. Keep these files for the life of the deployment; everykubectl apply -kandkubectl delete -kreads them, and a recreated indexer pod retrieves its credentials from them again.Retrieve the generated dashboard password to log in after deployment.
$ grep '^WAZUH_INDEXER_ADMIN_PASSWORD=' ./config/credentials/indexer.env | cut -d= -f2-
Set the cluster key and the agent enrollment password
The repository ships wazuh/secrets/wazuh-cluster-key-secret.yaml and wazuh/secrets/wazuh-authd-pass-secret.yaml with placeholder values. These values must be replaced manually before the first deployment. Perform the steps below to create the cluster key and agent enrollment password.
Generate a
CLUSTER_KEY. It must be exactly 32 alphanumeric characters.$ openssl rand -hex 16
The command output looks similar to this:
e9e059de43c6631e0a52e8acb3738c21
Encode the key in base64.
$ echo -n "<CLUSTER_KEY>" | base64
Replace the
data.keyvalue inwazuh/secrets/wazuh-cluster-key-secret.yamlwith the encodedCLUSTER_KEY.# Copyright (C) 2019, Wazuh Inc. # # This program is a free software; you can redistribute it # and/or modify it under the terms of the GNU General Public # License (version 2) as published by the FSF - Free Software # Foundation. # Wazuh cluster key secret apiVersion: v1 kind: Secret metadata: name: wazuh-cluster-key namespace: wazuh data: key: <ENCODED_CLUSTER_KEY>
Warning
Every Wazuh manager master and worker presents its cluster key when joining the Wazuh manager cluster. A node whose key doesn't match the Wazuh manager master’s key cannot join the cluster.
Generate an agent enrollment password
ENROLLMENT_PASSWORD.$ openssl rand -base64 24 | tr -dc A-Za-z0-9 | head -c 24
The command output looks similar to this:
ul0GkIsq9zGa0lVpbB5WOKsF
Encode the
ENROLLMENT_PASSWORDin base64.$ echo -n "<ENROLLMENT_PASSWORD>" | base64
Replace the
data.authd.passvalue inwazuh/secrets/wazuh-authd-pass-secret.yamlwith the encodedENROLLMENT_PASSWORD.# Copyright (C) 2019, Wazuh Inc. # # This program is a free software; you can redistribute it # and/or modify it under the terms of the GNU General Public # License (version 2) as published by the FSF - Free Software # Foundation. # Wazuh authd password secret apiVersion: v1 kind: Secret metadata: name: wazuh-authd-pass namespace: wazuh data: authd.pass: <ENCODED_ENROLLMENT_PASSWORD>
Apply all manifests
The Wazuh Kubernetes cluster manifest for other cluster types is located in envs/local-env.
You can adjust cluster resources by editing patch files in envs/local-env/. These files override specific values in the base manifests for each environment, such as CPU, memory, and storage for persistent volumes.
Run the command below to deploy the Traefik CRD:
$ cd ..
$ kubectl apply -f traefik/crd/
The command output looks similar to this:
customresourcedefinition.apiextensions.k8s.io/ingressroutes.traefik.io created
customresourcedefinition.apiextensions.k8s.io/ingressroutetcps.traefik.io created
customresourcedefinition.apiextensions.k8s.io/ingressrouteudps.traefik.io created
customresourcedefinition.apiextensions.k8s.io/middlewares.traefik.io created
customresourcedefinition.apiextensions.k8s.io/middlewaretcps.traefik.io created
customresourcedefinition.apiextensions.k8s.io/serverstransports.traefik.io created
customresourcedefinition.apiextensions.k8s.io/serverstransporttcps.traefik.io created
customresourcedefinition.apiextensions.k8s.io/tlsoptions.traefik.io created
customresourcedefinition.apiextensions.k8s.io/tlsstores.traefik.io created
customresourcedefinition.apiextensions.k8s.io/traefikservices.traefik.io created
Note
For Kubernetes clusters running on Minikube, you can optionally pre-load the images below before deploying. This is not required, since the cluster pulls them itself, but it avoids a wait during the first deployment.
$ docker pull wazuh/wazuh-indexer:5.0.0-rc1
$ docker pull wazuh/wazuh-manager:5.0.0-rc1
$ docker pull wazuh/wazuh-dashboard:5.0.0-rc1
$ minikube image load wazuh/wazuh-indexer:5.0.0-rc1
$ minikube image load wazuh/wazuh-manager:5.0.0-rc1
$ minikube image load wazuh/wazuh-dashboard:5.0.0-rc1
Deploy the Wazuh Kubernetes cluster using the
kustomizationfile:$ kubectl apply -k envs/local-env/
Wait until every pod in the
wazuhnamespace is ready. The first deployment can take several minutes while the images are pulled. A port-forward started before its pod is running exits immediately withunable to forward port because pod is not running.$ kubectl -n wazuh wait --for=condition=Ready pod --all --timeout=600s
Run the following commands to expose the Wazuh manager ports for agent enrollment and the Wazuh API service using port forwarding:
$ kubectl -n wazuh port-forward service/wazuh-agents --address <KUBERNETES_HOST_IP_ADDRESS> 1517:1517 > /tmp/wazuh-agent-port-forward.log 2>&1 &
$ kubectl -n wazuh port-forward service/wazuh-api --address <KUBERNETES_HOST_IP_ADDRESS> 55000:55000 &
Note
Wazuh 4.x agents connect on port
1514(wazuh-events, Wazuh manager workers) and enroll on port1515(wazuh-registration, Wazuh manager master) with the agent enrollment password. To connect Wazuh 4.x agents, also expose these ports.$ kubectl -n wazuh port-forward service/wazuh-events --address <KUBERNETES_HOST_IP_ADDRESS> 1514:1514 > /tmp/wazuh-events-port-forward.log 2>&1 & $ kubectl -n wazuh port-forward service/wazuh-registration --address <KUBERNETES_HOST_IP_ADDRESS> 1515:1515 > /tmp/wazuh-registration-port-forward.log 2>&1 &
Access the Wazuh dashboard using port forwarding. The Wazuh dashboard will be accessible at
https://<KUBERNETES_HOST_IP_ADDRESS>:8443:$ kubectl -n wazuh port-forward service/dashboard --address <KUBERNETES_HOST_IP_ADDRESS> 8443:443 > /tmp/wazuh-dashboard-port-forward.log 2>&1 &
Replace
<KUBERNETES_HOST_IP_ADDRESS>with the IP address of the Kubernetes endpoint:Refer to the verifying the deployment section to confirm the deployment is successful.
Verifying the deployment
Namespace
Run the following command to check that the Wazuh namespace is active:
$ kubectl get namespaces | grep wazuh
The command output looks similar to this:
wazuh Active 12m
Services
Run the command below to view all running services in the Wazuh namespace:
$ kubectl get services -n wazuh
The command output looks similar to this:
NAME                 TYPE        CLUSTER-IP       EXTERNAL-IP   PORT(S)             AGE
dashboard            ClusterIP   10.103.185.22    <none>        443/TCP             18h
wazuh-agents         ClusterIP   10.104.59.2      <none>        1517/TCP            18h
wazuh-api            ClusterIP   10.107.122.232   <none>        55000/TCP           18h
wazuh-cluster        ClusterIP   None             <none>        1516/TCP            18h
wazuh-events         ClusterIP   10.108.124.200   <none>        1514/TCP            18h
wazuh-indexer        ClusterIP   None             <none>        9300/TCP,9200/TCP   18h
wazuh-registration   ClusterIP   10.109.191.61    <none>        1515/TCP            18h
Deployments
Run the command below to check for the deployments in the Wazuh namespace:
$ kubectl get deployments -n wazuh
The command output looks similar to this:
NAME              READY   UP-TO-DATE   AVAILABLE   AGE
wazuh-dashboard   1/1     1            1           11m
StatefulSets
Run the command below to check the active StatefulSets in the Wazuh namespace:
$ kubectl get statefulsets -n wazuh
The command output looks similar to this:
NAME                   READY   AGE
wazuh-indexer          1/1     18h
wazuh-manager-master   1/1     18h
wazuh-manager-worker   1/1     18h
Pods
Run the command below to view the pods' status in the Wazuh namespace:
$ kubectl get pods -n wazuh
The command output looks similar to this:
NAME                              READY   STATUS    RESTARTS      AGE
wazuh-dashboard-79ccdf499-2k9lw   1/1     Running   0             18h
wazuh-indexer-0                   1/1     Running   0             18h
wazuh-manager-master-0            1/1     Running   3 (15h ago)   18h
wazuh-manager-worker-0            1/1     Running   1 (16h ago)   18h
Run the command below to confirm the Wazuh agent enrollment password string.
$ kubectl exec -it wazuh-manager-master-0 -n wazuh -- cat /wazuh-config-mount/etc/authd.pass
Accessing the Wazuh dashboard
On Amazon EKS, access the Wazuh dashboard at https://<EXTERNAL-IP>, using the load balancer hostname that you set in wazuh/base/ingressRoute-tcp-dashboard.yaml and in the dashboard node of config.yml. To use your own domain name instead, point it at the load balancer and use that name in both files before you generate the certificates and deploy.
Check the services to view the EXTERNAL-IP:
$ kubectl -n traefik get svc
The command output looks similar to this:
NAME      TYPE           CLUSTER-IP     EXTERNAL-IP                                                              PORT(S)                                                      AGE
traefik   LoadBalancer   10.100.34.51   a7ffe29bfcf38420988fd52a698be422-862207742.us-west-1.elb.amazonaws.com   443:30725/TCP,1517:31485/TCP,1514:32036/TCP,1515:30354/TCP   6m29s
Note
A local cluster has no Traefik service, so kubectl -n traefik get svc returns no resources. Use the dashboard port-forward you started in the last step of the Local cluster deployment section. If it is no longer running, for example after the dashboard pod was recreated, start it again:
$ kubectl -n wazuh port-forward --address <KUBERNETES_HOST_IP_ADDRESS> service/dashboard 8443:443 > /tmp/wazuh-dashboard-port-forward.log 2>&1 &
Replace <KUBERNETES_HOST_IP_ADDRESS> with the address you used in the Local cluster deployment section. The dashboard certificate matches that address only if it was added as an ip: entry to the dashboard node of config.yml when the certificates were generated. The browser also warns until you trust the deployment's root CA, wazuh/config/root-ca/certs/root-ca.pem.
Log in with the username admin and the password you read in the Generate credentials section. With the port-forward, the Wazuh dashboard is accessible at https://<KUBERNETES_HOST_IP_ADDRESS>:8443.
Deploying a Wazuh agent
This section provides steps to enroll a Wazuh agent in a Wazuh manager running in a Kubernetes environment and to deploy a Wazuh agent on Kubernetes.
Creating an enrollment token
Wazuh agents enroll with an enrollment token. The token carries the address that Wazuh agents use to reach the Wazuh manager on port 1517. Perform the following steps to generate an enrollment token for the Wazuh agent deployment.
On the Wazuh dashboard, click ☰ to open the menu and navigate to Agent management > Enrollment tokens. Click on Create token.
Fill in the following configuration information
Address: The address that the Wazuh agents use to reach the Wazuh manager. It must be one of the names in the Wazuh manager agent listener certificate, otherwise the token is refused with
address not in certificate SAN. For Wazuh agents deployed inside the cluster, usewazuh-agents.wazuh.svc.cluster.local. For Wazuh agents outside the cluster, use the TraefikEXTERNAL-IP(EKS) or<KUBERNETES_HOST_IP_ADDRESS>of the port-forward (local cluster); that address must have been added to the certificate with--agent-san <ADDRESS>when you rancertificates-conf.sh. Create one token for each address.Toggle Embed CA to include the CA certificate in the token.
Click Create Token.
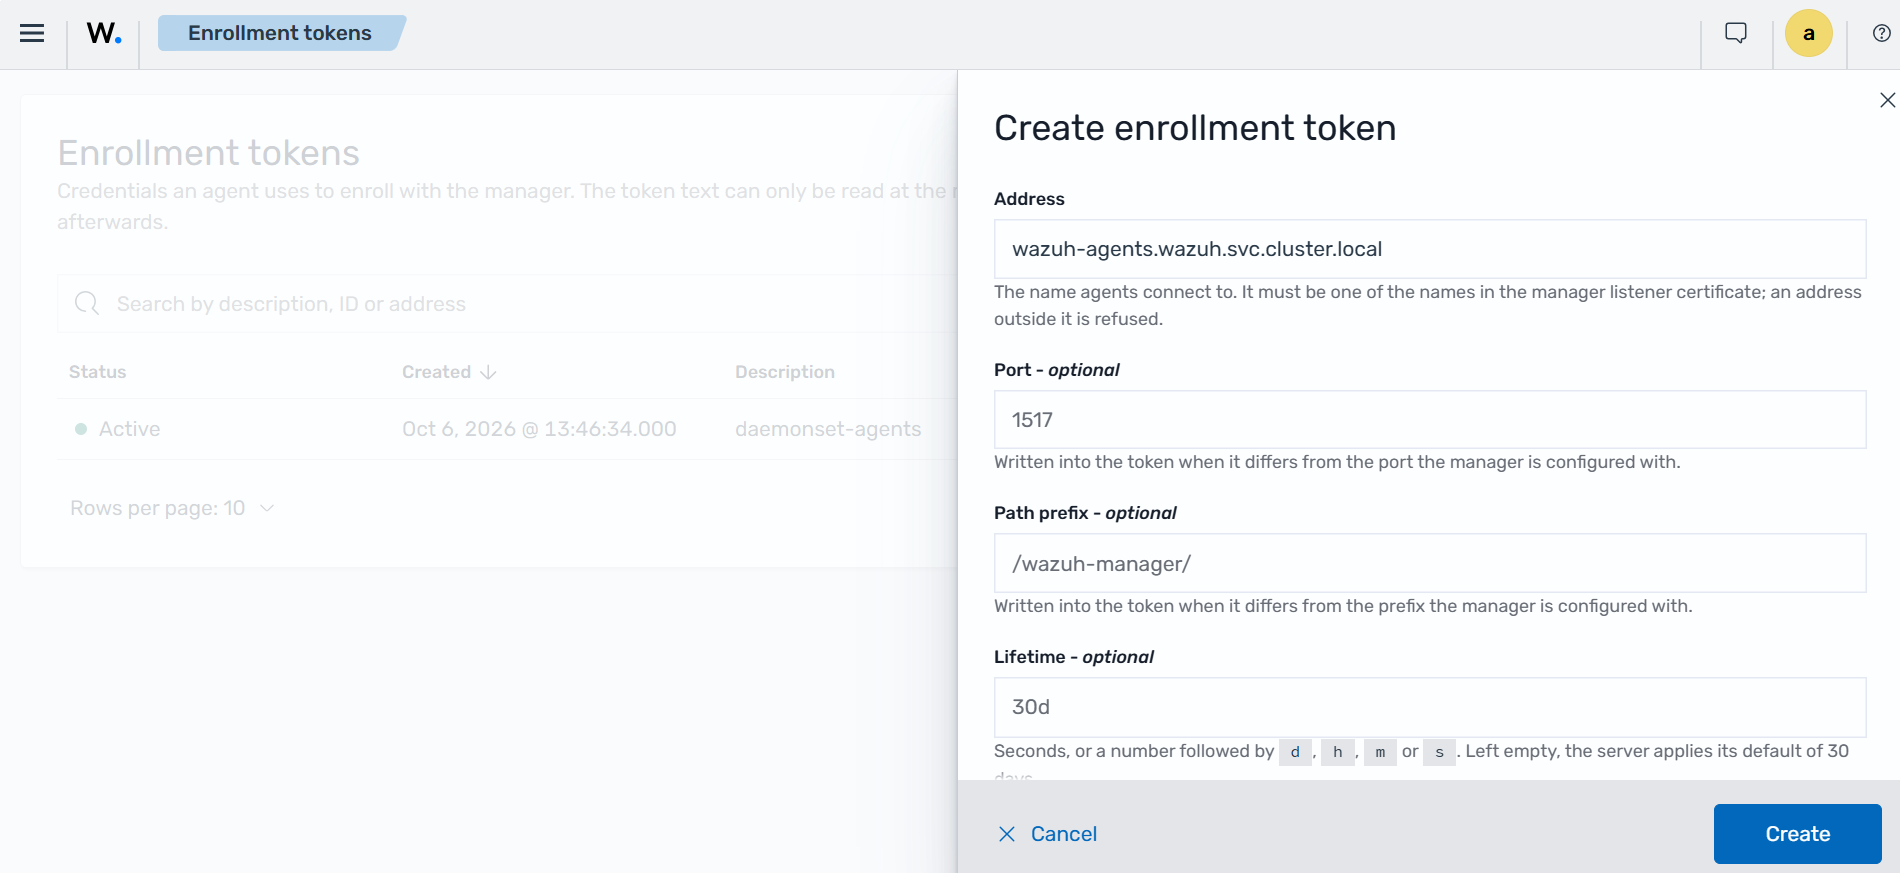
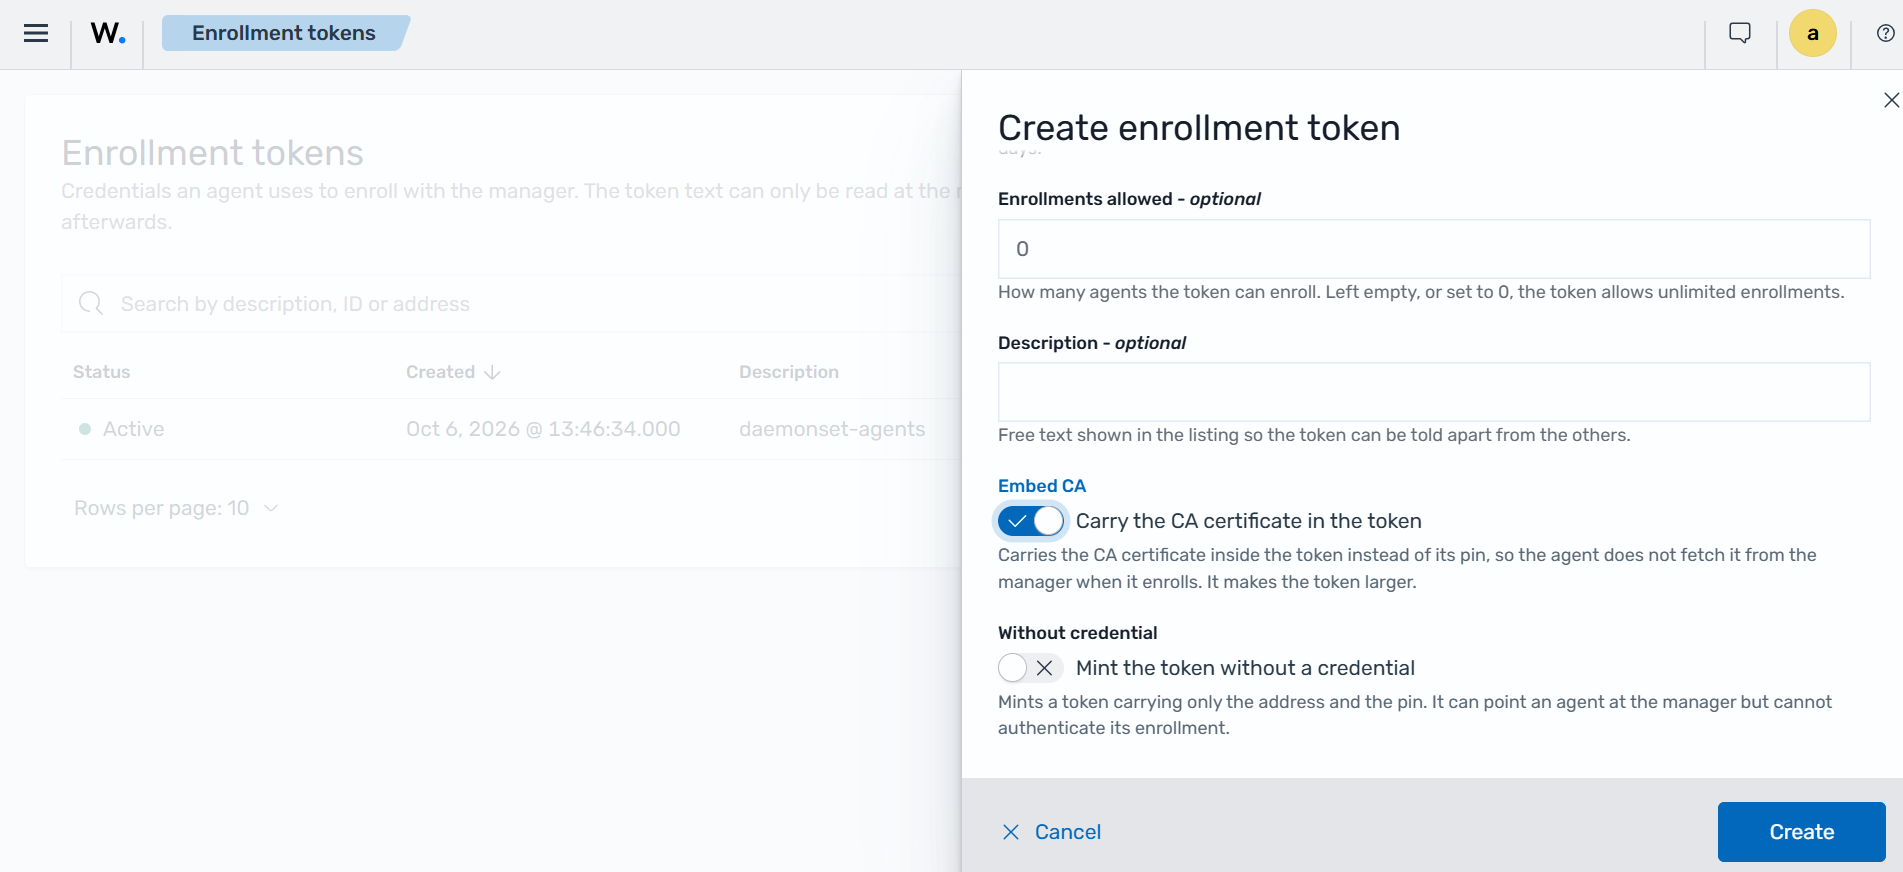
Copy the enrollment token. It is shown only when you create it. By default, a token is valid for 30 days, and any number of Wazuh agents can use it.
Enrolling a Wazuh agent
Follow the steps below to enroll a Wazuh agent outside the cluster in a Wazuh manager running in a Kubernetes environment.
Note the following Wazuh agent deployment variables to simplify the installation, enrollment, and configuration process of the Wazuh agent.
WAZUH_ENROLLMENT_TOKEN: The enrollment token generated for the agent deployment.WAZUH_AGENT_NAME: Name of the new Wazuh agent to be enrolled.
Use the deployment variables to install the Wazuh agent using the Wazuh agent installation guide. The example below shows the command to install the Wazuh agent on a Linux endpoint after adding the Wazuh repository.
$ sudo WAZUH_ENROLLMENT_TOKEN="<ENROLLMENT_TOKEN>" \
WAZUH_AGENT_NAME="<WAZUH_AGENT_NAME>" \
apt-get install -y wazuh-agent
Replace:
<ENROLLMENT_TOKEN>with the Wazuh agent enrollment token generated in the previous section.<WAZUH_AGENT_NAME>with the Wazuh agent name that will be used for enrollment.
Enable and start the Wazuh agent service with the following commands.
$ sudo systemctl daemon-reload
$ sudo systemctl enable wazuh-agent
$ sudo systemctl start wazuh-agent
Wazuh agent deployment on Kubernetes
The Wazuh agent can be deployed directly within your Kubernetes environment to monitor workloads, pods, and container activity. This setup provides visibility into the cluster’s runtime behavior, helping detect threats and configuration issues at the container and node levels.
There are two main deployment models for Wazuh agents in Kubernetes:
DaemonSet deployment where one Wazuh agent runs on each node to monitor the node and all containers on that node.
Sidecar deployment where the Wazuh agent runs as a companion container alongside a specific application pod to monitor that application only.
Allow agent traffic to the Wazuh manager
The wazuh namespace denies all ingress traffic by default (default-deny-all). Perform the following steps to allow Wazuh agents that run in other namespaces of the cluster to reach the Wazuh manager on port 1517. Wazuh agents outside the cluster are not affected: on EKS they arrive through Traefik, which is already allowed, and kubectl port-forward traffic is not subject to network policies.
Create the network policy manifest
allow-agents-to-manager-np.yaml.apiVersion: networking.k8s.io/v1 kind: NetworkPolicy metadata: name: allow-agents-to-manager namespace: wazuh spec: podSelector: matchLabels: app: wazuh-manager policyTypes: - Ingress ingress: - from: - namespaceSelector: {} ports: - port: 1517 protocol: TCP
Apply the manifest
allow-agents-to-manager-np.yaml.$ kubectl apply -f allow-agents-to-manager-np.yaml
Deploying the Wazuh agent as a DaemonSet
This is the most common approach for full-cluster monitoring. Each node runs one agent, ensuring complete coverage without manual intervention when new nodes are added.
Create the Wazuh agent DaemonSet manifest
wazuh-agent-daemonset.yaml:apiVersion: v1 kind: Namespace metadata: name: wazuh-daemonset --- apiVersion: v1 kind: Secret metadata: name: wazuh-enrollment-token namespace: wazuh-daemonset type: Opaque stringData: token: "<ENROLLMENT_TOKEN>" --- apiVersion: apps/v1 kind: DaemonSet metadata: name: wazuh-agent namespace: wazuh-daemonset spec: selector: matchLabels: app: wazuh-agent template: metadata: labels: app: wazuh-agent spec: automountServiceAccountToken: false terminationGracePeriodSeconds: 20 initContainers: # Clear stale PID/lock files left behind by an unclean restart - name: cleanup-ossec-stale image: busybox:1.36 imagePullPolicy: IfNotPresent command: ["/bin/sh", "-lc"] args: - | set -e mkdir -p /agent/var/run /agent/queue/ossec rm -f /agent/var/run/*.pid || true rm -f /agent/queue/ossec/*.lock || true volumeMounts: - name: ossec-data mountPath: /agent # Seed /var/ossec into the persistent hostPath on first run only, - name: prepare-ossec-tree image: wazuh/wazuh-agent:5.0.0-rc1 imagePullPolicy: IfNotPresent command: ["/bin/sh", "-lc"] args: - | set -e if [ ! -d /agent/bin ]; then cp -a /var/ossec/. /agent/ fi for d in etc logs queue var rids tmp "active-response"; do [ -d "/agent/$d" ] && chown -R wazuh:wazuh "/agent/$d" done chown -R 0:0 /agent/bin /agent/lib || true find /agent/bin -type f -exec chmod 0755 {} \; || true volumeMounts: - name: ossec-data mountPath: /agent containers: - name: wazuh-agent image: wazuh/wazuh-agent:5.0.0-rc1 imagePullPolicy: IfNotPresent env: - name: NODE_NAME valueFrom: fieldRef: fieldPath: spec.nodeName - name: WAZUH_AGENT_NAME value: "wazuh-agent-$(NODE_NAME)" - name: WAZUH_ENROLLMENT_TOKEN valueFrom: secretKeyRef: name: wazuh-enrollment-token key: token securityContext: runAsUser: 0 allowPrivilegeEscalation: true capabilities: add: ["SETGID", "SETUID"] volumeMounts: - name: varlog mountPath: /var/log readOnly: true - name: ossec-data mountPath: /var/ossec volumes: - name: varlog hostPath: path: /var/log type: Directory - name: ossec-data hostPath: path: /var/lib/wazuh type: DirectoryOrCreate
Replace:
<ENROLLMENT_TOKEN>with the Wazuh agent enrollment token generated in the previous section.
Deploy the Wazuh agent:
$ kubectl apply -f wazuh-agent-daemonset.yaml
Verify that the Wazuh agent is deployed across all nodes with the following command:
$ kubectl get pods -n wazuh-daemonset -o wide
The command output looks similar to this:
$ kubectl get pods -n wazuh-daemonset -o wide
NAME                READY   STATUS    RESTARTS   AGE   IP          NODE     NOMINATED NODE   READINESS GATES
wazuh-agent-t2fwl   1/1     Running   0          21m   10.42.0.9   server   <none>           <none>
Check your container runtime in the
CONTAINER-RUNTIMEcolumn ofkubectl get nodes -o wide.
Deploying the Wazuh agent as a Sidecar
The sidecar approach is ideal for targeted monitoring of sensitive applications or workloads that require isolated log collection. Perform the steps below to deploy Wazuh as a Sidecar:
Modify your application’s deployment to include the Wazuh agent container. In the example below, we deploy Wazuh alongside the Apache Tomcat application from the
wazuh-agent-sidecar.yamldeployment file:apiVersion: v1 kind: Namespace metadata: name: wazuh-sidecar --- apiVersion: v1 kind: Secret metadata: name: wazuh-enrollment-token namespace: wazuh-sidecar type: Opaque stringData: token: "<ENROLLMENT_TOKEN>" --- apiVersion: apps/v1 kind: StatefulSet metadata: name: tomcat-wazuh-agent namespace: wazuh-sidecar spec: serviceName: tomcat-app replicas: 1 selector: matchLabels: app: tomcat-wazuh-agent template: metadata: labels: app: tomcat-wazuh-agent spec: automountServiceAccountToken: false terminationGracePeriodSeconds: 20 initContainers: # Clear stale PID/lock files left behind by an unclean restart - name: cleanup-ossec-stale image: busybox:1.36 imagePullPolicy: IfNotPresent command: ["/bin/sh", "-lc"] args: - | set -e mkdir -p /agent/var/run /agent/queue/ossec rm -f /agent/var/run/*.pid || true rm -f /agent/queue/ossec/*.lock || true volumeMounts: - name: wazuh-agent-data mountPath: /agent # Seed /var/ossec into the PVC on first run only - name: prepare-ossec-tree image: wazuh/wazuh-agent:5.0.0-rc1 imagePullPolicy: IfNotPresent command: ["/bin/sh", "-lc"] args: - | set -e if [ ! -d /agent/bin ]; then cp -a /var/ossec/. /agent/ cat >> /agent/etc/ossec.conf <<'EOF' <ossec_config> <localfile> <log_format>syslog</log_format> <location>/usr/local/tomcat/logs/catalina.*.log</location> </localfile> </ossec_config> EOF fi for d in etc logs queue var rids tmp "active-response"; do [ -d "/agent/$d" ] && chown -R wazuh:wazuh "/agent/$d" done chown -R 0:0 /agent/bin /agent/lib || true find /agent/bin -type f -exec chmod 0755 {} \; || true volumeMounts: - name: wazuh-agent-data mountPath: /agent containers: - name: tomcat image: tomcat:10.1-jdk17 imagePullPolicy: IfNotPresent ports: - containerPort: 8080 volumeMounts: - name: application-data mountPath: /usr/local/tomcat/logs - name: wazuh-agent image: wazuh/wazuh-agent:5.0.0-rc1 imagePullPolicy: IfNotPresent lifecycle: preStop: exec: command: ["/bin/sh", "-lc", "/var/ossec/bin/wazuh-control stop || true; sleep 2"] env: - name: WAZUH_AGENT_NAME valueFrom: fieldRef: fieldPath: metadata.name - name: WAZUH_ENROLLMENT_TOKEN valueFrom: secretKeyRef: name: wazuh-enrollment-token key: token securityContext: runAsUser: 0 allowPrivilegeEscalation: true capabilities: add: ["SETGID", "SETUID"] volumeMounts: - name: wazuh-agent-data mountPath: /var/ossec - name: application-data mountPath: /usr/local/tomcat/logs volumeClaimTemplates: - metadata: name: wazuh-agent-data spec: accessModes: ["ReadWriteOnce"] # storageClassName: gp2 # set to your cluster's StorageClass (kubectl get sc) resources: requests: storage: 3Gi - metadata: name: application-data spec: accessModes: ["ReadWriteOnce"] # storageClassName: gp2 # uncomment to set to your cluster's StorageClass on EKS (kubectl get sc) resources: requests: storage: 5Gi --- apiVersion: v1 kind: Service metadata: name: tomcat-app namespace: wazuh-sidecar spec: selector: app: tomcat-wazuh-agent type: NodePort ports: - protocol: TCP port: 80 targetPort: 8080 nodePort: 30013
Replace:
<ENROLLMENT_TOKEN>with the Wazuh agent enrollment token generated in the previous section.
Deploy the sidecar setup:
$ kubectl apply -f wazuh-agent-sidecar.yaml
Run the command below to confirm that the
tomcat-wazuh-agentpod is running:$ kubectl get pods -n wazuh-sidecar
The command output looks similar to this:
NAME                           READY   STATUS     RESTARTS   AGE
tomcat-wazuh-agent-0   2/2     Running           0          18s