Deploying Wazuh agents on Windows endpoints
The Wazuh agent runs on the endpoint you want to monitor and communicates with the Wazuh manager, sending data in near real-time through an encrypted and authenticated channel. You can deploy the Wazuh agent on Windows 10 and 11, and Windows Server 2008 R2, 2012 R2, 2016, 2019, 2022, and 2025.
Before you start, create an enrollment token on the Wazuh manager, as described in Generate the enrollment token. The endpoint must reach the Wazuh manager on port 1517/TCP.
Note
You must have administrator privileges to perform the installation.
Download the Windows installer to start the installation process.
Select the installation method you want to follow: Command Line Interface (CLI) or Graphical User Interface (GUI).
Choose one of the command shell alternatives to deploy the Wazuh agent on your endpoint. Ensure the downloaded Wazuh agent installation file is in your working directory and run the following command.
Using CMD:
> start /wait wazuh-agent-5.0.0-rc1.msi /q WAZUH_ENROLLMENT_TOKEN="<ENROLLMENT_TOKEN>" WAZUH_AGENT_NAME="<AGENT_NAME>"
Using PowerShell:
> Start-Process -FilePath ".\wazuh-agent-5.0.0-rc1.msi" -ArgumentList '/q WAZUH_ENROLLMENT_TOKEN="<ENROLLMENT_TOKEN>" WAZUH_AGENT_NAME="<AGENT_NAME>"' -Wait
Replace
<ENROLLMENT_TOKEN>with the token you created in Generate the enrollment token, and<AGENT_NAME>with a name for this endpoint that no other agent uses, for example, its host name. If you omitWAZUH_AGENT_NAME, the agent enrolls under the endpoint's host name.For additional deployment options such as agent group, see the Deployment variables section.
Note
Alternatively, if you want to install an agent without enrolling it, omit the deployment variables. To learn more about the different enrollment methods, see the Wazuh agent enrollment section.
Start the Wazuh agent from the GUI or by running:
Using CMD:
> NET START WazuhSvcUsing PowerShell:
> Start-Service wazuhsvc
Check that the Wazuh agent is enrolled and connected. In PowerShell, run:
> Get-Service WazuhSvc
> Select-String -Path "C:\Program Files (x86)\ossec-agent\ossec.log" -Pattern "enrollment succeeded|ERR_|rejected|malformed|bootstrap failed"
Get-ServiceshowsRunning, andSelect-StringshowsToken bootstrap: enrollment succeeded. IfGet-ServiceshowsStopPendingorStoppedwithin a few seconds of the start, wait a few seconds and run it again.If the service stopped or the agent didn't enroll, the cause is one of these:
ERR_BAD_TOKEN: the installer refused the token, for example because it lost a character when you copied it. No token was stored, and the service stops when you start it.Enrollment rejected by the managerorEnrollment-token bootstrap failed: the Wazuh manager refused the token, for example a revoked or expired token, and the service stops.
In each case, enroll the agent with a valid token. In an administrator PowerShell, run:
> Set-Content -Path "<TOKEN_FILE_PATH>" -Value '<ENROLLMENT_TOKEN>' -Encoding ascii
> & "C:\Program Files (x86)\ossec-agent\wazuh-agent-auth.exe" --token-file "<TOKEN_FILE_PATH>"
> Remove-Item "<TOKEN_FILE_PATH>"
> Start-Service WazuhSvc
You can also uninstall the agent and reinstall it with a valid token. After
ERR_BAD_TOKEN, the agent enrolls under the endpoint's host name.Select-Stringkeeps showing the old failure lines above the new success line, becauseC:\Program Files (x86)\ossec-agent\ossec.logkeeps them.
In the Wazuh dashboard, Agents management > Summary lists the agent as Active. The installation process is now complete, and the Wazuh agent is successfully installed and configured.
Run the Windows installer. Accept the license agreement and click Install. On the last screen, select Run Agent configuration interface and click Finish. To open the agent GUI later, open the Start menu and select Manage Agent in the OSSEC folder. The agent GUI lets you configure the agent, open the log file, and start or stop the service.
In the agent GUI, go to Manage > Enroll, paste the enrollment token, and click OK. When asked Start the Wazuh agent service now?, click Yes. The GUI enrolls the agent under the computer's host name. To choose another name, use the CLI method and set
WAZUH_AGENT_NAME.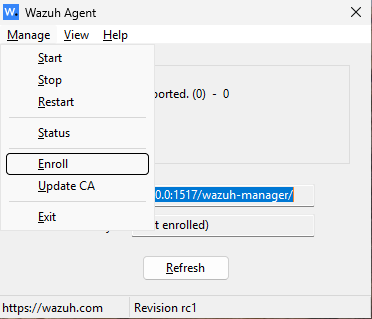
In the Wazuh dashboard, Agents management > Summary lists the agent as Active. The installation process is now complete, and the Wazuh agent is successfully installed on your Windows endpoint.
By default, all agent files are stored in C:\Program Files (x86)\ossec-agent after the installation.