Enroll Wazuh agents with password authentication
Password authentication requires a shared password during enrollment. The Wazuh manager accepts the enrollment request only when the Wazuh agent provides the configured password.
Wazuh 5.0 agents enroll with an enrollment token by default. See the Wazuh manager identity verification section. Password authentication is used by Wazuh 4.x agents, and by Wazuh 5.0 agents that have the password stored in the file set in <enrollment><authorization_pass_path>.
Follow the steps below to configure password authentication on different operating systems:
Prerequisites
Before a Wazuh agent can be enrolled in the Wazuh manager using the password authentication method, you must complete the following on the Wazuh manager:
Password authentication is enabled by default. The
<auth>section of the Wazuh manager configuration file/var/wazuh-manager/etc/wazuh-manager.confincludes the following setting:<auth> <use_password>yes</use_password> </auth>
Set a password to be used for Wazuh agent enrollment. You can achieve this in two ways:
Recommended - Set your password. This is done by creating the
/var/wazuh-manager/etc/authd.passfile on the Wazuh manager with your password.Replace
<CUSTOM_PASSWORD>with your chosen Wazuh agent enrollment password and run the following command:# echo "<CUSTOM_PASSWORD>" > /var/wazuh-manager/etc/authd.pass
Change the
authd.passfile permissions and ownership.# chmod 640 /var/wazuh-manager/etc/authd.pass # chown root:wazuh-manager /var/wazuh-manager/etc/authd.pass
Restart the Wazuh service for the changes to take effect.
# systemctl restart wazuh-manager
Alternatively, the Wazuh manager can generate a random enrollment password.
Restart the Wazuh manager service without creating the
/var/wazuh-manager/etc/authd.passfile manually:# systemctl restart wazuh-manager
Run the following command to confirm that the Wazuh manager generated the password:
# grep "etc/authd.pass" /var/wazuh-manager/logs/wazuh-manager.log
2026/07/09 16:15:06 wazuh-manager-authd: INFO: A new enrollment password was generated and written to 'etc/authd.pass'
Run the following command to view the generated password:
# cat /var/wazuh-manager/etc/authd.pass
3f1c9a7e52d84b60a9e1f2c7d4b8e05a6c3d9f1b7e2a4c8d0f5b6a9e3c7d1f20
Note
In a Wazuh manager cluster, the enrollment password belongs to the Wazuh master node and is distributed to the Wazuh worker nodes automatically. A Wazuh worker node rejects enrollment requests until it receives the password.
Once the above prerequisites are fulfilled, you can enroll the Wazuh agent using the steps corresponding to the OS running on the endpoints with the Wazuh agent installed.
Linux/Unix
Follow these steps to enroll a Linux/Unix endpoint with password authentication:
Launch the terminal with root permissions, and create the
/var/ossec/etc/authd.passfile with the Wazuh agent enrollment password in it.# echo "<CUSTOM_PASSWORD>" > /var/ossec/etc/authd.pass
Replace
<CUSTOM_PASSWORD>with the Wazuh agent enrollment password from the Wazuh manager.Set the file permissions for the
authd.passfile to 640, and the owner should be root. You can configure the permissions and ownership by running the commands below:# chmod 640 /var/ossec/etc/authd.pass # chown root:wazuh /var/ossec/etc/authd.pass # ll /var/ossec/etc/
The output below shows the recommended file owner and permissions.
-rw-r-----. 1 root wazuh 33 Jul 10 16:39 authd.pass
(Optional) To ensure the Wazuh agent can locate your password file if it is not in the default location (
/var/ossec/etc/authd.pass), include theauthorization_pass_pathsetting in the Wazuh agent configuration. Replace<PATH_TO_PASSWORD_FILE>with the filepath of the password file.<enrollment> <authorization_pass_path><PATH_TO_PASSWORD_FILE></authorization_pass_path> </enrollment>
Add the Wazuh manager IP address or fully qualified domain name (FQDN) in the Wazuh agent configuration file
/var/ossec/etc/ossec.conf. The setting depends on the Wazuh agent version:Wazuh 5.0 agents:
<ossec_config>
  <agent>
    <manager>
      <endpoint><WAZUH_MANAGER_IP_ADDRESS></endpoint>
    </manager>
  </agent>
</ossec_config>
Wazuh 4.x agents:
<ossec_config>
  <client>
    <server>
      <address><WAZUH_MANAGER_IP></address>
      ...
    </server>
  </client>
</ossec_config>
This will allow the Wazuh agent to enroll in the specified Wazuh manager.
Restart the Wazuh agent to make the changes effective:
# systemctl restart wazuh-agent
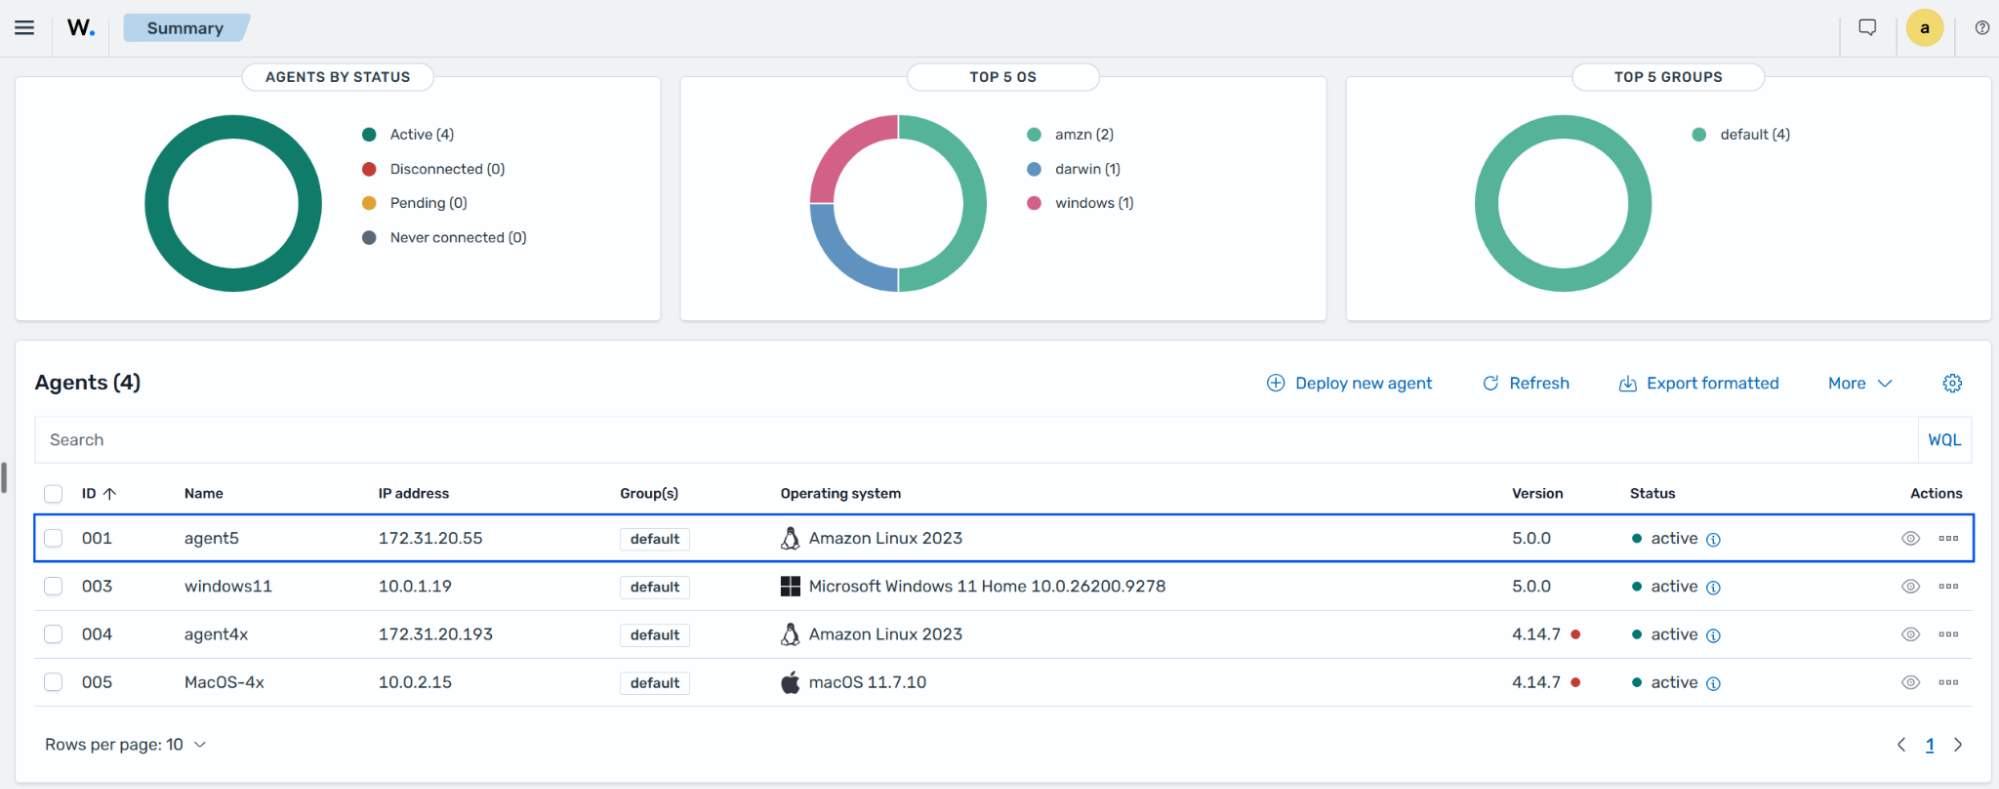
Click on the upper-left menu icon and navigate to Agents management > Summary on the Wazuh dashboard to check for the newly enrolled Wazuh agent and its connection status. If the enrollment was successful, the Wazuh dashboard displays an interface similar to the image below.
Windows
Follow these steps to enroll a Windows endpoint with password authentication:
The Wazuh agent installation directory depends on the host's architecture.
C:\Program Files (x86)\ossec-agentfor 64-bit systems.C:\Program Files\ossec-agentfor 32-bit systems.
Launch PowerShell as an administrator.
Create a file called
authd.passand save the password. Replace<CUSTOM_PASSWORD>with the Wazuh agent enrollment password created on the Wazuh manager.For 32-bit systems
> echo "<CUSTOM_PASSWORD>" > "C:\Program Files\ossec-agent\authd.pass"
For 64-bit systems
> echo "<CUSTOM_PASSWORD>" > "C:\Program Files (x86)\ossec-agent\authd.pass"
(Optional) To ensure the Wazuh agent can locate your password file if it is not in the default location (
C:\Program Files (x86)\ossec-agent\authd.pass), include theauthorization_pass_pathsetting in the Wazuh agent configuration. Replace<PATH_TO_PASSWORD_FILE>with the filepath of the password file.<enrollment> <authorization_pass_path><PATH_TO_PASSWORD_FILE></authorization_pass_path> </enrollment>
Add the Wazuh manager IP address or fully qualified domain name (FQDN) in the Wazuh agent configuration file in
C:\Program Files (x86)\ossec-agent\ossec.conf. The setting depends on the Wazuh agent version:Wazuh 5.0 agents:
<ossec_config>
  <agent>
    <manager>
      <endpoint><WAZUH_MANAGER_IP_ADDRESS></endpoint>
    </manager>
  </agent>
</ossec_config>
Wazuh 4.x agents:
<ossec_config>
  <client>
    <server>
      <address><WAZUH_MANAGER_IP_ADDRESS></address>
      ...
    </server>
  </client>
</ossec_config>
This will allow the Wazuh agent to enroll in the specified Wazuh manager.
Restart the Wazuh agent to make the changes effective.
> Restart-Service -Name wazuh
> net stop wazuh
> net start wazuh
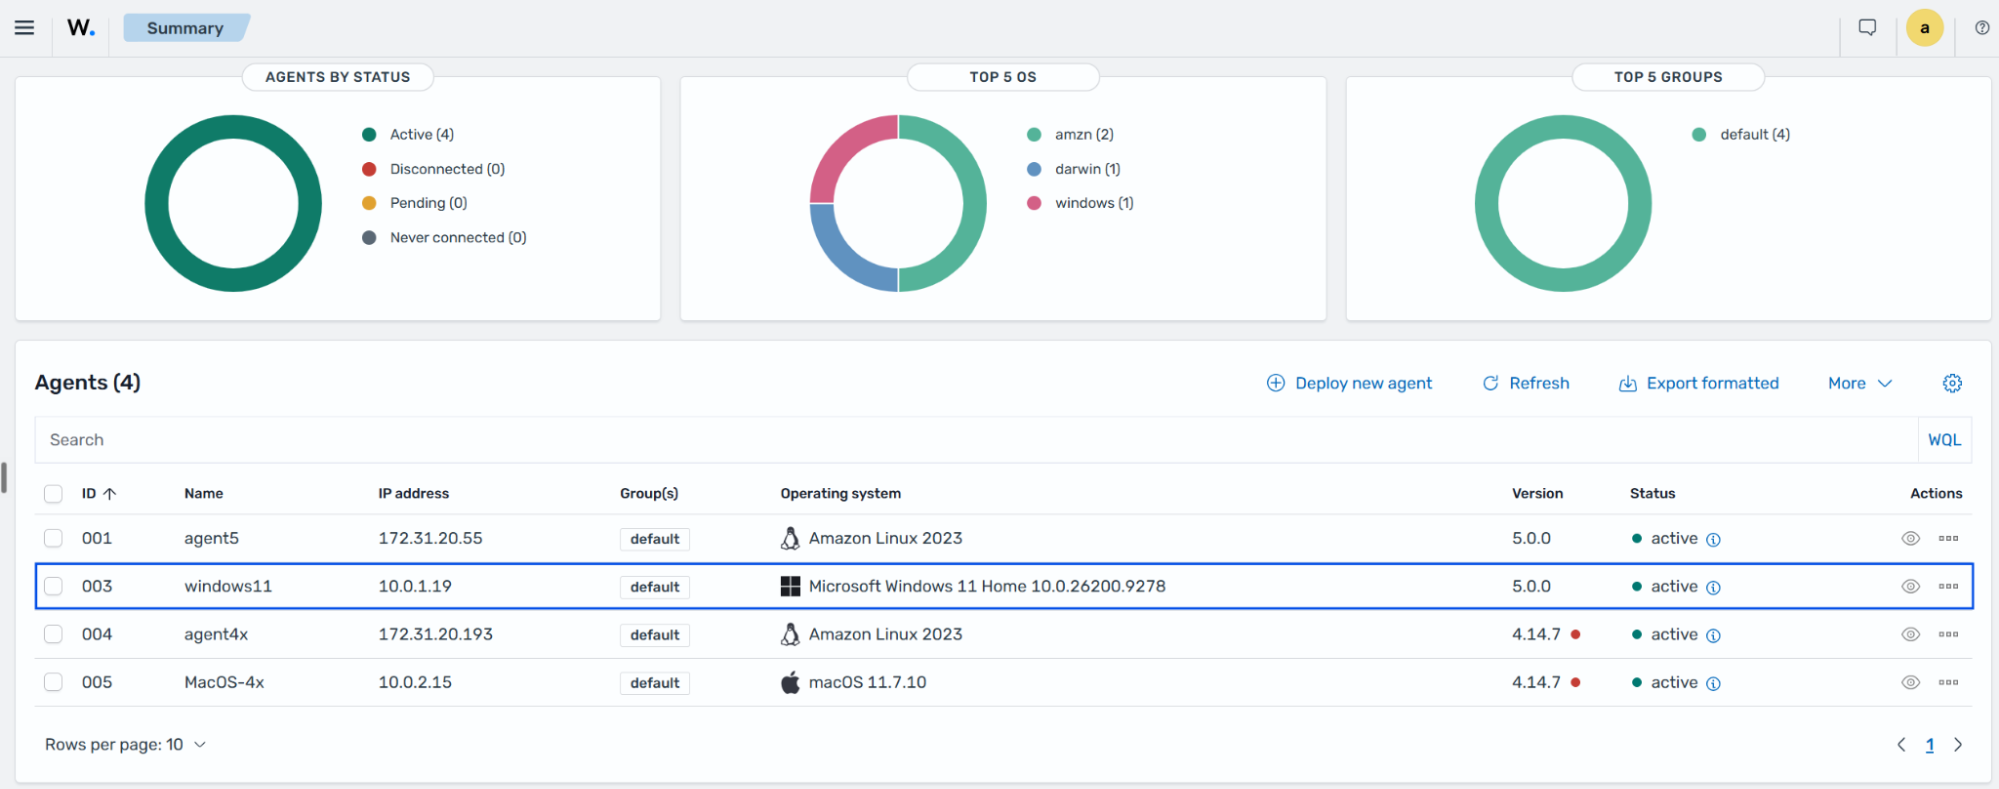
Click on the upper-left menu icon and navigate to Agents management > Summary on the Wazuh dashboard to check for the newly enrolled Wazuh agent and its connection status. If the enrollment was successful, the Wazuh dashboard displays an interface similar to the image below.
macOS
Follow the steps below to enroll a macOS endpoint with password authentication:
Launch the terminal with root permissions, create a file called
/Library/Ossec/etc/authd.pass, and save the password to it:# echo "<CUSTOM_PASSWORD>" > /Library/Ossec/etc/authd.pass
Replace
<CUSTOM_PASSWORD>with the Wazuh agent enrollment password created on the Wazuh manager.Set the file permissions for the
authd.passfile to 640, and the owner should be root. Configure the permissions and ownership by running the commands below:# chmod 640 /Library/Ossec/etc/authd.pass # chown root:wazuh /Library/Ossec/etc/authd.pass
The output below shows the recommended file owner and permissions:
-rw-r----- 1 root wazuh 33 Jul 09 20:26 /Library/Ossec/etc/authd.pass
(Optional) To ensure the Wazuh agent can locate your password file if it is not in the default location (
/Library/Ossec/etc/authd.pass), include theauthorization_pass_pathsetting in the Wazuh agent configuration. Replace<PATH_TO_PASSWORD_FILE>with the filepath of the password file.<enrollment> <authorization_pass_path><PATH_TO_PASSWORD_FILE></authorization_pass_path> </enrollment>
Add the Wazuh manager IP address or fully qualified domain name (FQDN) in the Wazuh agent configuration file
/Library/Ossec/etc/ossec.conf. The setting depends on the Wazuh agent version:Wazuh 5.0 agents:
<ossec_config>
  <agent>
    <manager>
      <endpoint><WAZUH_MANAGER_IP_ADDRESS></endpoint>
    </manager>
  </agent>
</ossec_config>
Wazuh 4.x agents:
<ossec_config>
  <client>
    <server>
      <address><WAZUH_MANAGER_IP_ADDRESS></address>
      ...
    </server>
  </client>
</ossec_config>
This will allow the Wazuh agent to enroll in the specified Wazuh manager.
Restart the Wazuh agent to make the changes effective:
# /Library/Ossec/bin/wazuh-control restart
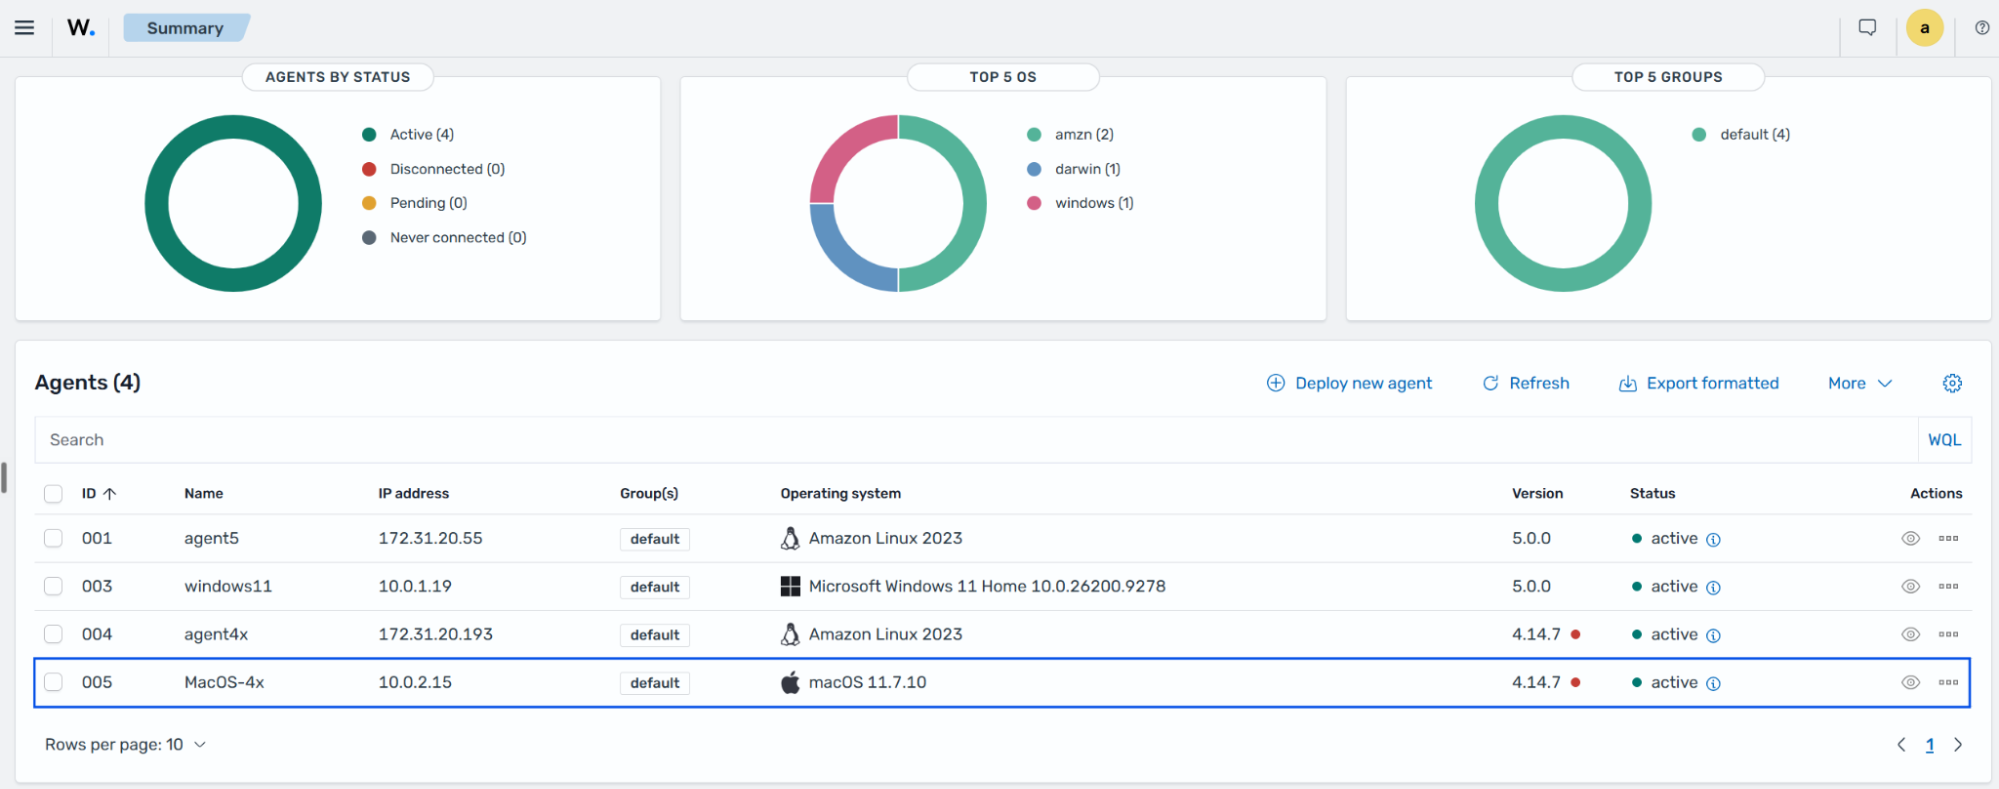
Click on the upper-left menu icon and navigate to Agents management > Summary on the Wazuh dashboard to check for the newly enrolled Wazuh agent and its connection status. If the enrollment was successful, the Wazuh dashboard displays an interface similar to the image below.