Group agents
There are two methods for grouping enrolled Wazuh agents. They can either be configured locally with the Wazuh agent configuration file or remotely using the centralized configuration. If the centralized configuration is used, Wazuh agents may be assigned to groups where each group possesses a unique configuration. This greatly simplifies the overall configuration process.
Note
Refer to the agent groups and centralized configuration blog post for more information.
Unless otherwise assigned, all newly connected Wazuh agents automatically belong to the 'default' group. This group is created during the installation process with the configuration files placed in the /var/wazuh-manager/etc/shared/default/ folder on the Wazuh manager. These files will be pushed from the Wazuh manager to all Wazuh agents belonging to this group.
Each group has a configuration file /var/wazuh-manager/etc/shared/<GROUP_NAME>/agent.conf located on the Wazuh manager, where <GROUP_NAME> is the name of the agent group. This file is empty by default, and here, you can define centralized agent configurations. After creating a group, you can modify the group's configuration file to apply configurations to all agents in that group.
Creating agent groups
There are three methods for creating agent groups which include:
The Wazuh dashboard
To create agent groups from the Wazuh dashboard:
Navigate to Agents management > Groups and click the Add new group button.
Enter a name for the agent group and click on the Save new group button.
The agent_groups tool
The agent_groups tool offers the ability to create and manage Wazuh agent groups directly from the command line. The tool is used as follows to create a Wazuh agent group:
Note
You need root user privileges to execute the commands below.
# /var/wazuh-manager/bin/agent_groups -a -g <GROUP_NAME> -q
Where:
The flag
-a-gadds a group.The
<GROUP_NAME>indicates a unique group name. Replace<GROUP_NAME>with the name of the group you want to create.The flag
-qtriggers the silent or no confirmation mode.
Run the following commands on the Wazuh manager to create the agent groups Windows, macOS, and Linux:
# /var/wazuh-manager/bin/agent_groups -a -g Windows -q
# /var/wazuh-manager/bin/agent_groups -a -g macOS -q
# /var/wazuh-manager/bin/agent_groups -a -g Linux -q
An example output is as follows:
Group 'Windows' created.
To ensure the groups are created correctly, run the following command to list all existing groups:
# /var/wazuh-manager/bin/agent_groups -l
An example output is as follows:
Groups (5):
  Linux (0)
  Test (0)
  Windows (0)
  default (4)
  macOS (0)
Unassigned agents: 0.
The Wazuh manager API
Using the Wazuh manager API to create and manage groups programmatically is effective for automating group management tasks. Perform the steps below to create agent groups using the Wazuh manager API:
On the Wazuh dashboard, navigate to Server management, and select Dev Tools.
Run the queries below to create the agent groups
Windows,macOS, andLinux:POST /groups {"group_id": "Windows"} POST /groups {"group_id": "macOS"} POST /groups {"group_id": "Linux"}
You can also use the command line interface to create agent groups via the Wazuh manager API. The equivalent command to run from the console with root user privileges to create the
Linuxgroup would be:# curl -k -X POST "https://<WAZUH_MANAGER_IP>:55000/groups?pretty=true" -H "Content-Type: application/json" -d '{"group_id": "Linux"}' -H "Authorization: Bearer $(curl -u <WAZUH_MANAGER_API_USER>:<WAZUH_MANAGER_API_PASSWORD> -k -X POST 'https://<WAZUH_MANAGER_IP>:55000/security/user/authenticate?raw=true')"
Replace:
The
<WAZUH_MANAGER_IP>variable with the IP address of your Wazuh manager. In case you have a distributed deployment, use the IP address of the master node.The
<WAZUH_MANAGER_API_USER>variable with your Wazuh manager API username.The
<WAZUH_MANAGER_API_PASSWORD>variable with the password of your Wazuh manager API user.
The output of the command is as follows:
{
   "message": "Group 'Linux' created.",
   "error": 0
}
Assigning agents to a group
Below are the steps to assign agents to a group with a specific configuration:
Once a Wazuh agent has been added and connected to the Wazuh manager, assign it to a group using the
/var/wazuh-manager/bin/agent_groupstool or the Wazuh manager API. Below are examples of how to assign a Wazuh agent with ID016to the groupdbmsusing these methods:Using the
/var/wazuh-manager/bin/agent_groupstool on the Wazuh manager:# /var/wazuh-manager/bin/agent_groups -a -i 016 -g dbms
Note
The group must be created and configured before assigning agents. You can create agent groups using the /var/wazuh-manager/bin/agent_groups tool. The group name can only contain upper/lower case letters, numbers, dots, underscores, and hyphens.
Using the Wazuh manager API endpoint PUT /agents/{agent_id}/group/{group_id}:
# curl -k -X PUT "https://<WAZUH_MANAGER_IP>:55000/agents/016/group/dbms?pretty=true" -H "Authorization: Bearer $(curl -u <WAZUH_MANAGER_API_USER>:<WAZUH_MANAGER_API_PASSWORD> -k -X POST 'https://<WAZUH_MANAGER_IP>:55000/security/user/authenticate?raw=true')"
Output
{
   "data": {
      "affected_items": [
         "016"
      ],
      "total_affected_items": 1,
      "total_failed_items": 0,
      "failed_items": []
   },
   "message": "All selected agents were assigned to dbms",
   "error": 0
}
Agents assigned to a group can be checked using one of the following commands:
Using
/var/wazuh-manager/bin/agent_groups:# /var/wazuh-manager/bin/agent_groups -l -g dbms
Output
1 agent(s) in group 'dbms':
  ID: 016  Name: CentOS.
Using the Wazuh manager API endpoint GET /groups/{group_id}/agents:
# curl -k -X GET "https://<WAZUH_MANAGER_IP>:55000/groups/dbms/agents?pretty=true&select=id,name" -H "Authorization: Bearer $(curl -u <WAZUH_MANAGER_API_USER>:<WAZUH_MANAGER_API_PASSWORD> -k -X POST 'https://<WAZUH_MANAGER_IP>:55000/security/user/authenticate?raw=true')"
Output
{
   "data": {
      "affected_items": [
         {
            "name": "CentOS",
            "id": "016"
         }
      ],
      "total_affected_items": 1,
      "total_failed_items": 0,
      "failed_items": []
   },
   "message": "All selected agents information was returned",
   "error": 0
}
Once a group is created, its
agent.conffile can be edited to include the specific configuration you wish to assign to this group. For this example, for a group named dbms, the file to be edited is located at/var/wazuh-manager/etc/shared/dbms/agent.confon the Wazuh manager and each agent belonging to this group will receive this file.After connecting to the Wazuh manager, each agent assigned to the group will receive the files contained in the
/var/wazuh-manager/etc/shared/dbms/folder from the Wazuh manager, including theagent.conffile that was modified in the previous step. The length of time it takes for the Wazuh manager to push these files to the Wazuh agents depends on the size of the files, the number of agents in the group, and the connection protocol used. For example, depending on network bandwidth and performance, it may take 8 minutes to receive a 10 MB folder (excluding merged.mg file) on 100 agents using UDP. However, if TCP is used, it may take less time.Once a specific agent belongs to a group, it will not be automatically reassigned to this group even if it is re-enrolled under another name or ID. After re-enrollment, it will be added to the default group which is the default behavior. If you want the Wazuh agent to be automatically reassigned after re-enrollment, it must be explicitly configured by the user in the
/var/ossec/etc/local_internal_options.conffile on the Wazuh agent by adding the optionremoted.guess_agent_group=1(see section remoted in internal options).When this option is added, on re-enrollment, the checksum of the
merged.mgfile sent by the Wazuh agent is compared with that of the other agents enrolled with the Wazuh manager.
merged.mg
When a Wazuh agent is enrolled in the Wazuh manager for the first time, the Wazuh manager generates a merged.mg file based on the Wazuh agent's configuration and group membership. Whenever the Wazuh agent's configuration or group membership changes, the Wazuh manager updates the merged.mg file and sends it to the Wazuh agent.
The merged.mg file plays a role in automatic re-assignment of agents to their original groups after re-enrollment (with the remoted.guess_agent_group=1 option enabled). The checksum of the merged.mg file is used for comparison with other agents to determine the appropriate group.
On the Wazuh manager, the file is located at var/wazuh-manager/etc/shared/<GROUP_NAME>/merged.mg.
On the Wazuh agent, it is located at /var/ossec/etc/shared/merged.mg for Linux and C:\Program Files (x86)\ossec-agent\shared\merged.mg on Windows.
Manage multiple groups
Agents can be members of multiple groups. When a Wazuh agent is associated with multiple groups, it will receive configuration files from each group. However, the configuration received from the most recently assigned group takes precedence over those from other groups.
The following activities can be carried out when managing multiple Wazuh agent groups.
The /var/wazuh-manager/bin/agent_groups tool and the Wazuh manager API help to manage agent groups by listing them and allowing them to assign/change/unassign groups to Wazuh agents. We explore two use cases managing multiple groups over existing Wazuh agents.
Assign multiple groups to a Wazuh agent
There are two methods to assign a Wazuh agent to one or more groups:
Using the Wazuh manager API
In this example, agent 012 has been added to the webserver and apache groups using the Wazuh manager API endpoint PUT /agents/{agent_id}/group/{group_id}:
# curl -k -X PUT "https://<WAZUH_MANAGER_IP>:55000/agents/012/group/webserver?pretty=true" -H "Authorization: Bearer $TOKEN"
Output
{
   "data": {
      "affected_items": [
         "012"
      ],
      "total_affected_items": 1,
      "total_failed_items": 0,
      "failed_items": []
   },
   "message": "All selected agents were assigned to webserver",
   "error": 0
}
# curl -k -X PUT "https://<WAZUH_MANAGER_IP>:55000/agents/012/group/apache?pretty=true" -H "Authorization: Bearer $TOKEN"
Output
{
   "data": {
      "affected_items": [
         "012"
      ],
      "total_affected_items": 1,
      "total_failed_items": 0,
      "failed_items": []
   },
   "message": "All selected agents were assigned to apache",
   "error": 0
}
Following this, we can query for groups to which a Wazuh agent belongs using the Wazuh manager API endpoint GET /agents <operation/api.controllers.agent_controller.get_agents>:
# curl -k -X GET "https://<WAZUH_MANAGER_IP>:55000/agents?pretty=true&agents_list=012&select=group" -H "Authorization: Bearer $TOKEN"
Output
{
   "data": {
      "affected_items": [
         {
            "id": "012",
            "group": [
               "default",
               "webserver",
               "apache"
            ]
         }
      ],
      "total_affected_items": 1,
      "total_failed_items": 0,
      "failed_items": []
   },
   "message": "All selected agents information was returned",
   "error": 0
}
In this case, the remote configuration for the group apache takes precedence over the three groups when a conflict exists on any configuration parameter.
Using the CLI (agent_groups tool)
With the CLI /var/wazuh-manager/bin/agent_groups tool, Wazuh agents can be assigned to groups in the same way. In this example, the agent 001 is added to the webserver group:
$ /var/wazuh-manager/bin/agent_groups -a -i 016 -g webserver
Output
Do you want to add the group 'webserver' to the agent '016'? [y/N]: y
Group 'webserver' added to agent '016'.
$ /var/wazuh-manager/bin/agent_groups -a -i 001 -g apache
Output
Do you want to add the group 'apache' to the agent '016'? [y/N]: y
Group 'apache' added to agent '016'.
List groups and configuration
It is possible to query agents belonging to groups in real-time, and the configuration and shared files applied to each one, depending on which groups they belong to.
For example, to list the Wazuh agents in the webserver group, we could run the following query using the /var/wazuh-manager/bin/agent_groups tool:
# /var/wazuh-manager/bin/agent_groups -l -g webserver
Output
root@manager:/var/wazuh-manager/bin# /var/wazuh-manager/bin/agent_groups -l -g webserver
2 agent(s) in group 'webserver':
  ID: 012  Name: Ubuntu.
  ID: 016  Name: CentOS.
We can also query which groups the Wazuh agent 001 is a member of:
# /var/wazuh-manager/bin/agent_groups -s -i 012
Output
The agent 'Ubuntu' with ID '012' belongs to groups: default, webserver, apache.
The priority of the groups increases from the left to the right, meaning the last group has the highest priority. In the example above, apache is the group that has the highest priority.
Make changes to group assignment
Just as agents can be assigned to multiple groups, it is also possible to revert assignments and switch between available groups. The command below removes the Wazuh agent 012 from the apache group:
# /var/wazuh-manager/bin/agent_groups -r -i 001 -g apache -q
Output
Agent '012' removed from apache.
To verify the successful removal from the group, run this command on the Wazuh manager to check which groups Wazuh agent 001 belongs to.
# /var/wazuh-manager/bin/agent_groups -s -i 012
Output
The agent 'Ubuntu' with ID '012' belongs to groups: default, webserver.
It is also possible to switch between groups and overwrite the existing assignment:
# /var/wazuh-manager/bin/agent_groups -s -i 012
Output
The agent 'Ubuntu' with ID '012' belongs to groups: default, webserver.
From the output above, the Wazuh agent has the existing group assignment: default, webserver.
# /var/wazuh-manager/bin/agent_groups -a -f -i 012 -g apache
Output
Do you want to add the group 'apache' to the agent '012'? [y/N]: y
Group 'apache' added to agent '012'.
The previous group assignment has been overwritten and changed to apache.
# /var/wazuh-manager/bin/agent_groups -s -i 012
Output
The agent 'Ubuntu' with ID '012' belongs to groups: apache.
The -f parameter resets the groups assigned to the Wazuh agent and forces it to belong only to the new group.
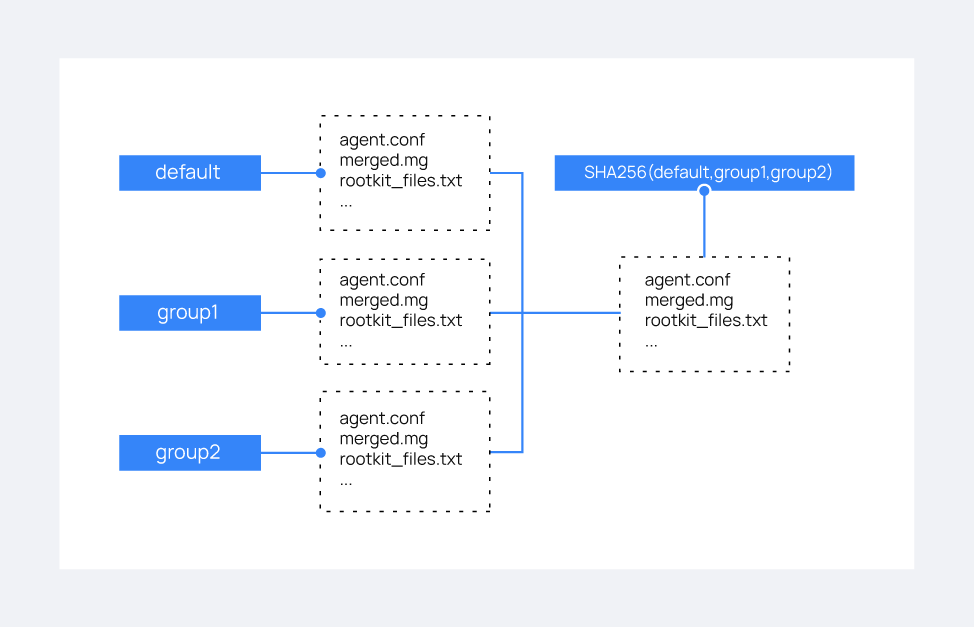
Shared files behavior
As previously mentioned, the Wazuh manager shares configuration files with its agents according to their group. In the case of belonging to multiple groups, the configuration files of every group are merged into one following these criteria:
Shared files, such as CIS benchmarks for rootkit detection, are joined in the shared folder. If there are repeated files, the last one added will overwrite the old ones.
The new
agent.conffile added is appended to the existing one. When two groups have conflicting configurations, the last group assigned to the Wazuh agent will take precedence. Learn more about the configuration precedence in centralized configuration manual.Custom shared files set from the user to a particular group are also joined to send them to the Wazuh agents.