GDPR IV, Controller and processor
In this chapter, the GDPR sets out requirements for managing, controlling, and processing personal data.
Chapter IV, Article 24, Head 2
Responsibility of the controller, Head 2: “Where proportionate in relation to processing activities, the measures referred to in paragraph 1 shall include the implementation of appropriate data protection policies by the controller.”
This article requires that adequate technical and organizational measures be in place to assist in complying with data security and protection policies. Therefore, the entity responsible for processing and storing data must comply with these policies.
The Wazuh Security Configuration Assessment (SCA) module performs configuration assessments to verify that endpoints comply with security policies, standards, and hardening guides. Refer to the SCA documentation for more information about configuring SCA checks.
Use case: Ensure that the shadow group is empty
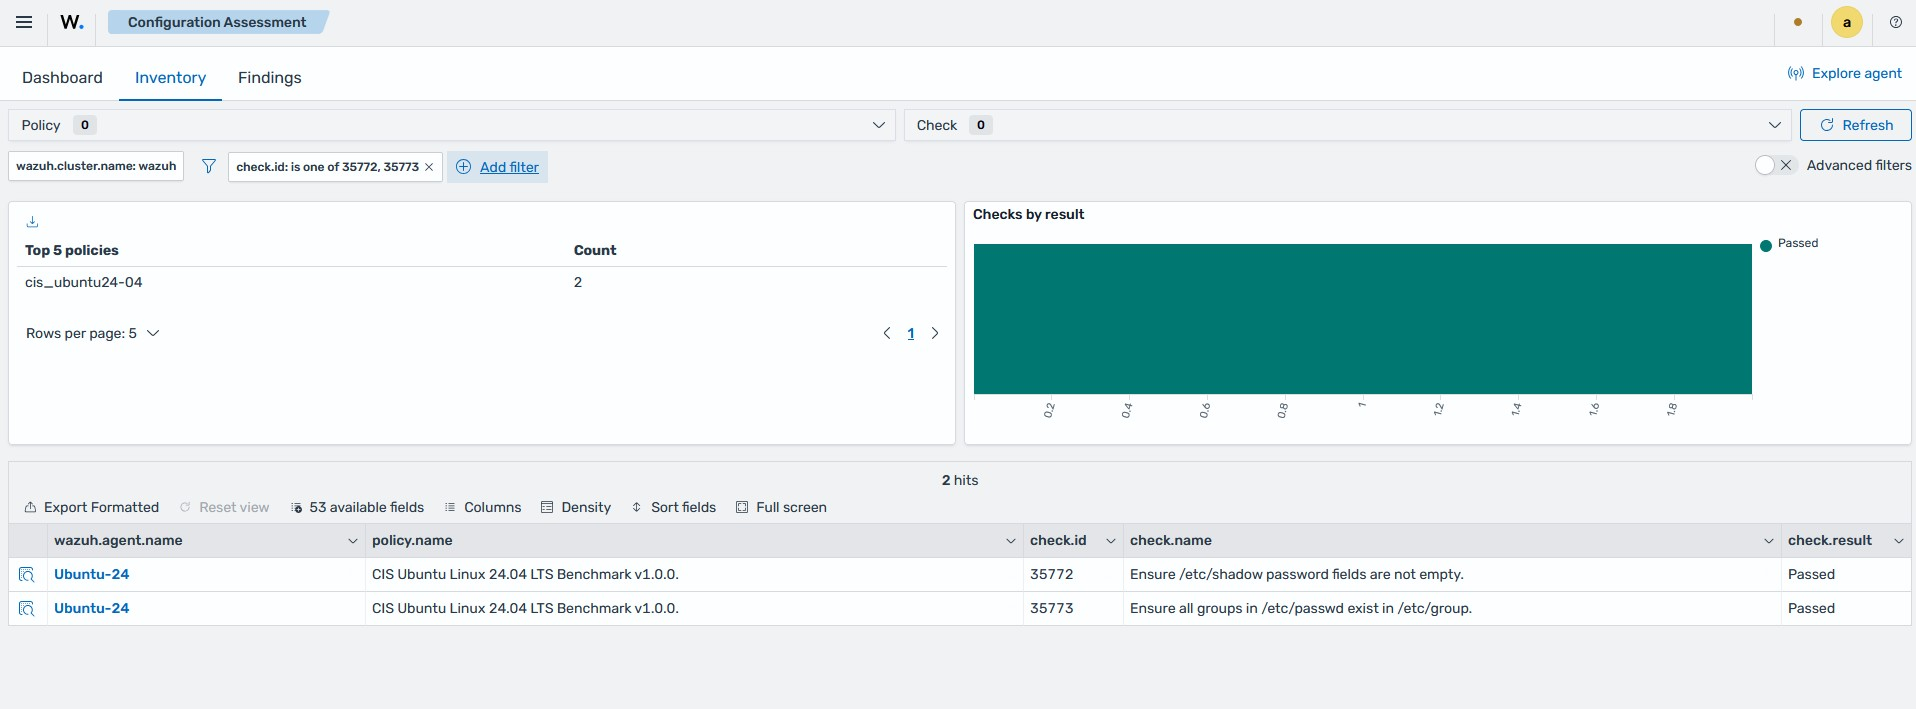
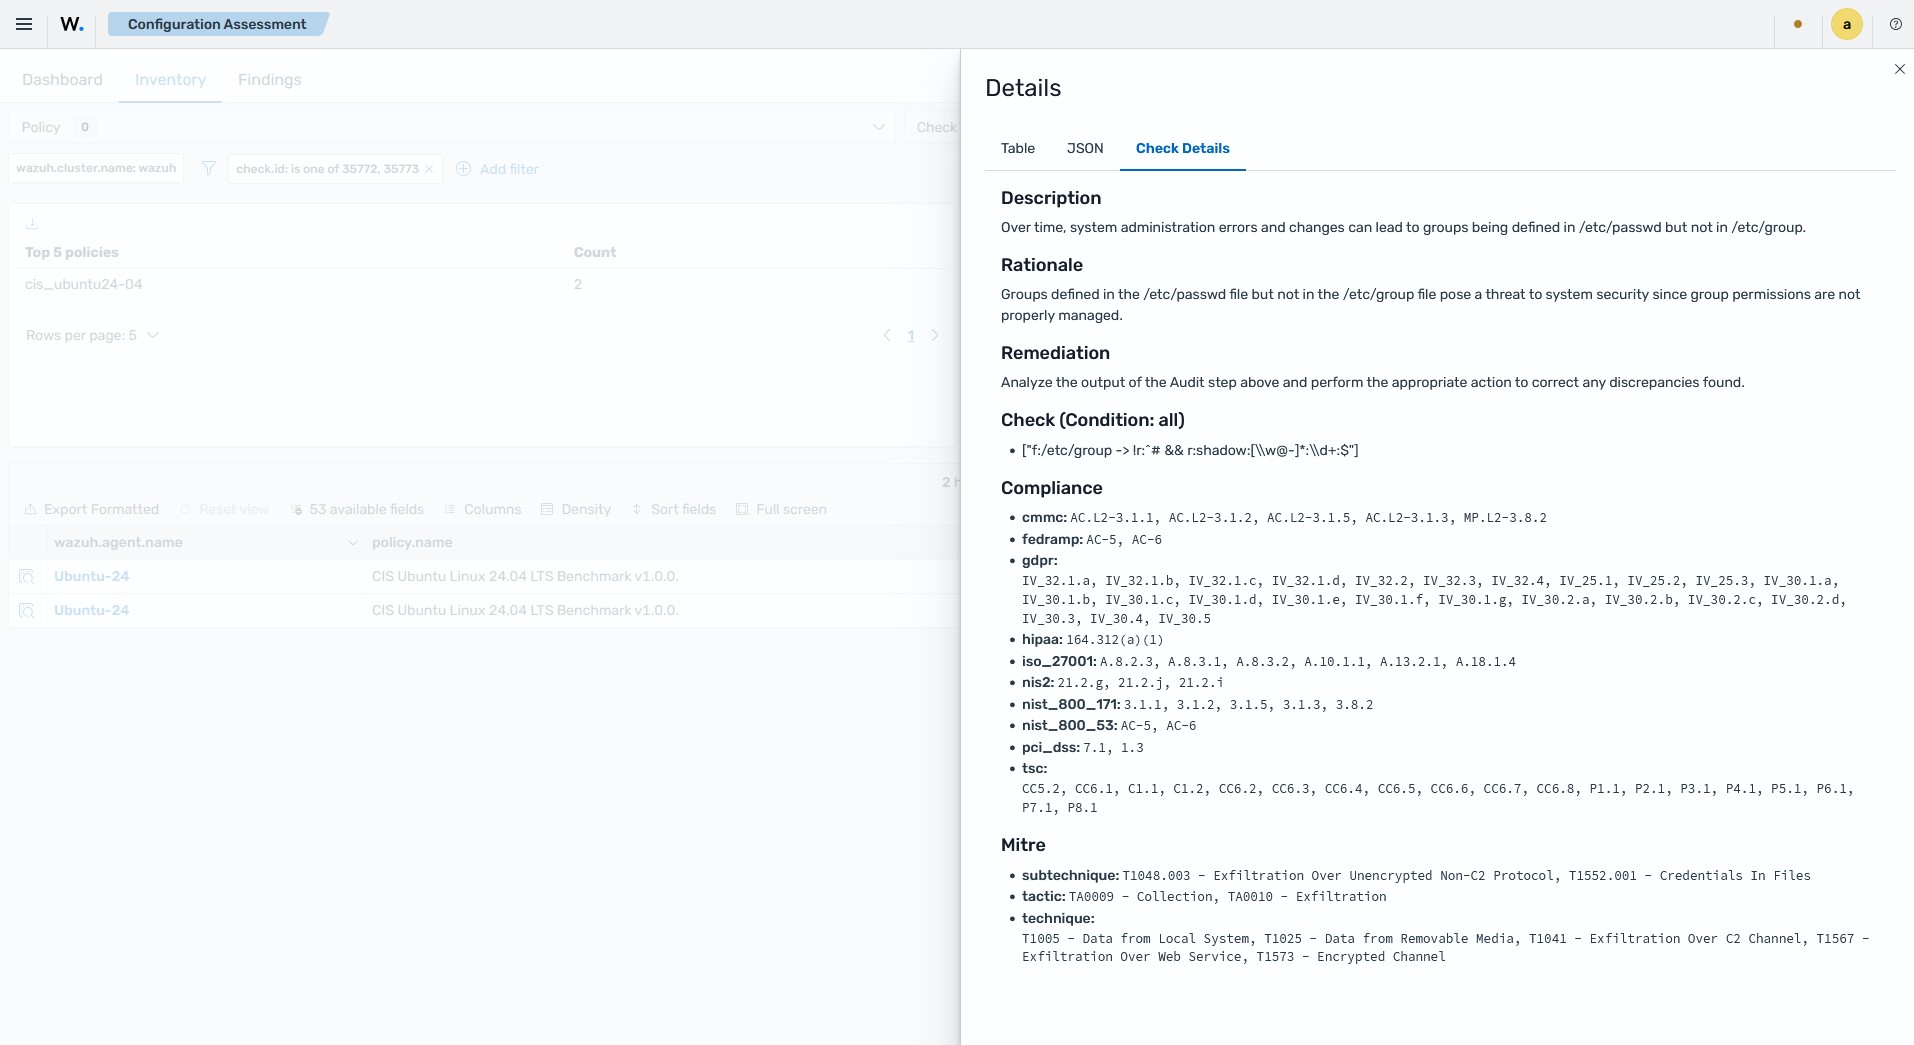
In this use case, Wazuh runs an SCA check to determine whether any users are assigned to the shadow group on an Ubuntu 24.04 endpoint. The /etc/shadow file in Linux systems stores encrypted user passwords. Any user in the shadow group can read the contents of the /etc/shadow file. Unauthorized access to this file can lead to system compromise by malicious actors. The SCA check ID is 35773. The check passes when the shadow group in /etc/group has no members.
The following image shows the result of the SCA check on the Wazuh dashboard.
Chapter IV, Article 28, Head 3 (c)
Processor, Head 3 (c): “Processing by a processor shall be governed by a contract or other legal act under Union or Member State law, that is binding on the processor with regard to the controller and that sets out the subject-matter and duration of the processing, the nature and purpose of the processing, the type of personal data and categories of data subjects and the obligations and rights of the controller. That contract or other legal act shall stipulate, in particular, that the processor: takes all measures required pursuant to Article 32.”
According to this article, organizational and technical safeguards must be in place to protect data during processing. This is necessary to avoid any unauthorized alterations.
The Wazuh FIM module helps you meet these protection measures. It logs information about who modified the data, when the modification occurred, and all related events that affect the data of interest.
Use case: Detect changes to file attributes
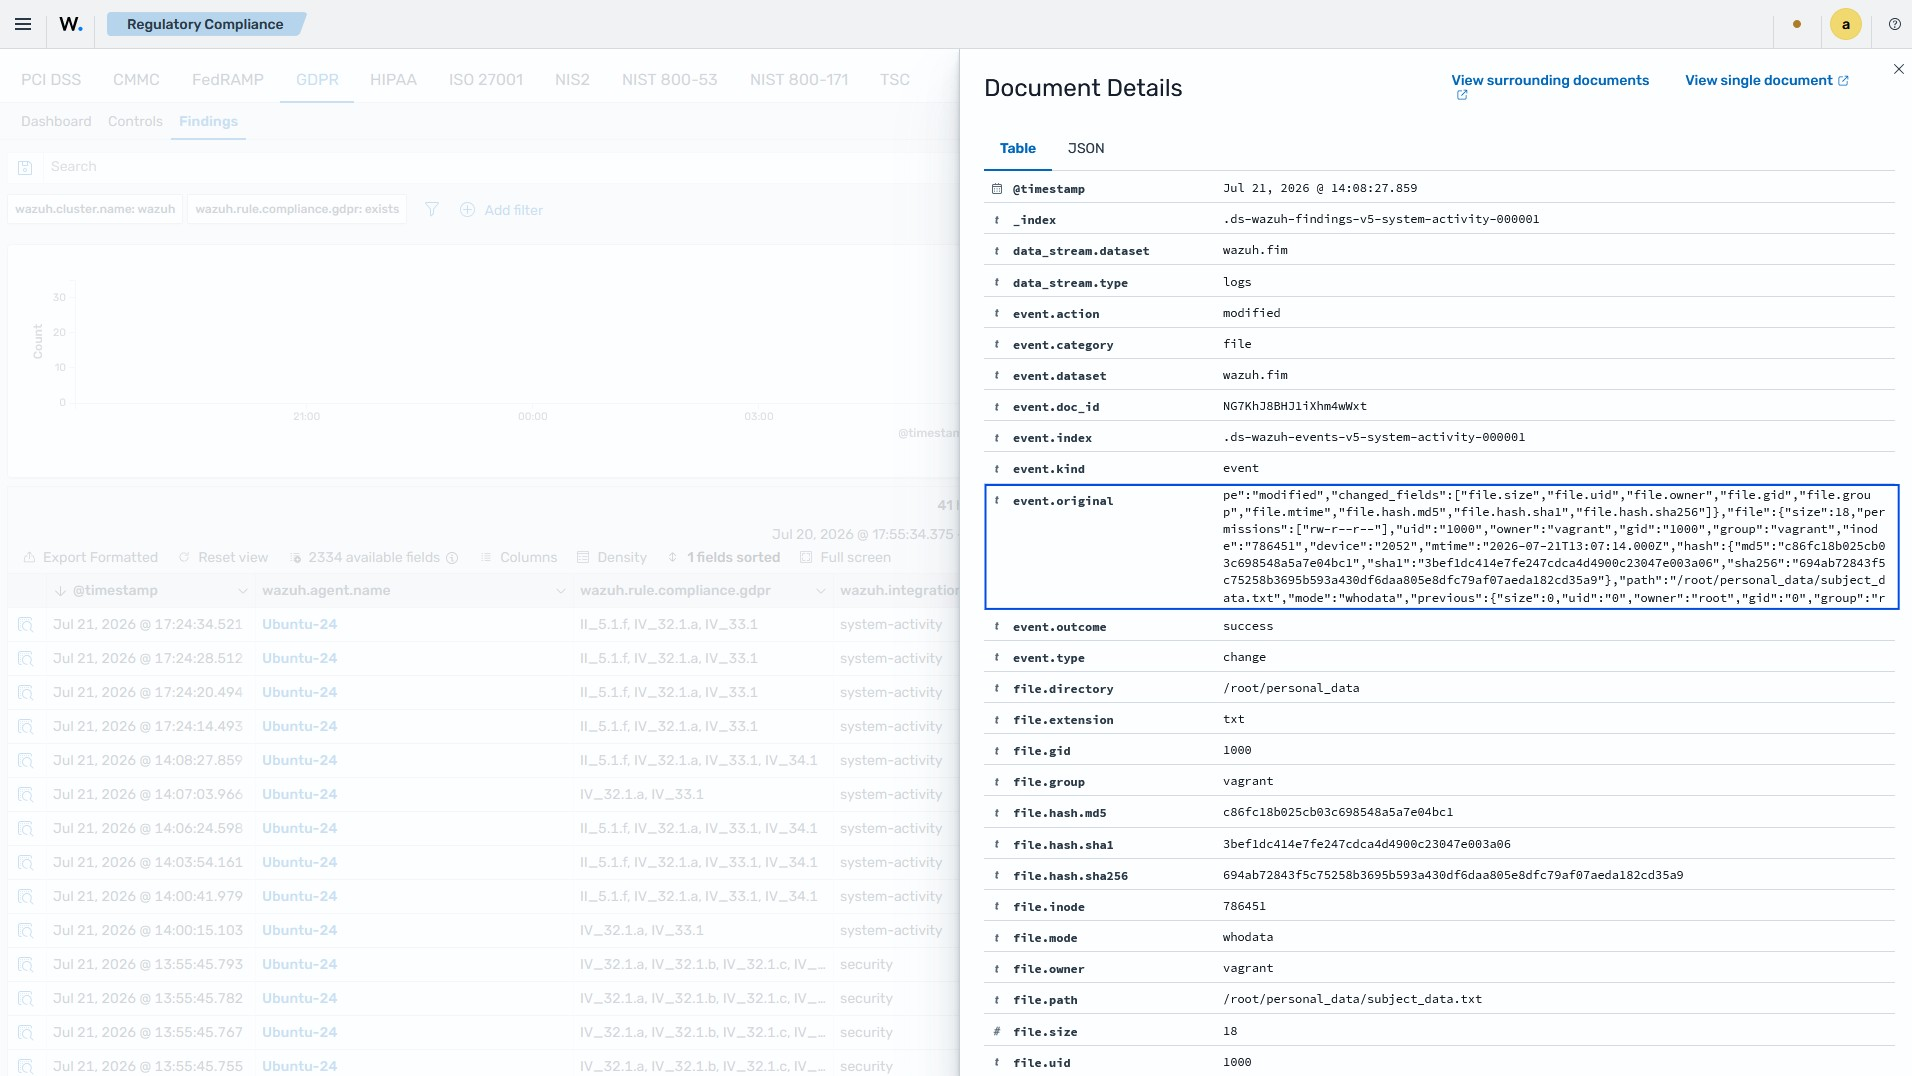
In this use case, you configure the Wazuh agent on an Ubuntu 24.04 endpoint to detect changes to /root/personal_data or its attributes, and to identify who made them. You then change the owner of a file to trigger a finding.
Ubuntu endpoint
Switch to the
rootuser:$ sudo su
Create the directory
personal_datain the/rootdirectory:# mkdir /root/personal_data
Create the file
subject_data.txtin the/root/personal_datadirectory and include some content:# touch /root/personal_data/subject_data.txt # echo "User01= user03_ID" >> /root/personal_data/subject_data.txt
Install
auditdso that the Linux Auditing System provides information about who made changes in a monitored directory:# apt-get install auditd
For Audit 3.1.1 and later, install the
audispdaf_unix plugin and restart the Audit service.# apt-get install audispd-plugins # service auditd restart
Add the highlighted configuration to the
<syscheck>block of the Wazuh agent configuration file/var/ossec/etc/ossec.conf:<syscheck> <directories check_all="yes" whodata="yes">/root/personal_data</directories> <whodata> <provider>audit</provider> </whodata> </syscheck>
Restart the Wazuh agent to apply the changes:
# systemctl restart wazuh-agent
Change the owner of
subject_data.txtfromrootto a regular user:# chown <YOUR_REGULAR_USER>:<YOUR_REGULAR_USER> /root/personal_data/subject_data.txt
The following image shows the change made to the file.
Chapter IV, Article 30, Head 1 (g)
Records of processing activities, Head 1 (g): “Each controller and, where applicable, the controller's representative, shall maintain a record of processing activities under its responsibility. That record shall contain all of the following information: where possible, a general description of the technical and organizational security measures referred to in Article 32 (1).”
This article requires that organizations document, inventory, and audit data processing activities. This helps keep a record of all data processing activities.
Wazuh stores information about system events. Each event enters through the root decoder decoder/core-wazuh-message/0, which belongs to the wazuh-core integration in the unclassified category. If an integration can process the event, it changes the category of the event and sends it to the matching index. Events that no integration processes remain unclassified. These are events that do not match any rule or fall below the threshold to trigger a finding.
You can enable the Index unclassified events and Index discarded events settings to store these events. When this is configured, Wazuh indexes unclassified events into the wazuh-events-v5-unclassified index. This gives you a record of events that no integration processes, including those that do not trigger a finding. These records help with activities such as data audits and threat hunting.
Use case: Store all logs generated from an endpoint
In this use case, you store all events from monitored endpoints whether they generate a finding or not.
Wazuh dashboard
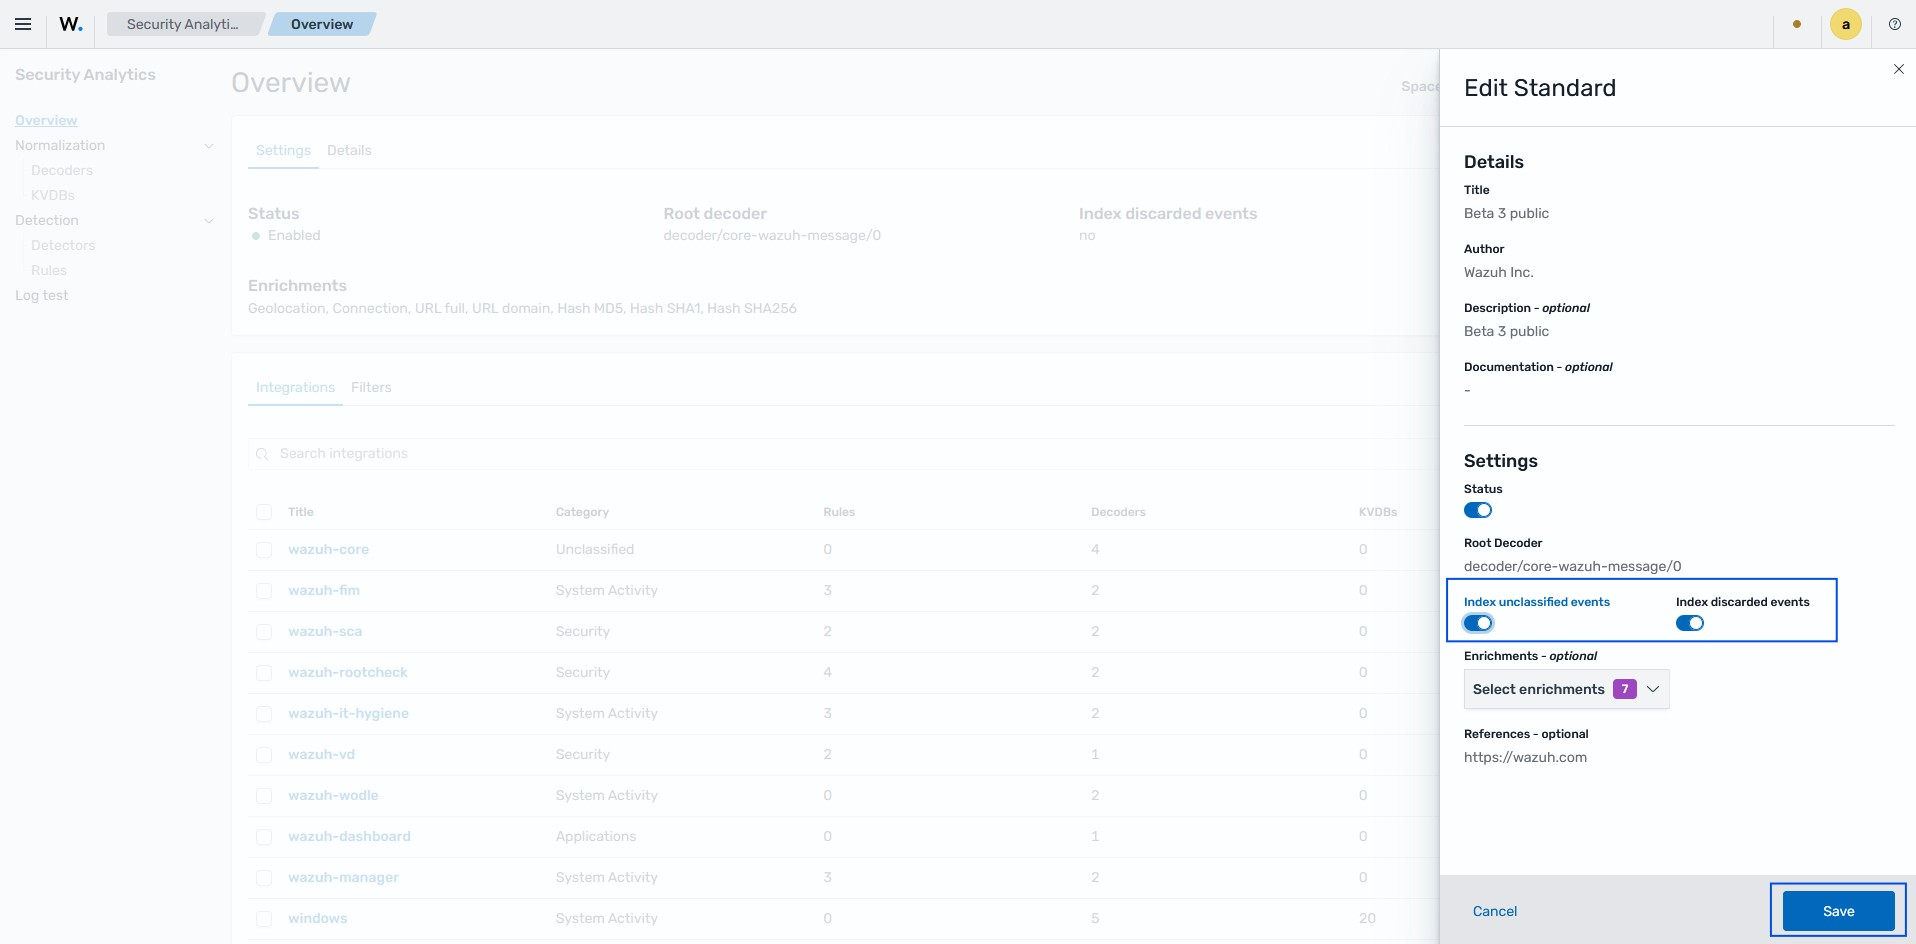
Click the menu icon, then navigate to Security analytics > Overview.
Select Actions > Edit at the top-right section.
Under Settings, toggle on Index unclassified events and Index discarded events.
Click Save.
View these events on the dashboard by navigating to Explore > Discover.
Change the Index patterns to
wazuh-events-v5-unclassified*.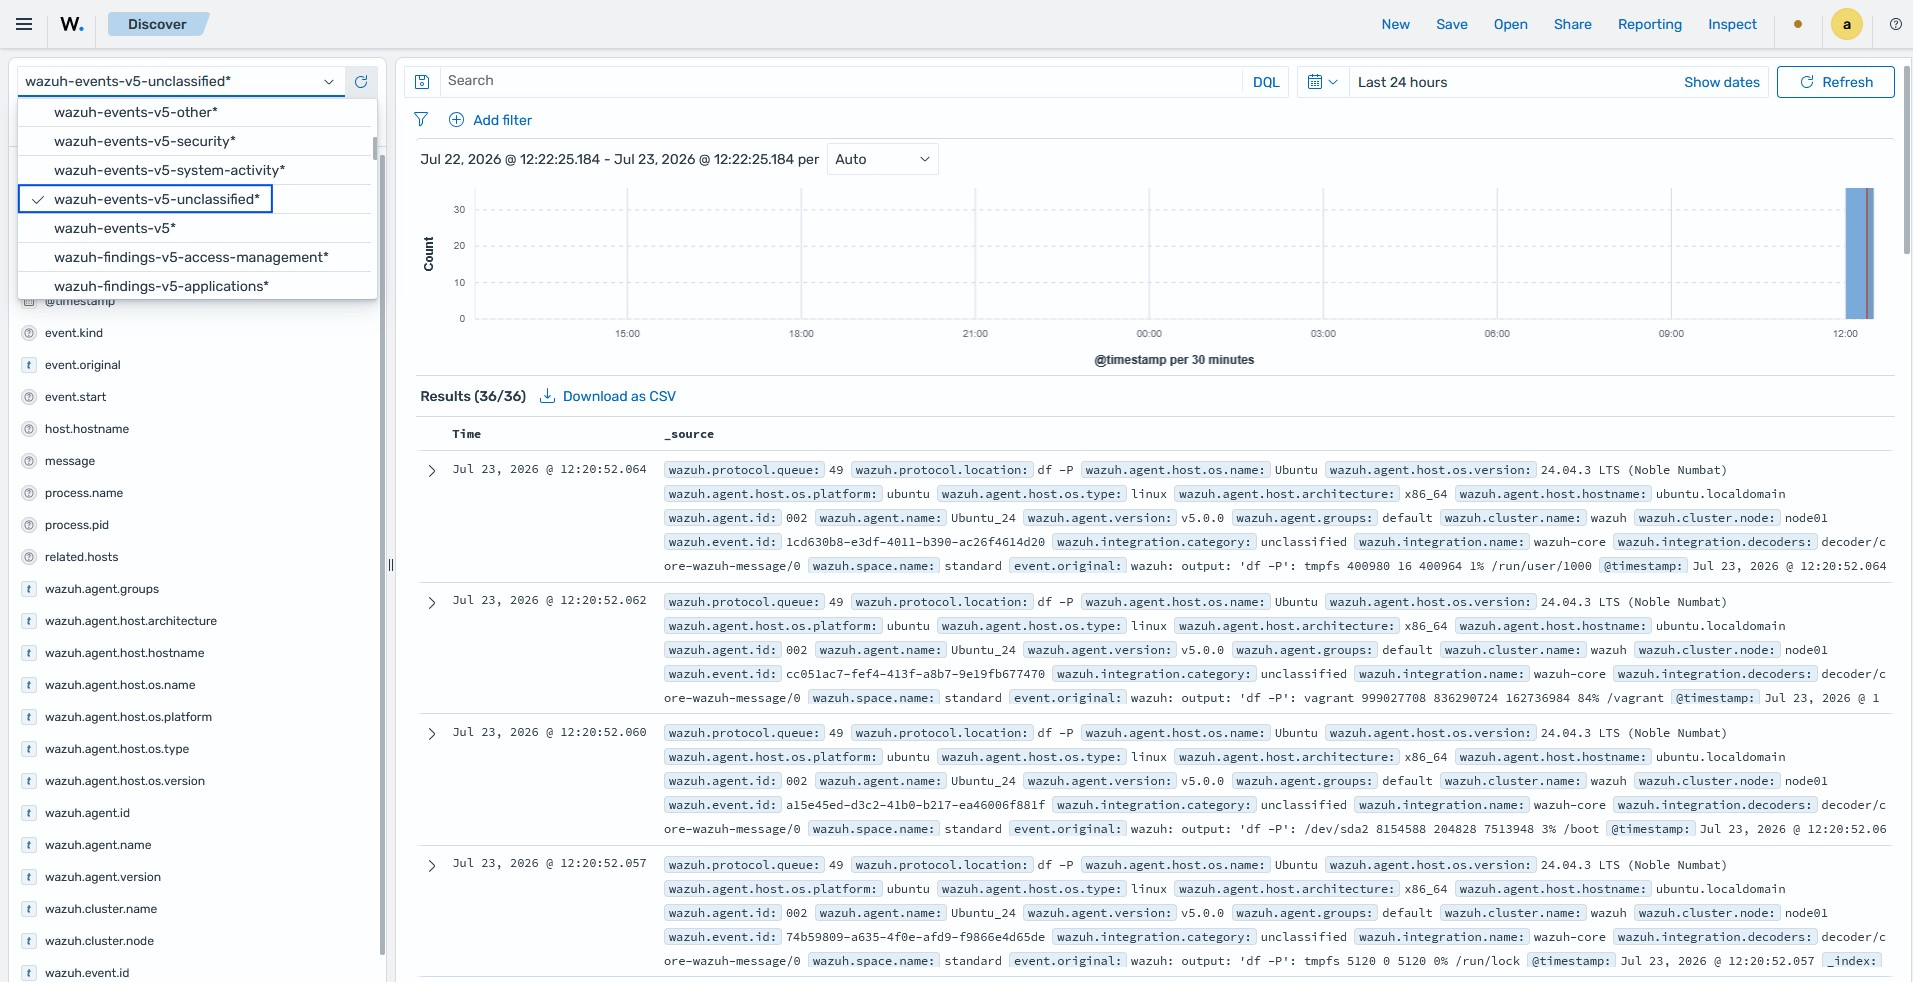
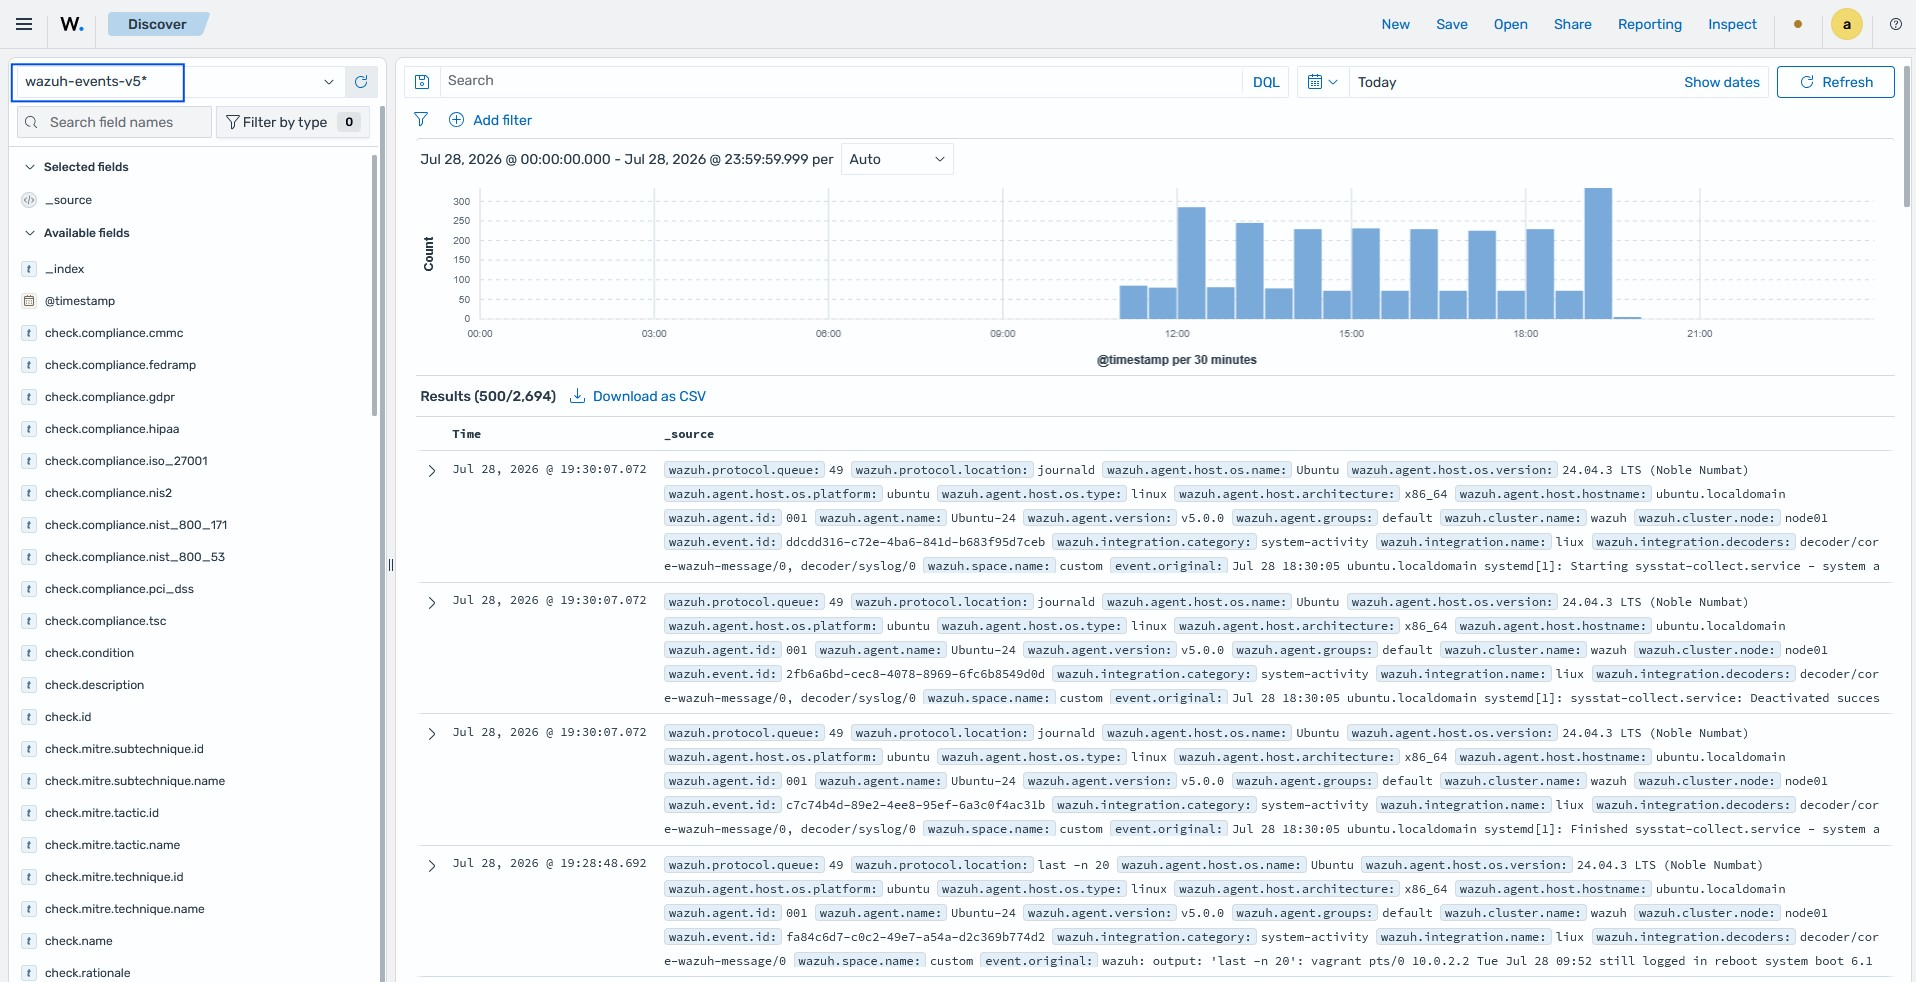
Change the Index patterns accordingly to view other events of interest.
Chapter IV, Article 32, Head 2
Security of processing, Head 2: “In assessing the appropriate level of security, account shall be taken in particular of the risks that are presented by processing, in particular from accidental or unlawful destruction, loss, alteration, unauthorised disclosure of, or access to personal data transmitted, stored or otherwise processed.”
This article requires you to account for the risks that processing poses to personal data. Unauthorized access is one of these risks. The Wazuh log data analysis capability helps you meet this requirement. It collects and decodes authentication logs from your endpoints and evaluates them against the Wazuh ruleset. This lets you detect access attempts to systems that process personal data and identify who made them.
Use case: Detect invalid SSH login attempts
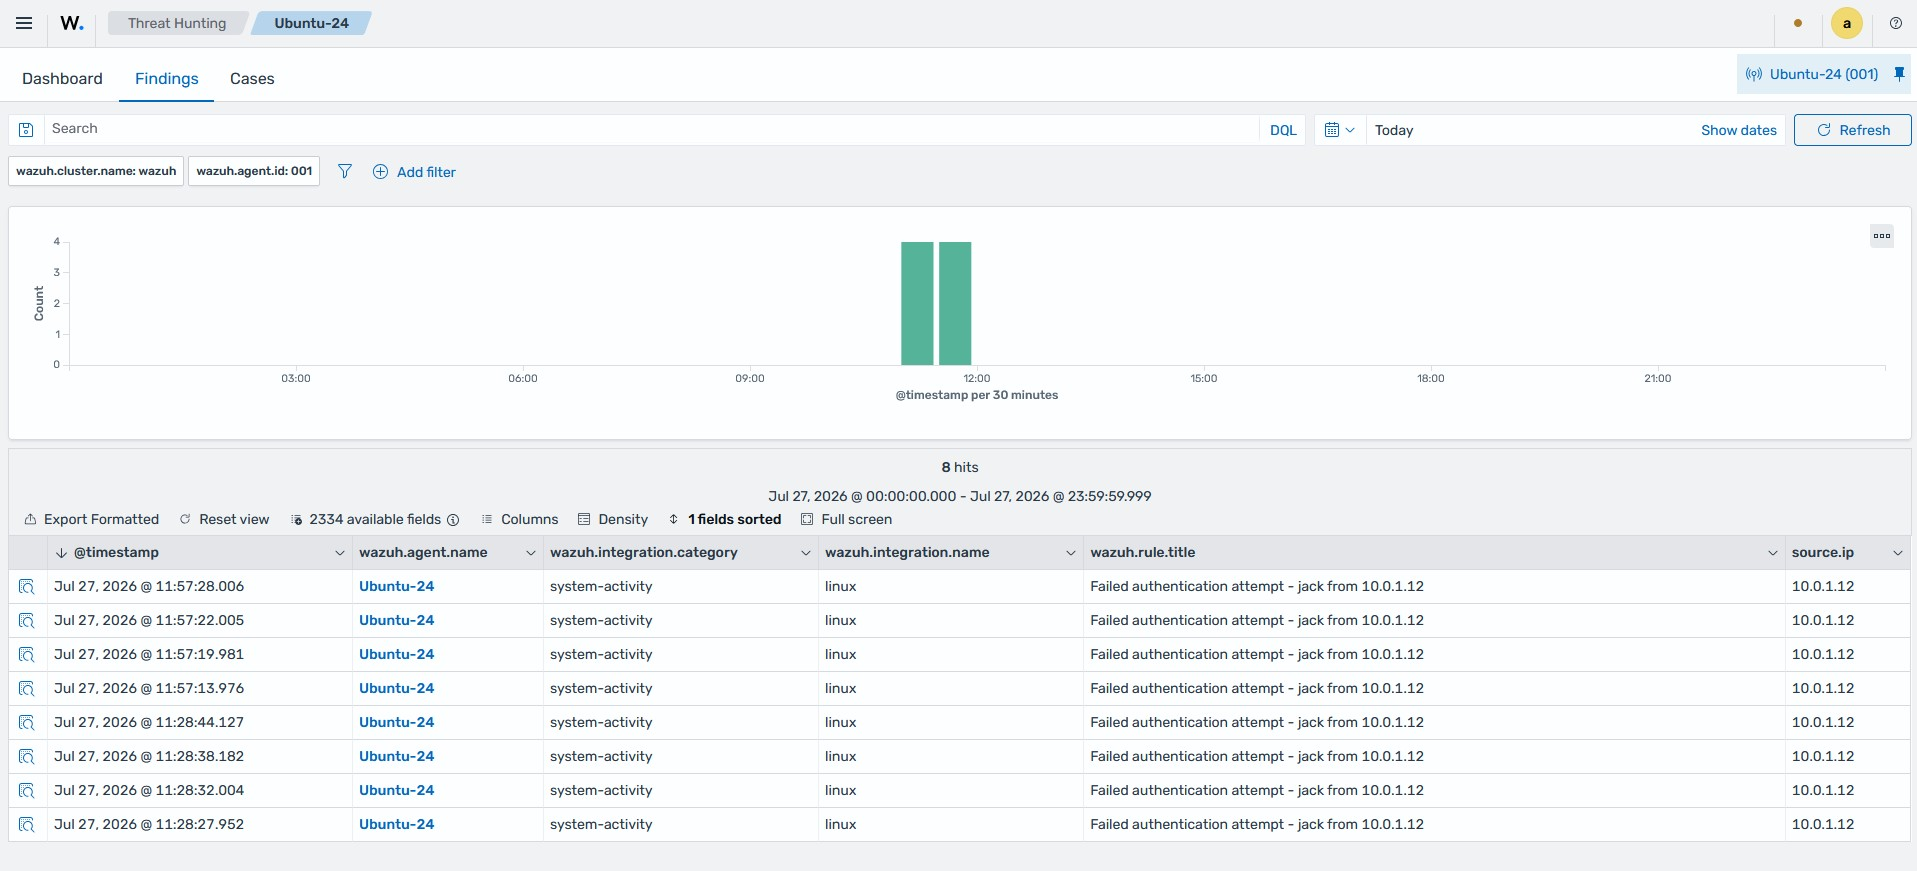
In this use case, the Wazuh agent on an Ubuntu 24.04 endpoint collects authentication logs from journald. When an invalid user attempts to log in over Secure Shell (SSH), the log is evaluated against the ruleset and generates a finding.
The Wazuh agent reads authentication events from journald by default through the Linux integration. No extra configuration is required to collect these events.
To generate a finding, attempt an SSH login with an invalid username on the monitored endpoint:
# ssh <USERNAME>@<IP_ADDRESS>
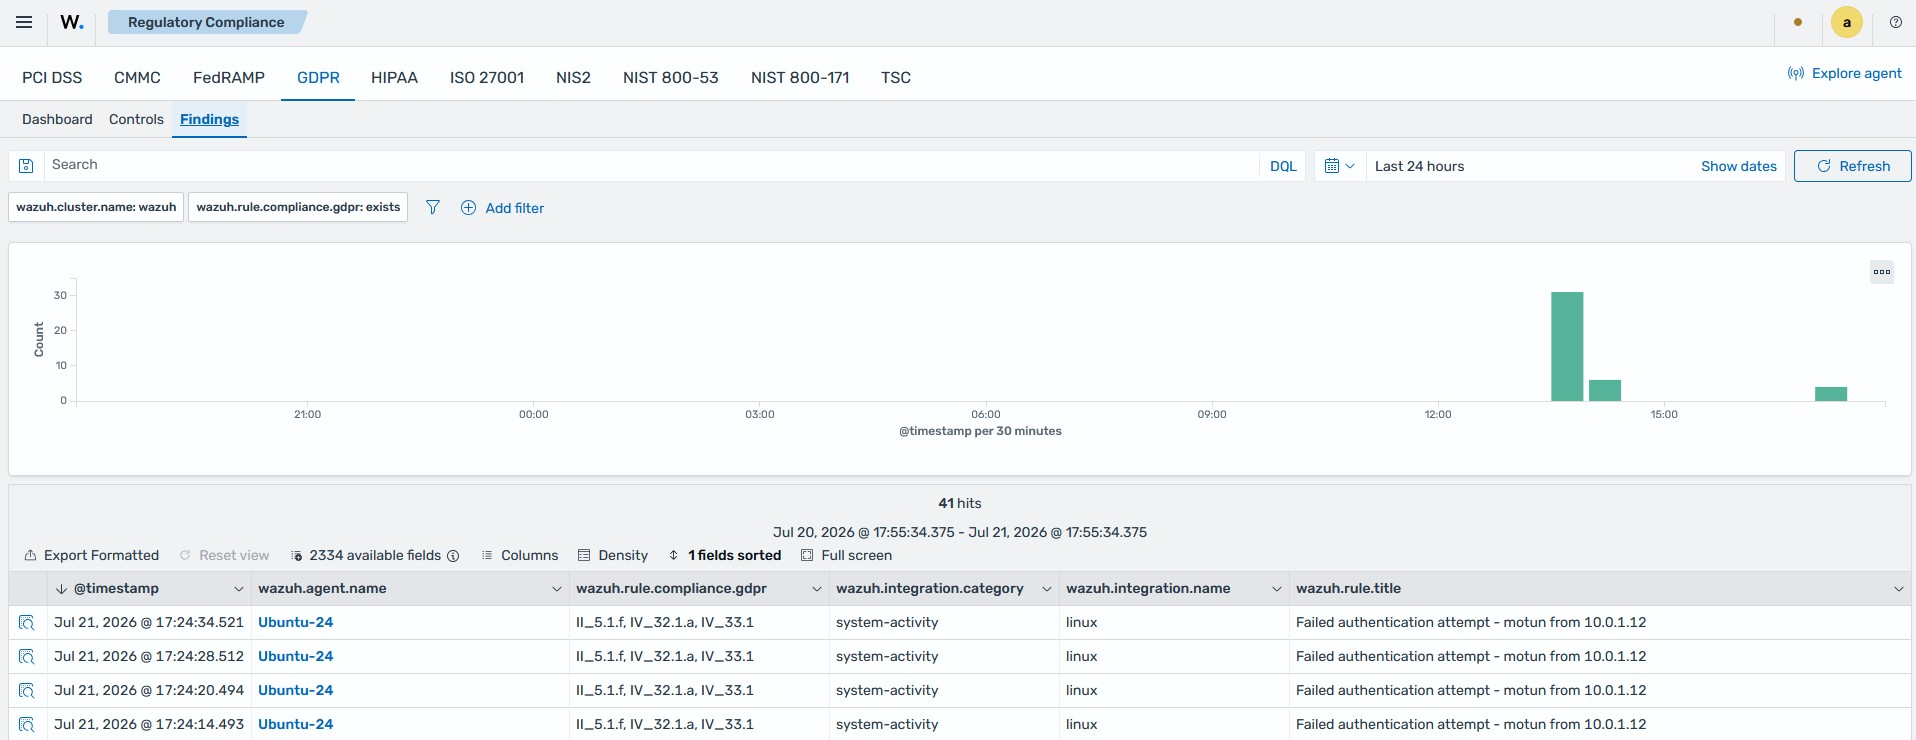
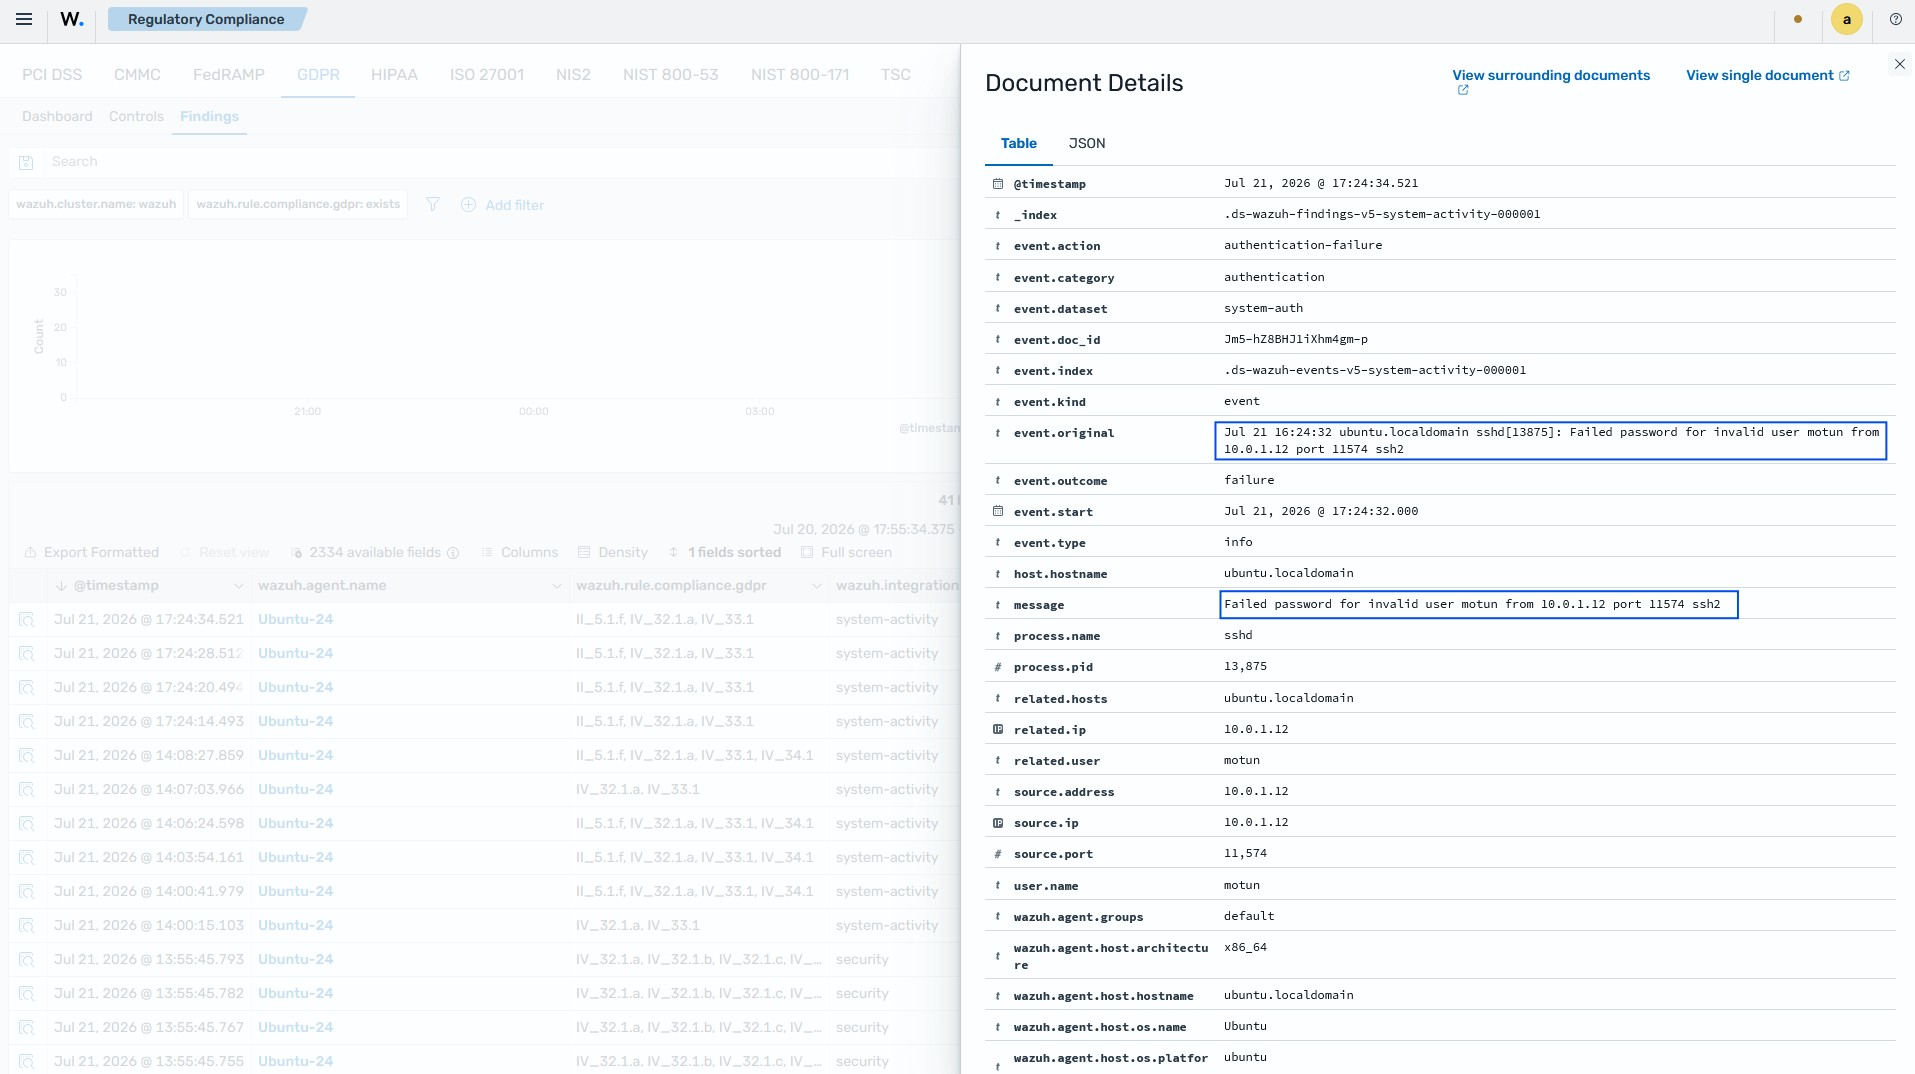
When an invalid login attempt is detected, you can see the following finding on the Wazuh dashboard.
Chapter IV, Article 33, Head 1
Notification of a personal data breach to the supervisory authority, Head 1: “In the case of a personal data breach, the controller shall without undue delay and, where feasible, not later than 72 hours after having become aware of it, notify the personal data breach to the supervisory authority competent in accordance with Article 55, unless the personal data breach is unlikely to result in a risk to the rights and freedoms of natural persons.”
This article requires you to notify the supervisory authority of a personal data breach without undue delay. Where feasible, you must send this notification within 72 hours of becoming aware of the breach. To meet this deadline, you must detect breach indicators quickly and alert the right people.
Wazuh provides an alerting capability that helps you meet this requirement. You can configure Wazuh to send an email notification when Wazuh generates a specific finding. Your data protection officer can then become aware of a potential breach in real time.
Wazuh sends email notifications through the Wazuh indexer. You configure an email notification channel with three components. A Simple Mail Transfer Protocol (SMTP) sender defines the outbound mail server, a recipient group defines who receives the email, and an email channel binds them together. You then create an alerting monitor that queries your findings and notifies the channel when it detects a match.
Use case: Email alert on failed login
In this use case, you configure Wazuh to send an email to your data protection officer when a failed authentication attempt occurs on a monitored endpoint. A failed authentication attempt is an early indicator of unauthorized access. It can precede a personal data breach, such as a brute force attack against an account that can access personal data.
Configure the SMTP sender
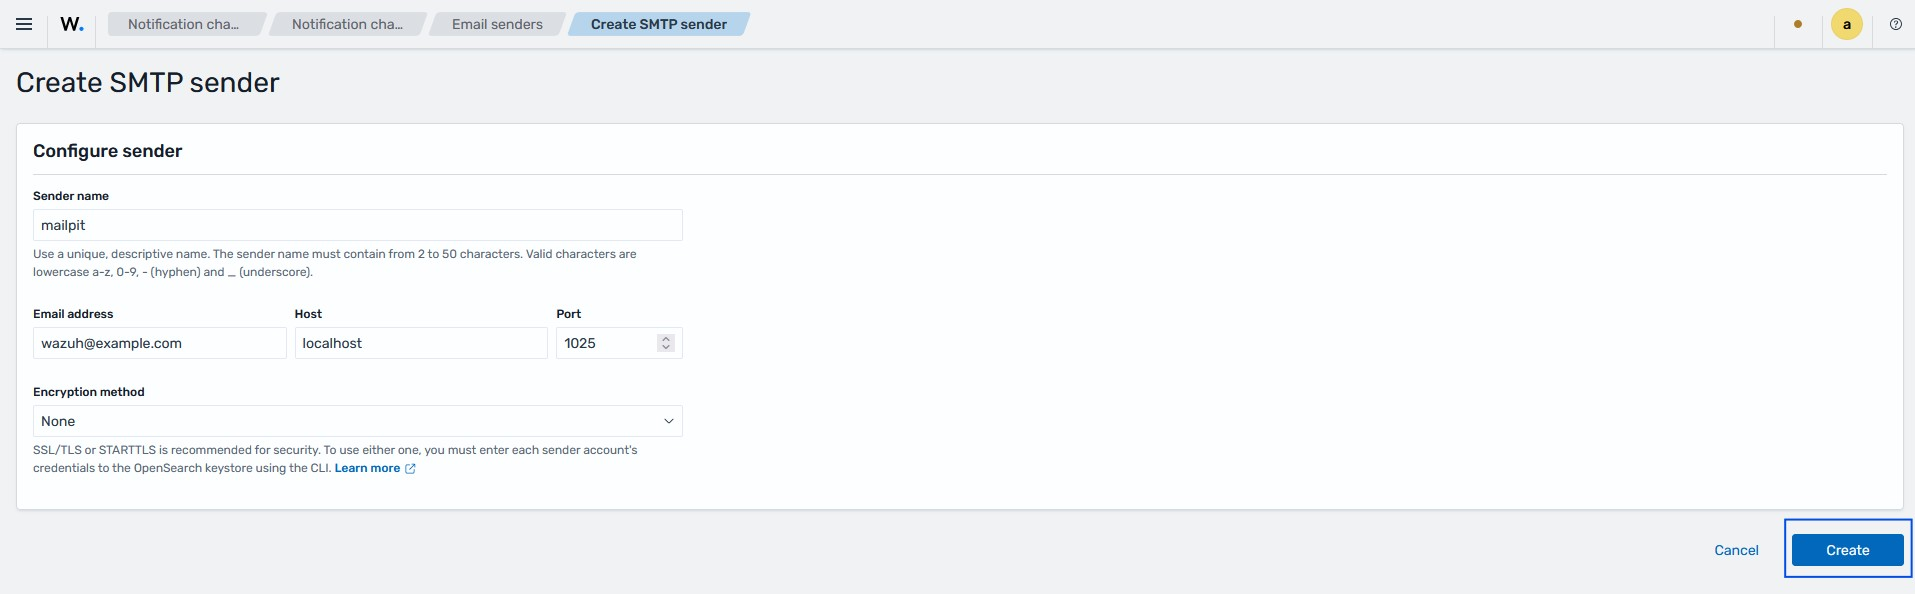
The SMTP sender defines the mail server that sends the notifications.
Click the menu icon, then navigate to Explore > Notifications.
Click Email senders > Create SMTP sender.
Type a unique name in Sender name.
Type the address that sends the notifications in Email address.
Type the hostname or IP address of your SMTP server in Host.
Type the port of your SMTP server in Port. The default value is 465.
Select an Encryption method.
Click Create.
Note
SSL/TLS and STARTTLS require you to add the sender account credentials to the Wazuh indexer keystore.
The Encryption method field offers three options:
Option |
Description |
|---|---|
SSL/TLS |
Encrypts the connection to the SMTP server. Use this option when your server supports implicit TLS, usually on port 465. |
STARTTLS |
Upgrades a plain connection to an encrypted one. Use this option when your server supports STARTTLS, usually on port 587. |
None |
Sends mail without encryption. Use this option only in a test environment, because it does not protect the credentials or the message content. |
Configure the recipient group
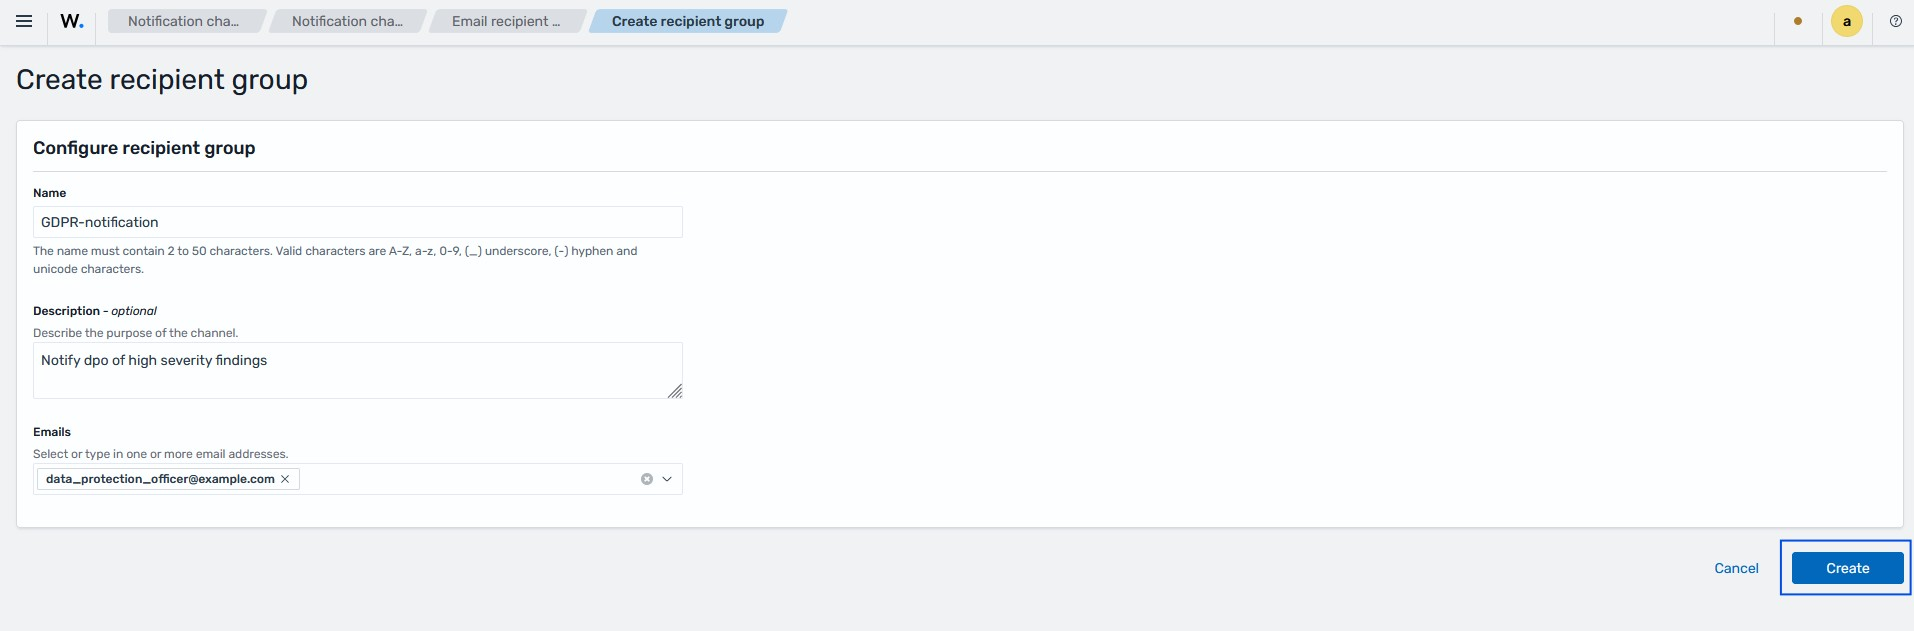
The recipient group defines who receives the email notifications.
Click the menu icon, then navigate to Explore > Notifications.
Click Email recipient groups > Create recipient group.
Type a name for the group in Name.
Describe the purpose of the group in Description. This field is optional.
Type one or more email addresses in Emails. For this use case, add the address of your data protection officer.
Click Create.
Note
You can also add recipient addresses directly to the channel. A recipient group is useful when you send notifications to the same addresses from more than one channel.
Configure the email channel
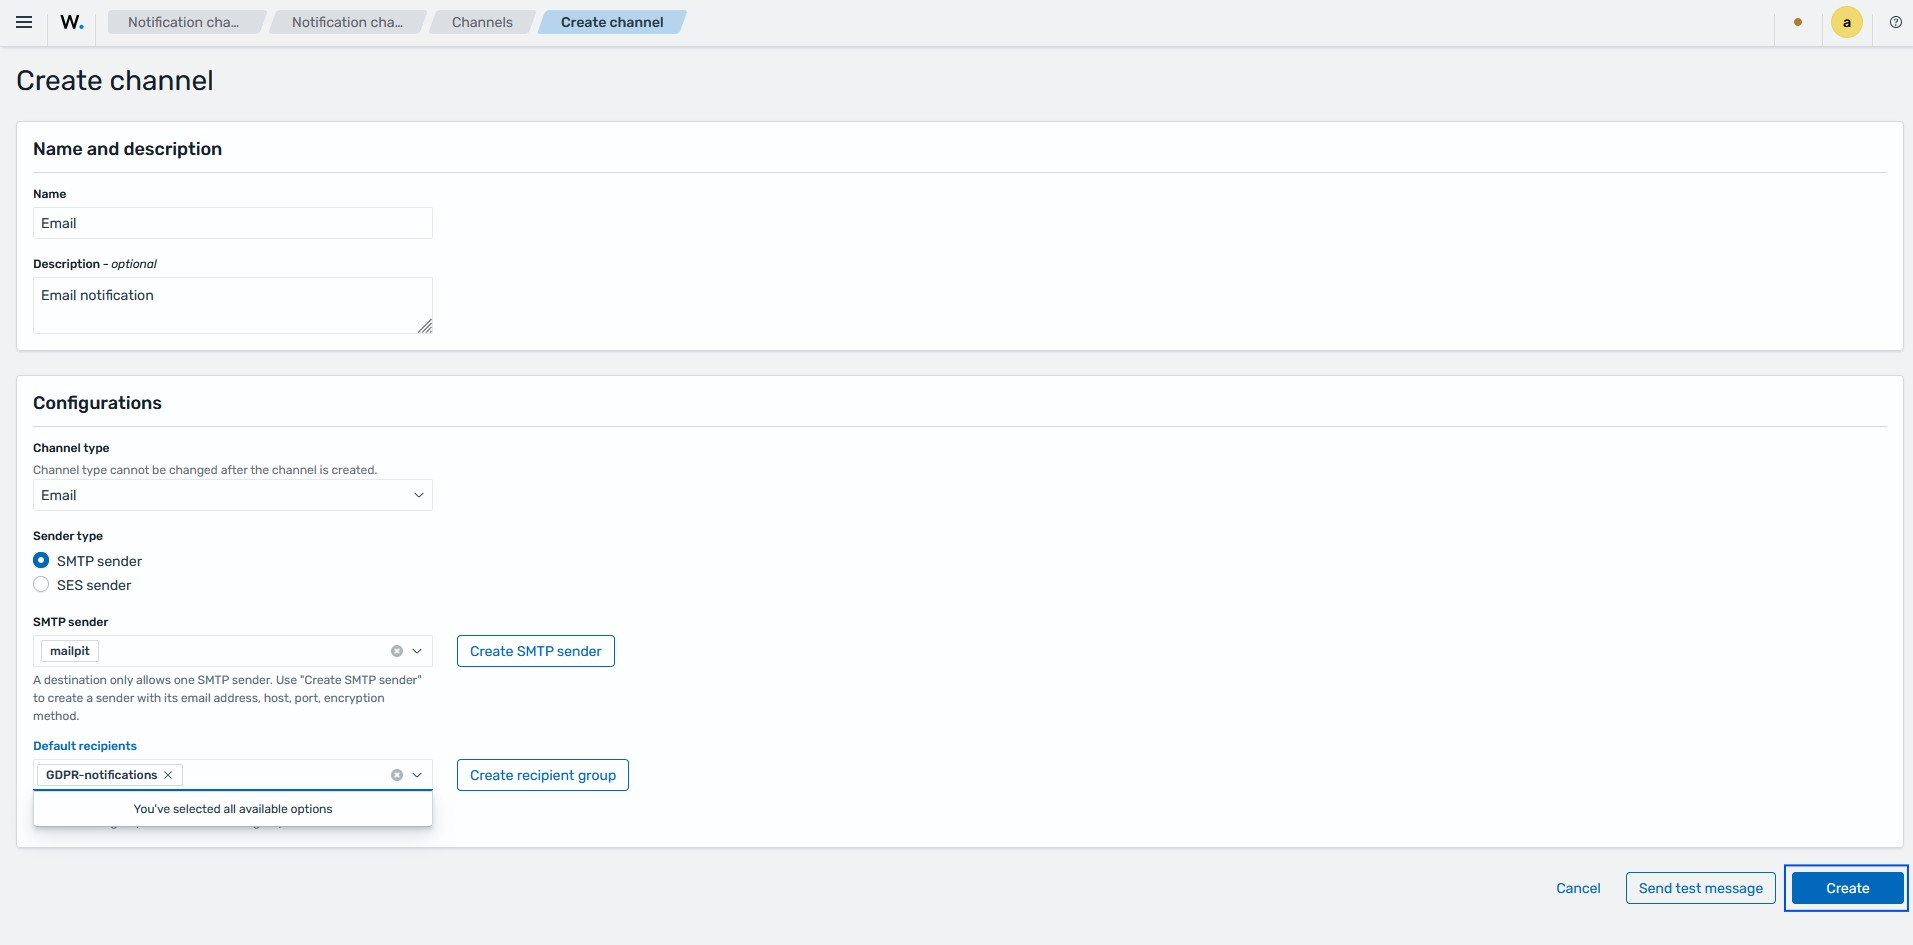
The email channel binds the sender and the recipients. The alerting monitor sends its notifications to this channel.
Click the menu icon, then navigate to Explore > Notifications.
Click Channels > Create channel.
Type a name for the channel in Name.
Describe the purpose of the channel in Description. This field is optional.
Select Email in Channel type. You cannot change the channel type after you create the channel.
Select SMTP sender in Sender type.
Select the sender you created in SMTP sender.
Select the recipient group you created in Default recipients. You can also type an email address directly.
Click Send test message to confirm the configuration. A success message confirms that the channel works.
Click Create.
The Sender type field offers two options:
Option |
Description |
|---|---|
SMTP sender |
Uses your own SMTP server. Use this option in most environments. |
SES sender |
Uses Amazon Simple Email Service (SES). Use this option when you run Wazuh on Amazon Web Services (AWS) and send mail through SES. An SES sender needs an AWS region and a role Amazon Resource Name (ARN) instead of a host and port. |
Create the alerting monitor
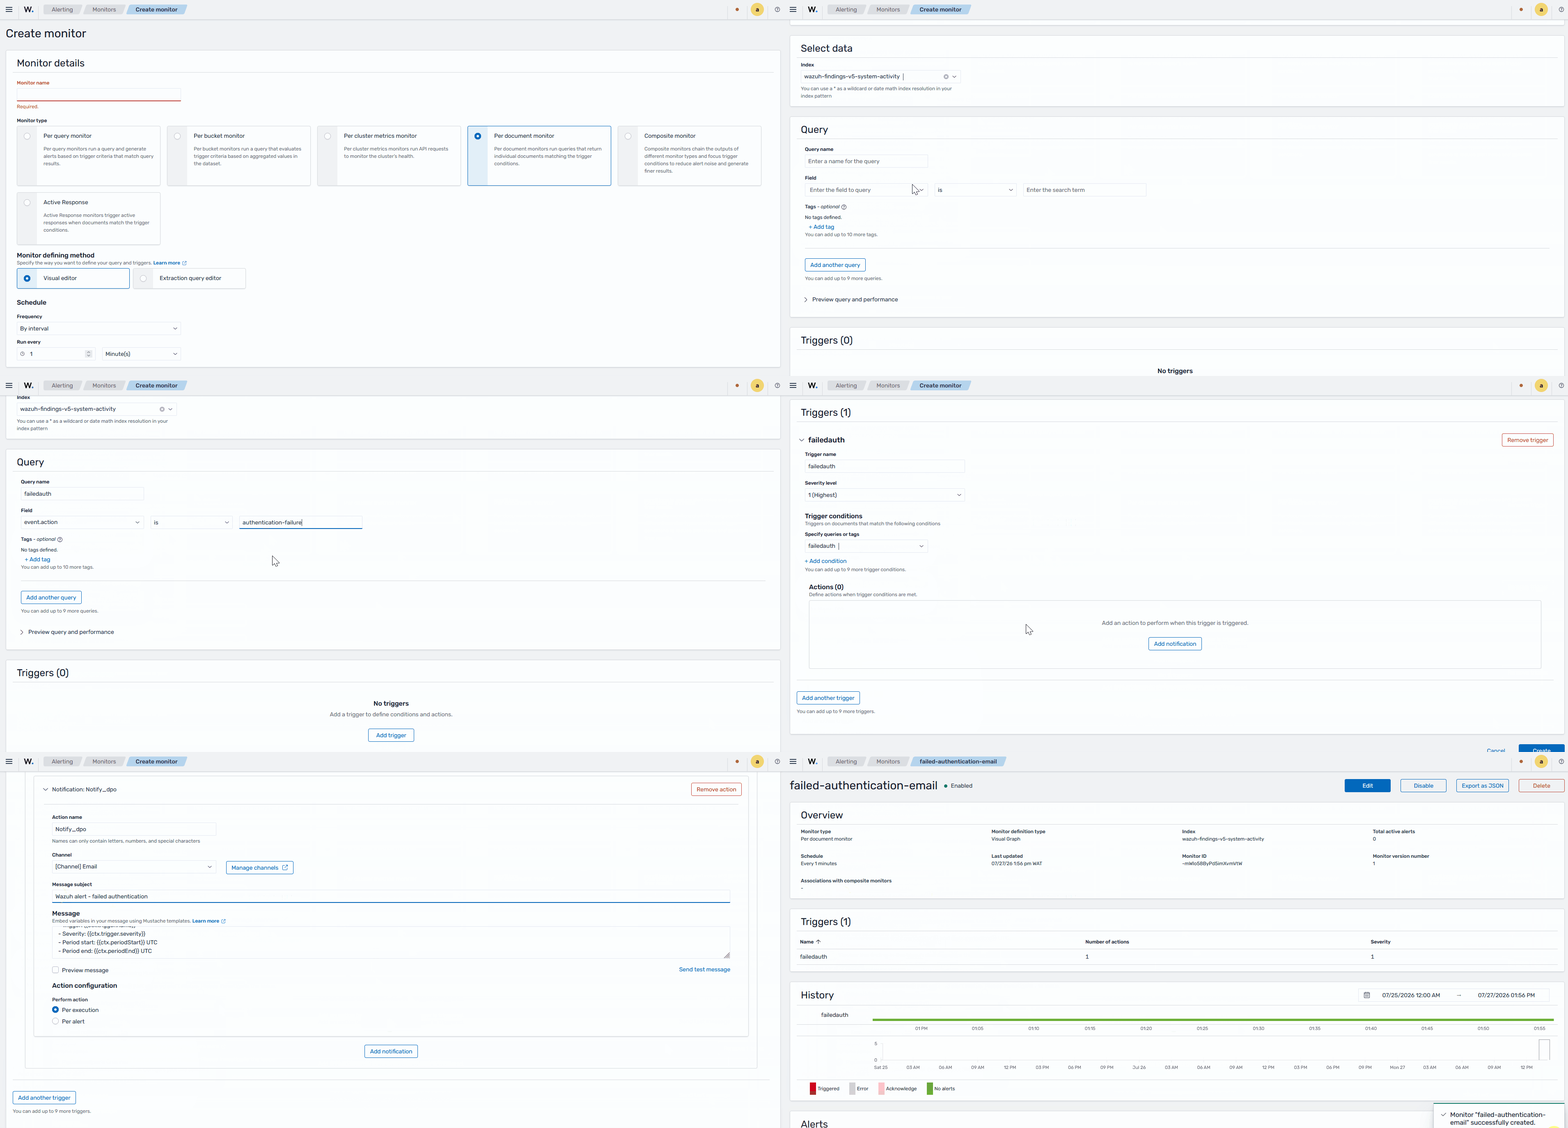
The alerting monitor watches your findings for failed authentication attempts. When the monitor detects a match, it triggers the action that sends the email.
Click the menu icon, then navigate to Explore > Alerting.
Switch to the Monitors tab and click Create monitor.
Type a name for the monitor in Monitor name.
Select Per document monitor in Monitor type.
Select Visual editor in Monitor defining method.
Set Frequency to By interval and set Run every to 1 minute under Schedule.
Under Select data, select
wazuh-findings-v5-system-activityin Index.Under Query, in Query name, type a name.
Set the query condition. In Field, select
event.action. In the operator list, select is. In the value field, typeauthentication-failure.Note
You can also match the finding by its rule identifier. In Field, select
wazuh.rule.sigma_idand type the rule identifier. Theevent.actionfield is more stable, because it does not change when the rule identifier changes.Click Add trigger under Triggers.
Type a name in Trigger name.
Select a level in Severity level. Level 1 is the highest.
Under Trigger conditions, in Specify queries or tags, select the name of the query.
Click Add notification under Actions.
Type a name in Action name.
Select the email channel you created in Channel.
Type a subject such as “Wazuh alert - failed authentication” in Message subject.
In Message, type the notification body. You can embed variables with Mustache templates.
A failed authentication attempt was detected on a monitored endpoint.
Trigger: {{ctx.trigger.name}}
Severity: {{ctx.trigger.severity}}
Monitor: {{ctx.monitor.name}}
Detected between {{ctx.periodStart}} and {{ctx.periodEnd}} UTC.
Review the finding in the Wazuh dashboard for the source IP, user, and host details.
Select Per alert in Perform action.
Click Send test message to confirm the action. A test email arrives at the recipient address.
Click Create.
The Monitor type field offers these options:
Option |
Description |
|---|---|
Per document monitor |
Generates an alert for each document that matches the query. Use this option to alert on each failed authentication finding. |
Per query monitor |
Runs a query and generates an alert when the results match the trigger criteria. Use this option to alert when failed authentications exceed a threshold in a time window, such as a brute force attempt. |
The Perform action field controls how often Wazuh sends the notification:
Option |
Description |
|---|---|
Per alert |
Sends one email for each matching finding. Use this option to notify on every failed authentication. |
Per execution |
Sends one email for each monitor run, regardless of how many findings match. Use this option to receive a single summary notification for each interval. |
Note
On a busy endpoint, the Per alert option can generate frequent emails. To reduce the volume, use a Per query monitor with a threshold instead.
Note
The Monitor defining method offers two options. The Visual editor lets you build the query with fields and values. The Extraction query editor lets you write the query in raw query syntax. Use the extraction query editor for conditions that the visual editor cannot express.
Verify the configuration
Verify that Wazuh sends the email when a failed authentication occurs.
On a monitored endpoint, attempt a Secure Shell (SSH) login with an invalid username:
# ssh <INVALID_USER>@<ENDPOINT_IP>
The login fails because the user does not exist.
Wait for one monitor interval.
Wazuh detects the finding, the trigger fires, and the action sends an email to the recipient group.
The data protection officer receives an email similar to the following:
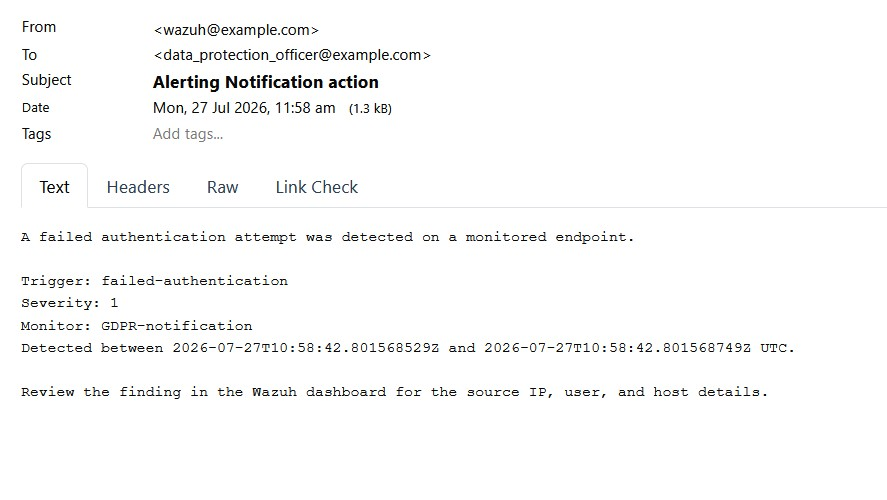
The email identifies the trigger, the severity, the monitor, and the detection window. To view more details, such as the source IP address, the recipient opens the finding on the Wazuh dashboard.
Chapter IV, Article 35, Head 1
Data protection impact assessment, Head 1: “Where a type of processing in particular using new technologies, and taking into account the nature, scope, context and purposes of the processing, is likely to result in a high risk to the rights and freedoms of natural persons, the controller shall, prior to the processing, carry out an assessment of the impact of the envisaged processing operations on the protection of personal data. A single assessment may address a set of similar processing operations that present similar high risks.”
This article recommends conducting a risk assessment of data processing channels and assessing the impact of the identified risks on data protection. Wazuh supports the risk assessment outcome by categorizing FIM findings for specific files or directories and raising severity levels based on the risk assessment reports.
Use case: Increase the severity level of a file modification finding
In this use case, you set a critical severity for a file modification event when the file is in a specific directory. You configure the agent to monitor /customers/personal_data, and you create a rule that raises the severity for changes in that directory.
Ubuntu endpoint
Create the directory
/customers:# mkdir /customers
Create the directory
personal_datain the/customersdirectory:# mkdir /customers/personal_data
Add the highlighted configuration to the
<syscheck>block of the agent configuration file/var/ossec/etc/ossec.conf:<syscheck> <directories realtime="yes" check_all="yes" report_changes="yes">/customers/</directories> </syscheck>
Restart the Wazuh agent to apply the changes:
# systemctl restart wazuh-agent
Create the file
regular_data.txtin the/customersdirectory and add some content:# touch /customers/regular_data.txt # echo "this is regular data" >> /customers/regular_data.txt
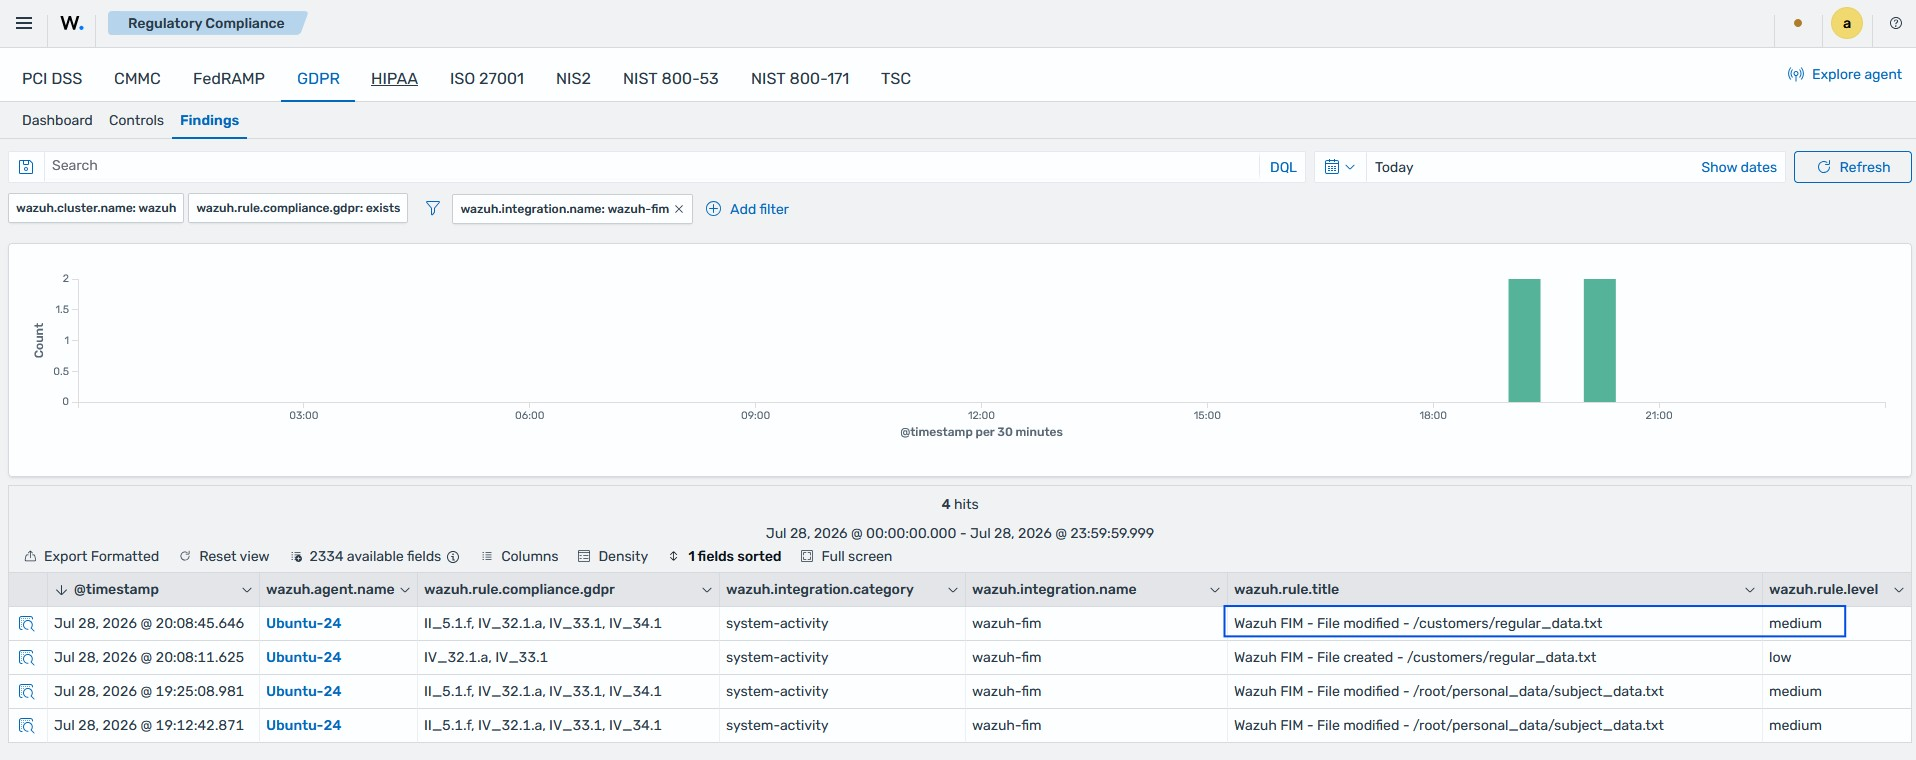
A medium severity finding on the Wazuh dashboard shows that a file was modified in the monitored directory.
Wazuh dashboard
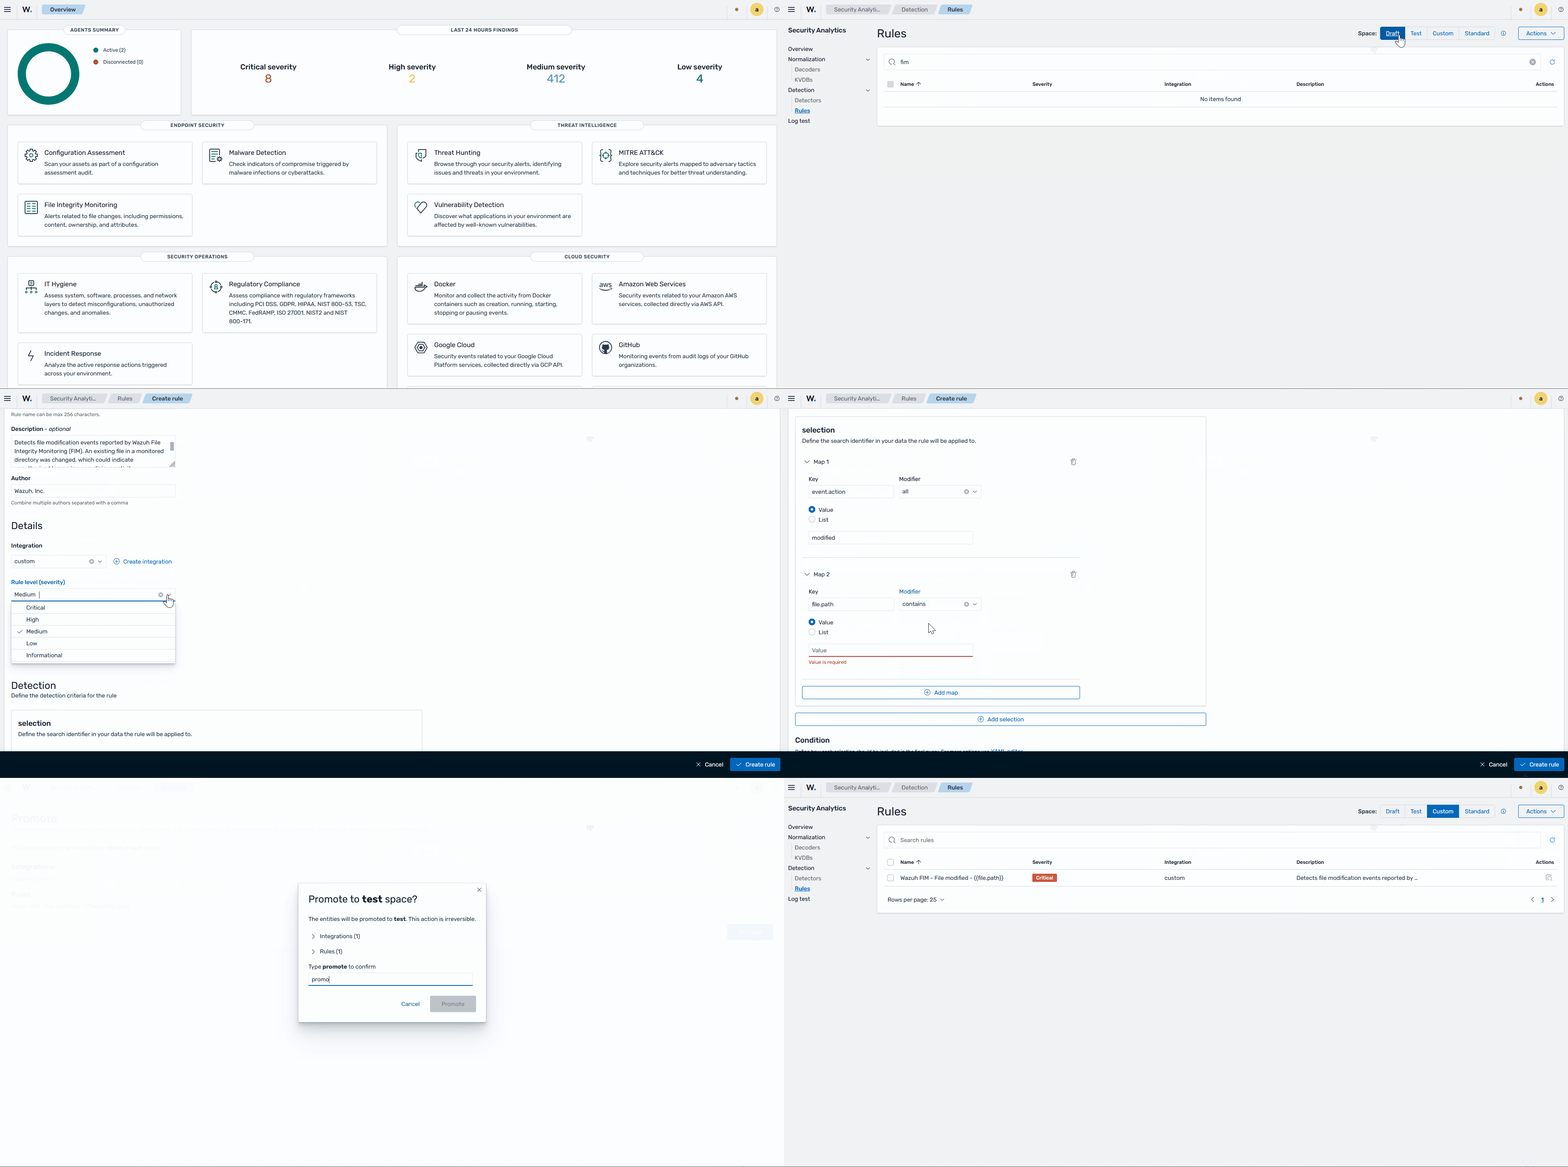
Create a custom rule to increase the severity of file modification in the directory /customers/personal_data from medium to critical.
Create decoder and integration
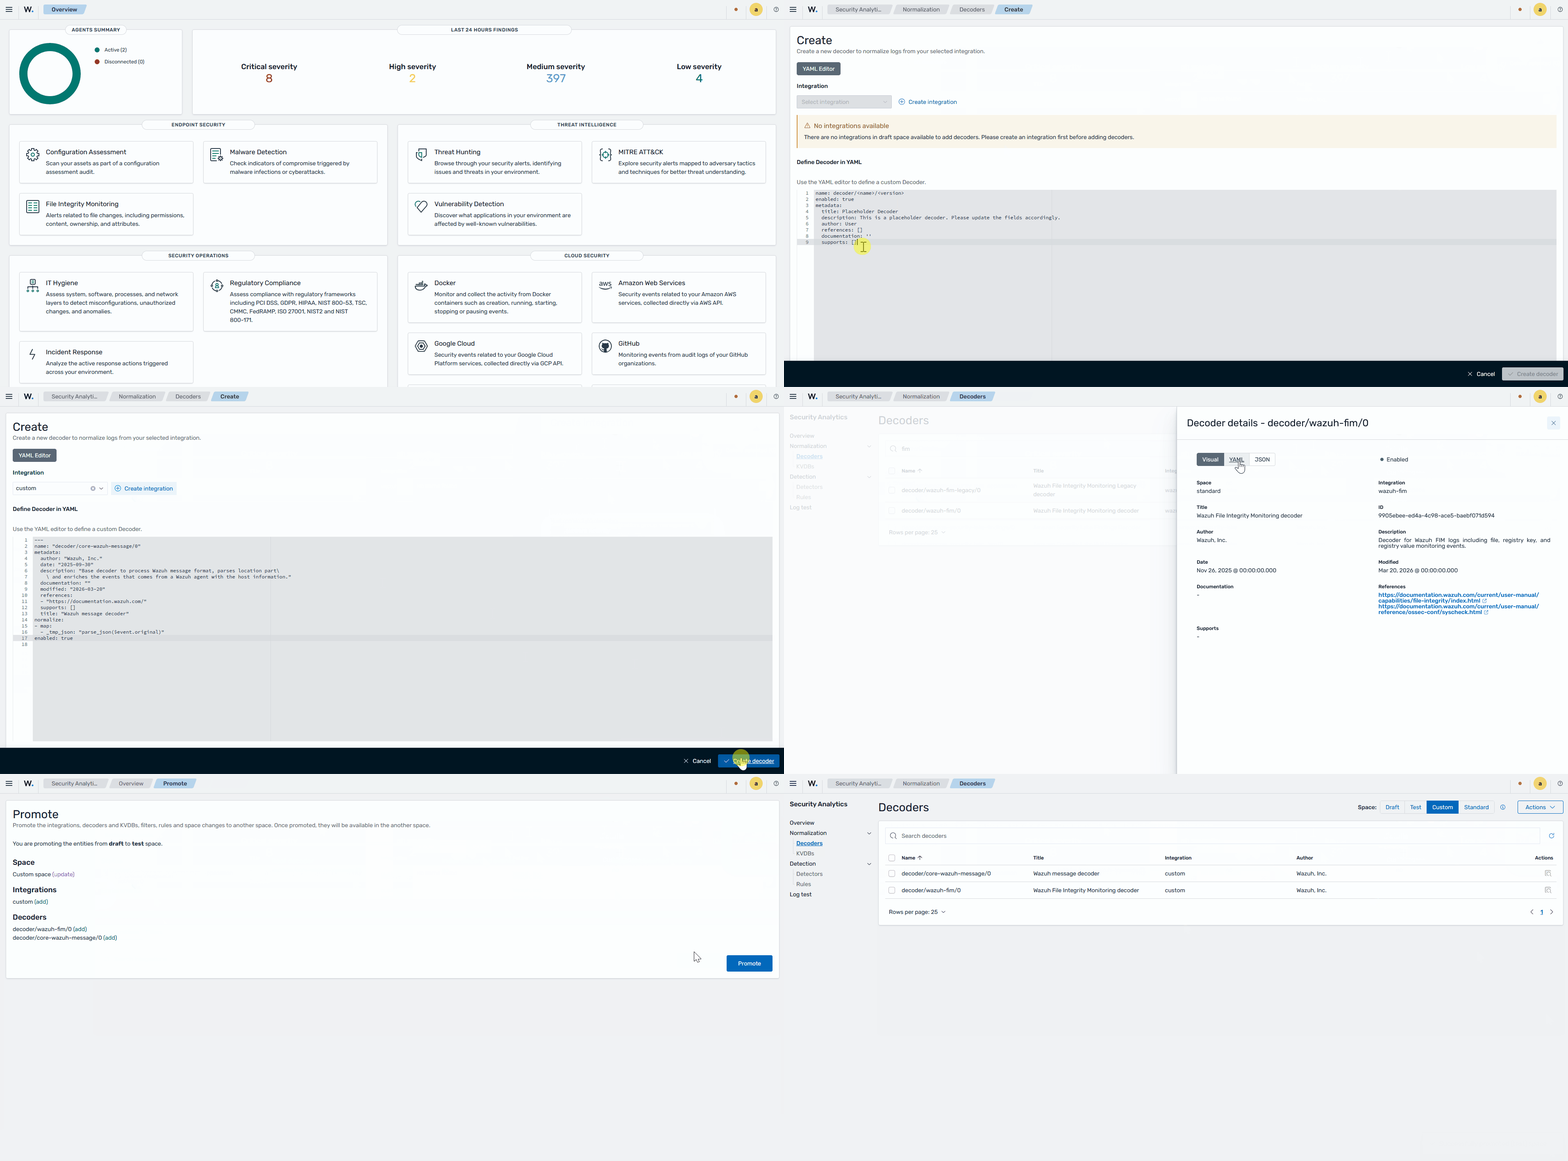
The two decoders that need to exist in your custom space are decoder/core-wazuh-message/0 and decoder/wazuh-fim/0. decoder/core-wazuh-message/0 is the Wazuh root decoder, and decoder/wazuh-fim/0 decodes FIM-related events.
Click the menu icon, then navigate to Security analytics > Decoders.
Switch to Standard in Space.
Search for
decoder/core-wazuh-message/0. Switch to the YAML tab and copy the decoder contents.Close the tab and switch to Draft in Space.
Click the dropdown under Actions and select + Create.
In the Integration section, click Create integration.
Give it a title and select System Activity under Category. Type the author name in Author and click Create integration.
Paste the copied decoder contents from the standard space into the decoder section.
Click Create decoder.
Repeat steps 2 to 5 for
decoder/wazuh-fim/0.In the Integration section, select the previously created integration.
Repeat steps 8 and 9.
Click Overview in the left pane, click the Actions dropdown, and select Edit.
In the Settings section, under Root Decoder, select the created root decoder
decoder/core-wazuh-message/0and click Save.In Overview, select Draft in Space.
Click the dropdown under Actions and select Promote to promote the decoders from Draft space to Test. In the prompt, type
promoteand click Promote.Switch to Test in Space and repeat step 16 to promote the decoders from Test space to Custom.
Note
You can ignore the steps to create a root decoder if you already have this configured in your custom space.
Create custom rule
The file modification rule already exists out of the box. To change the severity of file modification findings in your directory of choice, you need to create a custom rule to achieve this.
Click the menu icon, then navigate to Security analytics > Rules.
Switch to Standard in Space.
Search for FIM in the search bar.
The search returns the built-in FIM rules. Click the magnifying glass icon to view the rule titled
Wazuh FIM - File modified - {{file.path}}.Switch to the YAML tab and copy the rule contents.
Close the tab and switch to Draft in Space.
Click the dropdown under Actions and select + Create.
Switch to the YAML Editor tab, select the integration created previously, and paste the copied file modification rule from the standard space into the rule section.
Switch back to the Visual Editor tab for better visualization of the copied rule.
In the dropdown under Rule level (severity), select Critical.
In the Detection section, under selection, click Add map.
Type
file.pathin Key. Under Modifier, select contains and type the monitored directory/customers/personal_datain Value.Click Create rule.
Click Overview in the left pane and select Draft in Space.
Click the dropdown under Actions and select Promote to promote the rule from Draft space to Test. In the prompt, type
promoteand click Promote.Switch to Test in Space and repeat step 15 to promote the rule from Test space to Custom.
Create detector
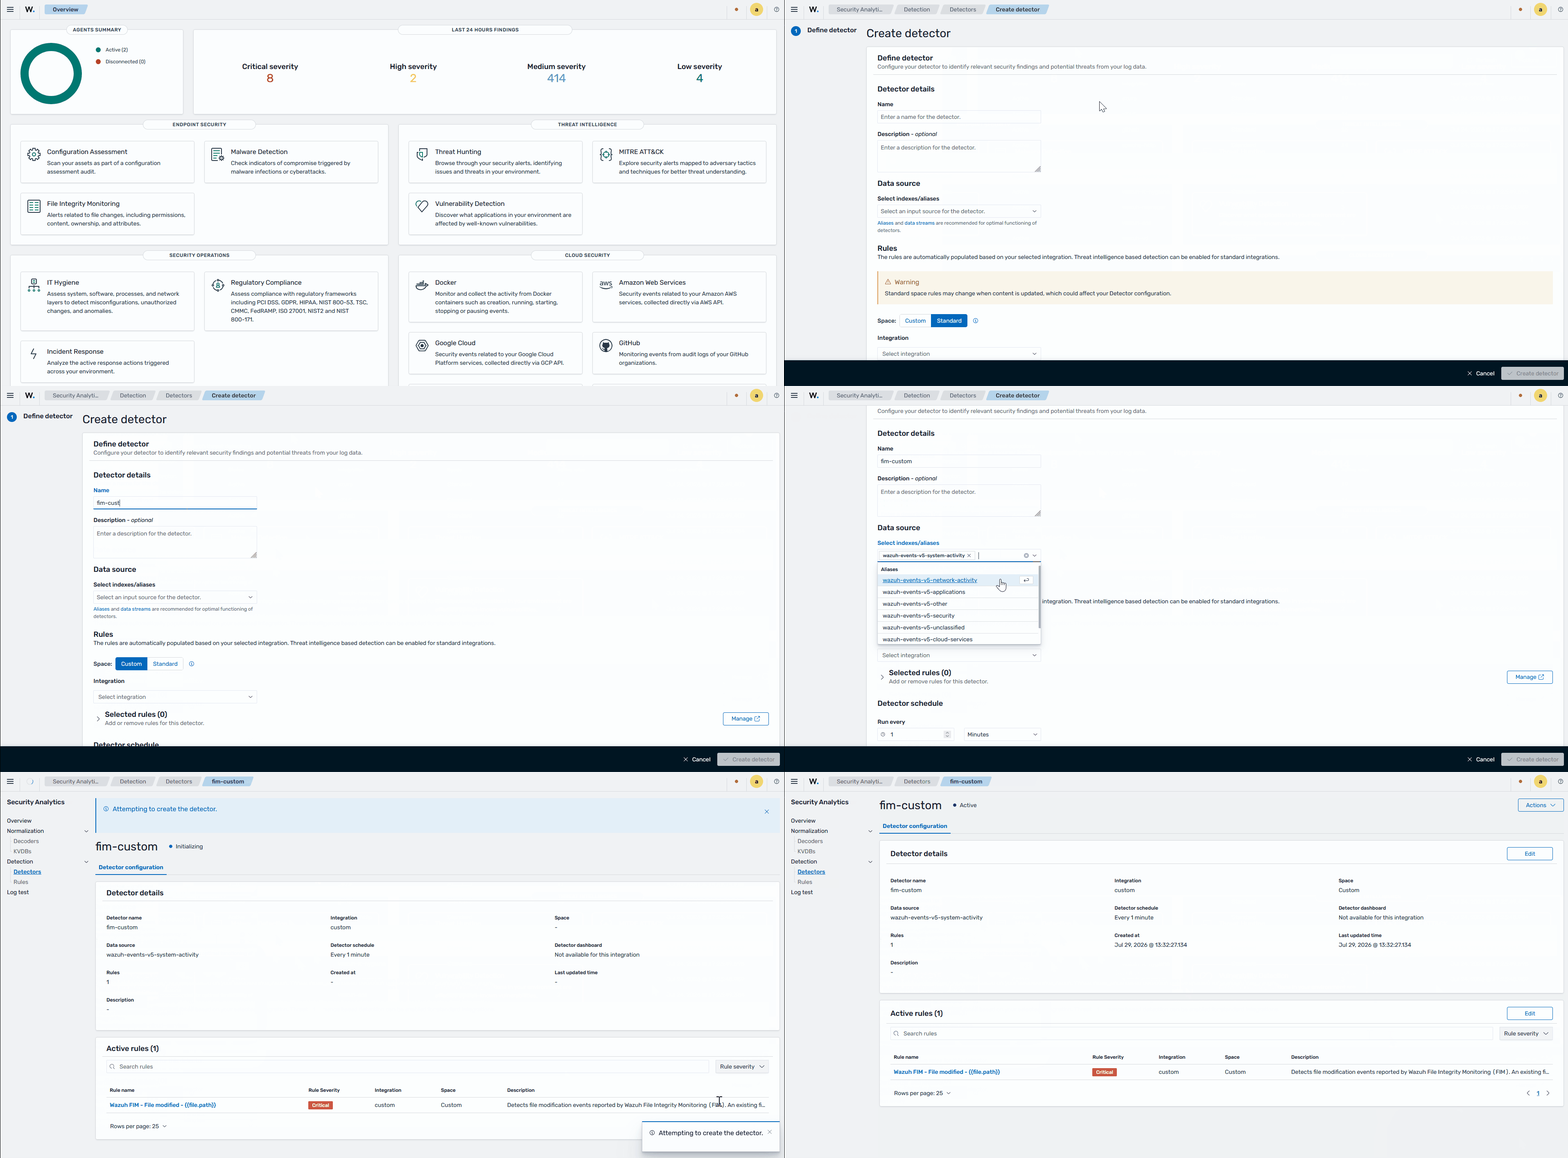
To generate a finding on the Wazuh dashboard, a corresponding detector must exist in your custom space to handle your custom rules.
Click the menu icon, then navigate to Security analytics > Detectors.
Click + Create detector.
Enter a name for the detector in Name.
Add a description in Description. This is optional.
Under Data source, click the drop-down and select
wazuh-events-v5-system-activityin Select indexes/aliases.Switch to Custom in Space.
Select the previously created integration under Integration.
Click Create detector.
Ubuntu endpoint
Create the file sensitive_data.txt in the /customers/personal_data directory and add some content:
# touch /customers/personal_data/sensitive_data.txt
# echo "User01= user03_ID" >> /customers/personal_data/sensitive_data.txt
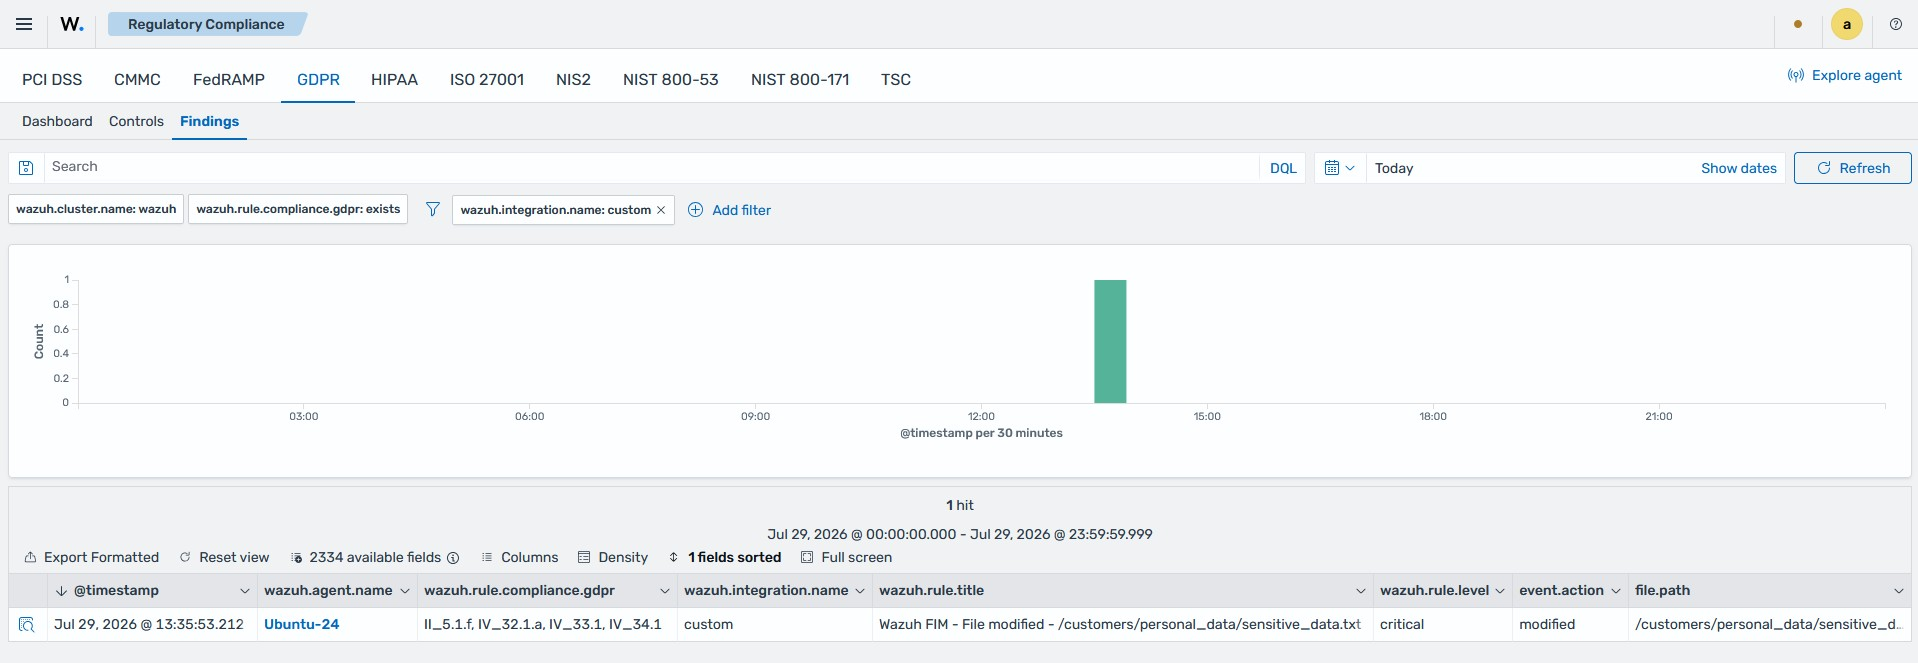
A critical finding shows that a sensitive file was modified in the monitored directory.
Chapter IV, Article 35, Head 7 (d)
Data protection impact assessment, Head 7 (d): “The assessment shall contain at least the measures envisaged to address the risks, including safeguards, security measures and mechanisms to ensure the protection of personal data and to demonstrate compliance with this Regulation taking into account the rights and legitimate interests of data subjects and other persons concerned.”
This article recommends implementing the necessary security measures to protect subject data. These security measures include threat detection and response on endpoints that contain personal user data.
Wazuh helps meet this article of the GDPR by providing security measures such as:
Malware detection.
Active response.