Migrating Wazuh indices
This section focuses on migrating Wazuh indices by using snapshots. This helps to restore alerts from one Wazuh indexer cluster to another without losing the original timestamp. We make use of two methods:
Using a local repository
In this method, you set up a repository for storing snapshots on the source and destination Wazuh indexer nodes. Then, we copy the snapshots taken on the source Wazuh indexer to the destination Wazuh indexer and restore the snapshots to complete the Wazuh index migration.
Create snapshot directory
Perform the following configuration on the source and destination Wazuh indexer nodes to set up the /mnt/snapshots directory to store snapshots.
Create a target directory for the snapshot repository in the
/mntdirectory:# mkdir /mnt/snapshots
Grant the
wazuh-indexeruser ownership of the/mnt/snapshotsdirectory:# chown wazuh-indexer:wazuh-indexer /mnt/snapshots
Add the configuration:
path.repo: /mnt/snapshotsto the/etc/wazuh-indexer/opensearch.ymlfile to specify the repository path:Example:
network.host: 127.0.0.1
node.name: indexer
cluster.initial_cluster_manager_nodes:
  - "indexer"
cluster.name: "wazuh-cluster"
discovery.seed_hosts:
  - "127.0.0.1"
node.max_local_storage_nodes: "3"
path.data: /var/lib/wazuh-indexer
path.logs: /var/log/wazuh-indexer
path.repo: /mnt/snapshots

plugins.security.ssl.http.pemcert_filepath: /etc/wazuh-indexer/certs/indexer.pem
plugins.security.ssl.http.pemkey_filepath: /etc/wazuh-indexer/certs/indexer-key.pem
plugins.security.ssl.http.pemtrustedcas_filepath: /etc/wazuh-indexer/certs/root-ca.pem
plugins.security.ssl.transport.pemcert_filepath: /etc/wazuh-indexer/certs/indexer.pem
plugins.security.ssl.transport.pemkey_filepath: /etc/wazuh-indexer/certs/indexer-key.pem
plugins.security.ssl.transport.pemtrustedcas_filepath: /etc/wazuh-indexer/certs/root-ca.pem
plugins.security.ssl.http.enabled: true
plugins.security.ssl.transport.enforce_hostname_verification: false
plugins.security.ssl.transport.resolve_hostname: false
plugins.security.authcz.admin_dn:
  - "CN=admin,OU=Wazuh,O=Wazuh,L=California,C=US"
plugins.security.check_snapshot_restore_write_privileges: true
plugins.security.enable_snapshot_restore_privilege: true
plugins.security.nodes_dn:
  - "CN=indexer,OU=Wazuh,O=Wazuh,L=California,C=US"
plugins.security.restapi.roles_enabled:
  - "all_access"
  - "security_rest_api_access"
plugins.security.system_indices.enabled: true
plugins.security.system_indices.indices: [".opendistro-alerting-config", ".opendistro-alerting-alert*", ".opendistro-re>
cluster.default_number_of_replicas: 0
bootstrap.memory_lock: true

# Resilience under heap pressure (small heaps, e.g. 2 GB): shed work — reject (429)
# and cancel runaway searches instead of letting the JVM heap exhaust and crash.
search_backpressure.mode: enforced                    # actually cancel heavy search tasks (default only logs)
indices.breaker.total.use_real_memory: true           # account real heap used, not just reserved bytes
indices.breaker.total.limit: 80%                      # trip early (default 95%); leaves headroom for Lucene flush/merge
indexing_pressure.memory.limit: 10%                   # cap in-flight indexing bytes; reject excess bulk

# Use no replicas by default on ISM internal indices
plugins.index_state_management.history.number_of_replicas: 0
Restart the Wazuh indexer to apply the configuration changes:
# systemctl restart wazuh-indexer
Note
Make sure to confirm that the
/mnt/snapshotsdirectory has thewazuh-indexer:wazuh-indexerownership on the Wazuh indexer nodes by runningls -l /mnt/snapshots.
Set up snapshot repository
Perform the following steps on the source and destination Wazuh dashboards to configure the /mnt/snapshots directory as the snapshot storage location:
Click the upper left menu ☰ > Index management > Snapshot Management > Repositories, and select + Create repository to create a new snapshot repository.
Enter a repository name, select the repository type Shared file system, enter the repository location
/mnt/snapshots, and select Add to register the new repository.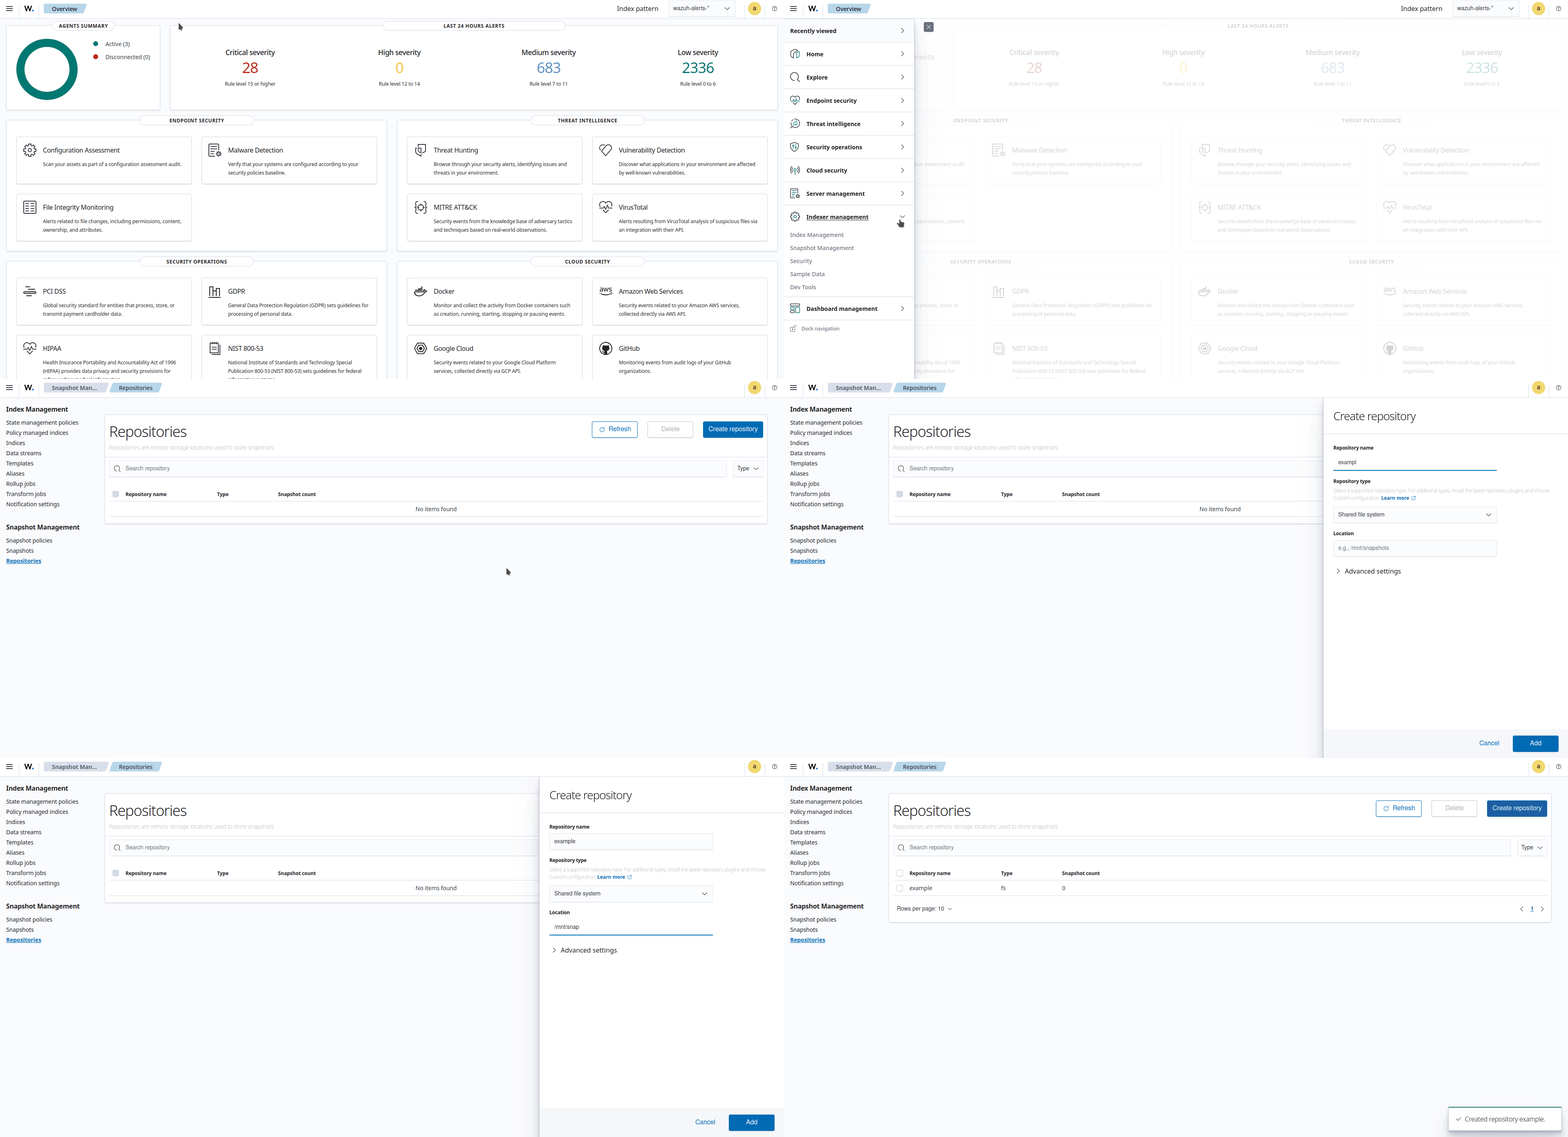
Take snapshot
Perform the following steps on the source Wazuh dashboard to take a snapshot:
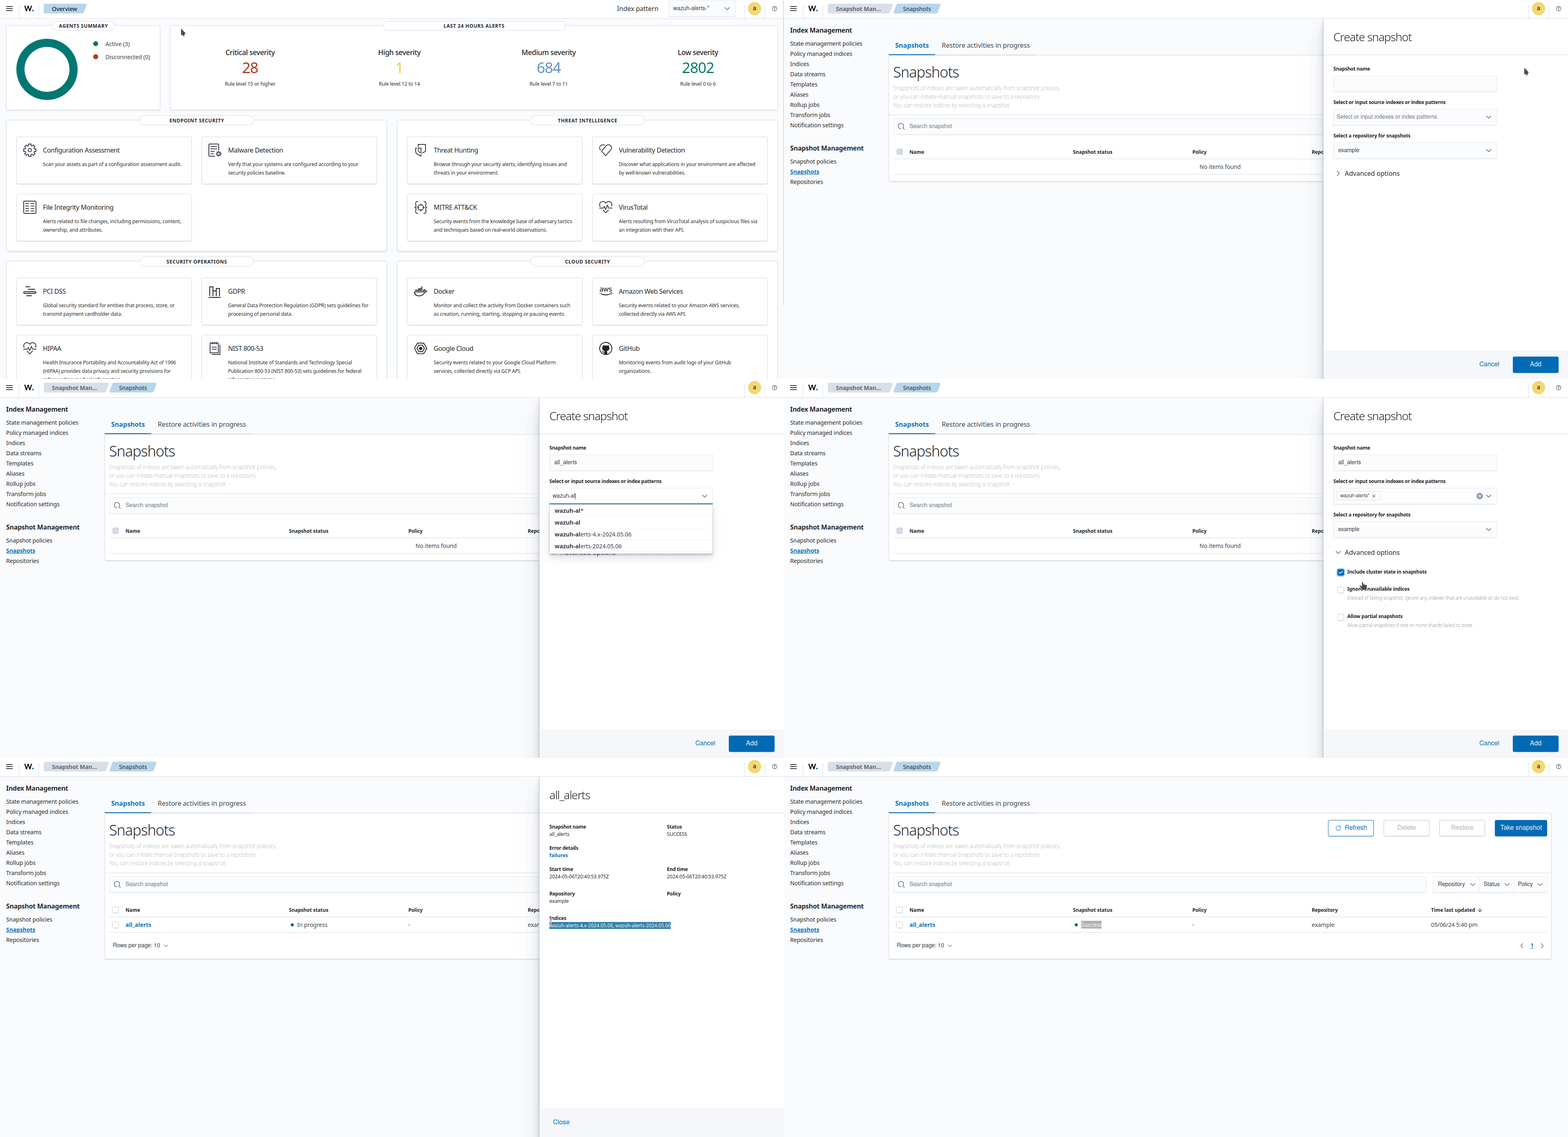
Click the upper left menu ☰ > Index management > Snapshot Management > Snapshots.
Select + Take snapshot, and enter a Snapshot name.
Click Select or input indexes or index patterns, and select or type a source index pattern. For example,
wazuh-findings*.Select the earlier created repository to store the snapshots.
Optional: Select Advanced options and check the Include cluster state in snapshots and Ignore unavailable indices option.
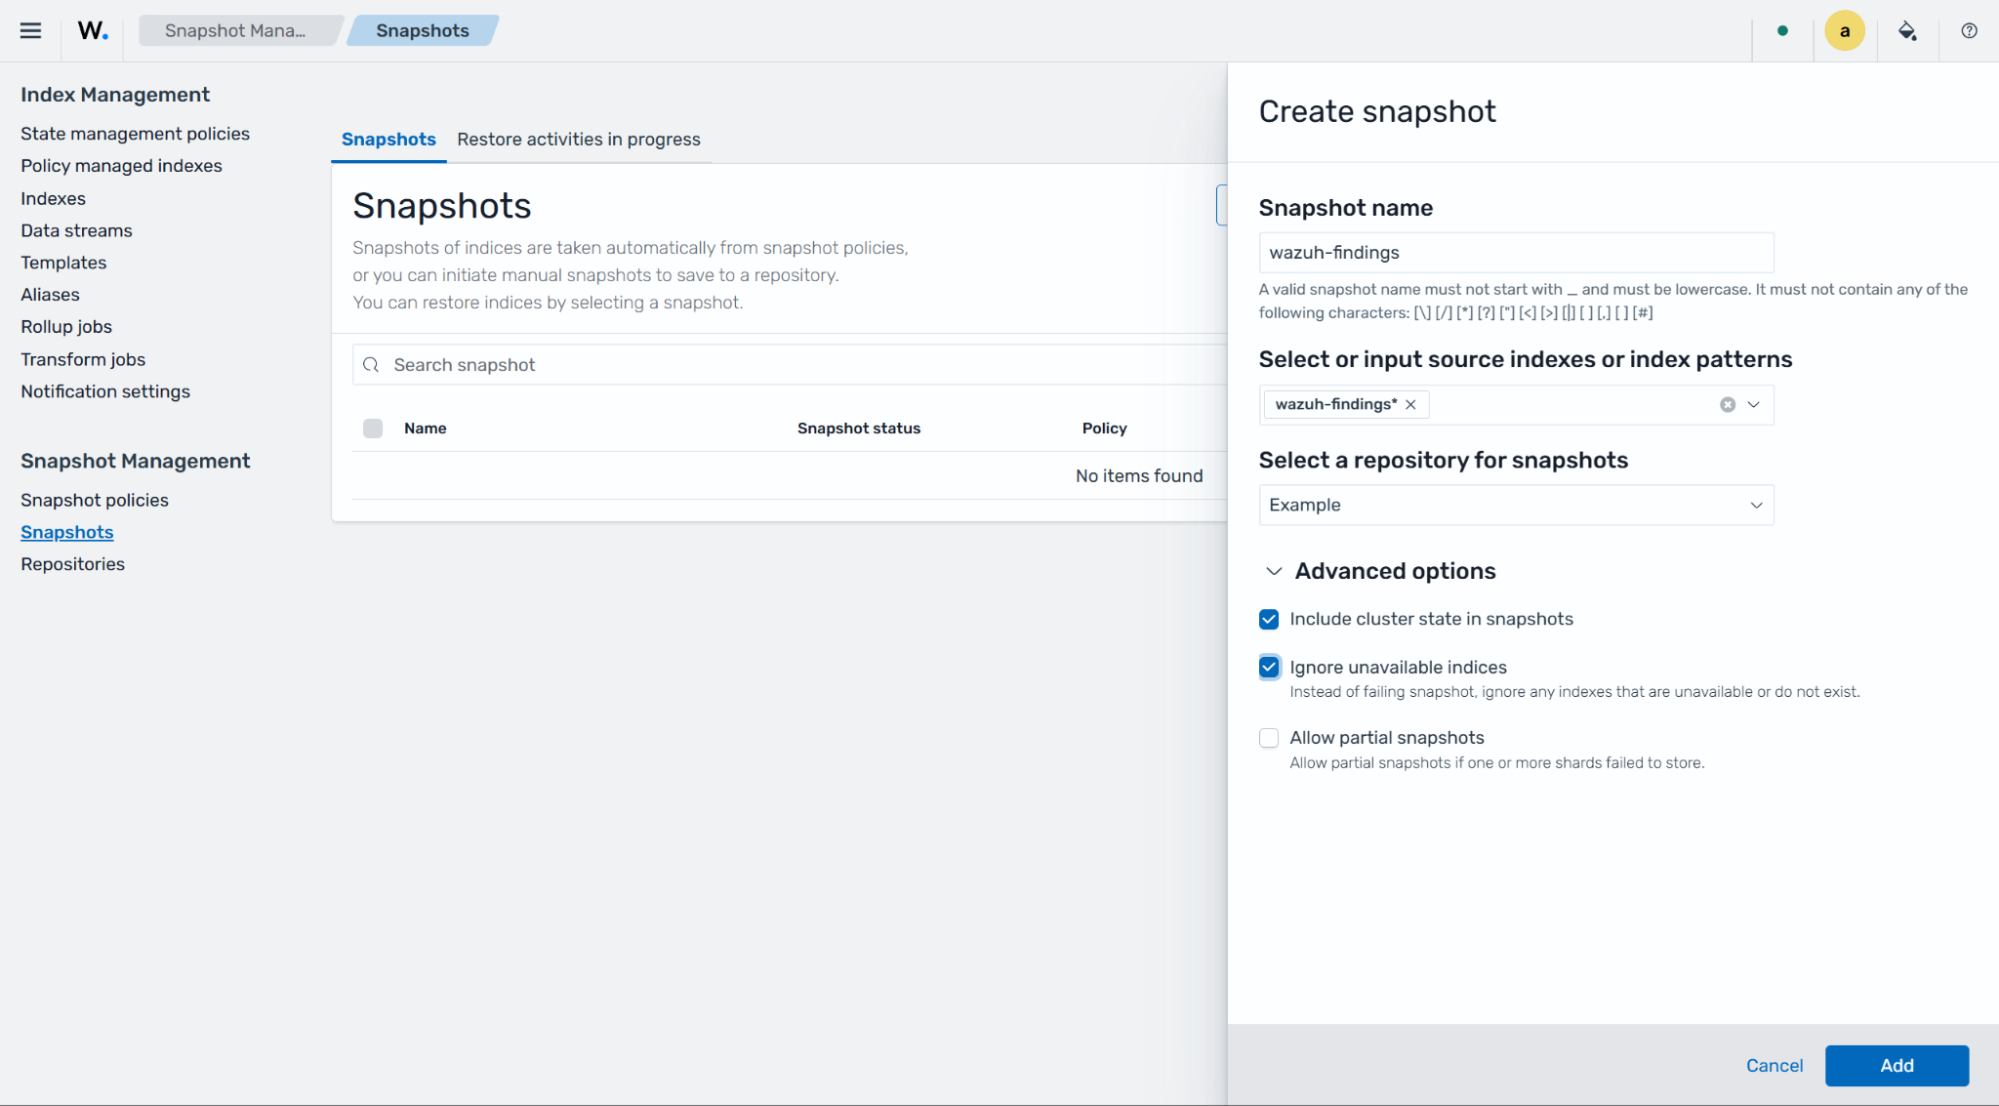
Select Add to create a new snapshot.
The snapshot files are saved in the repository location /mnt/snapshots on the source Wazuh indexer node.
Migrate snapshot
Follow the steps below to migrate the Wazuh index snapshots from the source to the destination Wazuh indexer node.
Source Wazuh indexer node
Perform the following steps on the source Wazuh indexer node to archive and copy the snapshot files to the destination Wazuh indexer node:
Create a tar file
snapshots.tar, from the snapshot files in the/mnt/snapshotsdirectory.# tar -C /mnt/snapshots -cvf snapshots.tar .
Copy the tar file to the destination Wazuh indexer node:
# scp snapshots.tar <USERNAME>@<IP_ADDRESS>:.
Replace:
<USERNAME>: with the username of the destination Wazuh indexer node.<IP_ADDRESS>: with the IP address of the destination Wazuh indexer node.
Destination Wazuh indexer node
Perform the following steps on the destination Wazuh indexer node to unarchive the snapshot files and move them to the /mnt/snapshots directory:
Untar the
snapshots.tarfile. This command adds all the snapshot files to the/mnt/snapshotsdirectory on the destination server.# tar -xvf <FULL_PATH>/snapshots.tar -C /mnt/snapshots
Replace:
<FULL_PATH>: with the full path tosnapshots.tarfile on the destination Wazuh indexer node.
Restore snapshot
To complete the Wazuh index migration, restore the snapshots taken from the source Wazuh indexer to the destination Wazuh indexer. Perform the following steps on the destination Wazuh dashboard:
Note
It is necessary to have performed the steps in the Set up a snapshot repository section on the destination Wazuh cluster before proceeding to Restore snapshots.
Restart the Wazuh indexer node in the destination Wazuh cluster to load the snapshot files using the command:
# systemctl restart wazuh-indexer
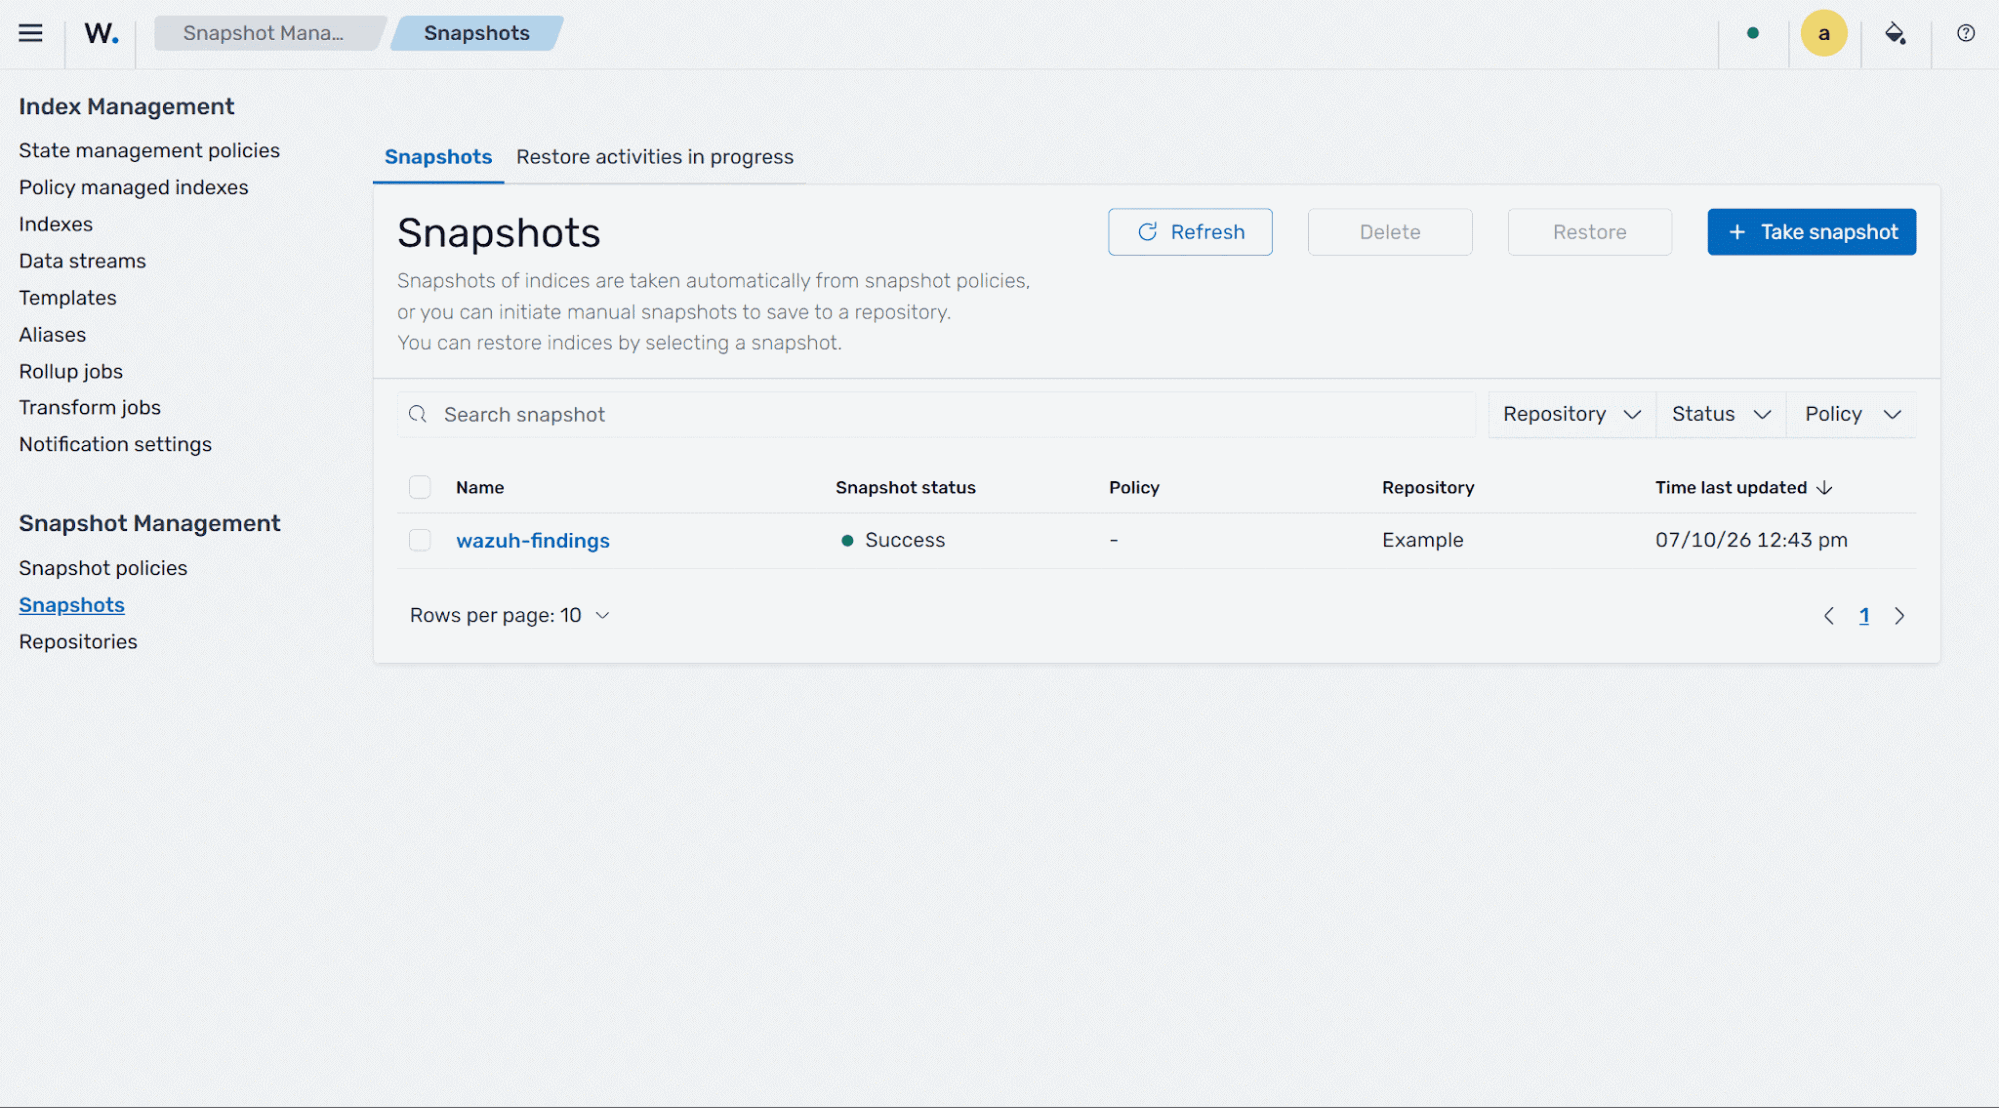
Click the upper left menu ☰ > Index management > Snapshot Management > Snapshots, and select Refresh to reload the Snapshots page. The snapshot in the repository location
/mnt/snapshotswill show on the destination Wazuh dashboard.Select the snapshot and click Restore.
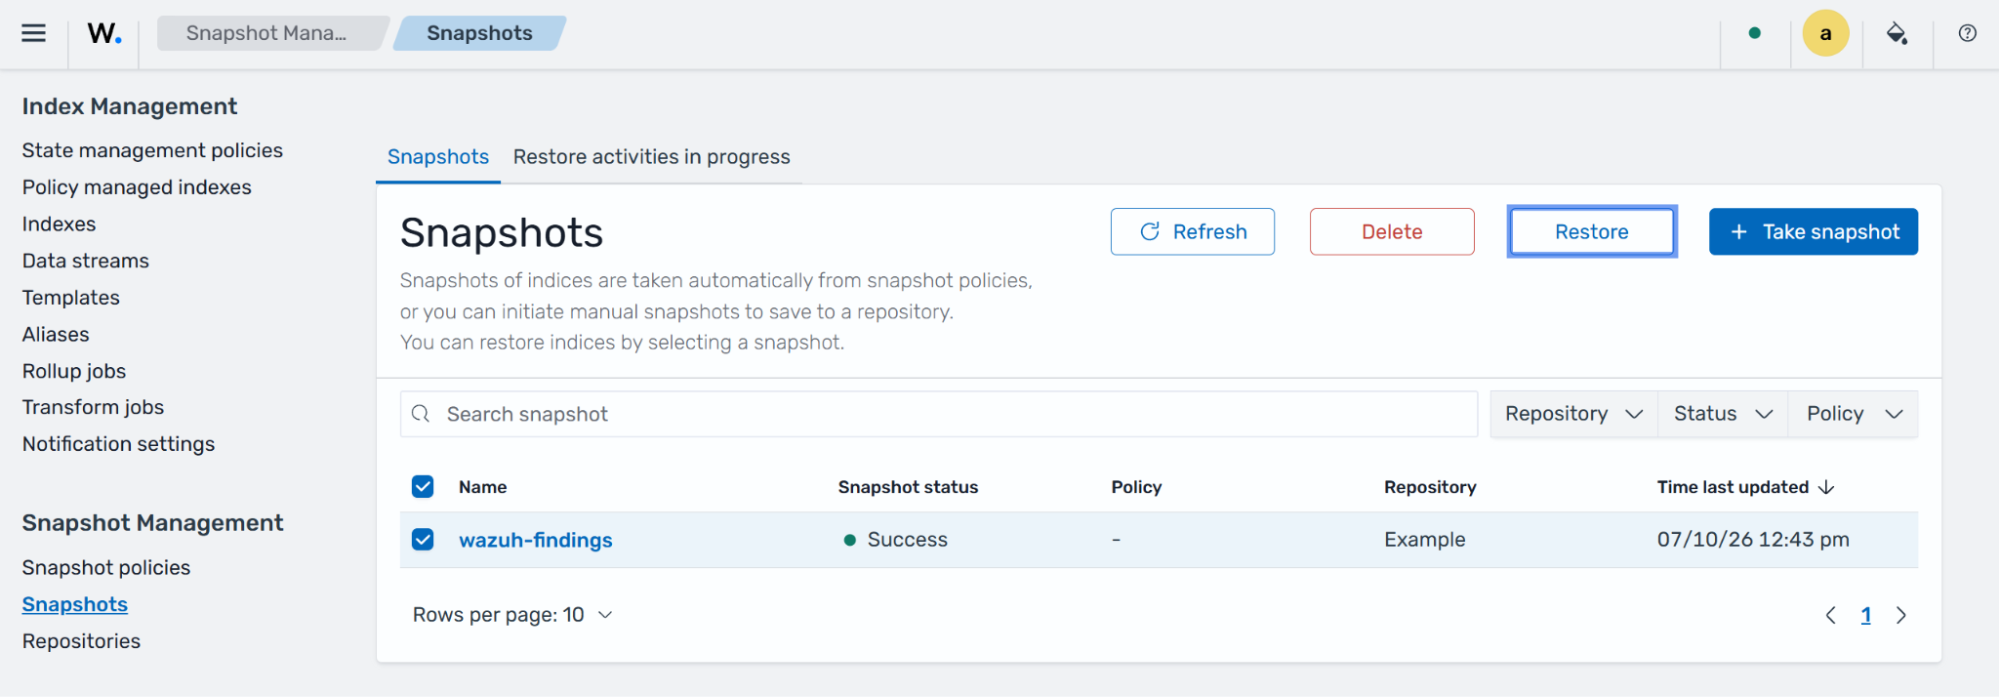
Specify your preferred restore option to Restore all indices in the snapshot or Restore specific indices. Select your preferred option for renaming the indices, and select all that applies under Advanced options.
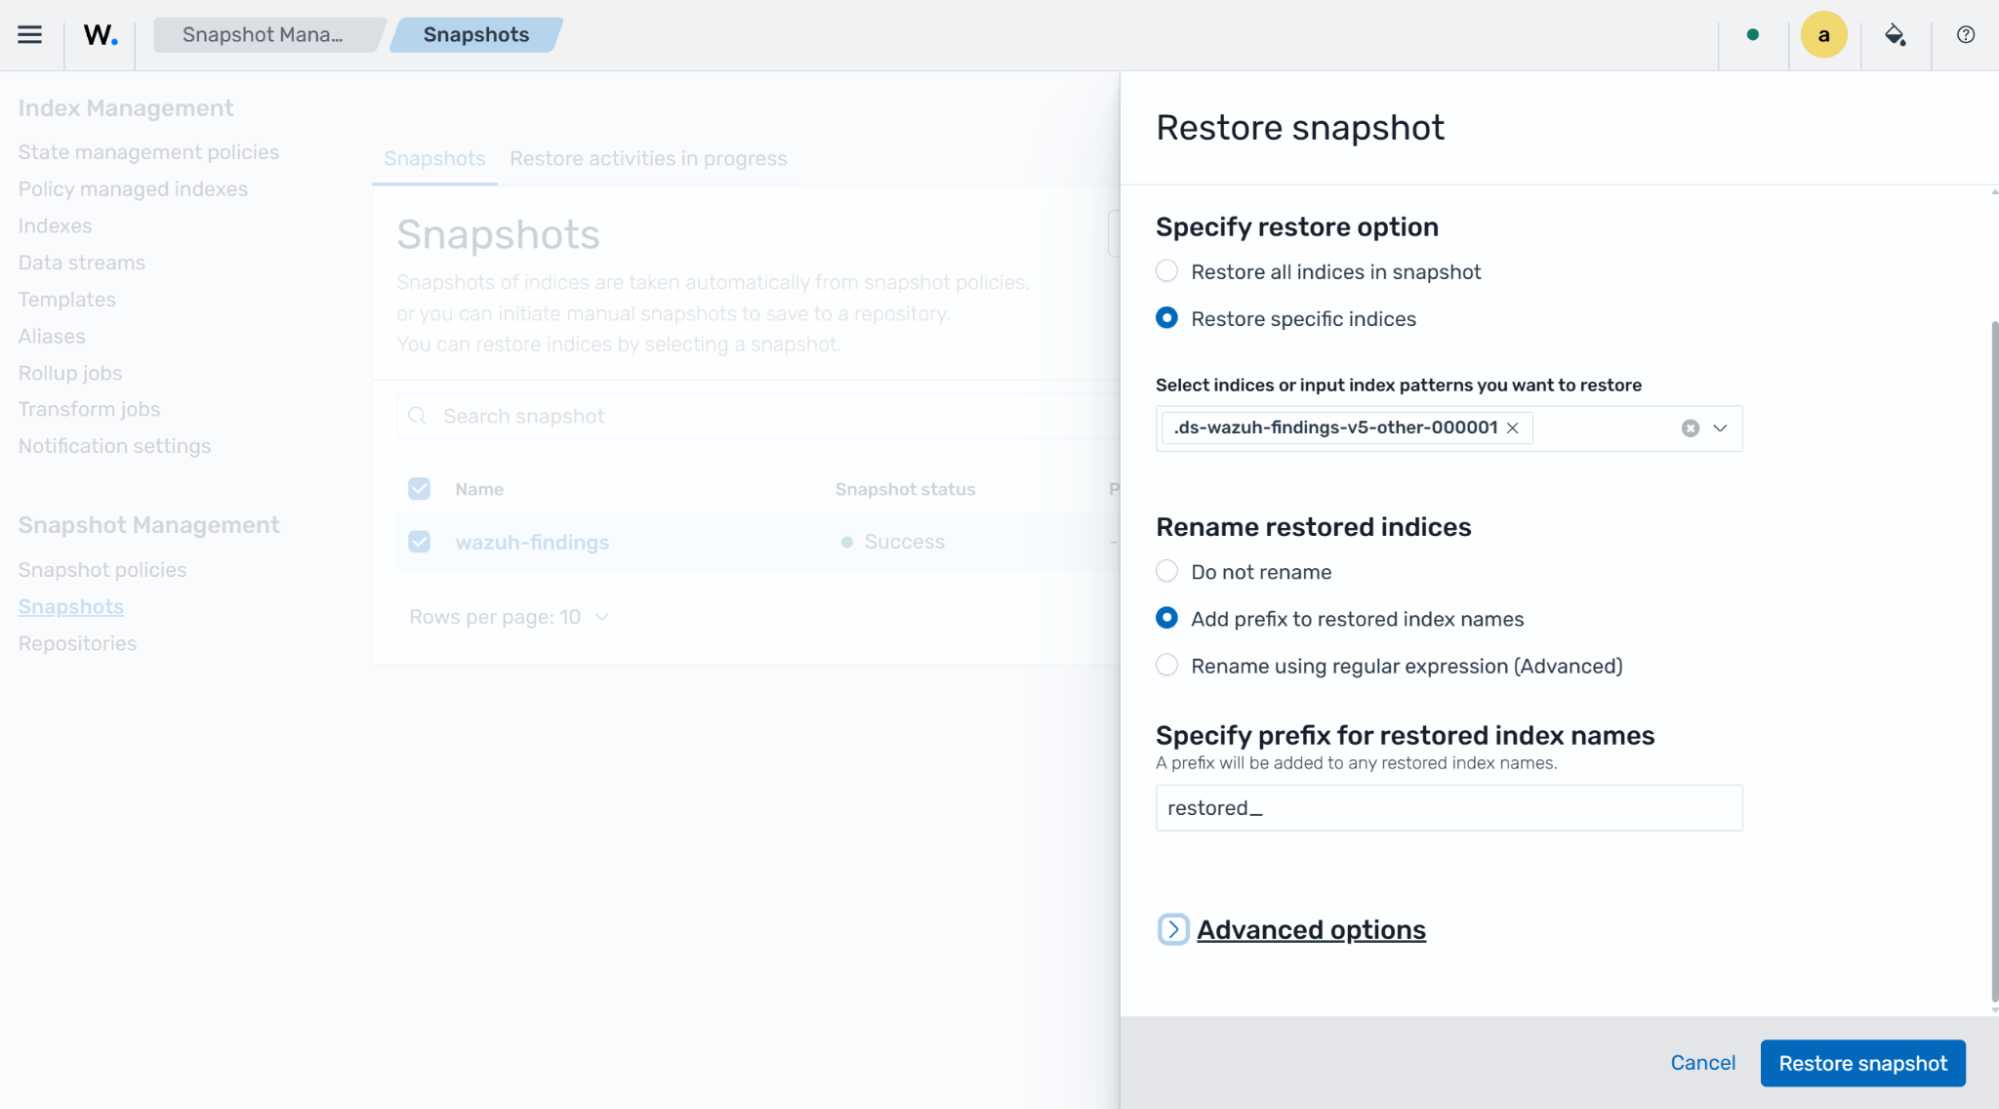
Click Restore snapshot to complete the migration process.
Using a shared file system (NFS)
To migrate Wazuh indices, we also use a Network File System (NFS) to create a shared file system for the snapshot repository. A dedicated endpoint is used to install and configure NFS, and the source and destination Wazuh indexer nodes are connected to the shared file system. This allows the destination Wazuh indexer node to access the snapshots and restore it to complete the Wazuh indices migration.
NFS server
Perform the following steps to set up NFS on a dedicated endpoint:
Create a target directory for the snapshot repository in the
/mntdirectory:# mkdir /mnt/snapshots
Install NFS by running the following commands:
# yum update
# yum install -y nfs-utils
# yum install exportfs
# systemctl enable nfs-server
# systemctl start nfs-server
# apt -y install nfs-kernel-server
# systemctl start nfs-kernel-server.service
Add the
/mnt/snapshotsdirectory to the/etc/exportsfile using the command below. Replace the<NETWORK_ADDRESS/CIDR>variable with your network address.# echo "/mnt/snapshots <NETWORK_ADDRESS/CIDR>(rw,sync,no_root_squash,no_subtree_check)" | sudo tee -a /etc/exportsFor example:
# echo "/mnt/snapshots 192.168.0.0/24(rw,sync,no_root_squash,no_subtree_check)" | sudo tee -a /etc/exports
Where:
rw- Allows both read and write access to the shared directory.sync- Forces the NFS server to write changes to the disk immediately, making the file system synchronous.no_root_squash- Allows the "root" user on the NFS client system to have full, unrestricted access to files on the NFS server.no_subtree_check- Disables subtree checking, which can improve performance for large directory trees.
Apply the NFS configuration:
# exportfs -a
Wazuh indexer
Perform the following steps on the source and destination Wazuh indexer nodes to complete the shared file system setup.
Create a target directory for the snapshot repository in the
/mntdirectory:# mkdir /mnt/snapshots
Install the NFS client:
# yum -y install nfs-utils
# apt -y install nfs-common
Mount the shared directory
/mnt/snapshotson the Wazuh indexer node(s). Replace the<NFS_SERVER_IP>variable with the IP address of the NFS server:# mount -t nfs <NFS_SERVER_IP>:/mnt/snapshots /mnt/snapshots
Grant the
wazuh-indexeruser ownership of the/mnt/snapshotsdirectory:# chown wazuh-indexer:wazuh-indexer /mnt/snapshots
Add the configuration:
path.repo: /mnt/snapshotsto the/etc/wazuh-indexer/opensearch.ymlfile to specify the repository path:Example:
network.host: 127.0.0.1
node.name: indexer
cluster.initial_cluster_manager_nodes:
  - "indexer"
cluster.name: "wazuh-cluster"
discovery.seed_hosts:
  - "127.0.0.1"
node.max_local_storage_nodes: "3"
path.data: /var/lib/wazuh-indexer
path.logs: /var/log/wazuh-indexer
path.repo: /mnt/snapshots

plugins.security.ssl.http.pemcert_filepath: /etc/wazuh-indexer/certs/indexer.pem
plugins.security.ssl.http.pemkey_filepath: /etc/wazuh-indexer/certs/indexer-key.pem
plugins.security.ssl.http.pemtrustedcas_filepath: /etc/wazuh-indexer/certs/root-ca.pem
plugins.security.ssl.transport.pemcert_filepath: /etc/wazuh-indexer/certs/indexer.pem
plugins.security.ssl.transport.pemkey_filepath: /etc/wazuh-indexer/certs/indexer-key.pem
plugins.security.ssl.transport.pemtrustedcas_filepath: /etc/wazuh-indexer/certs/root-ca.pem
plugins.security.ssl.http.enabled: true
plugins.security.ssl.transport.enforce_hostname_verification: false
plugins.security.ssl.transport.resolve_hostname: false
plugins.security.authcz.admin_dn:
  - "CN=admin,OU=Wazuh,O=Wazuh,L=California,C=US"
plugins.security.check_snapshot_restore_write_privileges: true
plugins.security.enable_snapshot_restore_privilege: true
plugins.security.nodes_dn:
  - "CN=indexer,OU=Wazuh,O=Wazuh,L=California,C=US"
plugins.security.restapi.roles_enabled:
  - "all_access"
  - "security_rest_api_access"
plugins.security.system_indices.enabled: true
plugins.security.system_indices.indices: [".opendistro-alerting-config", ".opendistro-alerting-alert*", ".opendistro-re>
cluster.default_number_of_replicas: 0
bootstrap.memory_lock: true

# Resilience under heap pressure (small heaps, e.g. 2 GB): shed work — reject (429)
# and cancel runaway searches instead of letting the JVM heap exhaust and crash.
search_backpressure.mode: enforced                    # actually cancel heavy search tasks (default only logs)
indices.breaker.total.use_real_memory: true           # account real heap used, not just reserved bytes
indices.breaker.total.limit: 80%                      # trip early (default 95%); leaves headroom for Lucene flush/merge
indexing_pressure.memory.limit: 10%                   # cap in-flight indexing bytes; reject excess bulk

# Use no replicas by default on ISM internal indices
plugins.index_state_management.history.number_of_replicas: 0
Restart the Wazuh indexer to apply the configuration changes:
# systemctl restart wazuh-indexer
Note
Make sure to confirm that the
/mnt/snapshotsdirectory has thewazuh-indexer:wazuh-indexerownership on the Wazuh indexer nodes by runningls -l /mnt/snapshots.
Set up snapshot repository
Perform the following steps on the source and destination Wazuh dashboards to configure the /mnt/snapshots directory as the snapshot storage location:
Click the upper left menu ☰ > Index management > Snapshot Management > Repositories, and select + Create repository to create a new snapshot repository.
Enter a repository name, select the repository type Shared file system, enter the repository location
/mnt/snapshots, and select Add to register the new repository.
Take snapshot
Perform the following steps on the source Wazuh dashboard to take a snapshot:
Click the upper left menu ☰ > Index management > Snapshot Management > Snapshots.
Select + Take snapshot, and enter a Snapshot name.
Click Select or input indexes or index patterns, and select or type a source index pattern. For example,
wazuh-findings*.Select the earlier created repository to store the snapshots.
Optional: Select Advanced options and check the Include cluster state in snapshots and Ignore unavailable indices option.
Select Add to create a new snapshot.
The snapshot files are saved in the repository location /mnt/snapshots on the source Wazuh indexer node.
Restore snapshot
To complete the Wazuh index migration, restore the snapshots taken from the source Wazuh indexer to the destination Wazuh indexer. Perform the following steps on the destination Wazuh dashboard:
Note
It is necessary to have performed the steps in the Set up a snapshot repository section on the destination Wazuh cluster before proceeding to Restore snapshots.
Restart the Wazuh indexer node in the destination Wazuh cluster to load the snapshot files using the command:
# systemctl restart wazuh-indexer
Click the upper left menu ☰ > Index management > Snapshot Management > Snapshots, and select Refresh to reload the Snapshots page. The snapshot in the repository location
/mnt/snapshotswill show on the destination Wazuh dashboard.Select the snapshot and click Restore.
Specify your preferred restore option to Restore all indices in the snapshot or Restore specific indices. Select your preferred option for renaming the indices, and select all that applies under Advanced options.
Click Restore snapshot to complete the migration process.