Wazuh indexer
Wazuh 5.x introduces changes to the Wazuh indexer cluster configuration, security settings, and index management. Deploy a new Wazuh indexer and recreate the supported configuration and security settings from the Wazuh 4.x deployment.
You can recreate the following Wazuh indexer configuration and security settings in Wazuh 5.x:
Cluster and node configuration
TLS certificates
Security configuration
Internal users
Roles and role mappings
External authentication providers, including LDAP, Active Directory, SAML, JWT, Kerberos, and client-certificate authentication
You can migrate Wazuh index data from the existing Wazuh 4.x indexer to the Wazuh 5.x indexer using snapshots. The migration requires a snapshot repository that is accessible to the source and destination Wazuh indexer clusters. The following sections describe how to recreate the Wazuh indexer configuration and security settings and migrate the required index data.
Wazuh indexer configuration
Wazuh indexer 5.x stores its configuration under /etc/wazuh-indexer/. The following configuration files and directories are commonly reviewed during the migration.
Path |
Purpose |
|---|---|
|
Main cluster and node configuration |
|
JVM heap and garbage collection settings |
|
Logging configuration |
|
Transport and HTTP TLS certificates |
|
Security plugin configuration |
Note
Do not copy configuration files from a 4.x deployment directly into a 5.x deployment. Use the 4.x configuration as a reference and recreate the required settings manually in the corresponding 5.x files.
Migrate the Wazuh indexer configuration
Perform the following steps on the new Wazuh 5.x endpoint.
Stop the Wazuh indexer service:
# systemctl stop wazuh-indexer
Review the Wazuh 4.x configuration and recreate the required settings manually in the corresponding Wazuh 5.x files.
Review any custom JVM and logging configuration before you apply it to the Wazuh 5.x deployment.
Complete the security configuration described in the Wazuh indexer security configuration section.
Start the Wazuh indexer service:
# systemctl start wazuh-indexer
Verify that the node joins the cluster.
$ curl -k -u <USERNAME>:<PASSWORD> \
  https://<WAZUH_INDEXER_IP>:9200/_cat/nodes?v
Where:
<USERNAME>: is the username of a Wazuh indexer user with permissions to query the cluster.<PASSWORD>: is the password of the specified Wazuh indexer user.<WAZUH_INDEXER_IP>: is the IP address or hostname of a Wazuh indexer node in the Wazuh 5.x cluster.
Note
The default credentials for the Wazuh indexer are
admin:admin.
Wazuh indexer security configuration
The Wazuh indexer security configuration controls authentication, authorization, user management, and access permissions.
During the migration, review the existing Wazuh 4.x security configuration and recreate the required users, roles, role mappings, authentication providers, and security settings manually in the corresponding Wazuh 5.x files.
The security configuration is stored under /etc/wazuh-indexer/opensearch-security/.
File |
Purpose |
|---|---|
|
Authentication and authorization configuration |
|
Internal user accounts |
|
Role definitions |
|
Role mappings |
|
Permission groups |
|
Dashboard tenants |
|
Allowed node certificate identities |
|
Restricted API access configuration |
|
Audit logging configuration |
Note
Before migrating the security settings, use the backup procedure to export the active Wazuh 4.x security configuration. The files on disk might not reflect the active configuration because the effective security configuration is stored in the Wazuh indexer security index.
Before applying the recreated security configuration, verify that the recreated roles reference valid permissions and that the role mappings reference users and roles defined in the Wazuh 5.x security configuration. Refer to the user administration documentation for more information.
Apply the security configuration
After you recreate the required security configuration, apply the changes to the Wazuh indexer.
Restart the Wazuh indexer service:
# systemctl restart wazuh-indexer
Apply the security configuration:
# /usr/share/wazuh-indexer/bin/indexer-security-init.shWarning
Running
indexer-security-init.shloads the security configuration from/etc/wazuh-indexer/opensearch-security/into the Wazuh indexer security index. This can overwrite security settings previously configured through the Wazuh dashboard or security API. Ensure that the configuration files contain the security settings you want to retain before running the script.Verify that authentication works. Log in to the Wazuh dashboard and confirm that users can authenticate and access the resources their assigned roles permit.
Indexer data migration
You can migrate Wazuh indices from the Wazuh 4.x indexer to the Wazuh 5.x indexer using snapshots. The migration requires a snapshot repository that is accessible to both the source and destination Wazuh indexer clusters. When restored on the destination Wazuh indexer, the indices retain their indexed data and original timestamps.
The restored indices remain separate from the Wazuh 5.x indices and data streams created for new data. You can create an index pattern for the restored indices to search and analyze historical data from the Discover page on the Wazuh dashboard.
Note
Restored indices retain their Wazuh 4.x mappings and remain separate from the Wazuh 5.x data schema. Wazuh 5.x does not write new data to the restored indices.
The following sections describe the steps required to migrate Wazuh indices from the Wazuh 4.x indexer to the Wazuh 5.x indexer.
Note
Index data migration to Wazuh 5.x requires the source deployment to run Wazuh 4.4.0 or later due to snapshot compatibility requirements.
Setting up a shared file system
Perform the following steps on a server that is accessible from both the Wazuh 4.x and Wazuh 5.x indexer clusters.
NFS server
Create the snapshot directory:
# mkdir -p /mnt/snapshots
Install and start the NFS service.
For RPM-based distributions:
# yum install -y nfs-utils
# systemctl enable nfs-server
# systemctl start nfs-server
For Debian-based distributions:
# apt -y install nfs-kernel-server
# systemctl enable nfs-kernel-server
# systemctl start nfs-kernel-server
Configure the snapshot directory as an NFS export:
# echo "/mnt/snapshots <NETWORK_ADDRESS/CIDR>(rw,sync,no_root_squash,no_subtree_check)" >> /etc/exports
Replace
<NETWORK_ADDRESS/CIDR>with the network containing the Wazuh indexer nodes. For example,192.168.33.0/24.Apply the NFS configuration:
# exportfs -a
Configure the Wazuh indexers
Perform the following steps on every Wazuh indexer node in the source Wazuh 4.x cluster and destination Wazuh 5.x cluster.
Create the snapshot repository directory:
# mkdir -p /mnt/snapshots
Install the NFS client.
RPM-based:
# yum install -y nfs-utils
Debian-based:
# apt -y install nfs-common
Mount the shared NFS directory:
# mount -t nfs <NFS_SERVER_IP>:/mnt/snapshots /mnt/snapshots
Replace
<NFS_SERVER_IP>with the IP address of the NFS server configured in the previous section.Grant the Wazuh indexers access to the directory:
# chown wazuh-indexer:wazuh-indexer /mnt/snapshots
Add the snapshot repository path to
/etc/wazuh-indexer/opensearch.yml:path.repo: - /mnt/snapshots
Restart the Wazuh indexer:
# systemctl restart wazuh-indexer
Verify the directory ownership:
# ls -ld /mnt/snapshots
Note
In a distributed deployment, mount the shared directory and configure
path.repoon every Wazuh indexer node in the cluster. In an all-in-one deployment, perform these steps on the host running the Wazuh indexer.
Set up snapshot repository on Wazuh 4.x
On the Wazuh 4.x dashboard, perform the following steps:
Click the ☰ menu, navigate to Indexer management > Snapshot Management > Repositories, and select Create repository to create a new snapshot repository.
Enter a Repository name, select the repository type Shared file system, enter the repository Location
/mnt/snapshots, and select Add to register the new repository.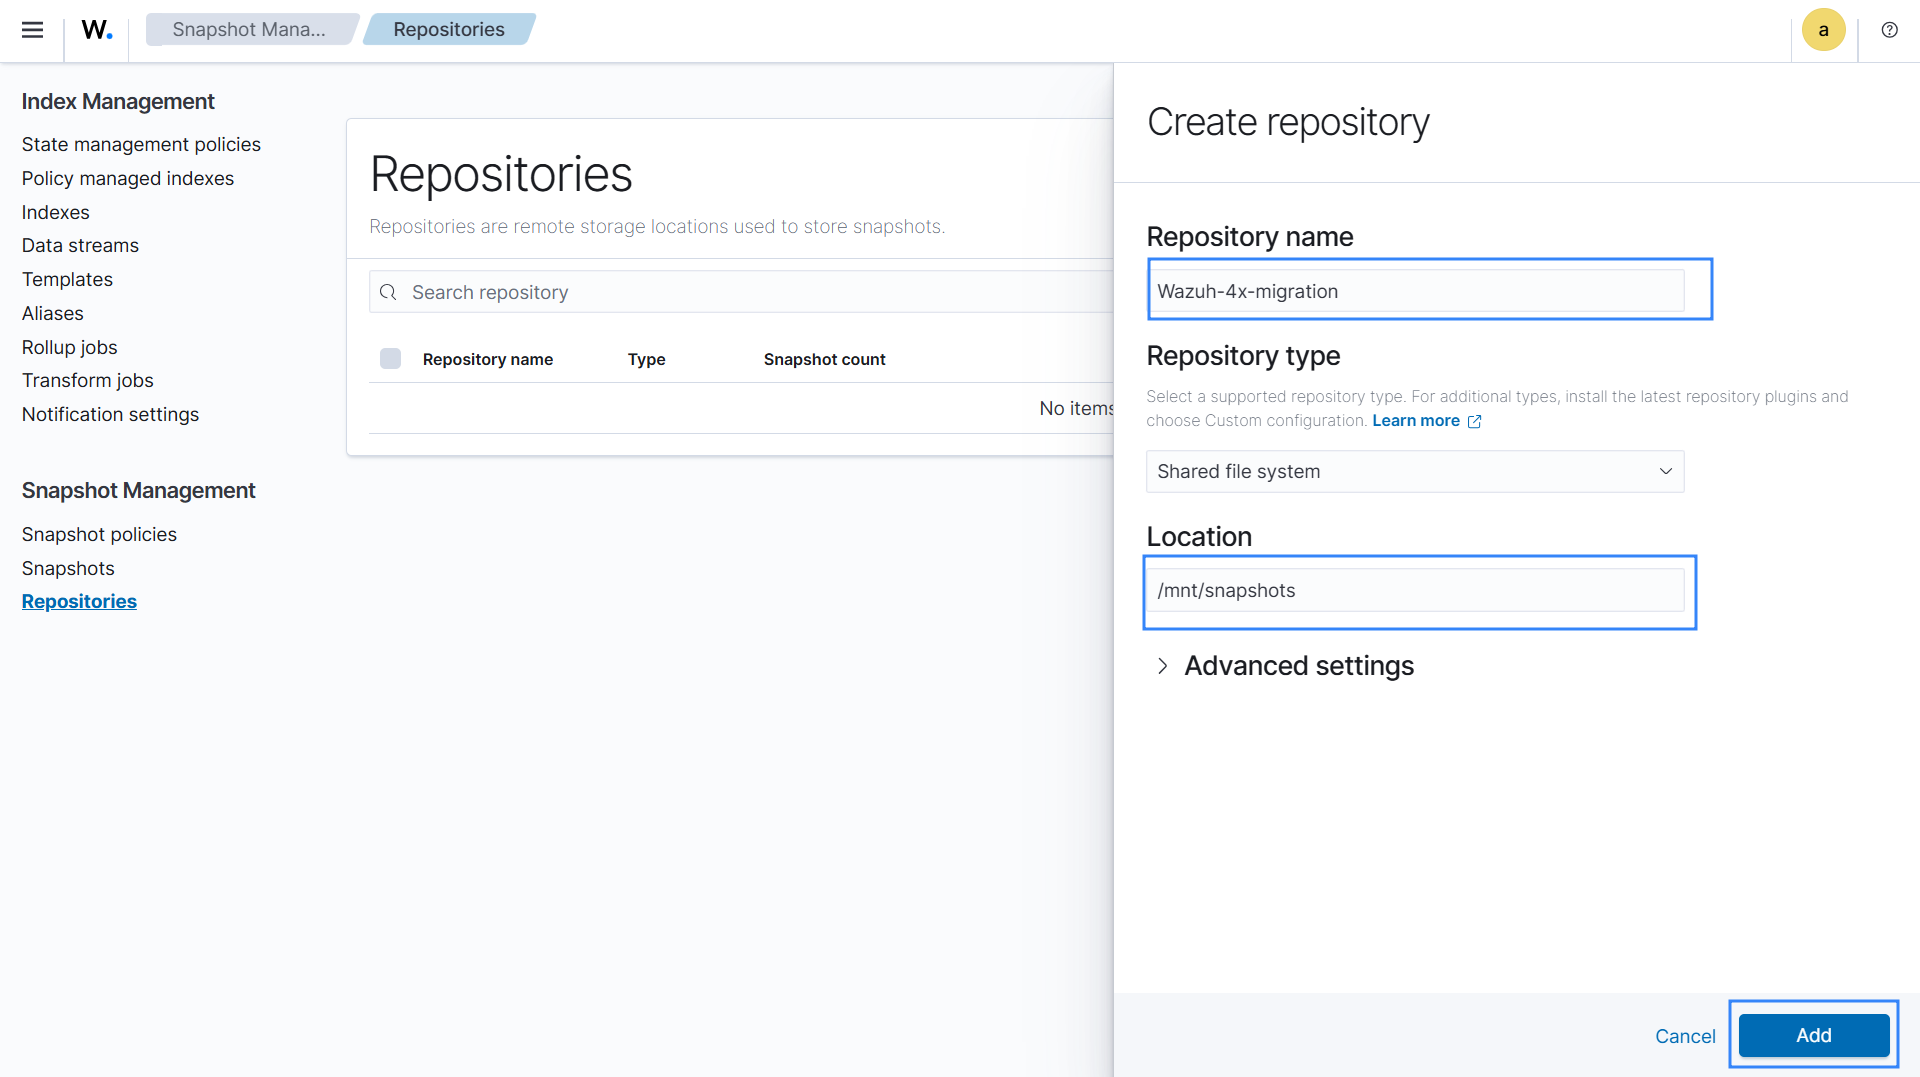
Take a snapshot of the Wazuh 4.x indices
On the Wazuh 4.x dashboard, perform the following steps:
Click the ☰ menu, navigate to Indexer management > Snapshot Management > Snapshots.
Select Take snapshot and enter a Snapshot name.
Select only the Wazuh data indices that you want to migrate.
Warning
Do not include system indices or the cluster state in the migration snapshot. The snapshot is intended to transfer Wazuh 4.x historical data to the new Wazuh 5.x deployment, not the Wazuh 4.x indexer configuration.
Select the repository you created earlier to store the snapshots.
Ensure Include global state is not selected in the Advanced options to prevent the snapshot from including cluster-level configuration.
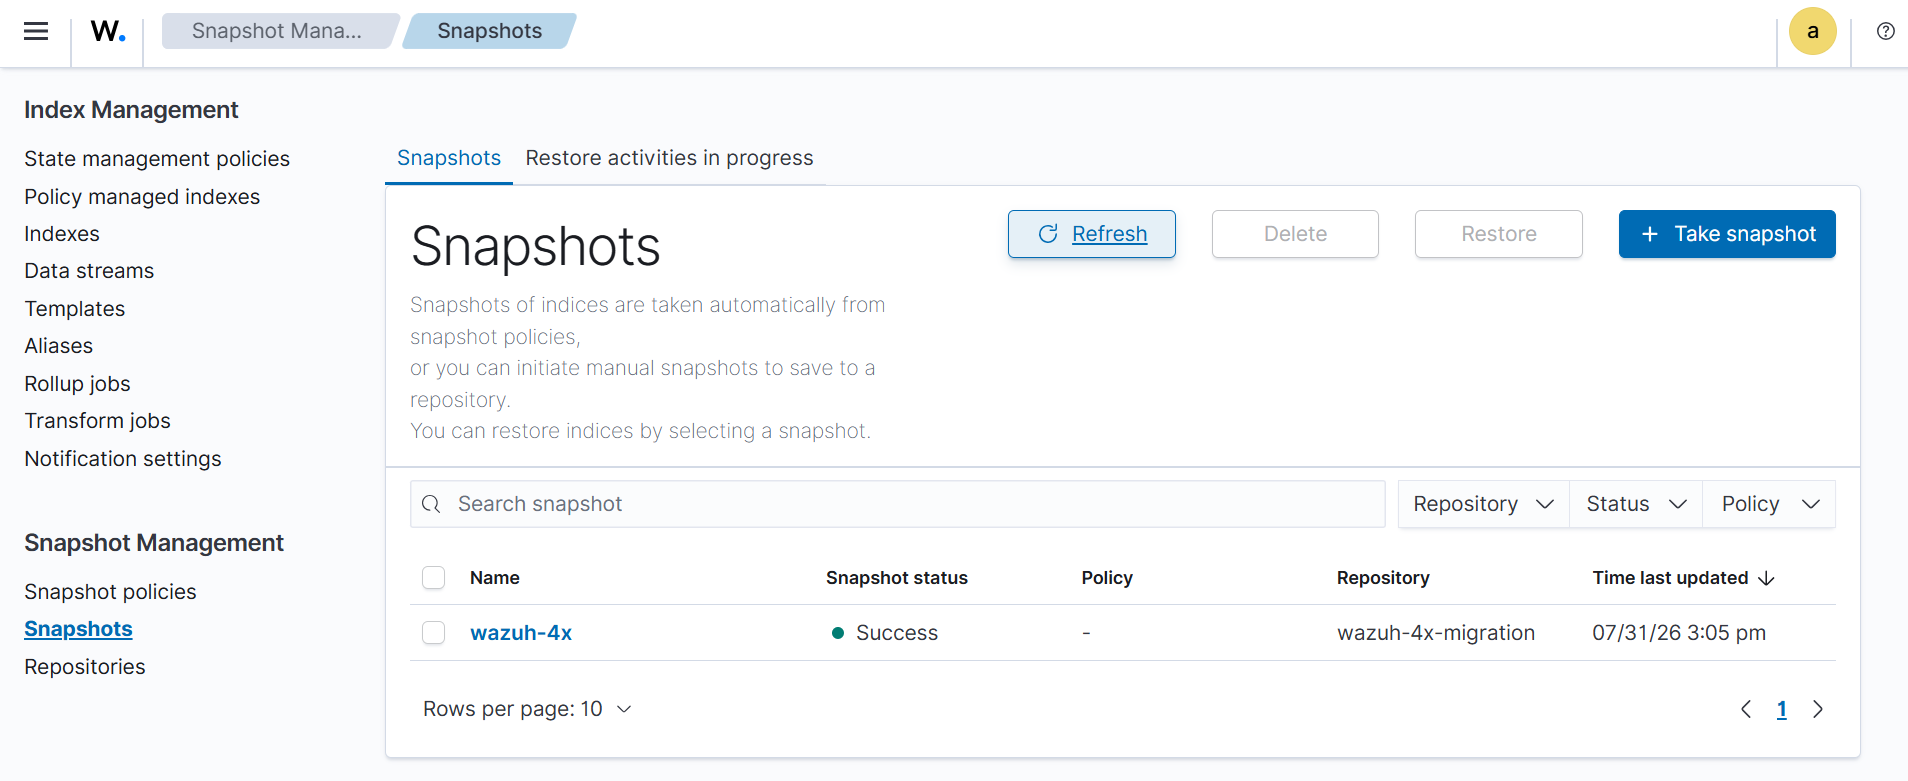
Click Add to create a new snapshot. The snapshot files are saved in the repository location
/mnt/snapshots.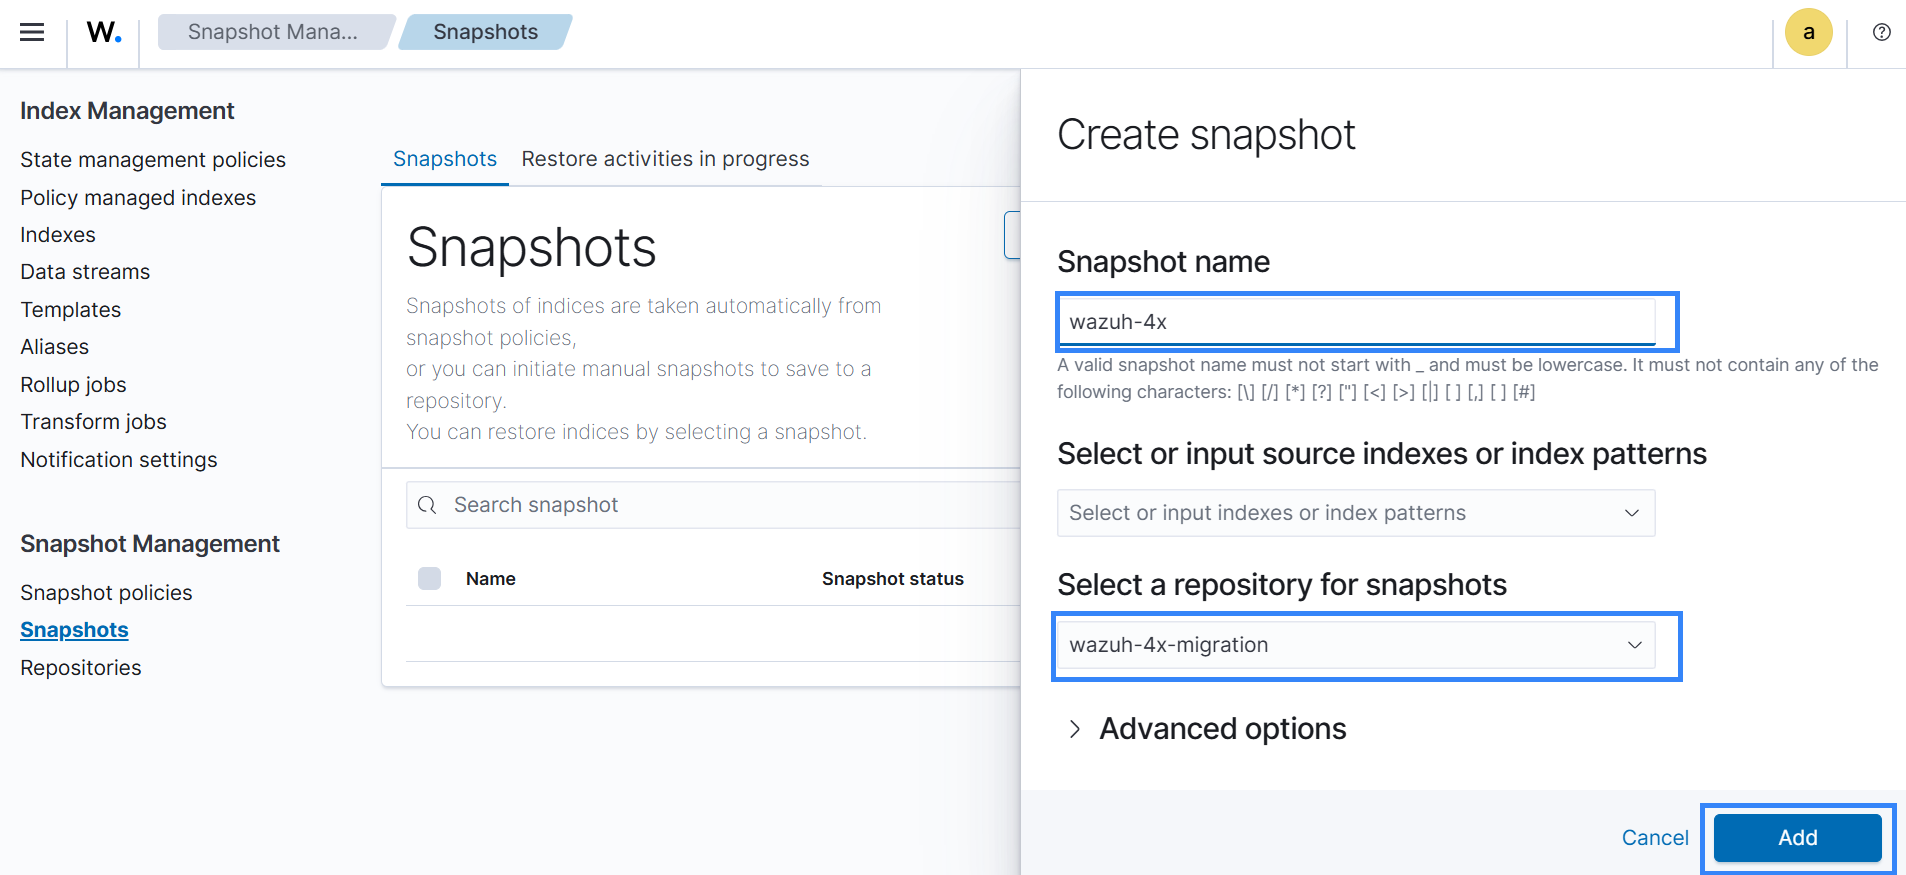
Set up a snapshot repository on Wazuh 5.x
Run the command below on the Wazuh 5.x indexer node to set up a read-only snapshot repository:
# curl -sk -X PUT \
  --cert /etc/wazuh-indexer/certs/admin.pem \
  --key /etc/wazuh-indexer/certs/admin-key.pem \
  "https://<WAZUH_INDEXER_IP>:9200/_snapshot/Wazuh-4x-migration" \
  -H "Content-Type: application/json" \
  -d '{
    "type": "fs",
    "settings": {
      "location": "/mnt/snapshots",
      "readonly": true
    }
  }'
The command output looks similar to this:
{"acknowledged":true}
Replace <WAZUH_INDEXER_IP> with the IP address of the Wazuh 5.x indexer.
Restoring the snapshot on Wazuh 5.x
Perform the following steps on the Wazuh 5.x deployment.
On the Wazuh dashboard, navigate to Indexer management > Snapshot Management > Snapshots. The snapshot created on the Wazuh 4.x deployment is available to the Wazuh 5.x deployment through the shared
/mnt/snapshotsrepository. Select the migration snapshot, then click Restore.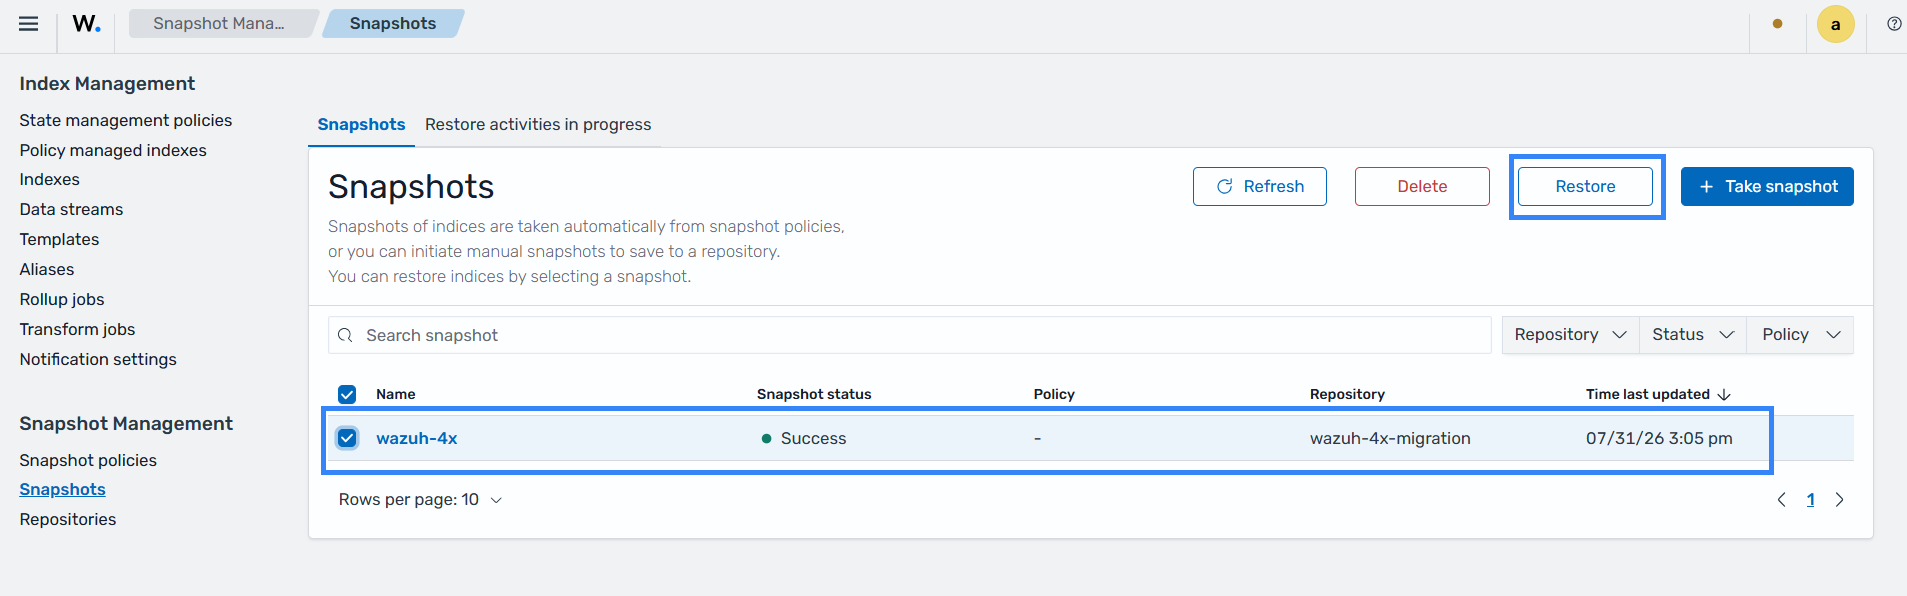
Click Restore snapshot.
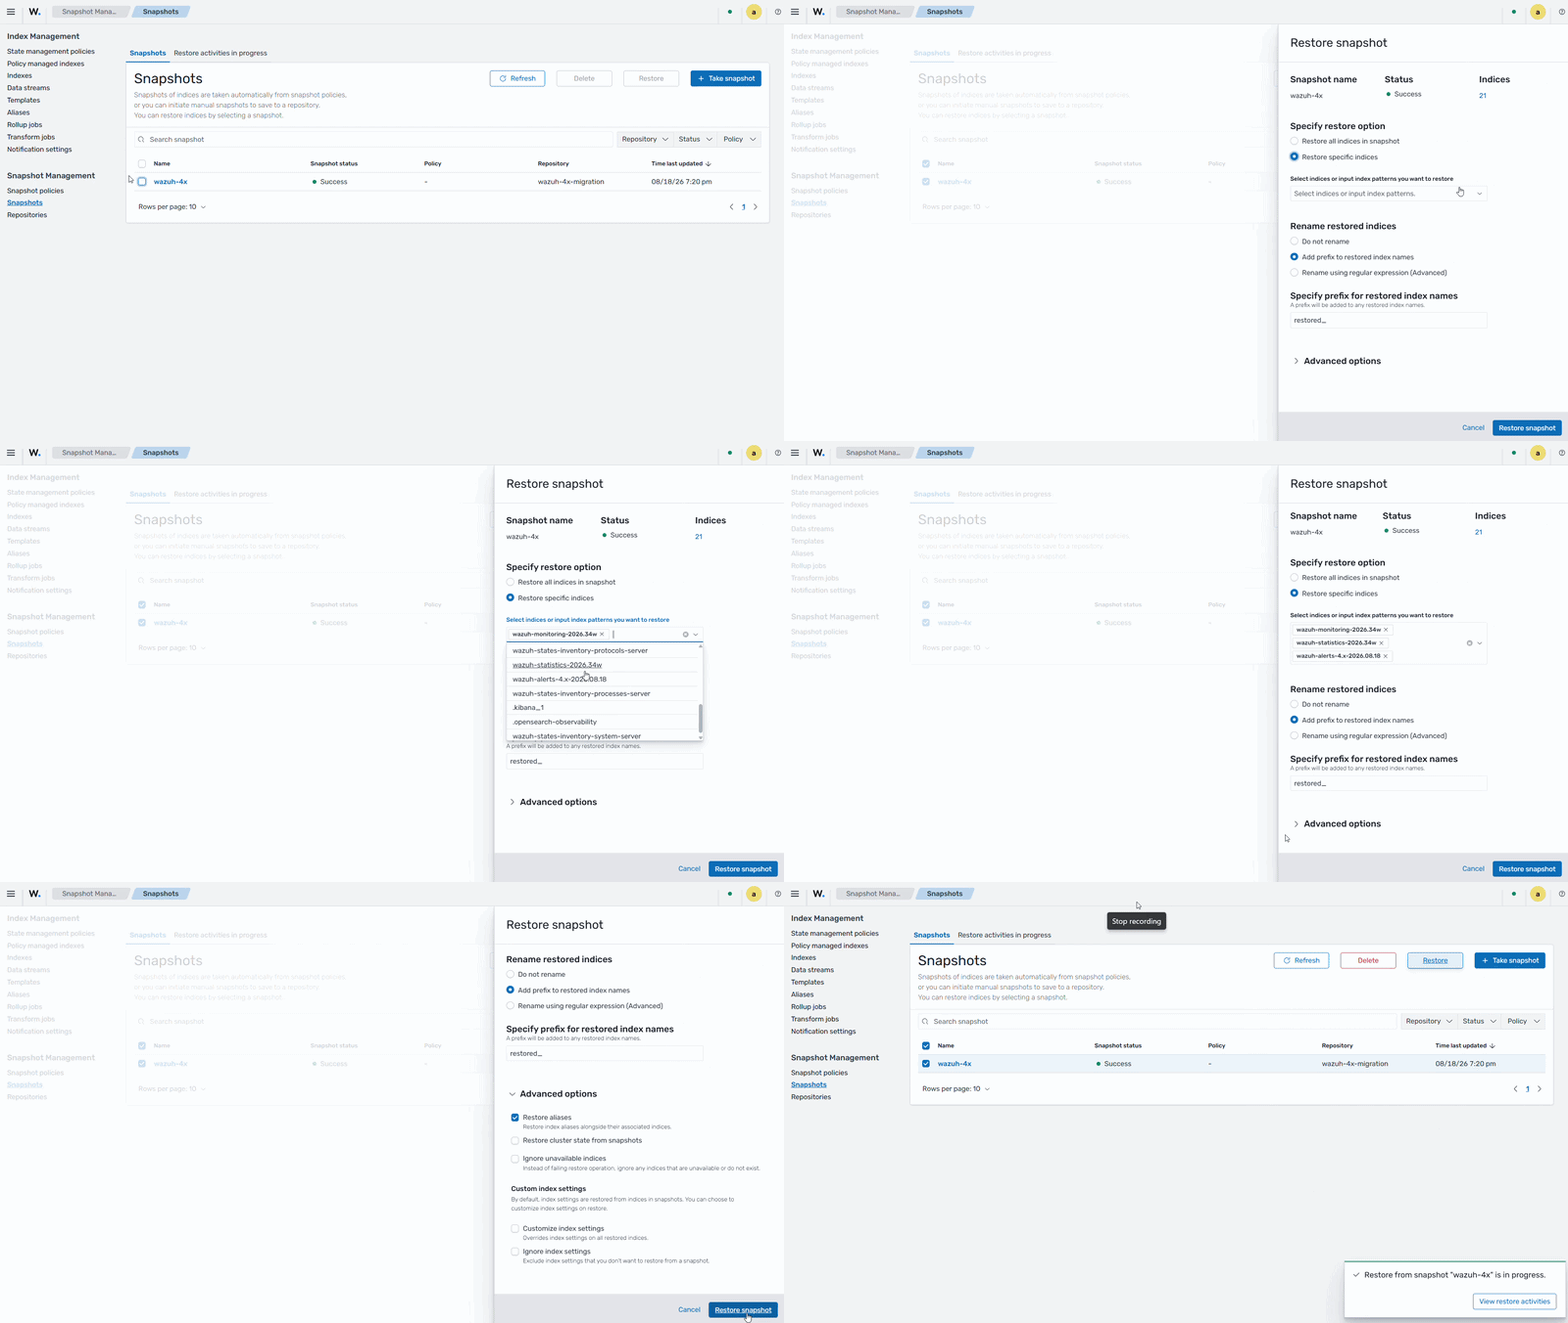
Note
You can choose to restore specific indices or rename the indices. In the image above, we add the prefix
restored_to the restored index names.Warning
Do not restore system indices or the global cluster state into the Wazuh 5.x deployment (for example,
.kibana*,.opendistro*).Navigate to Indexer management > Indexes on the Wazuh dashboard, and filter with the prefix
restored_to view the restored indices.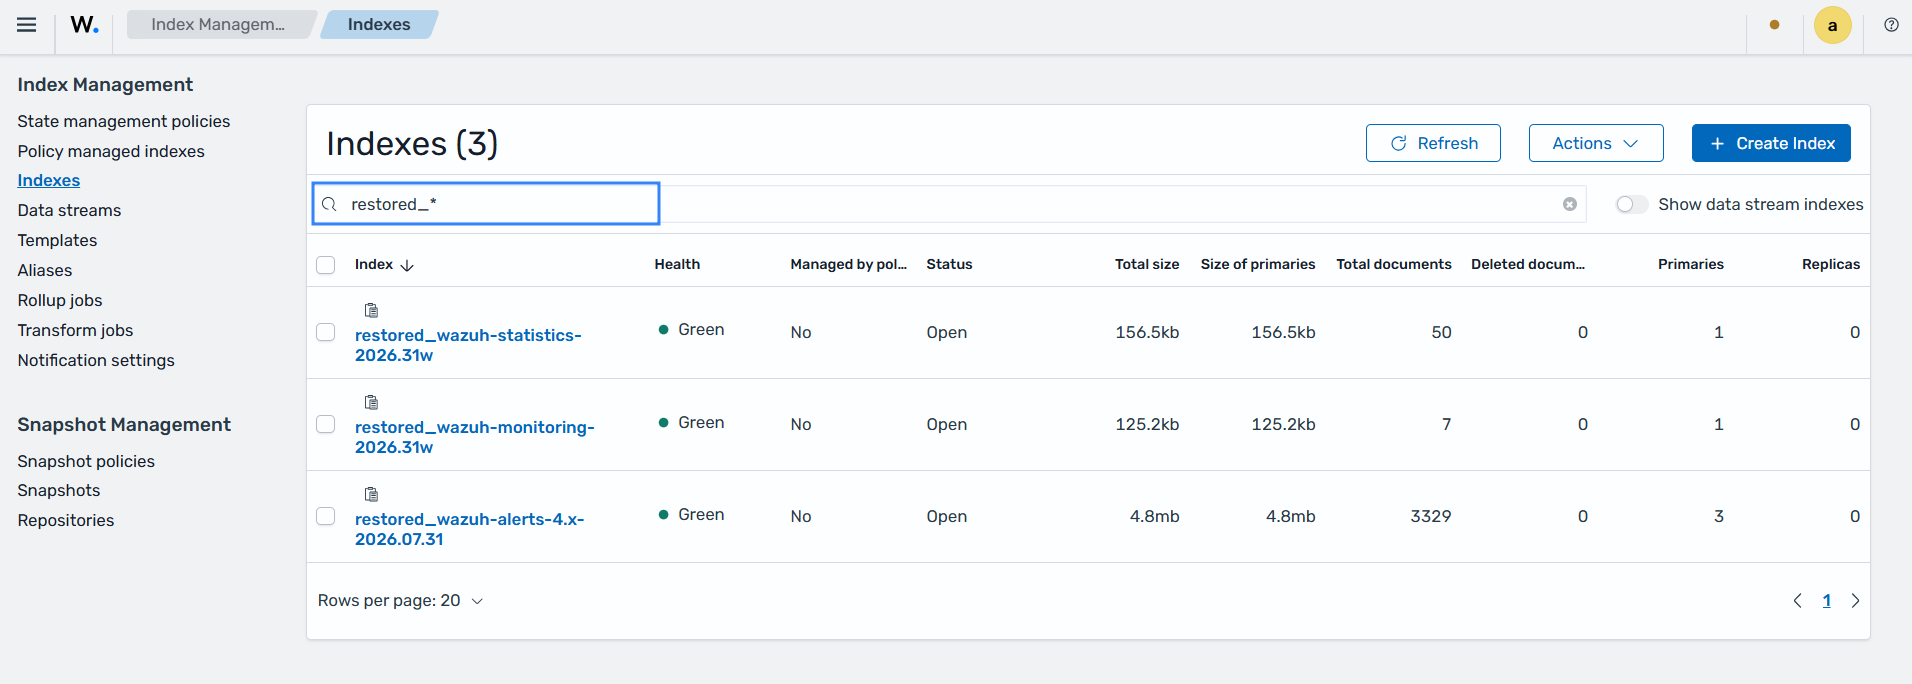
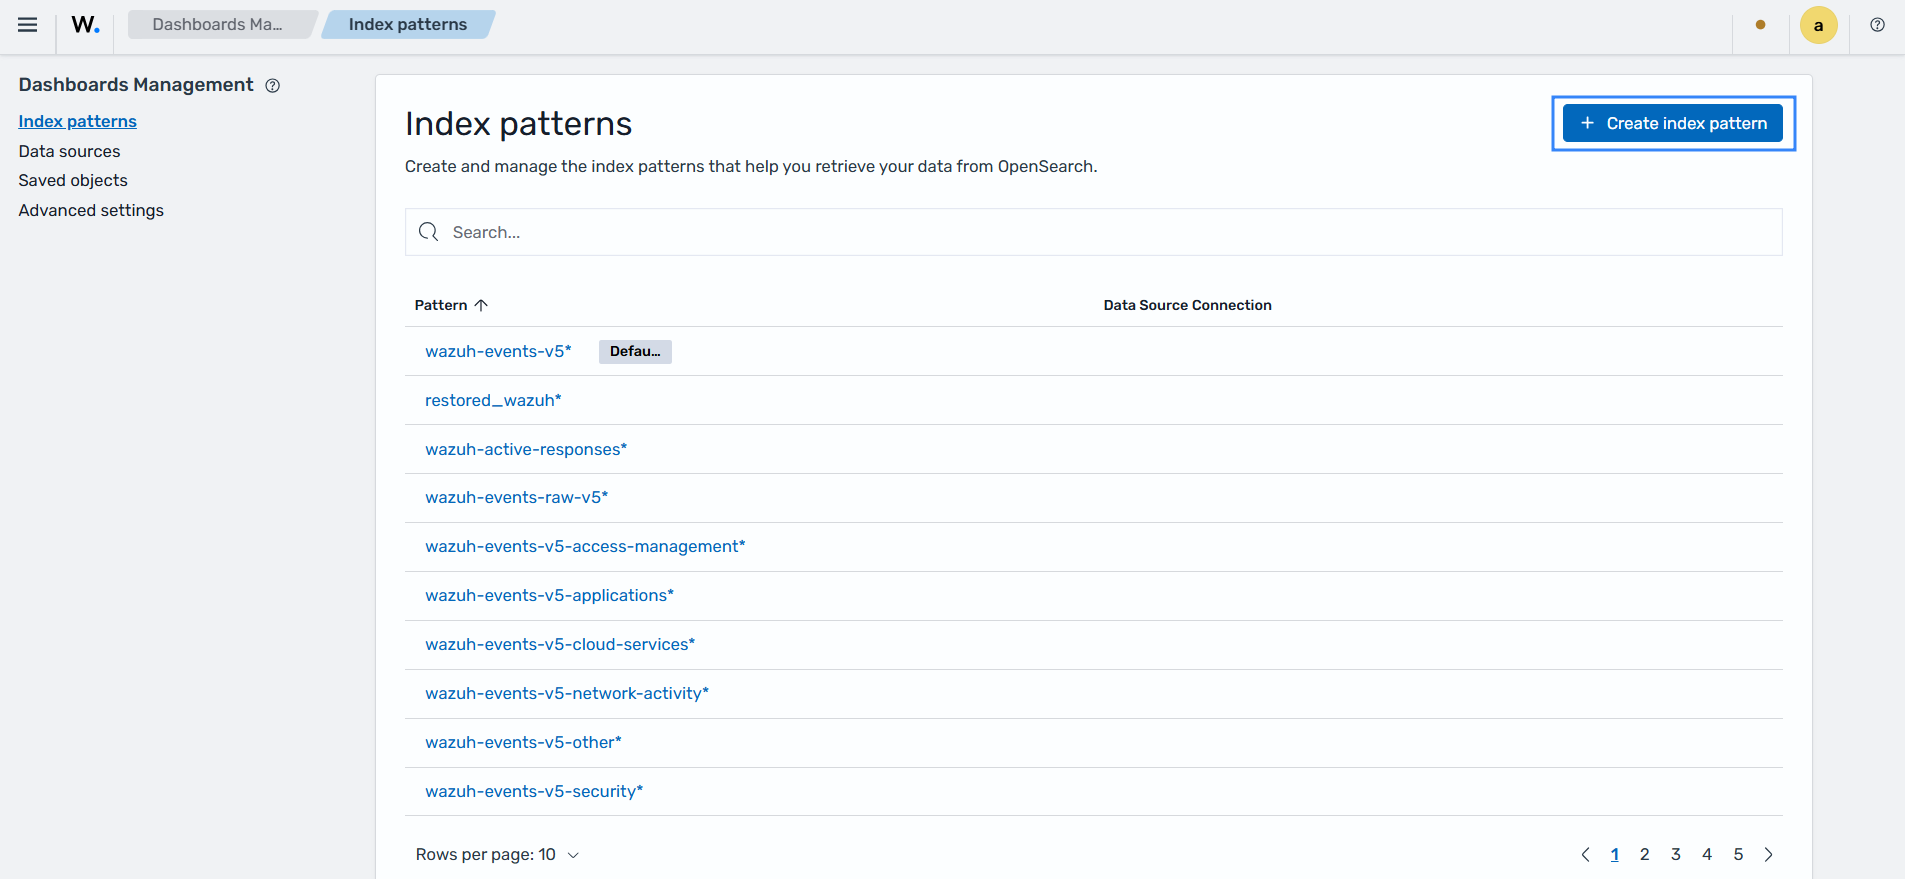
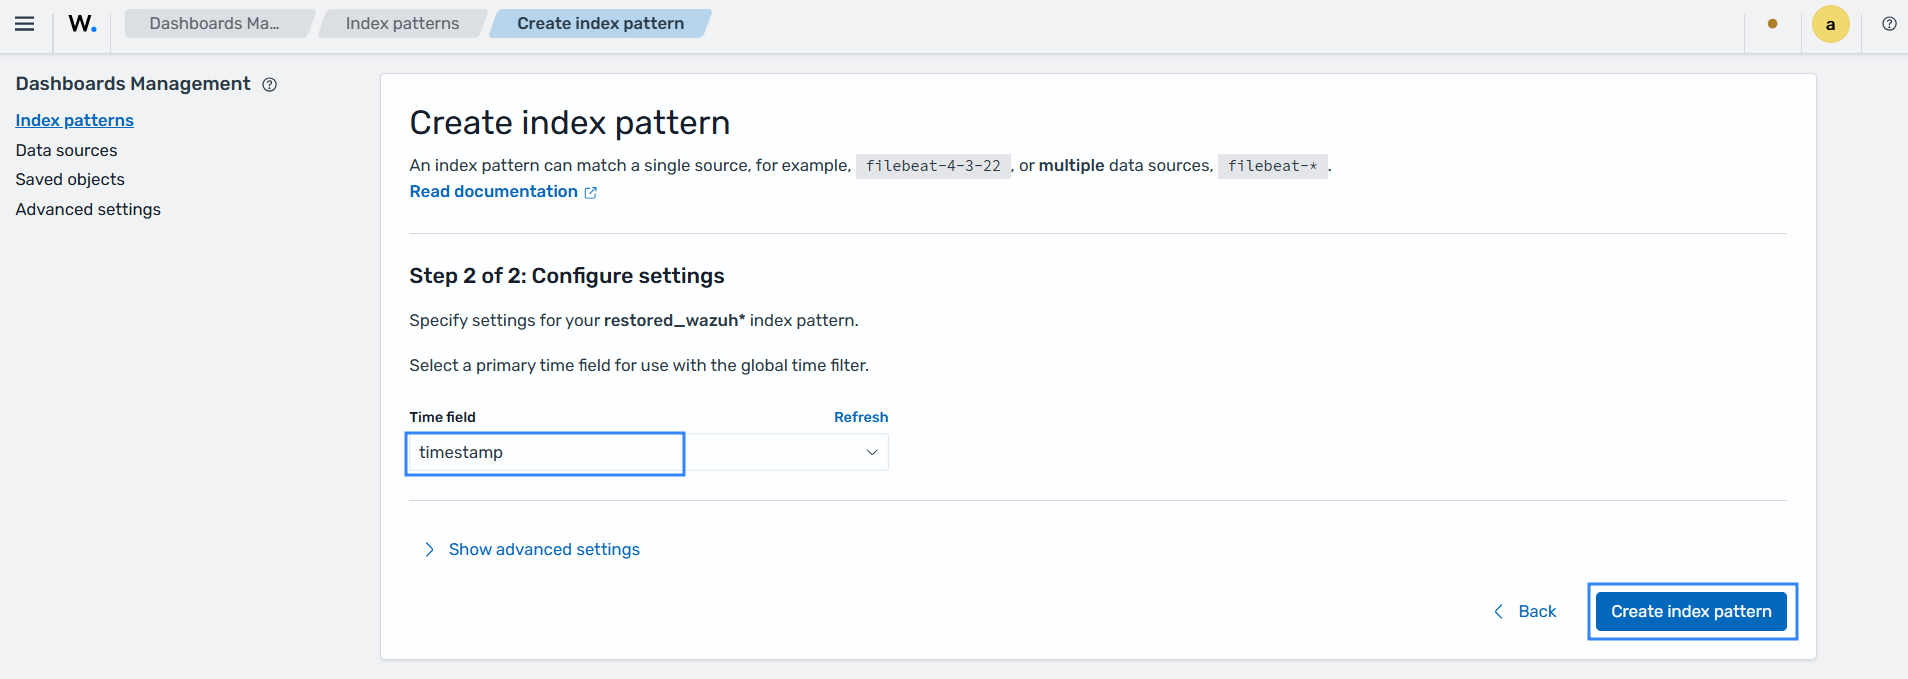
Create an index pattern to retrieve the indices' data. On the Wazuh dashboard, navigate to Dashboards management > Index patterns, then click on Create index pattern.
Set the Index pattern name, then click on Next step. In the image below, we use the index pattern name
restored_wazuh*.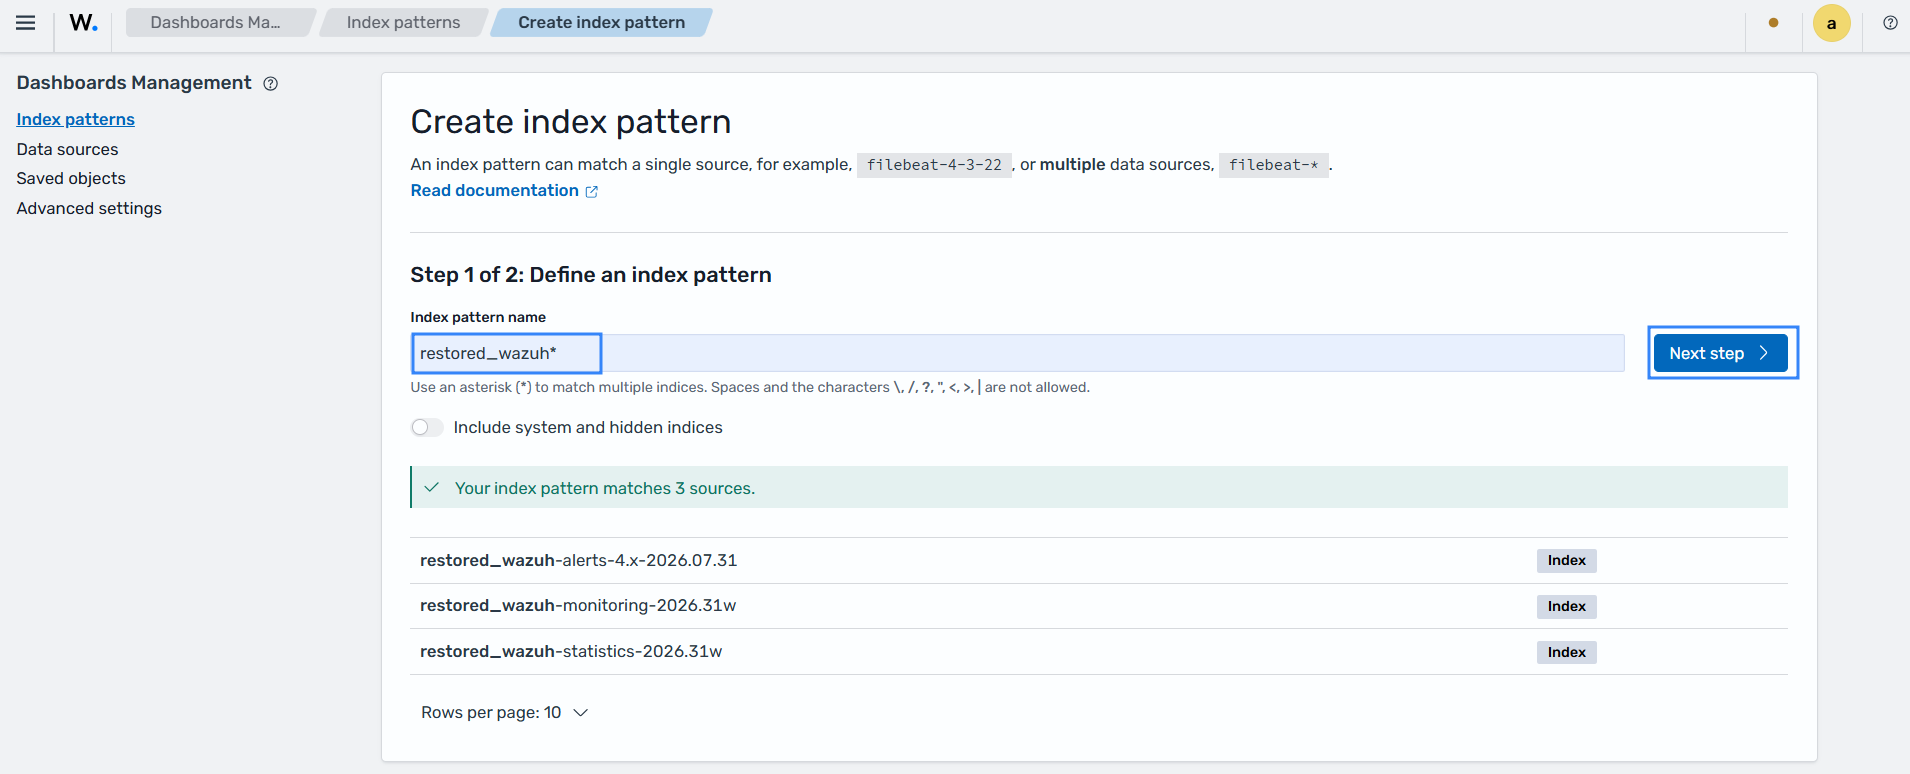
Set the Time field. From the drop-down menu, select timestamp, then click Create index pattern.
Click the ☰ menu, navigate to Discover on the Wazuh dashboard to verify that the migrated indices are available. Select the Index pattern (
restored_wazuh*) created in the previous step to view the migrated index data.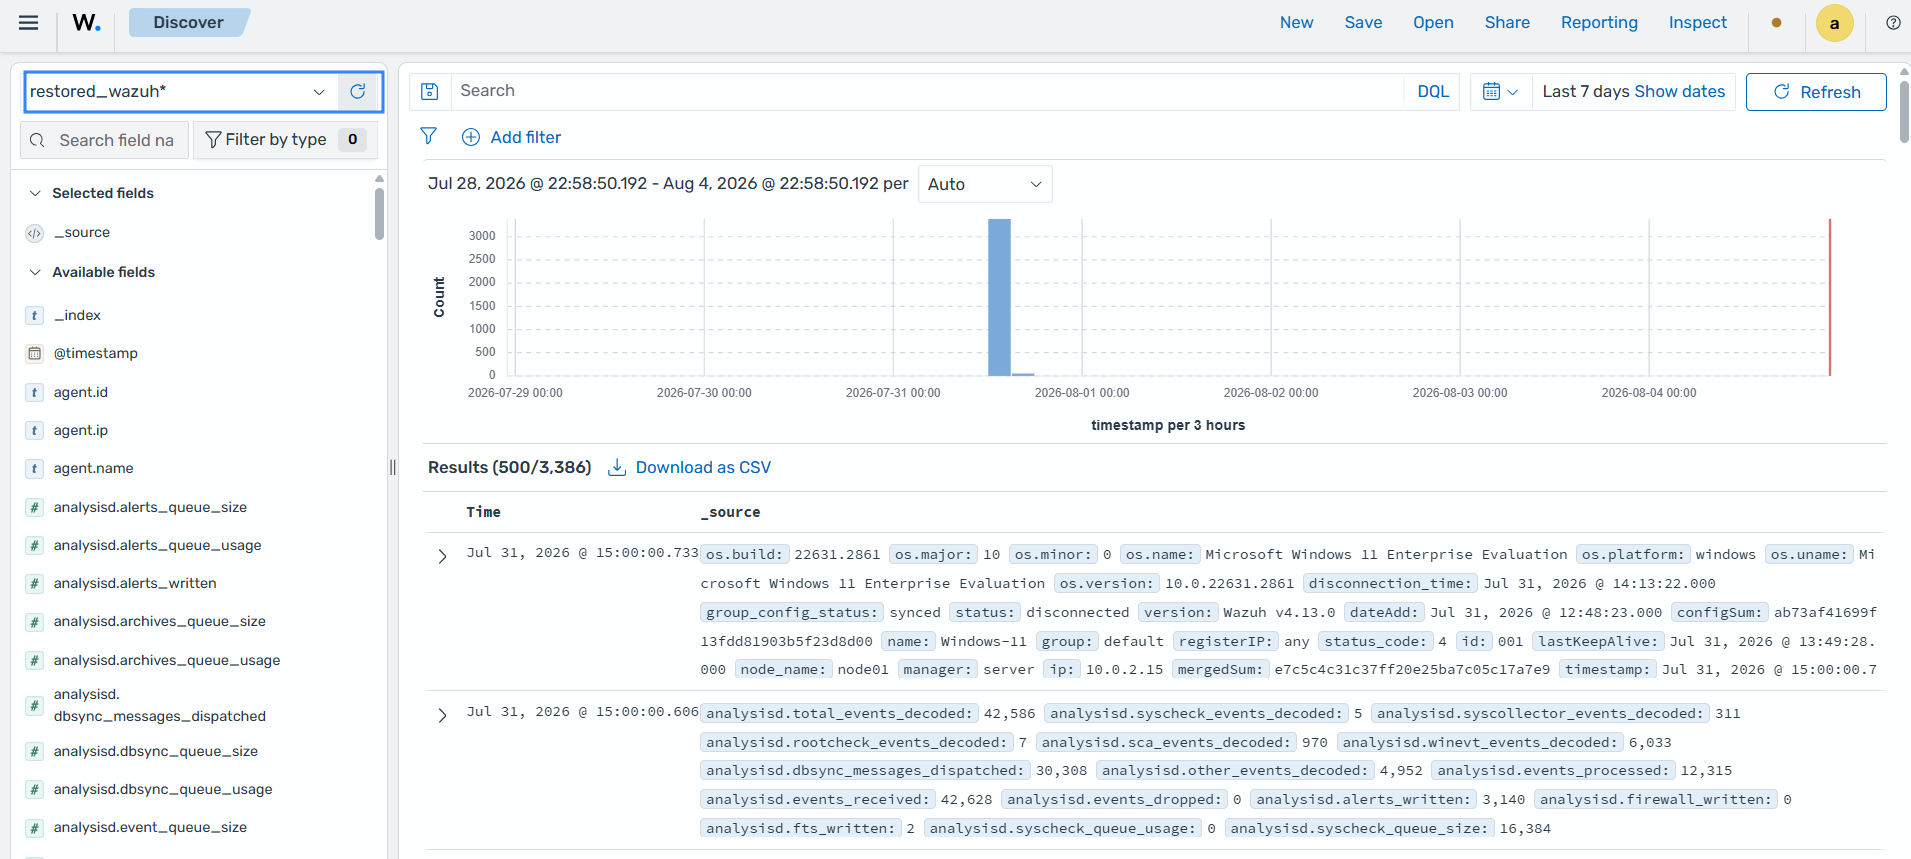
From the Discover page, you can explore and search the migrated index data using the Wazuh dashboard.