Monitoring GitHub audit logs
Organizational administrators proactively utilize GitHub audit logs to review the actions performed by members within their organization. It includes details such as the user who performs the action, the nature of the action, and the timestamp of its execution. The Wazuh module for GitHub enables the collection of audit logs from GitHub through its API. Wazuh initiates an HTTP GET request to GitHub API endpoint /orgs/{org}/audit-log to collect the audit logs. For further details, you can refer to the GitHub REST API documentation.
Requirements for monitoring GitHub audit logs
You need the following requirements on GitHub to access the audit logs with Wazuh.
GitHub organization: You can only view audit logs for GitHub organizations.
GitHub Enterprise Cloud subscription: Only organizations with a GitHub Enterprise Cloud subscription can use the GitHub audit log REST API.
Creating a personal access token on GitHub
Take the following steps on GitHub to generate the required personal access token:
Sign into GitHub with an account that belongs to the organization owner.
Navigate to https://github.com/settings/tokens/new to create a new personal access token.
Include a descriptive note for the personal access token, and select an expiration time.
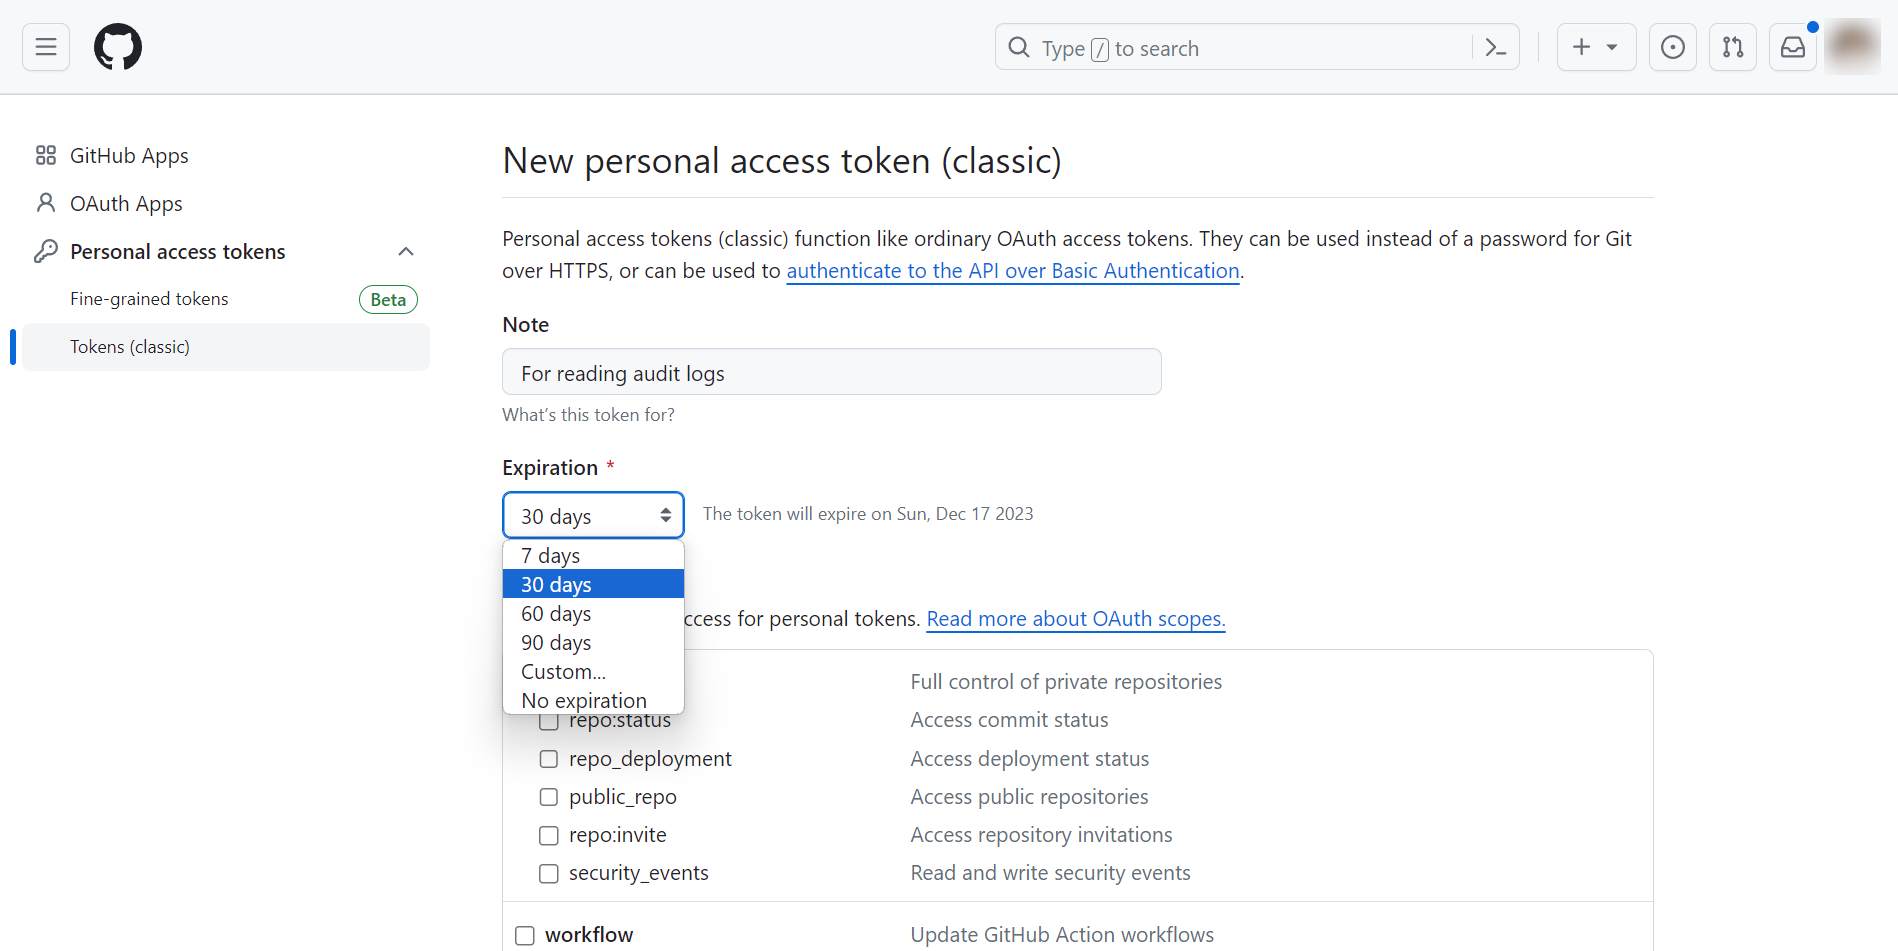
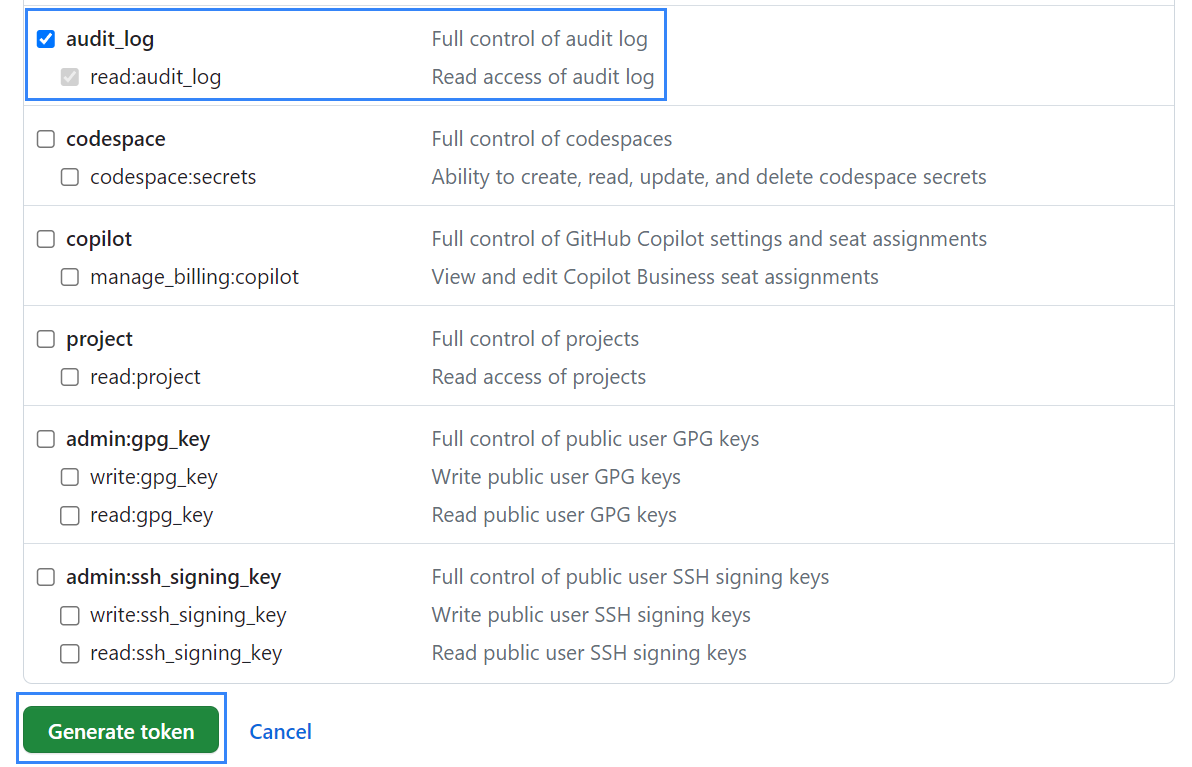
Scroll down, select audit_log, and click Generate token.
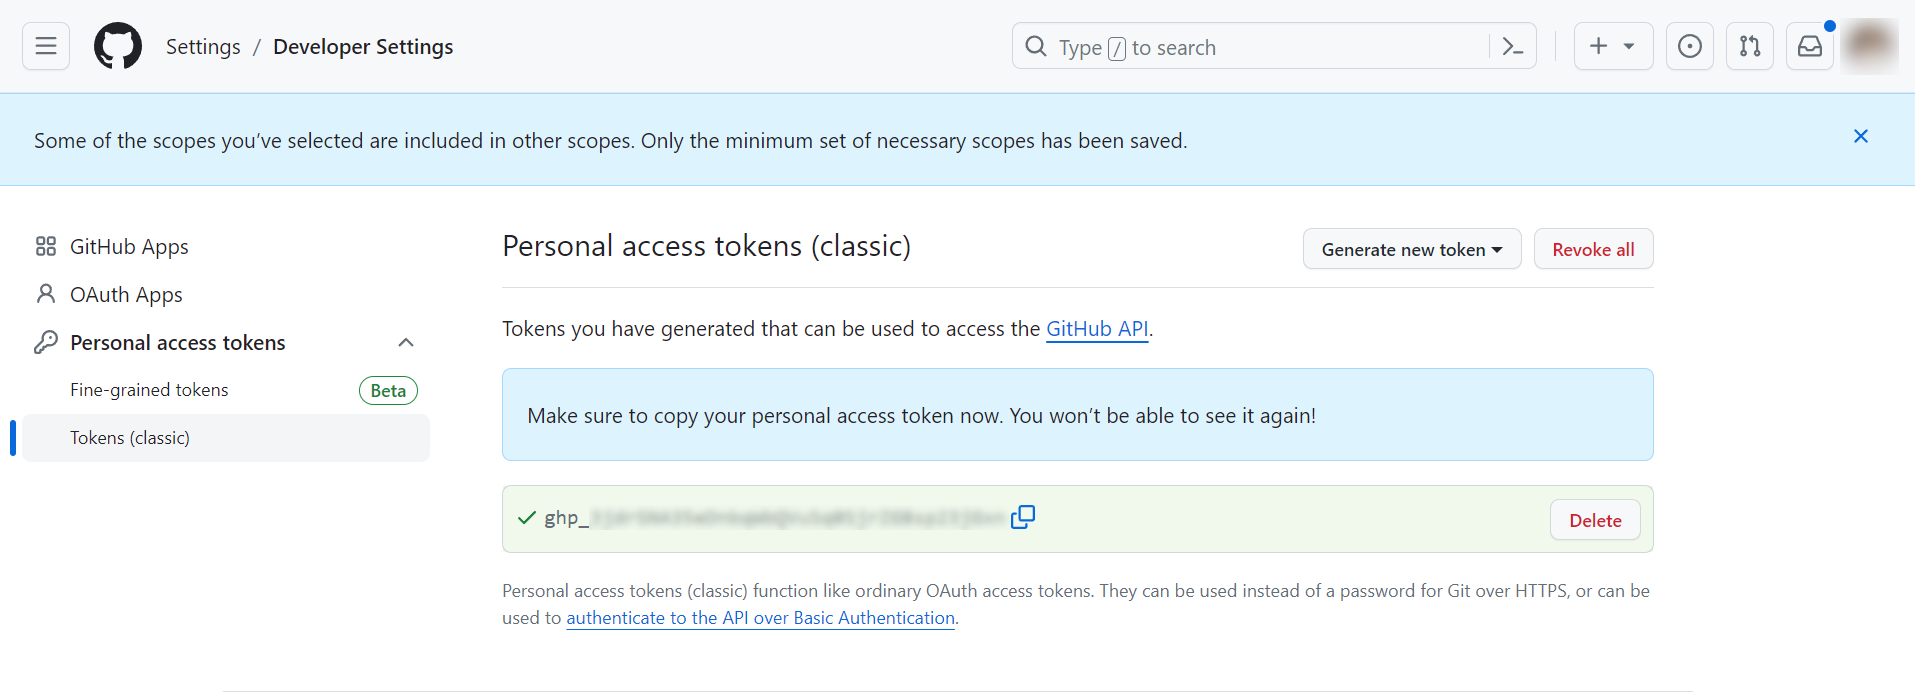
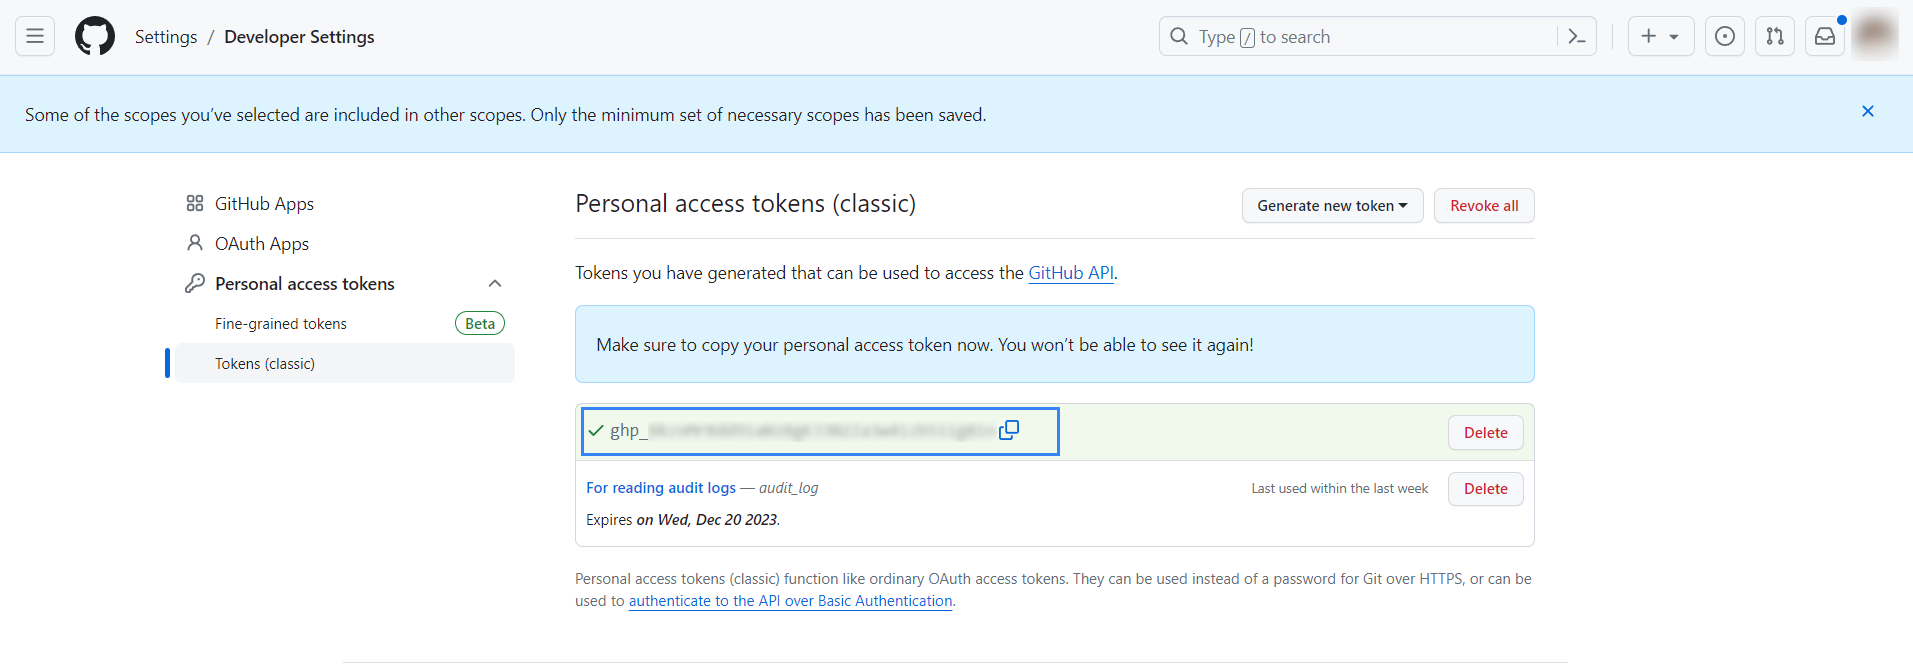
Copy the newly generated personal access token.
Configure Wazuh to pull GitHub logs
Perform the following steps to allow Wazuh to monitor, collect, and analyze the GitHub audit logs. You can either configure the Wazuh module for GitHub in the Wazuh server or the Wazuh agent.
Append the following configuration to the
/var/ossec/etc/ossec.conffile on the Wazuh server.<ossec_config> <github> <enabled>yes</enabled> <interval>1m</interval> <time_delay>1m</time_delay> <curl_max_size>1M</curl_max_size> <only_future_events>yes</only_future_events> <api_auth> <org_name><ORG_NAME></org_name> <api_token><API_TOKEN></api_token> </api_auth> <api_parameters> <event_type>all</event_type> </api_parameters> </github> </ossec_config>
Where:
<enabled>: Enables the Wazuh module for GitHub. The allowed values areyesandno.<interval>: Defines the time interval between each execution of the Wazuh module for GitHub. The default value is10m, and the allowed value is any positive number that contains a suffix character indicating a time unit, such as s (seconds), m (minutes), h (hours), and d (days).<time_delay>: Specifies the delay time of the scan with respect to the current time. The default value is30s, and the allowed value is any positive number that contains a suffix character indicating a time unit, such as s (seconds), m (minutes), h (hours), and d (days).<curl_max_size>: Specifies the maximum size allowed for the GitHub API response. The default value is1M, and the allowed value is any positive number that contains a suffix character indicating a size unit, such as b/B (bytes), k/K (kilobytes), m/M (megabytes), and g/G (gigabytes).<only_future_events>: When set to yes, the Wazuh module for GitHub collects only events generated after you start the Wazuh manager. when set tono, it collects previous events generated before you start the Wazuh manager. The default value isyes, and the allowed values areyesandno.<api_auth>: This block configures the credential for the authentication with the GitHub REST API. The following tags<org_name>and<api_token>are configuration tags within<api_auth>.<org_name>: Name of your GitHub organization. The allowed value is any string.<api_token>: Personal access token to authenticate with the GitHub API. The allowed value is any string.
<api_parameters>: This block configures the internal options in the GitHub REST API. One sub-configuration block within<api_parameters>is<event_type>.<event_type>: Specifies the event types Wazuh should collect. The available event types are web and git events. The default value for this configuration block isall, to collect both web and git events. Allowed values areall,web, andgit.
To learn more about the configuration options, refer to the Wazuh module for GitHub reference.
Restart the Wazuh manager or agent service to apply the changes:
Wazuh manager
# systemctl restart wazuh-manager
Wazuh agent
# systemctl restart wazuh-agent
Monitor multiple GitHub organizations
You can monitor multiple GitHub organizations with Wazuh by specifying the organization credentials in individual <api_auth> sections. For example, the following configuration monitors two organizations named organization1 and organization2.
<github>
  <enabled>yes</enabled>
  <interval>1m</interval>
  <time_delay>1m</time_delay>
  <curl_max_size>1M</curl_max_size>
  <only_future_events>no</only_future_events>

  <api_auth>
    <org_name>organization1</org_name>
    <api_token><API_TOKEN></api_token>
  </api_auth>

  <api_auth>
    <org_name>organization2</org_name>
    <api_token><API_TOKEN></api_token>
  </api_auth>

  <api_parameters>
    <event_type>git</event_type>
  </api_parameters>
</github>
Where:
<API_TOKEN>is the GitHub personal access token created within theadmin:orgscope.
Use case
Requirements
Integrate Wazuh with GitHub according to the monitoring GitHub activity documentation.
An Ubuntu 23.10 endpoint with curl installed.
GitHub
Create a GitHub personal access token within the admin:org, repo, and delete_repo scopes. We will use this token with the GitHub REST API to test the use cases by performing actions on the organization that trigger alerts on Wazuh. Take the following steps to create the token:
Navigate to https://github.com/settings/tokens/new, add a note for the token, select your desired expiration time, and then select the
repoand theadmin:orgscopes.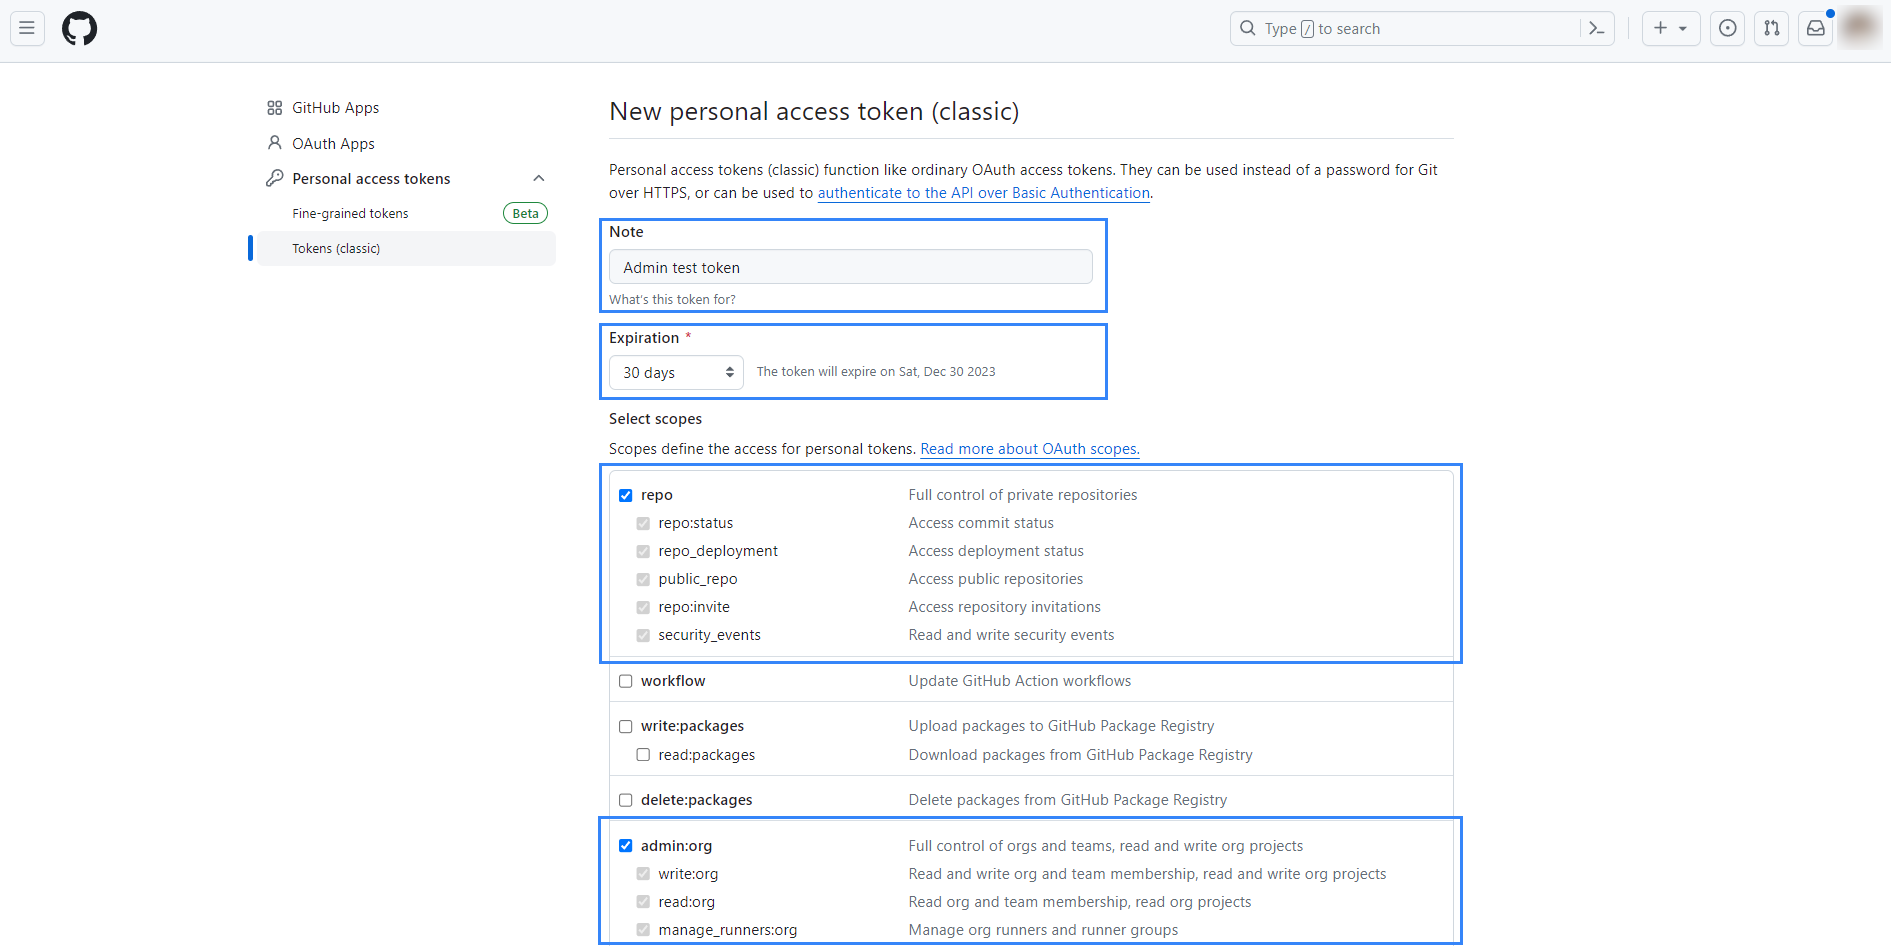
Scroll to the bottom of the page, then select the
delete_reposcope and click the Generate token button.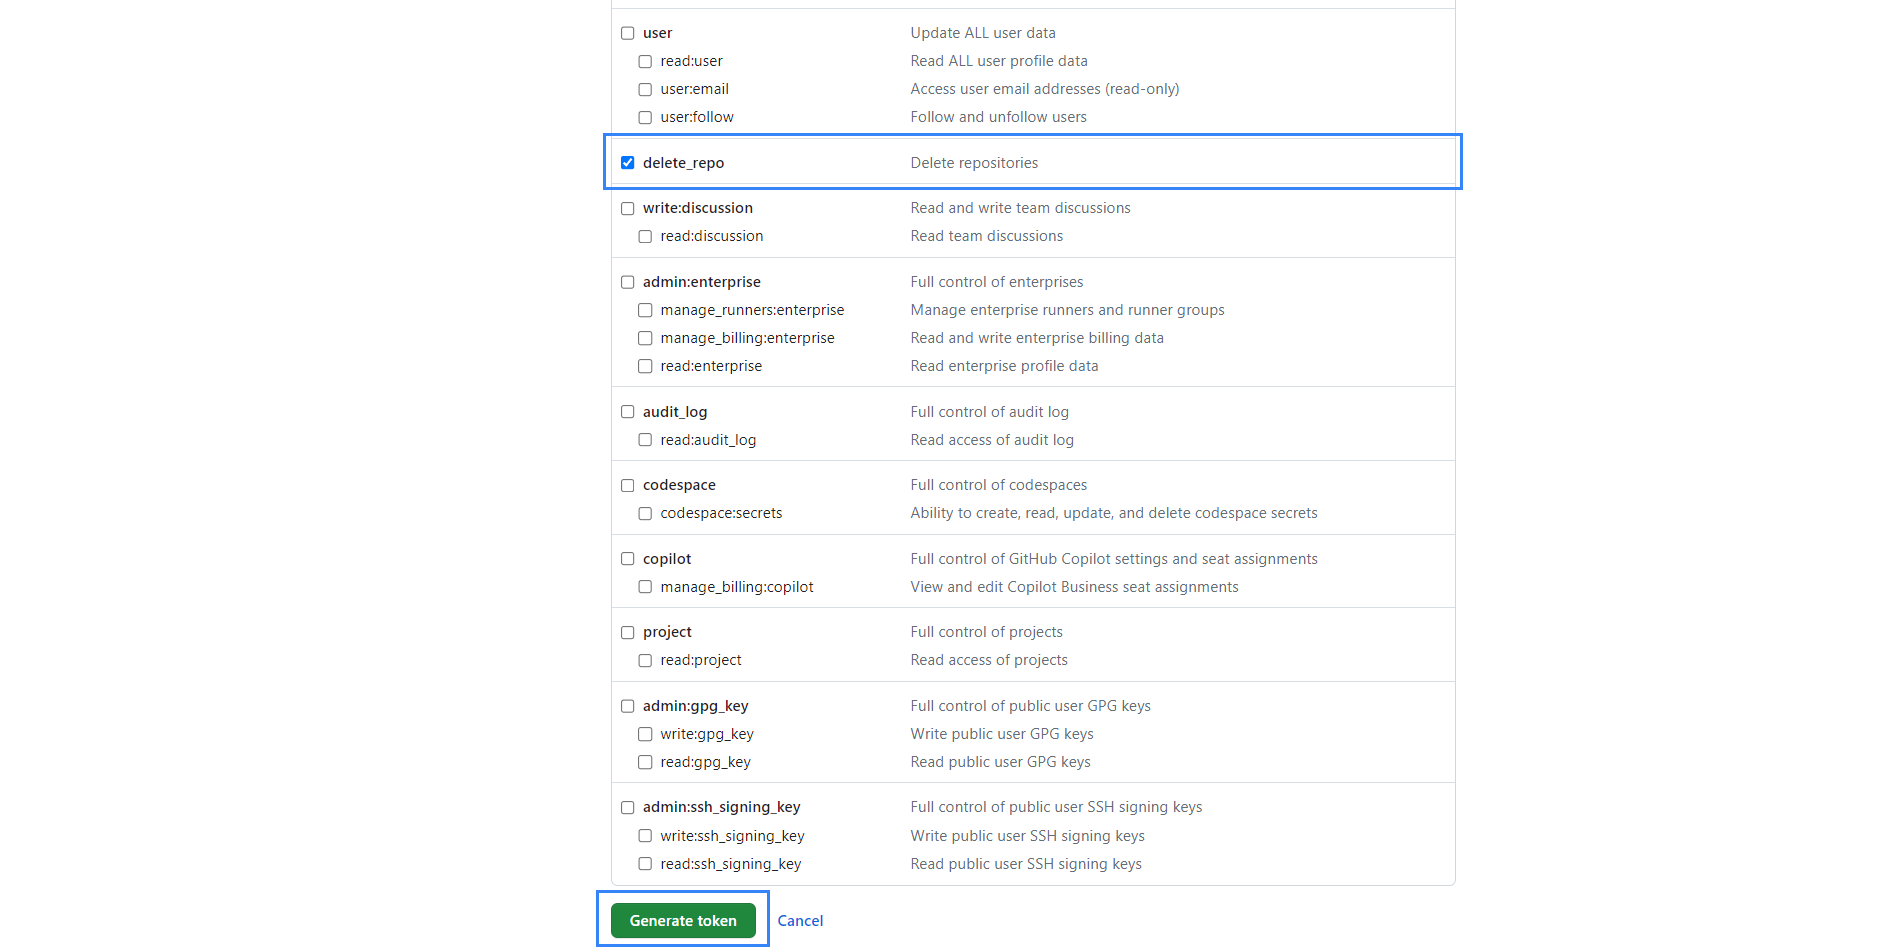
Copy the newly generated personal access token.
Ubuntu endpoint
Detect organization members’ manipulation
Invite a member
Take the following steps to invite a member to your organization.
Run the following command on the Ubuntu endpoint:
# curl -L \
  -X POST \
  -H "Accept: application/vnd.github+json" \
  -H "Authorization: Bearer <API_TOKEN>" \
  -H "X-GitHub-Api-Version: 2022-11-28" \
  https://api.github.com/orgs/<ORG_NAME>/invitations \
  -d '{"email":"<USER_EMAIL>","role":"direct_member"}'
Where:
<API_TOKEN>is the GitHub personal access token created within theadmin:orgscope.<ORG_NAME>is your organization name.<USER_EMAIL>is the email address of the user you want to invite.
Go to the invited member’s mailbox and accept the invite.
Promote a member to administrator
Run the following command to promote a member of your organization to the role of an administrator:
# curl \
  -u <ADMIN_USERNAME>:<API_TOKEN> \
  -X PUT \
  -H "Accept: application/vnd.github.v3+json" https://api.github.com/orgs/<ORG_NAME>/memberships/<MEMBER_USERNAME> \
   -d '{"role":"admin"}'
Where:
<ADMIN_USERNAME>is the username of a current administrator. For example, the username of the owner of the organization.<API_TOKEN>is the GitHub personal access token created within theadmin:orgscope.<ORG_NAME>is your organization name.<MEMBER_USERNAME>is the username of the user you want to promote.
Create a new team
Run the following command to create a new team in your organization:
# curl -X POST \
     -H "Authorization: Bearer <API_TOKEN>" \
     -d '{"name": "<NEW_TEAM_NAME>"}' \
     "https://api.github.com/orgs/<ORG_NAME>/teams"
Where:
<NEW_TEAM_NAME>is the name of the new team.<API_TOKEN>is the GitHub personal access token created within theadmin:orgscope.<ORG_NAME>is your organization name.
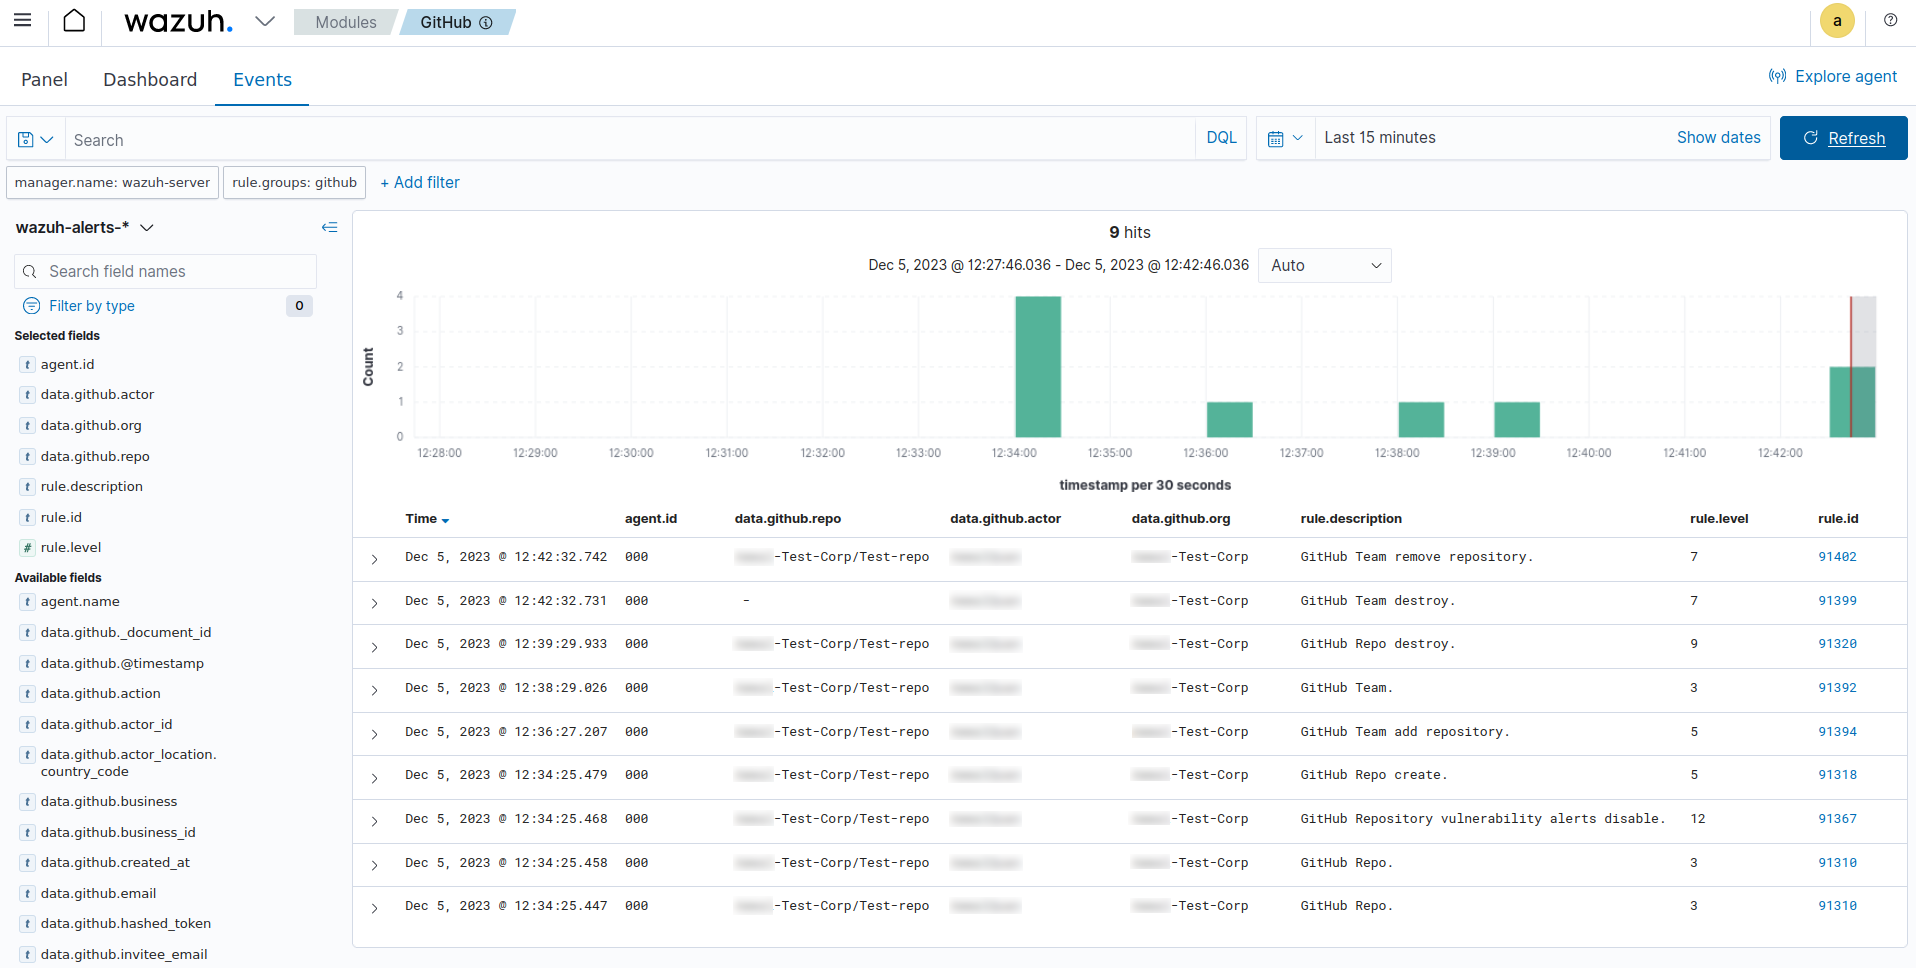
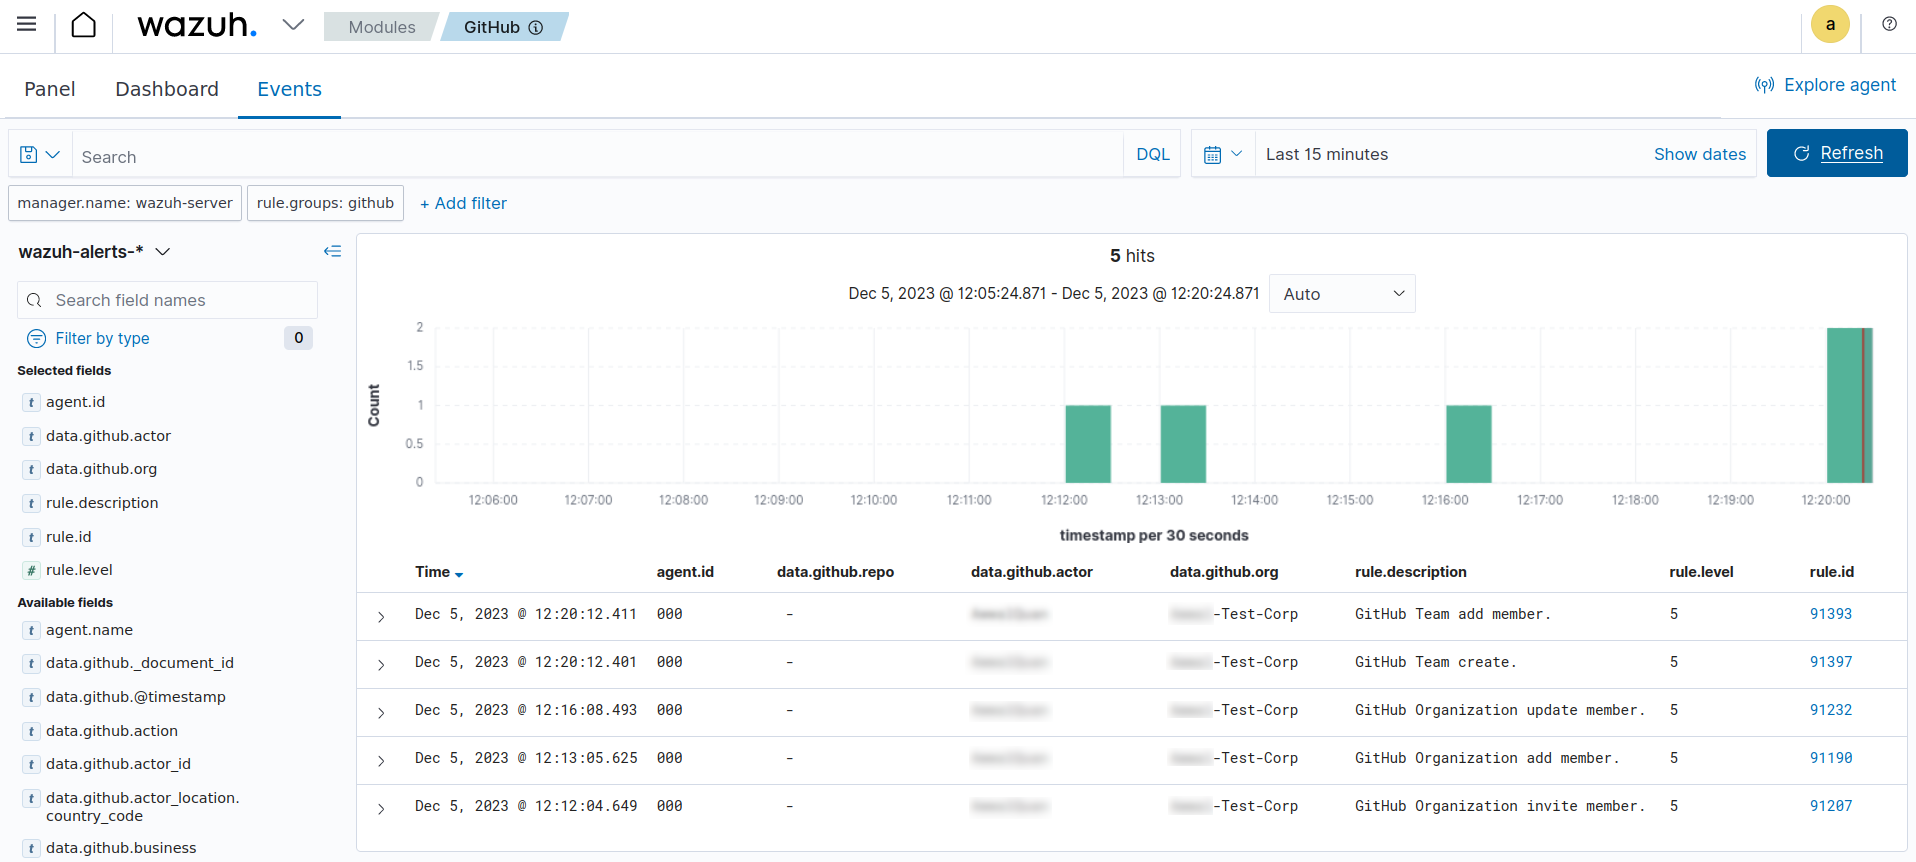
The image below shows the alerts generated on the Wazuh dashboard after we performed the above actions on the monitored GitHub organization.
Detect changes to a repository
Create a new repository
Run the following command to create a new repository:
# curl -L \
  -X POST \
  -H "Accept: application/vnd.github+json" \
  -H "Authorization: Bearer <API_TOKEN>" \
  -H "X-GitHub-Api-Version: 2022-11-28" \
  https://api.github.com/orgs/<ORG_NAME>/repos \
  -d '{"name":"<NEW_REPO_NAME>"}'
Where:
<API_TOKEN>is the GitHub personal access token created within thereposcope.<ORG_NAME>is your organization name.<NEW_REPO_NAME>is the name of the repository you want to create.
Add a team to your repository
Run the following commands to list teams and add a team to your repository:
List the team IDs in your organization.
# curl -H "Authorization: Bearer <API_TOKEN>" "https://api.github.com/orgs/<ORG_NAME>/teams"
Input the ID of the team you want to add to your repository.
# curl -X PUT \
     -H "Authorization: Bearer <API_TOKEN>" \
     -d '{"permission": "push"}' \
     "https://api.github.com/teams/<TEAM_ID>/repos/<ORG_NAME>/<REPO_NAME>"
Where:
<TEAM_ID>is the team ID.<API_TOKEN>is the GitHub personal access token created within theadmin:orgscope.<ORG_NAME>is your organization name.<REPO_NAME>is the name of the repository you want to add a team to.
Manage privileges
Run the following command to grant members of your team administrator privileges on the repository:
# curl \
-u <ADMIN_USERNAME>:<API_TOKEN> \
-X PUT \
-H "Accept: application/vnd.github.v3+json" https://api.github.com/orgs/<ORG_NAME>/teams/<TEAM_NAME>/repos/<ORG_NAME>/<REPO_NAME> \
 -d '{"permission":"admin"}'
Where:
<ADMIN_USERNAME>is the username of the user that has permission to promote a user to admin<API_TOKEN>is the GitHub personal access token created within theadmin:orgscope.<ORG_NAME>is your organization name.<REPO_NAME>is the name of the repository you want to manage its team’s access.<TEAM_NAME>is the name of the specific team in your repository.
Delete repository
Run the following command to delete a repository in your organization:
# curl -L \
  -X DELETE \
  -H "Accept: application/vnd.github+json" \
  -H "Authorization: Bearer <API_TOKEN>" \
  -H "X-GitHub-Api-Version: 2022-11-28" \
  https://api.github.com/repos/<ORG_NAME>/<REPO_NAME>
Where:
<API_TOKEN>is the GitHub personal access token created within thedelete_reposcope.<ORG_NAME>is your organization name.<REPO_NAME>is the name of the repository you want to delete from your organization.
Delete team
Run the following command to delete the team you created:
# curl -L \
  -X DELETE \
  -H "Accept: application/vnd.github+json" \
  -H "Authorization: Bearer <API_TOKEN>" \
  https://api.github.com/orgs/<ORG_NAME>/teams/<TEAM_NAME>
Where:
<API_TOKEN>is the GitHub personal access token created within theadmin:orgscope.<ORG_NAME>is your organization name.<TEAM_NAME>is the name of the specific team in your repository.
The image below shows the alerts generated on the Wazuh dashboard after we performed the above actions on the monitored GitHub organization.