Active Directory and LDAP integration
Lightweight Directory Access Protocol (LDAP) centralizes authentication and authorization data. It also stores structured data such as employee records and contact information. Microsoft Active Directory is a widely used directory service that implements LDAP and extends it with additional features for enterprise identity and access management.
You can configure LDAP to provide both authentication and authorization for users accessing the Wazuh dashboard. Authentication verifies user identity using credentials such as a username and password. Authorization retrieves backend roles based on LDAP attributes and determines which actions a user is allowed to perform.
In this section, we show how to integrate LDAP authentication and authorization with the Wazuh platform. The guide assumes you already have an LDAP server or Microsoft Active Directory.
Required parameters
The following parameters are required to make the configurations on the Wazuh indexer instance:
hosts: This is the LDAP server hostname or IP address and its port (by default, it is 389 for LDAP and 636 for LDAP over SSL).bind_dn: The credential to authenticate to your LDAP server.password: The password to authenticate to your LDAP server.enable_ssl: Specifies whether to use LDAP over SSL (LDAPS). This can be set to true or false.pemtrustedcas_filepath: The absolute path to the Privacy Enhanced Mail (PEM) file containing the root Certificate Authority (CA) of your Microsoft Active Directory or LDAP server. This is required whenenable_sslis set to true.userbase: Specifies the subtree in the directory where user information is stored.usersearch: The LDAP query the Security plugin executes to authenticate a user.username_attribute: Specifies the LDAP attribute used to identify the username. If set to null, the Distinguished Name (DN) is used by default.rolebase: Specifies the directory subtree where role or group information is stored.rolesearch: The LDAP query the Security plugin executes to determine a user's roles.userrolename: Specifies the LDAP attribute in the user entry that contains role or group information when roles are not stored in the groups subtree.rolename: The attribute of the role entry that should be used as the role name.skip_users: Array of users that should be skipped when retrieving roles. Wildcards and regular expressions are supported.
Note
This integration uses Microsoft Active Directory, configured for LDAP over SSL (LDAPS).
The LDAP attribute types, such as Common Name (CN), Organizational Unit (OU), Distinguished Name (DN), and Domain Component (DC), used in this integration are from a test Microsoft Active Directory server. Replace them with the corresponding values from your Microsoft Active Directory or LDAP server.
The
securityadminscript has to be executed with root privileges.You need an account with administrator privileges on the Wazuh dashboard.
We recommend clearing the browser cache and cookies before the integration is carried out.
LDAP server requirement
Depending on your LDAP server configuration, you need to create users and groups or use existing ones. You also have to obtain some information from your Active Directory or LDAP server:
Create an OU for the users (or use an already created OU). Get the DN of the OU, in our case:
ou=people,dc=example,dc=org.Create an OU for the group(s) (or use an already created OU). Get the DN of the OU, in our case:
ou=Groups,dc=example,dc=org.Create a user with sufficient privileges to bind to the service. Get the DN of the user, in our case, this is
cn=ldap,ou=people,dc=example,dc=org.Create a group to manage users with access to Wazuh; in our case, this includes the
wazuh-adminsandwazuh-readonlygroups.Get the FQDN of the LDAP server or Domain Controller.
LDAP configuration
We configure an Active Directory instance running on Windows Server 2025 as the centralized authentication and authorization server. This instance uses LDAP over SSL (LDAPS). We create organizational units for users and groups, along with the required user accounts and group memberships. We also collect essential directory details, including domain components and the Fully Qualified Domain Name (FQDN) of the domain controller, to enable LDAP integration.
Create an OU for the Users
Follow these steps on the Domain Controller to create an OU and users who can sign in to the Wazuh dashboard.
Open Active Directory Users and Computers.
Right-click the domain -> New -> Organizational Unit.
Assign a name to the OU. In our case, we name it People.
Right-click the People OU -> New -> User and create users with the following User logon name:
ldap — used as the bind user
wazuh-admin-user — used for administrator access
wazuh-readonly-user — used for read-only access
Fill in the required details and complete the user creation process for each account.
Run the command below on the Domain Controller using PowerShell with admin privileges to view the users in the People OU. The user's logon name (
sAMAccountName) will be used for authentication on the Wazuh dashboard.
> Get-ADUser -SearchBase "OU=People,DC=example,DC=org" -Filter * -Properties cn | Select-Object cn, sAMAccountName
cn              sAMAccountName
----            --------------
ldap            ldap
Wazuh Admin     wazuh-admin-user
Wazuh ReadOnly  wazuh-readonly-user
Create an OU for the Groups
Follow these steps on the Domain Controller to create an OU for the Groups.
Open Active Directory Users and Computers.
Right-click the domain -> New -> Organizational Unit.
Assign a name to the OU. In our case, this is Groups.
Right-click the Groups OU -> New -> Group and create the following groups:
wazuh-admins — users who are members have administrator access
wazuh-readonly — users who are members have read-only access
Fill in the required details and complete the group creation process. These groups will be the backend role in the Wazuh indexer configuration.
Right-click the wazuh-admins group -> Properties -> Members and add the admin user. In our case, this is wazuh-admin-user.
Right-click the wazuh-readonly group -> Properties -> Members and add the read-only user. In our case, this is wazuh-readonly-user.
Run the command below on the Domain Controller using PowerShell with admin privileges to view the objects in the Group OU. The group name (CN) will be used as the backend role in the Wazuh indexer configuration.
> Get-ADGroup -SearchBase "OU=Groups,DC=example,DC=org" -Filter * -Properties cn | Select-Object cn
cn
--
wazuh-admins
wazuh-readonly
Get the FQDN of the LDAP server or Domain Controller
Run the command below on the Domain Controller using PowerShell with administrator privileges to display the FQDN. This is required for the Wazuh indexer configuration.
> [System.Net.Dns]::GetHostEntry($env:computerName).HostName
DC01.example.org
Configure LDAPS for Active Directory
If you don't have a certificate authority server, you can enable LDAPS by creating a self-signed certificate on the Domain Controller using the steps listed below.
Run the command below on the Domain Controller using PowerShell with administrator privileges to create the certificate. Replace
<FQDN_LDAP_SERVER>and<HOSTNAME>with the FQDN and hostname of your domain controller:
> New-SelfSignedCertificate -DnsName <FQDN_LDAP_SERVER>, <HOSTNAME> -CertStoreLocation cert:\LocalMachine\My
PSParentPath: Microsoft.PowerShell.Security\Certificate::LocalMachine\My
Thumbprint                                Subject
----------                                -------
C54F4646170E6888054B0A7C340128E0A7700572  CN=DC01.example.org
Run the following command to open the certificate management snap-in for the local machine.
> certlm.msc
Browse to Personal -> Certificates, locate the newly created certificate, and copy it into Trusted Root Certification Authorities -> Certificates.
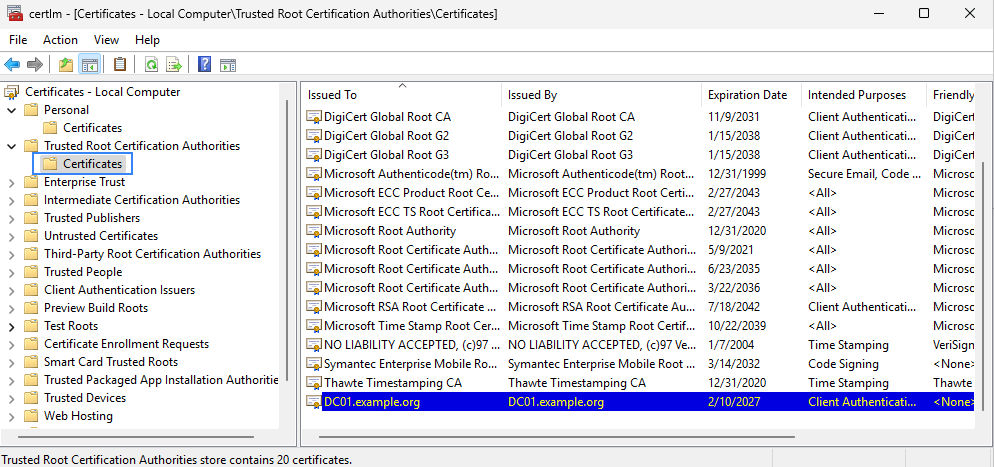
Wait for one minute for LDAPS to bind to port 636 using the new certificate.
Use the following command to verify the connection to the Active Directory server using SSL over port 636.
> ldp.exe
Click Connection -> Connect, then enter the FQDN of the domain controller and connect over port 636 using SSL.
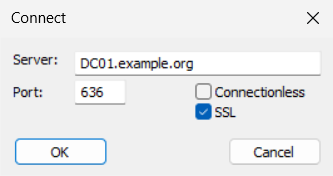
The output should be similar to the image below.

Map LDAP role to Wazuh
LDAP can be used for authorization by retrieving the backend roles associated with a user. This backend role determines a user's access privileges on the Wazuh dashboard. We recommend backing up the /etc/wazuh-indexer/opensearch-security/roles_mapping.yml file before proceeding with this configuration. In this section, we map the LDAP roles to the administrator and read-only roles on the Wazuh dashboard.
Map LDAP role to Wazuh administrator role
Follow these steps on the Wazuh indexer node to create a new role mapping and grant administrator permissions to the backend role.
Backup the existing Wazuh indexer security configuration files:
# /usr/share/wazuh-indexer/bin/indexer-security-init.sh --options "-backup /etc/wazuh-indexer/opensearch-security -icl -nhnv"
Configure the
roles_mapping.ymlfile to map the role in the LDAP server to the appropriate Wazuh indexer role. In our case, we map users in thewazuh-adminsgroup in LDAP to theall_accessrole on the Wazuh indexer.Edit the
/etc/wazuh-indexer/opensearch-security/roles_mapping.ymlfile and add thewazuh-adminsgroup in LDAP.all_access: reserved: false hidden: false backend_roles: - "admin" - "wazuh-admins" description: "Maps admin to all_access"
Run the
securityadminscript to load the configuration changes made in theroles_mapping.ymlfile. Replace<WAZUH_INDEXER_URL>with the IP address of the Wazuh indexer:# export JAVA_HOME=/usr/share/wazuh-indexer/jdk/ && bash /usr/share/wazuh-indexer/plugins/opensearch-security/tools/securityadmin.sh -f /etc/wazuh-indexer/opensearch-security/roles_mapping.yml -icl -key /etc/wazuh-indexer/certs/admin-key.pem -cert /etc/wazuh-indexer/certs/admin.pem -cacert /etc/wazuh-indexer/certs/root-ca.pem -h <WAZUH_INDEXER_URL> -nhnv
The command output must be similar to the following:
Security Admin v7
Will connect to localhost:9200 ... done
Connected as "CN=admin,OU=Wazuh,O=Wazuh,L=California,C=US"
OpenSearch Version: 2.19.4
Contacting opensearch cluster 'opensearch' and wait for YELLOW clusterstate ...
Clustername: wazuh-cluster
Clusterstate: GREEN
Number of nodes: 1
Number of data nodes: 1
.opendistro_security index already exists, so we do not need to create one.
Populate config from /home/wazuh-user
Will update '/rolesmapping' with /etc/wazuh-indexer/opensearch-security/roles_mapping.yml
   SUCC: Configuration for 'rolesmapping' created or updated
SUCC: Expected 1 config types for node {"updated_config_types":["rolesmapping"],"updated_config_size":1,"message":null} is 1 (["rolesmapping"]) due to: null
Done with success
Verify that
run_asis set totruein the/usr/share/wazuh-dashboard/data/wazuh/config/wazuh.ymlconfiguration file. Ifrun_asis set tofalse, change it totrue. This is required to create a role mapping in the Wazuh dashboard, ensuring the LDAP backend role is correctly mapped to the corresponding Wazuh role.hosts: - default: url: https://localhost port: 55000 username: wazuh-wui password: "<WAZUH_WUI_PASSWORD>" run_as: true
Click ☰ to open the menu on the Wazuh dashboard, go to Server management -> Security, and then Roles mapping to open the page.
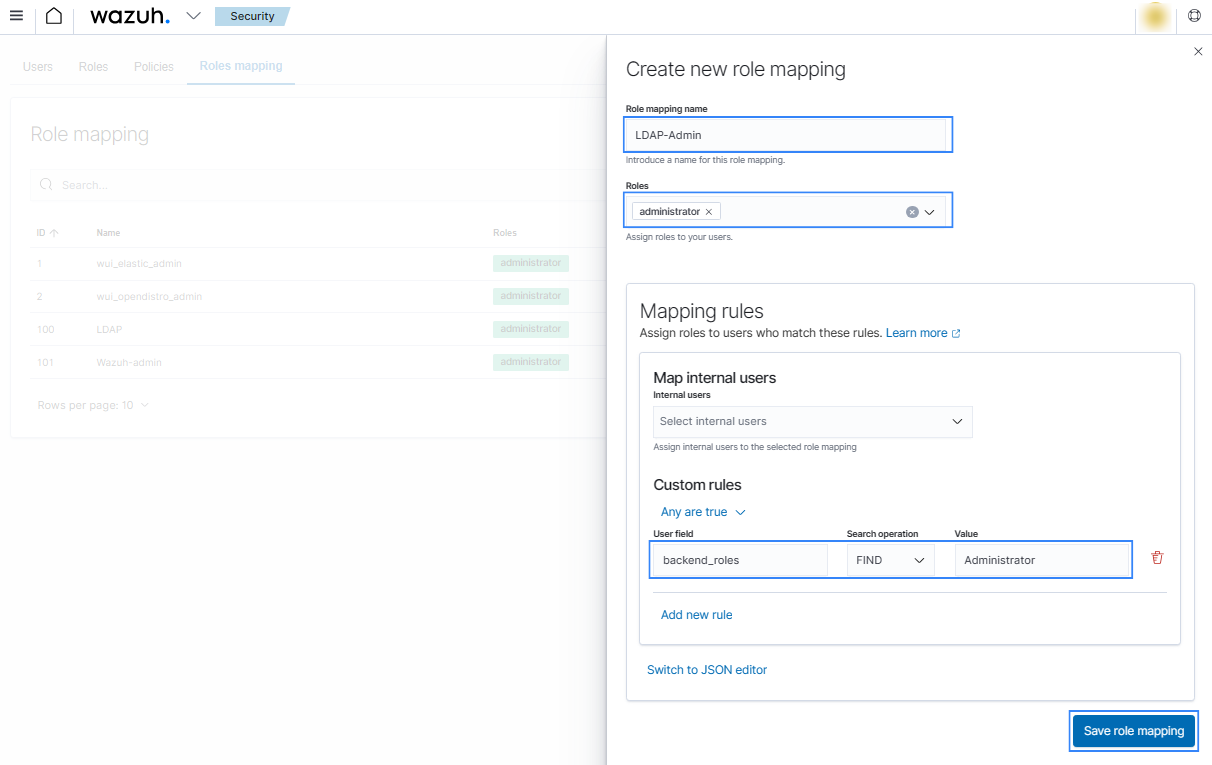
Click Create Role mapping and complete the empty fields with the following parameters:
Role mapping name: Assign a name to the role mapping.
Roles: Select
administrator.Custom rules: Click Add new rule to expand this field.
User field:
backend_rolesSearch operation:
FINDValue: Assign the name of your backend role in your LDAP server. In our case, this is a group named
wazuh-admins, which contains users with administrator roles.
Click Save role mapping to save and map the backend role with Wazuh as administrator.
Restart the Wazuh dashboard service using this command:
# systemctl restart wazuh-dashboard
Log in to the Wazuh dashboard with your LDAP credentials to test the configuration. In our case, we log in using the
wazuh-admin-usercredentials.
Map LDAP role to Wazuh read-only role
Follow these steps to create a new role mapping and grant read-only permissions to the backend role.
Log in to the Wazuh dashboard as an administrator.
Click the upper-left menu icon ☰ to open the options, go to Indexer management -> Security, and then Roles to open the roles page.
Click Create role, complete the empty fields with the following parameters, and then click Create to complete the task.
Name: Assign a name to the role.
Cluster permissions: cluster_composite_ops_ro
Index: *
Index permissions: read
Tenant permissions: global_tenant and select the Read only option.
Select the newly created role.
Select the Mapped users tab and click Manage mapping.
Under Backend roles, assign the name of the read-only role you have in your LDAP server and click on Map to confirm the action. In our case, the backend role (CN) is
wazuh-readonly.
Verify that
run_asis set totruein the/usr/share/wazuh-dashboard/data/wazuh/config/wazuh.ymlconfiguration file. Ifrun_asis set tofalse, change it totrue. This is required to create a role mapping in the Wazuh dashboard, ensuring the LDAP backend role is correctly mapped to the corresponding Wazuh role.hosts: - default: url: https://localhost port: 55000 username: wazuh-wui password: "<WAZUH_WUI_PASSWORD>" run_as: true
Click ☰ to open the menu on the Wazuh dashboard, go to Server management -> Security, and then Roles mapping to open the page.
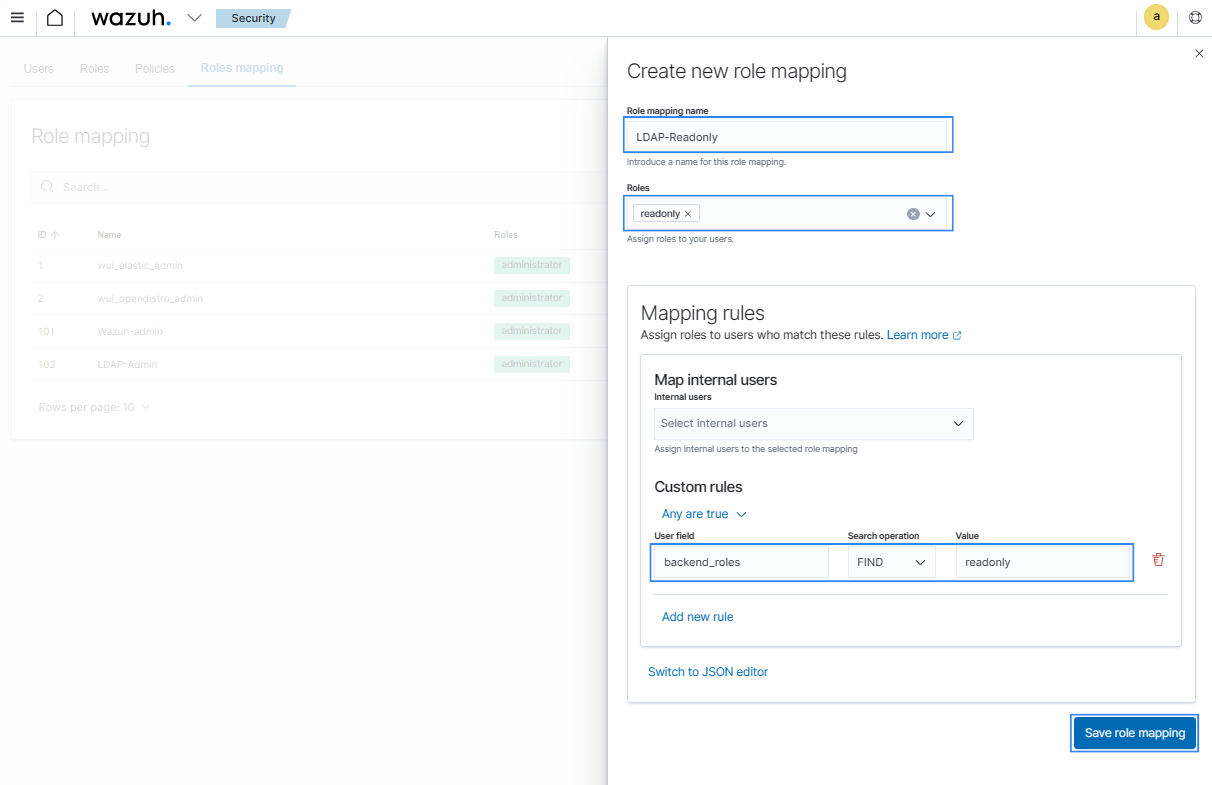
Click Create Role mapping and complete the empty fields with the following parameters:
Role mapping name: Assign a name to the role mapping.
Roles: Select
readonly.Custom rules: Click Add new rule to expand this field.
User field:
backend_rolesSearch operation:
FINDValue: Assign the name of your backend role in your LDAP server. In our case, this is a group named
wazuh-readonly, which contains users with read-only roles.
Click Save role mapping to save and map the backend role with Wazuh as read-only.
Restart the Wazuh dashboard service using this command:
# systemctl restart wazuh-dashboard
Log in to the Wazuh dashboard with your LDAP credentials to test the configuration. In our case, we log in using the
wazuh-readonly-usercredentials.