Migrating Wazuh indices

In this section, we focus on migrating Wazuh indices by using snapshots. This helps to restore alerts from one Wazuh indexer cluster to another without losing the original timestamp.

Setup shared file system

We recommend the use of a Network File System (NFS) to create a shared file system for the snapshot repository.

NFS server

Perform the following steps to set up NFS on a dedicated server:

  1. Create a target directory for the snapshot repository in the /mnt directory:

    # mkdir /mnt/snapshots
    
  2. Install NFS by running the following commands:

    # yum update
    # yum install -y nfs-utils
    # yum install exportfs
    # systemctl enable nfs-server
    # systemctl start nfs-server
    
  3. Add the /mnt/snapshots directory to the /etc/exports file using the command below. Replace the <NETWORK_ADDRESS/CIDR> variable with your network address.

    # echo "/mnt/snapshots     <NETWORK_ADDRESS/CIDR>(rw,sync,no_root_squash,no_subtree_check)" | sudo tee -a /etc/exports
    

    Where:

    • rw - Allows both read and write access to the shared directory.

    • sync - Forces the NFS server to write changes to the disk immediately, making the file system synchronous.

    • no_root_squash - Allows the "root" user on the NFS client system to have full, unrestricted access to files on the NFS server.

    • no_subtree_check - Disables subtree checking, which can improve performance for large directory trees.

  4. Apply the NFS configuration:

    # exportfs -a
    

Wazuh indexer

Perform the following steps on the Wazuh indexer node (s) to complete the shared file system setup.

  1. Create a target directory for the snapshot repository in the /mnt directory:

    # mkdir /mnt/snapshots
    
  2. Install the NFS client:

    # yum -y install nfs-utils
    
  3. Mount the shared directory /mnt/snapshots on the Wazuh indexer node(s). Replace the <SERVER_IP_ADDRESS> variable with the IP address of the NFS server:

    # mount -t nfs <SERVER_IP_ADDRESS>:/mnt/snapshots /mnt/snapshots
    
  4. Grant the wazuh-indexer user ownership of the /mnt/snapshots directory:

    # chown wazuh-indexer:wazuh-indexer /mnt/snapshots
    
  5. Add the configuration: path.repo: /mnt/snapshots to the /etc/wazuh-indexer/opensearch.yml file to specify the repository path:

    network.host: "127.0.0.1"
    node.name: "node-1"
    cluster.initial_master_nodes:
    - "node-1"
    cluster.name: "wazuh-cluster"
    
    node.max_local_storage_nodes: "3"
    path.data: /var/lib/wazuh-indexer
    path.logs: /var/log/wazuh-indexer
    path.repo: /mnt/snapshots
    
    plugins.security.ssl.http.pemcert_filepath: /etc/wazuh-indexer/certs/wazuh-indexer.pem
    plugins.security.ssl.http.pemkey_filepath: /etc/wazuh-indexer/certs/wazuh-indexer-key.pem
    plugins.security.ssl.http.pemtrustedcas_filepath: /etc/wazuh-indexer/certs/root-ca.pem
    plugins.security.ssl.transport.pemcert_filepath: /etc/wazuh-indexer/certs/wazuh-indexer.pem
    plugins.security.ssl.transport.pemkey_filepath: /etc/wazuh-indexer/certs/wazuh-indexer-key.>plugins.security.ssl.transport.pemtrustedcas_filepath: /etc/wazuh-indexer/certs/root-ca.pem
    plugins.security.ssl.http.enabled: true
    plugins.security.ssl.transport.enforce_hostname_verification: false
    plugins.security.ssl.transport.resolve_hostname: false
    plugins.security.ssl.http.enabled_ciphers:
      - "TLS_ECDHE_RSA_WITH_AES_128_GCM_SHA256"
      - "TLS_ECDHE_RSA_WITH_AES_256_GCM_SHA384"
      - "TLS_ECDHE_ECDSA_WITH_AES_128_GCM_SHA256"
      - "TLS_ECDHE_ECDSA_WITH_AES_256_GCM_SHA384"
    plugins.security.ssl.http.enabled_protocols:
      - "TLSv1.2"
    plugins.security.authcz.admin_dn:
    - "CN=admin,OU=Wazuh,O=Wazuh,L=California,C=US"
    plugins.security.check_snapshot_restore_write_privileges: true
    plugins.security.enable_snapshot_restore_privilege: true
    plugins.security.nodes_dn:
    - "CN=indexer,OU=Wazuh,O=Wazuh,L=California,C=US"
    plugins.security.restapi.roles_enabled:
    - "all_access"
    - "security_rest_api_access"
    
    plugins.security.system_indices.enabled: true
    plugins.security.system_indices.indices: [".opendistro-alerting-config", ".opendistro-alert>
    ### Option to allow Filebeat-oss 7.10.2 to work ###
    compatibility.override_main_response_version: true
    
  6. Restart the Wazuh indexer to apply the configuration changes:

    # systemctl restart wazuh-indexer
    

Warning

Make sure to confirm that the /mnt/snapshots directory has the wazuh-indexer:wazuh-indexer ownership on the Wazuh indexer nodes using the ll utility.

Repeat the Setup shared file system > Wazuh indexer steps on the destination Wazuh indexer(s) to use the NFS share directory, /mnt/snapshots, as its snapshot repository.

Setup snapshot repository

On the Wazuh dashboard, perform the following steps:

  1. Click on the upper left menu , go to Snapshot Management > Repositories, and select Create repository to create a new snapshot repository.

  2. Enter a repository name, select the repository type Shared file system, enter the repository location /mnt/snapshots, and select Add to register the new repository.

    Create snapshot repository

Repeat the above steps on the destination Wazuh cluster to set up a similar snapshot repository.

Take snapshots

  1. Click on the upper left menu , and go to Snapshot Management > Snapshots.

  2. Select Take snapshot, and enter a Snapshot name.

  3. Select or input source index patterns.

  4. Select the earlier created repository to store the snapshots.

  5. Select Advanced options and check the Include cluster state in snapshots option.

    Include cluster state in snapshots option
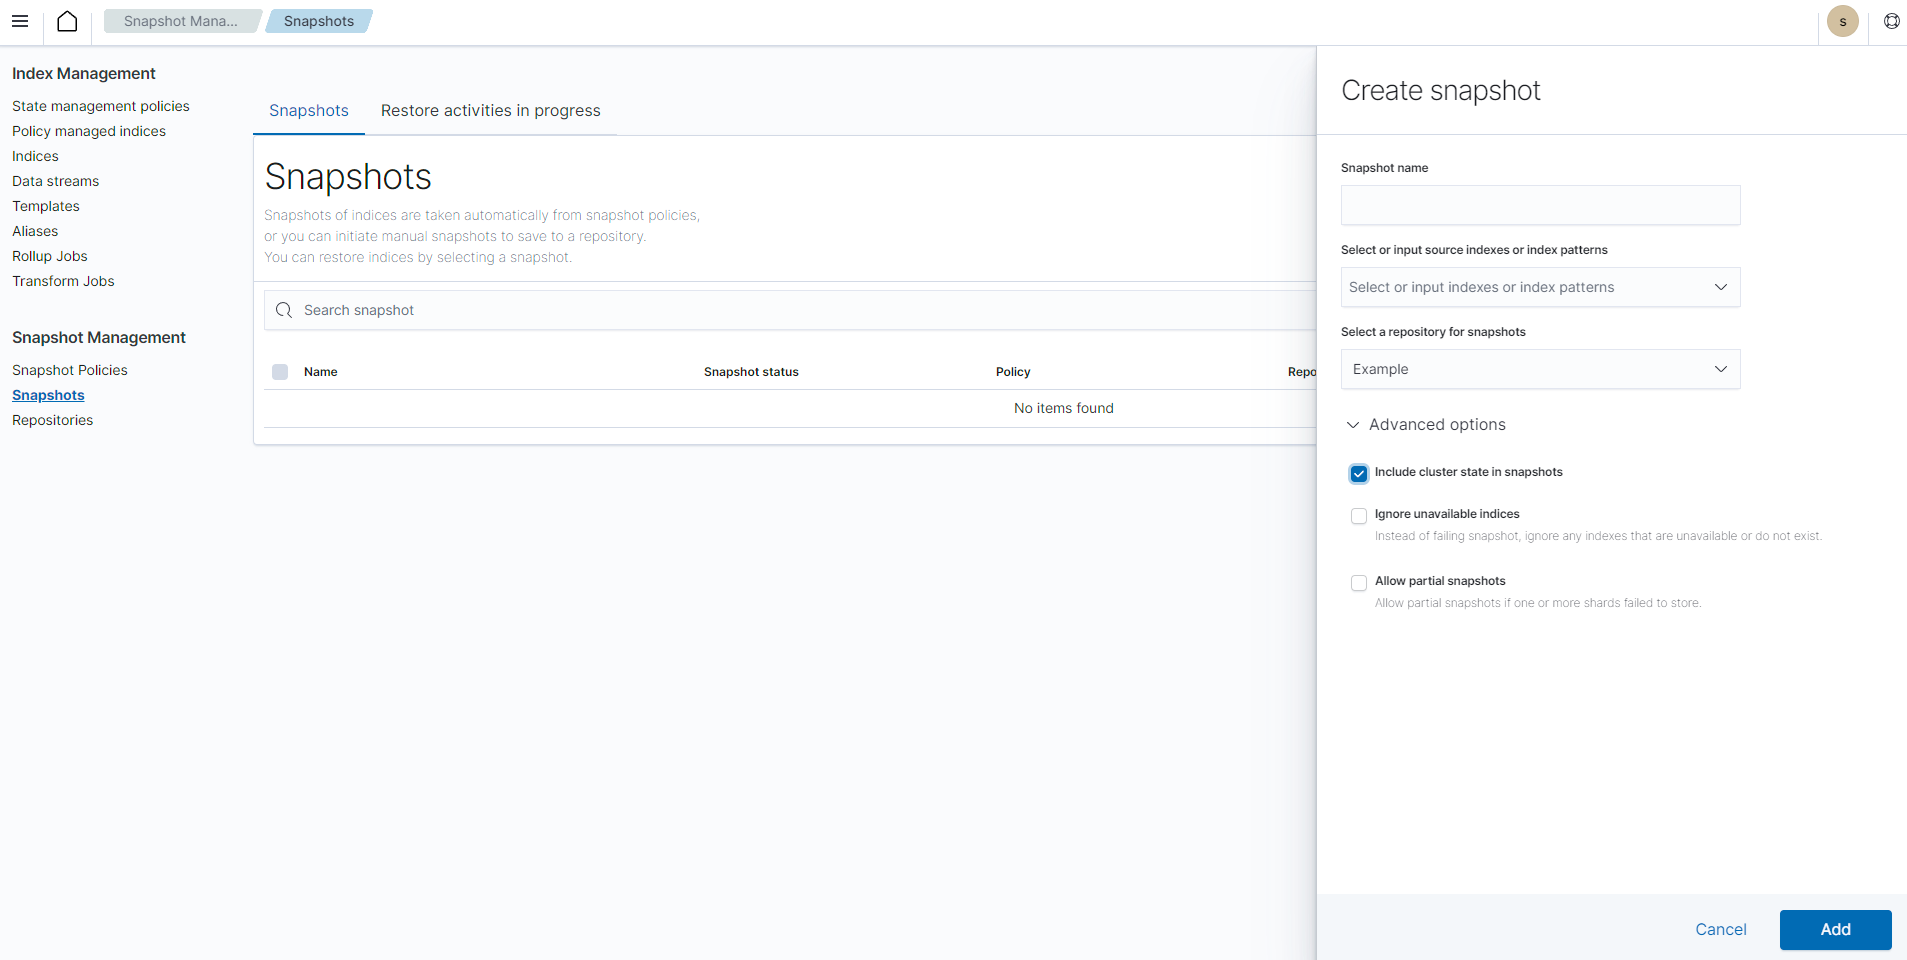
  6. Select Add to create a new snapshot.

The snapshot files are saved in the repository location /mnt/snapshots.

Snapshot file saved

Restore snapshots

To complete the Wazuh indices migration steps, restore the snapshots taken from the old Wazuh indexers to the destination Wazuh indexers. Perform the following steps on the destination Wazuh indexer.

Note

It is necessary to have performed the steps in the Setup shared file system and Setup snapshot repository sections on the destination Wazuh cluster before proceeding.

  1. Restart the Wazuh indexer nodes in the destination Wazuh cluster to load the snapshot files using the command:

    # systemctl restart wazuh-indexer
    
  2. Click on the upper left menu , go to Snapshot Management > Snapshots, and refresh the Snapshots page. The snapshots in the repository location /mnt/snapshots will show on the destination Wazuh cluster’s dashboard.

  3. Select the snapshot and click on Restore. Delete the restored_ prefix to restore the indices to their original names. The restored_ prefix exists to avoid conflicting index names.

  4. Select Advanced options and make sure all the options are unchecked.

    Restore snapshot advanced options
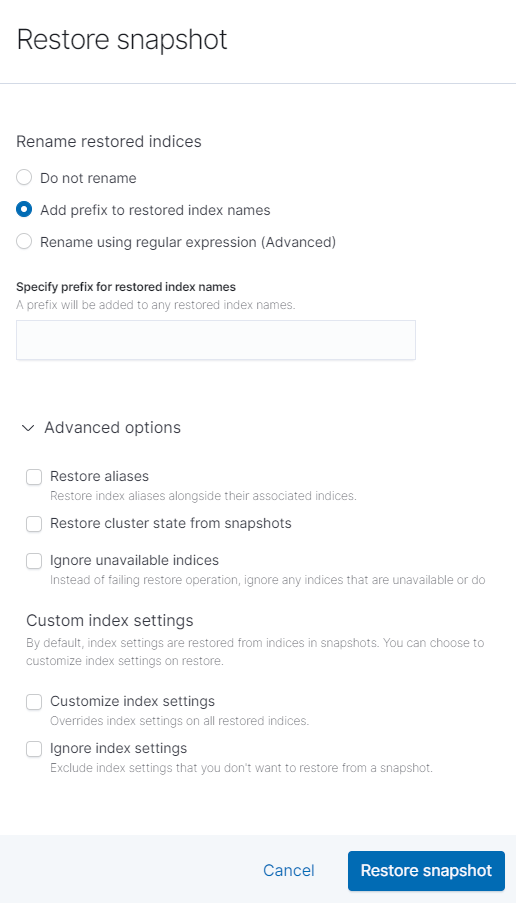
  5. Select Restore snapshot to complete the migration process.

    Restore snapshot