Advanced settings
In this section, we describe different advanced settings that can provide greater control and flexibility over how the FIM module works.
Who-data monitoring
The who-data functionality allows the FIM module to obtain information about who made modifications to a monitored file. This information contains the user who made the changes to the monitored files and the program name or process used.
Who-data monitoring on Linux
Wazuh supports two modes for who-data monitoring on Linux endpoints:
The audit mode
Who-data monitoring in audit mode uses the Linux Audit subsystem to get information about who makes the changes in a monitored directory. These changes produce audit events, which are processed by the FIM module and reported to the Wazuh server. The audit mode is an extension of the real-time monitoring with the who-data information added.
Requirements
You need to install the audit daemon if you don’t have it already installed on your endpoint.
# yum install audit
For Audit 3.1.1 and later, install the audispd af_unix plugin and restart the Audit service.
# yum install audispd-plugins
# service auditd restart
# apt-get install auditd
For Audit 3.1.1 and later, install the audispd af_unix plugin and restart the Audit service.
# apt-get install audispd-plugins
# service auditd restart
In most systems, auditd includes a rule to skip processing of every audit rule by default. This setting prevents the reporting of any who-data information. To ensure that auditd is not DISABLED BY DEFAULT, follow these steps.
Check the output of this command to find out if the
auditdrules include the-a never,taskrule.# auditctl -l | grep task
If the output displays the
-a never,taskrule, remove it from the audit rules file located at/etc/audit/rules.d/audit.rulesaudit rules file.Restart auditd and Wazuh agent to apply the changes:
# service auditd restart
# systemctl restart wazuh-agent
Configuration
Perform the following steps to enable who-data monitoring using the audit mode. In this example, we configure who-data monitoring for the /etc directory.
Add the configuration below within the
<ossec_config>block of the Wazuh agent/var/ossec/etc/ossec.confconfiguration file:<syscheck> <directories check_all="yes" whodata="yes">/etc</directories> <whodata> <provider>audit</provider> </whodata> </syscheck>
Note
If the
<provider>tag is not configured, the FIM module defaults to using theauditmode.Restart the Wazuh agent to apply the changes. This action adds an audit rule for the monitored directory:
# systemctl restart wazuh-agent
Execute the following command to check if the audit rule for monitoring the selected directory is applied:
# auditctl -l | grep wazuh_fim
auditctl -w /etc -p wa -k wazuh_fimFrom the output above, you can see the rule was added:
Note
When the Wazuh agent service stops, it removes the rule. You can use the same command to check that it removed the rule successfully.
Alert fields
The following table establishes a correspondence between audit fields and their equivalent fields in an alert when who-data is enabled.
Audit field
Alert field
Fields description
User
audit.user.id
audit.user.name
Contains information about who started the process that modified the monitored file.
Login user
audit.login_user.id
audit.login_user.name
Contains information about the user who started the session. They correspond respectively to the login UID and login name. Upon login, this ID is assigned to a user and is inherited by every process, even when the user's identity changes.
Effective user
audit.effective_user.id
audit.effective_user.name
Contains the effective ID and name of the user who started the process that modified the monitored file. When a user executes a command using sudo, the effective user ID changes to
0, and the effective username becomes root.Group
audit.group.id
audit.group.name
Contains the group ID and group name of the user who started the process that modified the monitored file.
Process ID
audit.process.id
Contains the ID of the process used to modify the monitored file.
Process name
audit.process.name
Contains the name of the process used to modify the monitored file.
Process ppid
audit.process.ppid
Contains the parent process ID of the process used to modify the monitored file.
Example: Monitor changes in the /etc/hosts.allow file on Linux
Perform the following steps to configure the FIM module to get the information about who makes changes to /etc/hosts.allow file.
Configuration
Append the configuration below to the
/var/ossec/etc/ossec.conffile to monitor the/etc/hosts.allowfile for changes:<ossec_config> <syscheck> <directories check_all="yes" whodata="yes" report_changes="yes">/etc/hosts.allow</directories> <whodata> <provider>audit</provider> </whodata> </syscheck> </ossec_config>
Restart the Wazuh agent to apply the configuration changes:
# systemctl restart wazuh-agent
Test the configuration
Create the user
smithon a Linux endpoint and assign sudo privileges:# adduser smith # sudo usermod -aG sudo smith
Log out of the Linux endpoint and log in as
smith.Open the
nanoeditor and add a new IP address, such as192.168.32.5in the/etc/hosts.allowfile on the Linux endpoint.# nano /etc/hosts.allow
Visualize the alert
Navigate to Endpoint security > File Integrity Monitoring > Events on the Wazuh dashboard to view the alert generated when the FIM module detects changes in the monitored file.

Expand the alert to view more information. In the alert fields below, you can see the user smith added a new IP address to the /etc/hosts.allow file using the nano text editor with root privileges.

Alert in JSON format:
{
  "_index": "wazuh-alerts-4.x-2025.12.15",
  "_id": "-ynvIpsBhUkrkhLo429p",
  "_score": null,
  "_source": {
    "syscheck": {
      "size_before": "1",
      "uname_after": "root",
      "mtime_after": "2025-12-15T11:54:54",
      "size_after": "13",
      "gid_after": "0",
      "md5_before": "68b329da9893e34099c7d8ad5cb9c940",
      "diff": "1c1\n< \n---\n> 192.168.32.5\n",
      "sha256_before": "01ba4719c80b6fe911b091a7c05124b64eeece964e09c058ef8f9805daca546b",
      "mtime_before": "2025-12-15T11:53:17",
      "mode": "whodata",
      "path": "/etc/hosts.allow",
      "sha1_after": "3c832d37ef2fa9f85931b072054464123f6125a2",
      "changed_attributes": [
        "size",
        "mtime",
        "md5",
        "sha1",
        "sha256"
      ],
      "gname_after": "root",
      "audit": {
        "process": {
          "parent_name": "/usr/bin/bash",
          "cwd": "/home/smith",
          "parent_cwd": "/home/smith",
          "name": "/usr/bin/nano",
          "id": "20337",
          "ppid": "20274"
        },
        "login_user": {
          "name": "smith",
          "id": "1001"
        },
        "effective_user": {
          "name": "root",
          "id": "0"
        },
        "user": {
          "name": "root",
          "id": "0"
        },
        "group": {
          "name": "root",
          "id": "0"
        }
      },
      "uid_after": "0",
      "perm_after": "rw-r--r--",
      "event": "modified",
      "md5_after": "3016df224717bfd1f51a8edaf6aa89ae",
      "sha1_before": "adc83b19e793491b1c6ea0fd8b46cd9f32e592fc",
      "sha256_after": "cf34fb40d08b630d166bf03fdfe4b82bfc6f593e19ef7bd713186be84d5e4874",
      "inode_after": 34715907
    },
    "input": {
      "type": "log"
    },
    "agent": {
      "ip": "192.168.33.134",
      "name": "CentOS_Stream_10",
      "id": "005"
    },
    "manager": {
      "name": "ubuntu-VMware-Virtual-Platform"
    },
    "rule": {
      "mail": false,
      "level": 7,
      "pci_dss": [
        "11.5"
      ],
      "hipaa": [
        "164.312.c.1",
        "164.312.c.2"
      ],
      "tsc": [
        "PI1.4",
        "PI1.5",
        "CC6.1",
        "CC6.8",
        "CC7.2",
        "CC7.3"
      ],
      "description": "Integrity checksum changed.",
      "groups": [
        "ossec",
        "syscheck",
        "syscheck_entry_modified",
        "syscheck_file"
      ],
      "nist_800_53": [
        "SI.7"
      ],
      "gdpr": [
        "II_5.1.f"
      ],
      "firedtimes": 3,
      "mitre": {
        "technique": [
          "Stored Data Manipulation"
        ],
        "id": [
          "T1565.001"
        ],
        "tactic": [
          "Impact"
        ]
      },
      "id": "550",
      "gpg13": [
        "4.11"
      ]
    },
    "location": "syscheck",
    "decoder": {
      "name": "syscheck_integrity_changed"
    },
    "id": "1765817694.1028827",
    "full_log": "File '/etc/hosts.allow' modified\nMode: whodata\nChanged attributes: size,mtime,md5,sha1,sha256\nSize changed from '1' to '13'\nOld modification time was: '1765817597', now it is '1765817694'\nOld md5sum was: '68b329da9893e34099c7d8ad5cb9c940'\nNew md5sum is : '3016df224717bfd1f51a8edaf6aa89ae'\nOld sha1sum was: 'adc83b19e793491b1c6ea0fd8b46cd9f32e592fc'\nNew sha1sum is : '3c832d37ef2fa9f85931b072054464123f6125a2'\nOld sha256sum was: '01ba4719c80b6fe911b091a7c05124b64eeece964e09c058ef8f9805daca546b'\nNew sha256sum is : 'cf34fb40d08b630d166bf03fdfe4b82bfc6f593e19ef7bd713186be84d5e4874'\n",
    "timestamp": "2025-12-15T11:54:54.192-0500"
  },
  "fields": {
    "syscheck.mtime_after": [
      "2025-12-15T11:54:54.000Z"
    ],
    "syscheck.mtime_before": [
      "2025-12-15T11:53:17.000Z"
    ],
    "timestamp": [
      "2025-12-15T16:54:54.192Z"
    ]
  },
  "sort": [
    1765817694192
  ]
}
The eBPF mode
Extended Berkeley Packet Filter (eBPF) enables developers to build programs that run securely in the Linux operating system kernel space. Who-data monitoring in eBPF mode directly extracts FIM events from programs that use eBPF. This approach eliminates the need for external dependencies like auditd, allowing faster extraction of the generated events.
The FIM events extracted from eBPF programs for who-data monitoring include:
vfs_open: When a new file has been created on the endpoint.security_inode_setattr: When a file has been modified on the endpoint.vfs_unlink: When a file has been removed from the endpoint.
Wazuh uses a kernel data structure called ring_buffer to transfer these events from the kernel to the user space, where the FIM module analyzes them.
Note
Who-data monitoring with eBPF requires kernel version 5.8 or higher, as the data structure is only present in kernels starting with this version.
Configuration
Configuring who-data in eBPF mode requires a provider option within the <whodata> tag. The <provider> tag accepts two values, audit and ebpf. The audit mode (default) and the newly added eBPF mode should not be used together. If both are configured, only the last configured provider takes effect to monitor every who-data configured directory.
Note
If the <provider> tag is not configured, the FIM module defaults to the audit mode. Additionally, if the provider is set to ebpf, but unavailable due to kernel version incompatibility, it also falls back to the audit mode.
A configuration block of who-data in eBPF mode to monitor the /home/user/documents directory is shown below:
<syscheck>
  <directories whodata="yes">/home/user/documents</directories>

  <whodata>
    <provider>ebpf</provider>
  </whodata>
</syscheck>
Given the high speed at which eBPF detects events, it's important to fine-tune the queue_size of the whodata option. This adjustment gives it enough size to handle a big burst of events that may be generated by the kernel, such as during a massive deletion event. An increase in the value of the queue_size prevents events from being lost when a large number of events are collected from monitored endpoints. Note that, increasing the value of the queue_size increases the memory consumption of the Wazuh agent on the monitored endpoint.
The configuration below enables who-data in eBPF mode to handle up to 50000 events:
<whodata>
  <provider>ebpf</provider>
  <queue_size>50000</queue_size>
</whodata>
You can learn more about the available configuration options in the whodata reference section.
Alert fields
Who-data monitoring alerts generated using the eBPF mode preserve the same structure as the audit mode alert fields.
Example: Monitoring changes in configuration files
Monitoring configuration files such as the ../sshd_config file on Linux endpoints can help detect unauthorized changes. This approach ensures the integrity of configuration files are not tempered and provides early detection of suspicious behavior.
Perform the steps below to monitor changes made to the /etc/ssh/sshd_config configuration file on an Ubuntu endpoint using who-data in eBPF mode.
Configuration
Append the configuration below to the
/var/ossec/etc/ossec.confconfiguration file on the Ubuntu endpoint:<ossec_config> <syscheck> <directories whodata="yes">/etc/ssh/sshd_config</directories> <whodata> <provider>ebpf</provider> <queue_size>50000</queue_size> </whodata> </syscheck> </ossec_config>
Restart the Wazuh agent to apply the configuration changes:
# systemctl restart wazuh-agent
Test the configuration
While logged in as the root user, append a new line of text to the /etc/ssh/sshd_config file on the Ubuntu endpoint:
# echo "eBPF test" >> /etc/ssh/sshd_config
Visualize the alert
Navigate to Endpoint security > File Integrity Monitoring > Events on the Wazuh dashboard to view the alert generated when the FIM module detects changes in the monitored file.
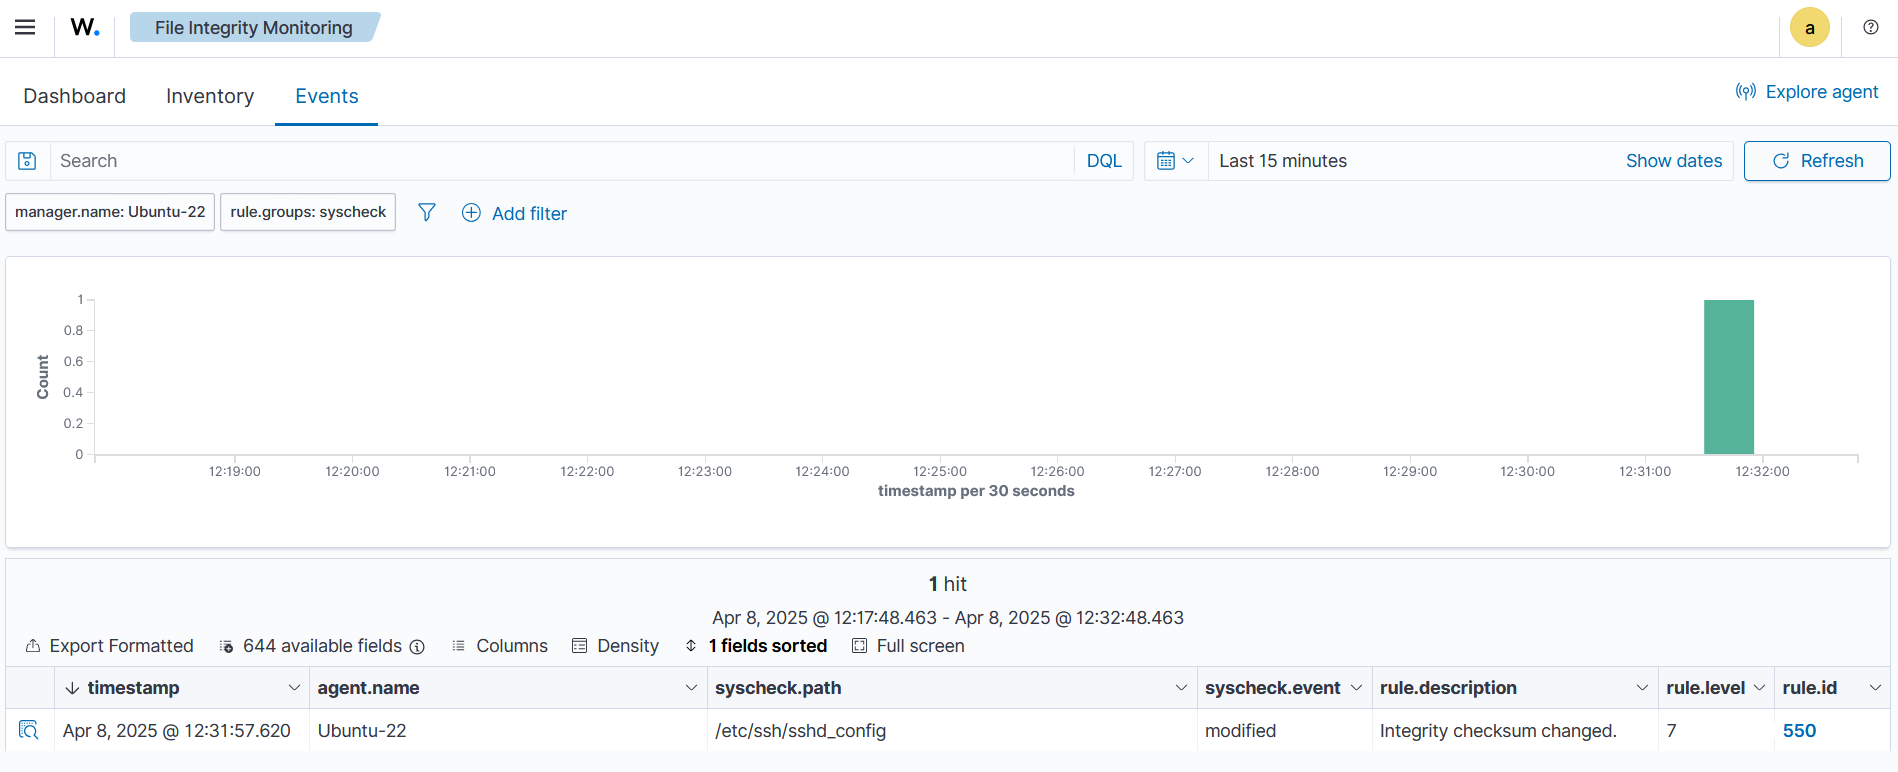
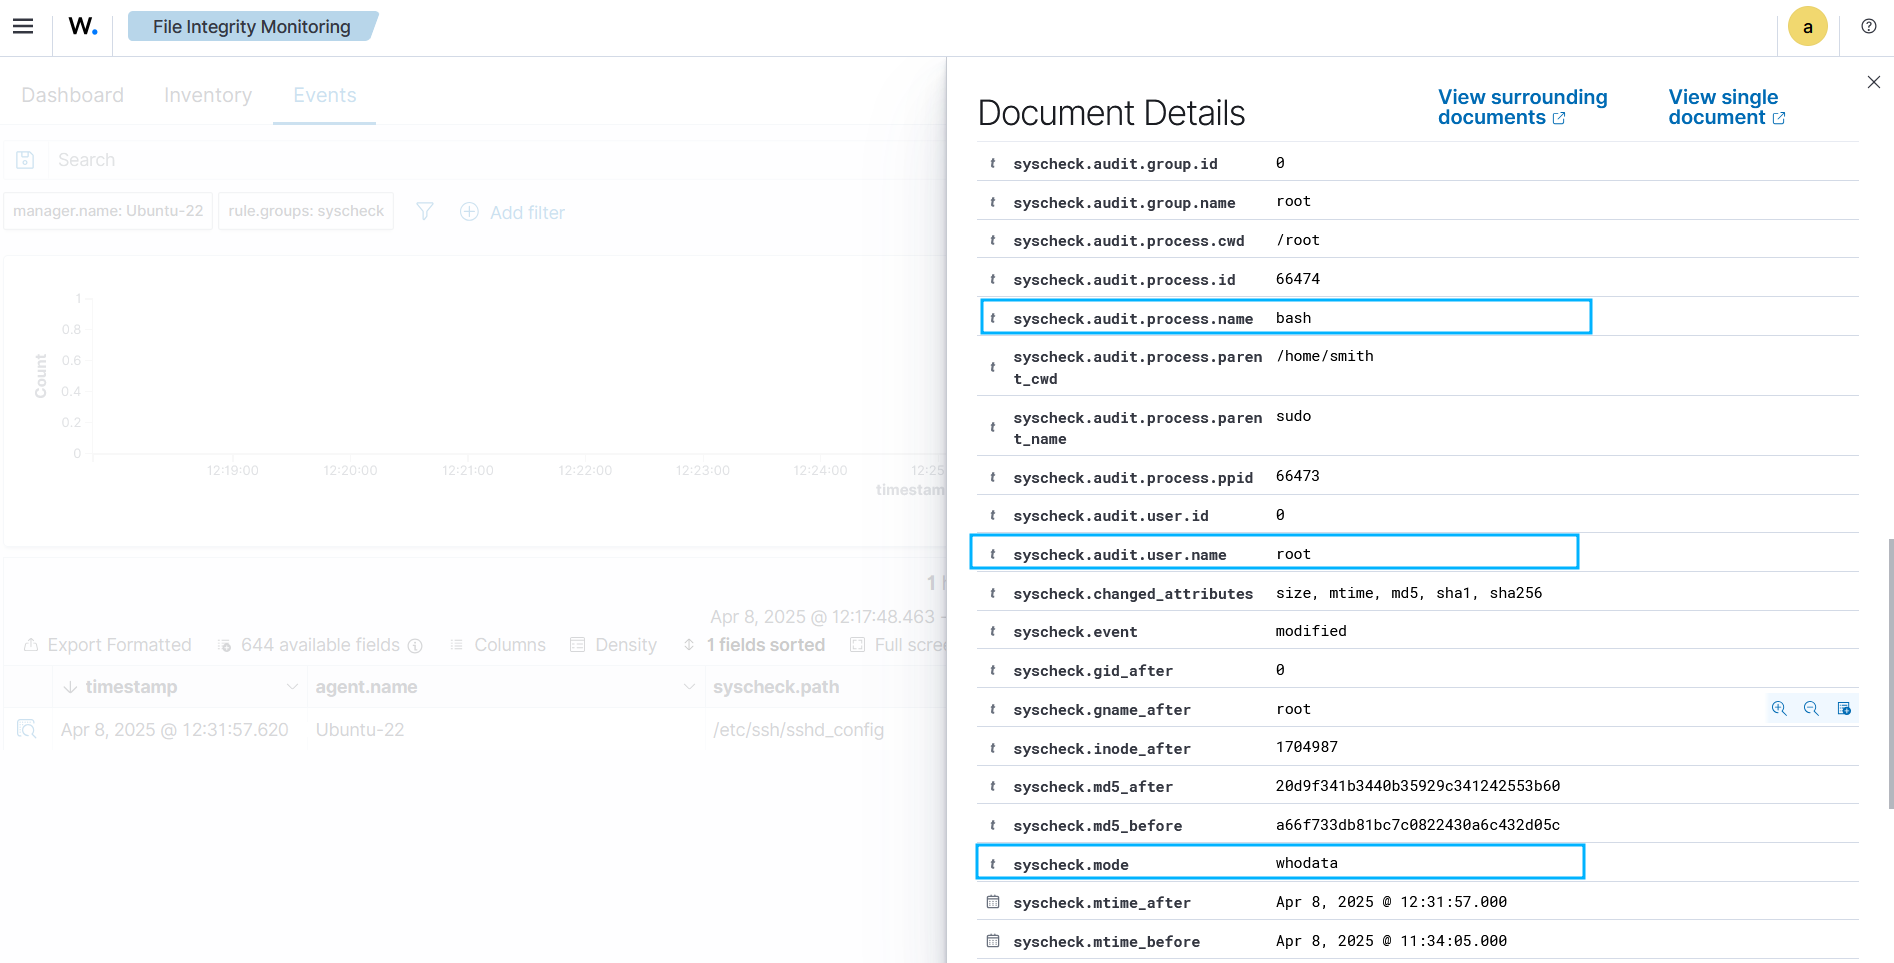
Expand the alert to view more information. In the alert fields below, you can see that the user root added a config to the /etc/ssh/sshd_config file using the bash terminal program.
Alert output in JSON format.
{
  "_index": "wazuh-alerts-4.x-2025.04.08",
  "_id": "SR0rFZYBmHj4HFa46tcz",
  "_score": null,
  "_source": {
    "syscheck": {
      "size_before": "3365",
      "uname_after": "root",
      "mtime_after": "2025-04-08T11:31:57",
      "size_after": "3390",
      "gid_after": "0",
      "md5_before": "a66f733db81bc7c0822430a6c432d05c",
      "sha256_before": "3be5039e47d50f99d69b99ce2dfc1bf3476670cf583760930bca2286bdd82621",
      "mtime_before": "2025-04-08T10:34:05",
      "mode": "whodata",
      "path": "/etc/ssh/sshd_config",
      "sha1_after": "29bf442cd835f3020963b2ad7b08f590e149f6e7",
      "changed_attributes": [
        "size",
        "mtime",
        "md5",
        "sha1",
        "sha256"
      ],
      "gname_after": "root",
      "audit": {
        "process": {
          "parent_name": "sudo",
          "cwd": "/root",
          "parent_cwd": "/home/smith",
          "name": "bash",
          "id": "66474",
          "ppid": "66473"
        },
        "user": {
          "name": "root",
          "id": "0"
        },
        "group": {
          "name": "root",
          "id": "0"
        }
      },
      "uid_after": "0",
      "perm_after": "rw-r--r--",
      "event": "modified",
      "md5_after": "20d9f341b3440b35929c341242553b60",
      "sha1_before": "ec5f46ee42c9749237a4d321725e9e6ffae90cf9",
      "sha256_after": "ee89357aa17bd90d7201897a508a83df913f6d330e2eb0d8629d7c954b59c330",
      "inode_after": 1704987
    },
    "input": {
      "type": "log"
    },
    "agent": {
      "name": "Ubuntu-22",
      "id": "000"
    },
    "manager": {
      "name": "Ubuntu-22"
    },
    "rule": {
      "mail": false,
      "level": 7,
      "pci_dss": [
        "11.5"
      ],
      "hipaa": [
        "164.312.c.1",
        "164.312.c.2"
      ],
      "tsc": [
        "PI1.4",
        "PI1.5",
        "CC6.1",
        "CC6.8",
        "CC7.2",
        "CC7.3"
      ],
      "description": "Integrity checksum changed.",
      "groups": [
        "ossec",
        "syscheck",
        "syscheck_entry_modified",
        "syscheck_file"
      ],
      "nist_800_53": [
        "SI.7"
      ],
      "gdpr": [
        "II_5.1.f"
      ],
      "firedtimes": 1,
      "mitre": {
        "technique": [
          "Stored Data Manipulation"
        ],
        "id": [
          "T1565.001"
        ],
        "tactic": [
          "Impact"
        ]
      },
      "id": "550",
      "gpg13": [
        "4.11"
      ]
    },
    "location": "syscheck",
    "decoder": {
      "name": "syscheck_integrity_changed"
    },
    "id": "1744111917.26911",
    "full_log": "File '/etc/ssh/sshd_config' modified\nMode: whodata\nChanged attributes: size,mtime,md5,sha1,sha256\nSize changed from '3365' to '3390'\nOld modification time was: '1744108445', now it is '1744111917'\nOld md5sum was: 'a66f733db81bc7c0822430a6c432d05c'\nNew md5sum is : '20d9f341b3440b35929c341242553b60'\nOld sha1sum was: 'ec5f46ee42c9749237a4d321725e9e6ffae90cf9'\nNew sha1sum is : '29bf442cd835f3020963b2ad7b08f590e149f6e7'\nOld sha256sum was: '3be5039e47d50f99d69b99ce2dfc1bf3476670cf583760930bca2286bdd82621'\nNew sha256sum is : 'ee89357aa17bd90d7201897a508a83df913f6d330e2eb0d8629d7c954b59c330'\n",
    "timestamp": "2025-04-08T11:31:57.620+0000"
  },
  "fields": {
    "syscheck.mtime_after": [
      "2025-04-08T11:31:57.000Z"
    ],
    "syscheck.mtime_before": [
      "2025-04-08T10:34:05.000Z"
    ],
    "timestamp": [
      "2025-04-08T11:31:57.620Z"
    ]
  },
  "sort": [
    1744111917620
  ]
}
Who-data monitoring on Windows
How it works
The who-data monitoring functionality uses the Microsoft Windows auditing subsystem. It gets the related information about who makes modifications in a monitored directory. These changes produce audit events. The FIM module processes these events and reports them to the Wazuh server. This feature is only compatible with Windows operating systems later than Windows Vista.
Configuration
To enable the who-data feature, you must declare the tag whodata="yes" within the directories block in the C:\Program Files (x86)\ossec-agent\ossec.conf configuration file. You need to properly configure the Local Audit Policies and the System Access Control List (SACLs) of each monitored directory. Wazuh automatically performs these configurations for the directory to monitor.
...
<syscheck>
  ...
  <directories check_all="yes" whodata="yes">C:\test</directories>
  ...
</syscheck>
...
The FIM module configures the required Local Audit Policies and SACLs when launched. However, other services might change this configuration which would prevent who-data from receiving the monitored events. To overcome this, FIM detects this configuration change and switches all the directories monitoring with who-data to real-time mode. The two available mechanisms to detect these configuration changes are:
Wazuh monitors specific events (ID 4719) that Windows generates when one of the Audit Policies is modified (Success removed).
Periodically, Wazuh checks that the Audit Policies and the SACLs are configured as expected. You can modify the frequency of this verification with windows_audit_interval.
If your Windows OS version is later than Windows Vista but the system didn’t automatically configure the audit policies, see the Manual configuration of the Windows Audit Policies guide.
The following table establishes a correspondence between audit fields and their equivalent fields in an alert when who-data is enabled:
Audit field
Alert field
Fields description
User
audit.user.id audit.user.name
Contain the ID and name of the user who started the process that modified the monitored file.
Process id
audit.process.id
Contain the ID of the process used to modify the monitored file.
Process name
audit.process.name
Contain the name of the process used to modify the monitored file.
Example: Monitor changes in a text file on Windows
Perform the following steps to configure the FIM module. This configuration gets the information about the user and the process that modified the monitored file.
Edit the Wazuh agent
C:\Program Files (x86)\ossec-agent\ossec.confconfiguration file and add theDocumentsdirectory for FIM monitoring. The configuration ensures that the FIM module records who-data information and also reports the exact changes made to text files:<syscheck> <directories check_all="yes" whodata="yes" report_changes="yes">C:\Users\*\Documents</directories> </syscheck>
Restart the Wazuh agent using PowerShell with administrator privileges to apply the changes:
Restart-Service -Name wazuh
Test the configuration
Create a text file
audit_docu.txtin theDocumentsfolder using Notepad.Add the text “Hello” and save the changes.
Visualize the alert
Navigate to File Integrity Monitoring on the Wazuh dashboard and find the alert generated when the FIM module detects changes in the monitored directory.

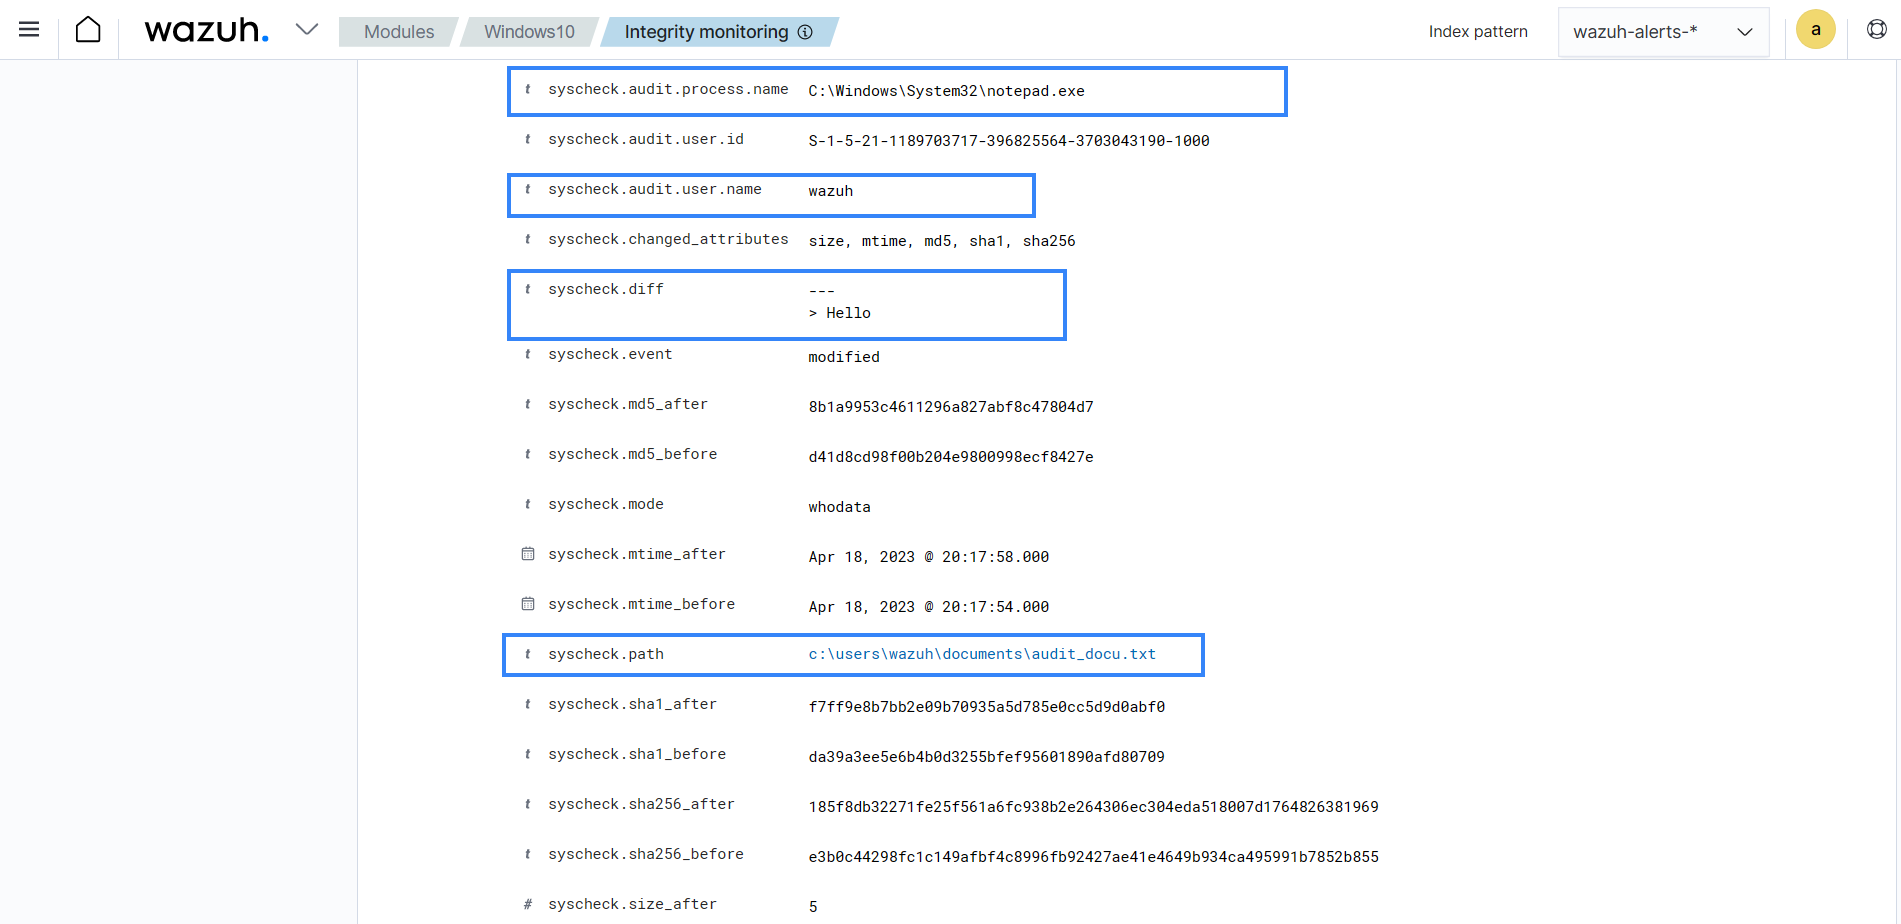
Expand the alert with rule.id:550 to view all the information. In the alert fields below, you can see the user admin added the word “Hello” to the audit_docu.txt file using the Notepad text editor.
Alert in JSON:
{
  "_index": "wazuh-alerts-4.x-2023.04.18",
  "_id": "ZcS6lIcB57JzuUZxyH13",
  "_version": 1,
  "_score": null,
  "_source": {
    "syscheck": {
      "size_before": "0",
      "uname_after": "wazuh",
      "mtime_after": "2023-04-18T17:17:58",
      "size_after": "5",
      "md5_before": "d41d8cd98f00b204e9800998ecf8427e",
      "diff": "---\n> Hello\n",
      "win_perm_after": [
        {
          "allowed": [
            "DELETE",
            "READ_CONTROL",
            "WRITE_DAC",
            "WRITE_OWNER",
            "SYNCHRONIZE",
            "READ_DATA",
            "WRITE_DATA",
            "APPEND_DATA",
            "READ_EA",
            "WRITE_EA",
            "EXECUTE",
            "READ_ATTRIBUTES",
            "WRITE_ATTRIBUTES"
          ],
          "name": "SYSTEM"
        },
        {
          "allowed": [
            "DELETE",
            "READ_CONTROL",
            "WRITE_DAC",
            "WRITE_OWNER",
            "SYNCHRONIZE",
            "READ_DATA",
            "WRITE_DATA",
            "APPEND_DATA",
            "READ_EA",
            "WRITE_EA",
            "EXECUTE",
            "READ_ATTRIBUTES",
            "WRITE_ATTRIBUTES"
          ],
          "name": "Administrators"
        },
        {
          "allowed": [
            "DELETE",
            "READ_CONTROL",
            "WRITE_DAC",
            "WRITE_OWNER",
            "SYNCHRONIZE",
            "READ_DATA",
            "WRITE_DATA",
            "APPEND_DATA",
            "READ_EA",
            "WRITE_EA",
            "EXECUTE",
            "READ_ATTRIBUTES",
            "WRITE_ATTRIBUTES"
          ],
          "name": "wazuh"
        }
      ],
      "sha256_before": "e3b0c44298fc1c149afbf4c8996fb92427ae41e4649b934ca495991b7852b855",
      "mtime_before": "2023-04-18T17:17:54",
      "mode": "whodata",
      "path": "c:\\users\\wazuh\\documents\\audit_docu.txt",
      "sha1_after": "f7ff9e8b7bb2e09b70935a5d785e0cc5d9d0abf0",
      "changed_attributes": [
        "size",
        "mtime",
        "md5",
        "sha1",
        "sha256"
      ],
      "audit": {
        "process": {
          "name": "C:\\Windows\\System32\\notepad.exe",
          "id": "5672"
        },
        "user": {
          "name": "wazuh",
          "id": "S-1-5-21-1189703717-396825564-3703043190-1000"
        }
      },
      "attrs_after": [
        "ARCHIVE"
      ],
      "uid_after": "S-1-5-21-1189703717-396825564-3703043190-1000",
      "event": "modified",
      "md5_after": "8b1a9953c4611296a827abf8c47804d7",
      "sha1_before": "da39a3ee5e6b4b0d3255bfef95601890afd80709",
      "sha256_after": "185f8db32271fe25f561a6fc938b2e264306ec304eda518007d1764826381969"
    },
    "input": {
      "type": "log"
    },
    "agent": {
      "ip": "192.168.33.132",
      "name": "Windows10",
      "id": "021"
    },
    "manager": {
      "name": "wazuh"
    },
    "rule": {
      "mail": false,
      "level": 7,
      "pci_dss": [
        "11.5"
      ],
      "hipaa": [
        "164.312.c.1",
        "164.312.c.2"
      ],
      "tsc": [
        "PI1.4",
        "PI1.5",
        "CC6.1",
        "CC6.8",
        "CC7.2",
        "CC7.3"
      ],
      "description": "Integrity checksum changed.",
      "groups": [
        "ossec",
        "syscheck",
        "syscheck_entry_modified",
        "syscheck_file"
      ],
      "nist_800_53": [
        "SI.7"
      ],
      "gdpr": [
        "II_5.1.f"
      ],
      "firedtimes": 2,
      "mitre": {
        "technique": [
          "Stored Data Manipulation"
        ],
        "id": [
          "T1565.001"
        ],
        "tactic": [
          "Impact"
        ]
      },
      "id": "550",
      "gpg13": [
        "4.11"
      ]
    },
    "location": "syscheck",
    "decoder": {
      "name": "syscheck_integrity_changed"
    },
    "id": "1681827479.1689265",
    "full_log": "File 'c:\\users\\wazuh\\documents\\audit_docu.txt' modified\nMode: whodata\nChanged attributes: size,mtime,md5,sha1,sha256\nSize changed from '0' to '5'\nOld modification time was: '1681827474', now it is '1681827478'\nOld md5sum was: 'd41d8cd98f00b204e9800998ecf8427e'\nNew md5sum is : '8b1a9953c4611296a827abf8c47804d7'\nOld sha1sum was: 'da39a3ee5e6b4b0d3255bfef95601890afd80709'\nNew sha1sum is : 'f7ff9e8b7bb2e09b70935a5d785e0cc5d9d0abf0'\nOld sha256sum was: 'e3b0c44298fc1c149afbf4c8996fb92427ae41e4649b934ca495991b7852b855'\nNew sha256sum is : '185f8db32271fe25f561a6fc938b2e264306ec304eda518007d1764826381969'\n",
    "timestamp": "2023-04-18T17:17:59.498+0300"
  },
  "fields": {
    "syscheck.mtime_after": [
      "2023-04-18T17:17:58.000Z"
    ],
    "syscheck.mtime_before": [
      "2023-04-18T17:17:54.000Z"
    ],
    "timestamp": [
      "2023-04-18T14:17:59.498Z"
    ]
  },
}
Manual configuration of the Windows Audit Policies
For Windows versions later than Windows Vista and Windows Server 2008, when you monitor a file or directory with the whodata option, Wazuh automatically configures the Local Audit Policies and the System Access Control List (SACL) for the file or directory. If this is not done automatically or you have an earlier version of Windows such as Windows Vista and Windows Server 2008, you have to manually configure the audit policies and the SACL.
Local Audit Policies in Windows
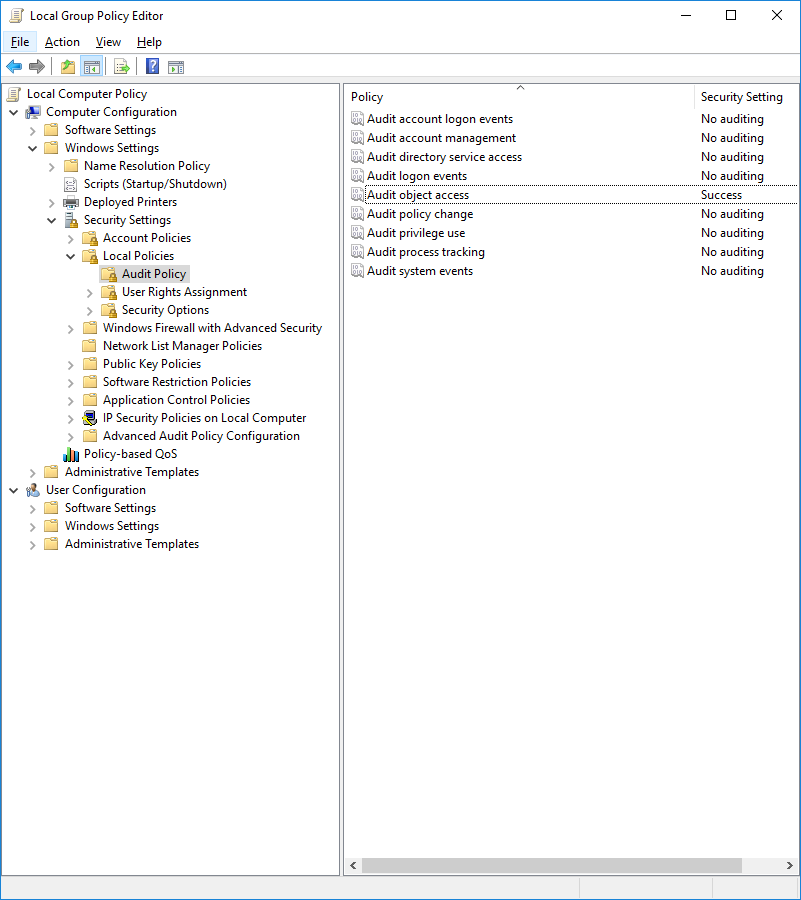
To manually configure the audit policies needed to run FIM in who-data mode, you need to activate the logging of successful events.
On the Run dialog box (win + R), open the Local Group Policy Editor using the following command:
gpedit.msc
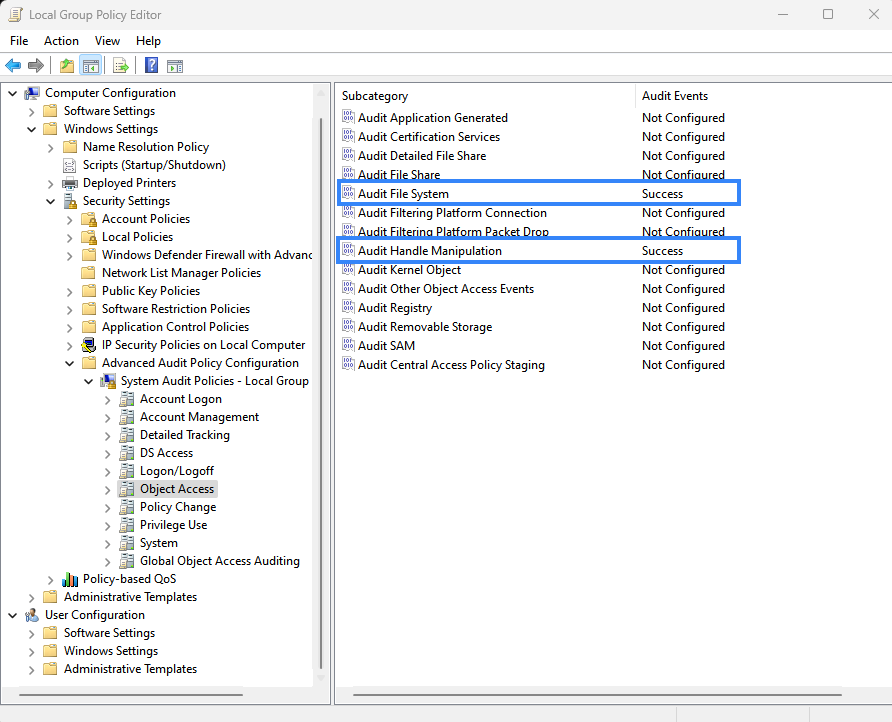
Configure the Audit Events field to Success for the following policies:
Computer Configuration > Windows Settings > Security Settings > Advanced Audit Policy Configuration > Object Access > Audit File System
Computer Configuration > Windows Settings > Security Settings > Advanced Audit Policy Configuration > Object Access > Audit Handle Manipulation
If your system doesn't allow configuring subcategories through Advanced Audit Policy Configuration, configure the Security Setting field to Success for the following policy:
Computer Configuration > Windows Settings > Security Settings > Local Policies > Audit Policy > Audit object access
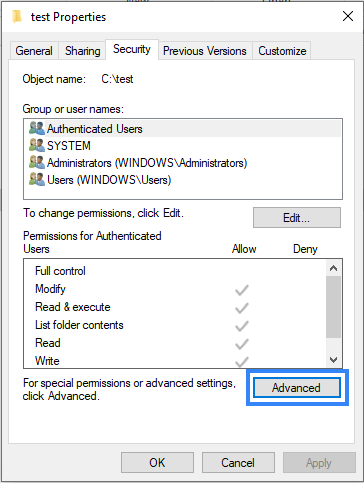
System Access Control List (SACL) in Windows
A system access control list (SACL) enables administrators to log attempts to access a secured object. You can check and modify SACLs of each monitored directory through Properties, selecting the Security tab, and clicking on Advanced:
It's necessary to have a Success entry in the Auditing tab:
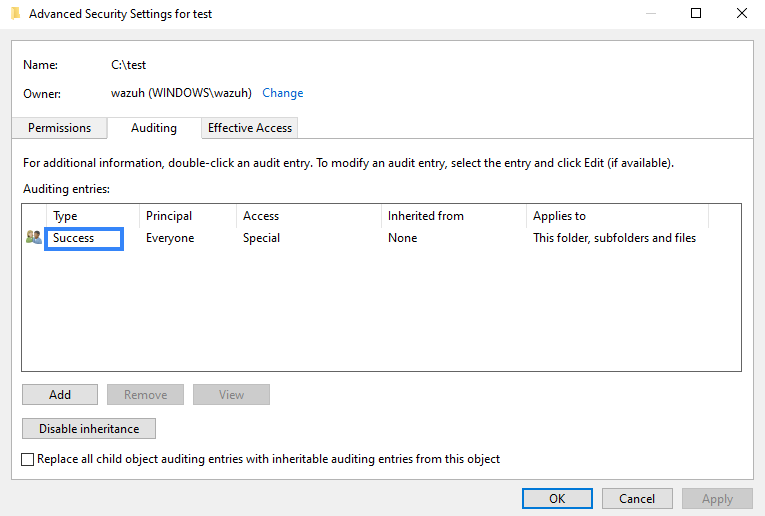
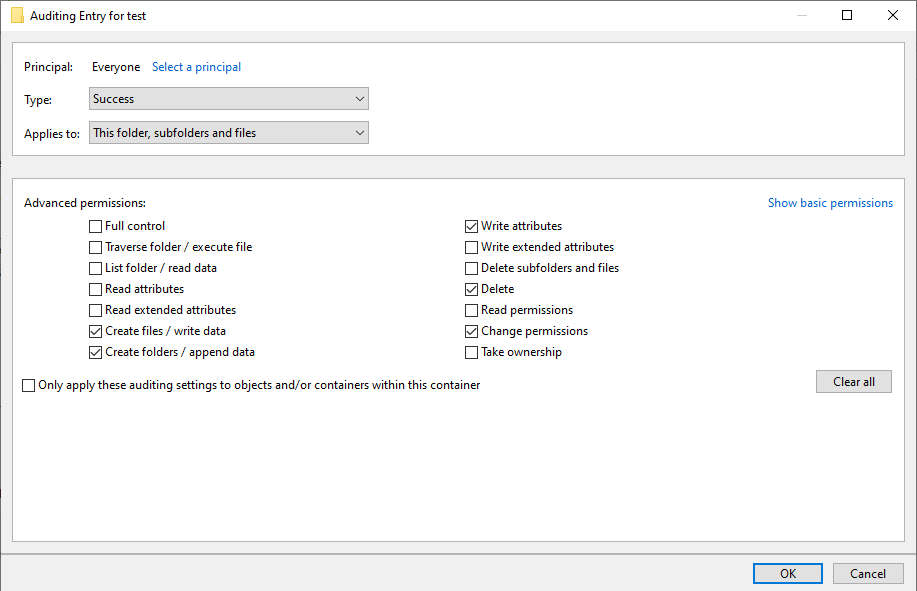
If there is no Success entry, click on Add, to create it with these advanced permissions:
Tuning audit to deal with a flood of who-data events
On the Wazuh side, the syscheck.rt_delay variable in the internal FIM configuration helps to prevent the loss of events by setting a delay between alerts. You can configure this variable in the /var/ossec/etc/internal_options.conf file on the Wazuh server. The allowed value for this variable is a numerical value. You must set the delay in milliseconds. To process who-data events faster, decrease this numerical value.
Windows installation directory monitoring
In 64-bit architecture systems, you can locate 32-bit and 64-bit DLLs in a special way.
System32is reserved for 64-bit DLLs.SysWOW64is reserved for all 32-bit DLLs.
Furthermore, 32-bit processes running in 64-bit environments access System32 through a virtual folder called Sysnative.
We disabled this redirection and you can access System32 directly. Monitoring %WINDIR%/System32 and %WINDIR%/Sysnative directories is equivalent and Wazuh shows the path %WINDIR%/System32 in the alerts. SysWOW64 is a different directory. To monitor %WINDIR%/SysWOW64, you must add it to the C:\Program Files (x86)\ossec-agent\ossec.conf configuration file.
You can monitor the Windows special directories %WINDIR%/System32 and %WINDIR%/SysWOW64 directories by configuring them with any of the FIM modes. For example:
Scheduled scan
<syscheck>
  <directories>%WINDIR%/System32</directories>
  <directories>%WINDIR%/SysWOW64</directories>
</syscheck>
Real-time
<syscheck>
  <directories realtime="yes">%WINDIR%/System32</directories>
  <directories realtime="yes">%WINDIR%/SysWOW64</directories>
</syscheck>
Who-data
<syscheck>
  <directories whodata="yes">%WINDIR%/System32</directories>
  <directories whodata="yes">%WINDIR%/SysWOW64</directories>
</syscheck>
Note
Starting with Wazuh 4.13.0, the FIM module on Windows does not support monitoring network locations. This includes:
UNC paths (e.g.,
\\server\share\folder)Mapped drives (e.g.,
Z:\folder)
If these types of paths are included in your <directories> configuration, they will be ignored and no FIM events will be generated for them. This applies to all FIM modes: scheduled, real-time, and whodata.
Recursion level
You can configure the maximum recursion level allowed for a specific directory by using the recursion_level attribute of the directories option. The recursion_level value must be an integer between 0 and 320.
In the configuration example below, you can see how to set the recursion_level of the folder_test directory to 3. Replace <FILEPATH_OF_MONITORED_DIRECTORY> with your own file paths.
Add the following settings to the Wazuh agent configuration file:
Linux:
/var/ossec/etc/ossec.confWindows:
C:\Program Files (x86)\ossec-agent\ossec.confmacOS:
/Library/Ossec/etc/ossec.conf
<syscheck>
   <directories check_all="yes" recursion_level="3"><FILEPATH_OF_MONITORED_DIRECTORY></directories>
</syscheck>
Restart the Wazuh agent with administrator privilege to apply any configuration change:
Linux:
systemctl restart wazuh-agentWindows:
Restart-Service -Name wazuhmacOS:
/Library/Ossec/bin/wazuh-control restart
If you have the following directory structure and the above setting with recursion_level="3", FIM then generates alerts for file_3.txt and all files up to <FILEPATH_OF_MONITORED_DIRECTORY>/level_1/level_2/level_3/ but not for any files in the directory deeper than level_3.
<FILEPATH_OF_MONITORED_DIRECTORY>
├── file_0.txt
└── level_1
    ├── file_1.txt
    └── level_2
        ├── file_2.txt
        └── level_3
            ├── file_3.txt
            └── level_4
                ├── file_4.txt
                └── level_5
                    └── file_5.txt
To disable the recursion and generate the alerts only for the files in the monitored folder, you need to set the recursion_level value to 0.
If you don’t specify recursion_level, it’s set to 256. This is the default value defined by syscheck.default_max_depth in the internal options configuration file.
Process priority
To adjust the CPU usage of the FIM module on the monitored endpoint, use the process_priority option in the agent configuration. You can configure process priority on Windows, Linux, and macOS operating systems.
The process priority scale for the Wazuh FIM module ranges from -20 to 19 for each agent. The default process_priority value is set to 10. Setting the process_priority value in an agent higher than the default, gives its FIM module lower priority, fewer CPU resources, and makes it run slower.
You need to edit the Wazuh agent /var/ossec/etc/ossec.conf configuration file to configure the process priority of the Wazuh FIM module.
In the configuration example below the FIM module of the agent gets the minimum process priority:
Add the following settings to the Wazuh agent configuration file:
Linux:
/var/ossec/etc/ossec.confWindows:
C:\Program Files (x86)\ossec-agent\ossec.confmacOS:
/Library/Ossec/etc/ossec.conf
<syscheck>
   <process_priority>19</process_priority>
</syscheck>
Restart the Wazuh agent with administrator privilege to apply any configuration change:
Linux:
systemctl restart wazuh-agentWindows:
Restart-Service -Name wazuhmacOS:
/Library/Ossec/bin/wazuh-control restart
Setting the process_priority value lower than the default gives the FIM module higher priority, more CPU resources, and makes it run faster. In the configuration example below the FIM module has the maximum process priority.
Add the following settings to the Wazuh agent configuration file:
Linux:
/var/ossec/etc/ossec.confWindows:
C:\Program Files (x86)\ossec-agent\ossec.confmacOS:
/Library/Ossec/etc/ossec.conf
<syscheck>
   <process_priority>-20</process_priority>
</syscheck>
Restart the Wazuh agent with administrator privilege to apply any configuration change:
Linux:
systemctl restart wazuh-agentWindows:
Restart-Service -Name wazuhmacOS:
/Library/Ossec/bin/wazuh-control restart
Database storage
Wazuh uses a SQLite database to store information related to FIM events such as information about creation, modification, and deletion of regular files. When the Wazuh agent starts, the FIM module performs a first scan and generates the database for the agent. By default, the database on the agent is saved on disk to the file /var/ossec/queue/fim/db.
You can configure the database storage options by using the database attribute. The allowed values for the database attribute are disk and memory. These storage options are available on Windows, macOS, and Linux operating systems.
In the configuration example below, we set the database location to memory.
Add the following settings to the Wazuh agent configuration file:
Linux:
/var/ossec/etc/ossec.confWindows:
C:\Program Files (x86)\ossec-agent\ossec.confmacOS:
/Library/Ossec/etc/ossec.conf
<syscheck>
   <database>memory</database>
</syscheck>
Restart the Wazuh agent with administrator privilege to apply any configuration change:
Linux:
systemctl restart wazuh-agentWindows:
Restart-Service -Name wazuhmacOS:
/Library/Ossec/bin/wazuh-control restart
In the configuration example below, we set the database location to disk.
Add the following settings to the Wazuh agent configuration file:
Linux:
/var/ossec/etc/ossec.confWindows:
C:\Program Files (x86)\ossec-agent\ossec.confmacOS:
/Library/Ossec/etc/ossec.conf
<syscheck>
   <database>disk</database>
</syscheck>
Restart the Wazuh agent with administrator privilege to apply any configuration change:
Linux:
systemctl restart wazuh-agentWindows:
Restart-Service -Name wazuhmacOS:
/Library/Ossec/bin/wazuh-control restart
The main advantage of using an in-memory database is the performance, as reading and writing operations are faster than performing them on disk. The corresponding disadvantage is that the memory must be sufficient to store the data.
Synchronization
The FIM module keeps the Wazuh agent and the Wazuh server databases synchronized with each other through synchronization messages. It always updates the file inventory in the Wazuh server with the data available to the Wazuh agent.
Whenever the Wazuh agent service restarts, the module rebuilds the FIM database of the agent, runs a full scan, and synchronizes the result updating the file inventory in the Wazuh server. The module synchronizes directories monitored with the realtime or whodata options immediately, while others require a full scan before synchronization takes place. The module doesn’t report to the Wazuh server changes in the monitored files performed while the service was not running. If you restart the agent after the last scheduled scan, it also discards any event before the restart.
You can see below the default synchronization setting on the /var/ossec/etc/ossec.conf configuration file:
<syscheck>
  <synchronization>
    <enabled>yes</enabled>
    <interval>5m</interval>
    <max_interval>1h</max_interval>
    <response_timeout>30</response_timeout>
    <queue_size>16384</queue_size>
    <max_eps>10</max_eps>
  </synchronization>
</syscheck>
The table below explains the supported attributes of the synchronization option:
Attribute
Default value
Allowed values
Description
enabled
yes
yes, no
Enables FIM database synchronizations.
interval
5m
Any number greater than or equal to 0. Allowed suffixes (s, m, h, d)
Sets the starting number of seconds to wait for a new database synchronization attempt. If synchronization fails the value gets duplicated up to the
max_intervalvalue.max_interval
1h
Any number greater than or equal to the interval. Allowed suffixes (s, m, h, d).
Specifies the maximum number of seconds to wait between every inventory synchronization attempt.
response_timeout
30
Any number greater than or equal to 0.
Specifies the minimum time in seconds that must elapse before considering a message sent to the manager as timed-out. If the agent message times out, the module starts a new synchronization session.
queue_size
16384
Integer number between 2 and 1000000.
Specifies the queue size of the manager synchronization responses.
response_timeout
10
Integer number between 0 and 1000000. 0 means disabled.
Sets the maximum synchronization message throughput.