Amazon Security Lake
Note
This document guides you through setting up Wazuh as a subscriber to AWS Security Lake data. To configure Wazuh as a source for Amazon Security Lake, refer to Amazon Security Lake integration
Amazon Security Lake is a fully-managed security data lake service that consolidates data from multiple AWS and other services, optimizing storage costs and performance at scale.
All logs in Amazon Security Lake use the Open Cybersecurity Schema Framework (OCSF) standard for formatting. You can use the Wazuh integration for Amazon Security Lake to ingest security events from AWS services.
These events are available as multi-event Apache Parquet objects in an S3 bucket. Each object has a corresponding SQS message, once it's ready for download.
Wazuh periodically checks for new SQS messages, downloads new objects, converts the files from Parquet to JSON, and indexes each event into the Wazuh indexer. To set up the Wazuh integration for Amazon Security Lake as a subscriber, you need to do the following:
Create a subscriber in Amazon Security Lake.
Set up the Wazuh integration for Amazon Security Lake.
AWS configuration
The following sections cover how to configure the Amazon Security Lake service to integrate with Wazuh.
Enabling Amazon Security Lake
If you haven't already, ensure that you have enabled Amazon Security Lake by following the instructions at Getting started - Amazon Security Lake.
For multiple AWS accounts, we strongly encourage you to use AWS Organizations and set up Amazon Security Lake at the Organization level.
Creating a Subscriber in Amazon Security Lake
After completing all required AWS prerequisites, configure a subscriber for Amazon Security Lake via the AWS console. This creates the resources you need to make the Amazon Security Lake events available for consumption in your Wazuh platform deployment.
Setting up a subscriber in the AWS Console
Creating a subscriber
Enter a descriptive name for your subscriber. For example,
Wazuh.Enter the AWS account ID for the account you are currently logged into.
Enter a unique value in External ID. For example,
WAZUH-EXTERNAL-ID-VALUE.Choose to either collect all log and event sources, or only specific log and event sources.
Select S3 as your data access method.
Under S3 notification type select SQS queue.
Click the Create button to get to the Subscribers pages.
Reviewing the subscriber
Navigate to My subscribers section, and click on your newly created subscriber to get to the Subscriber details page.
Check that AWS created the subscriber with the correct parameters.
Save the SQS queue name. You need the name of the Subscription endpoint for later on when verifying the information in the SQS queue.
Verifying information in SQS Queue
Follow these steps in your Amazon deployment to verify the information for the SQS Queue that Security Lake creates.
In your AWS console, navigate to the Amazon Simple Queue Service.
In the Queues section, navigate to the queue that Security Lake created. Click on its name.
In the information page for the queue, click on the Monitoring tab. Verify that events are flowing in by looking at the Approximate Number Of Messages Visible graph and confirming the number is increasing.
Verifying events are flowing into S3 bucket
Follow these steps in your Amazon deployment to verify that parquet files are flowing into your configured S3 buckets.
In your AWS console, navigate to the Amazon S3 service.
Navigate to the Buckets section, and click on the S3 bucket name that Security Lake created for each applicable region. These bucket names start with the prefix
aws-security-data-lake.In each applicable bucket, navigate to the Objects tab. Click through the directories to verify that Security Lake has available events flowing into the S3 bucket. Check that new files with the
.gz.parquetextension appear.If you enabled Security Lake on more than one AWS account, check if you see each applicable account number listed. Check that parquet files exist inside each account.
In each applicable S3 bucket, navigate to the Properties tab and verify in the Event notifications section that the data destination is the Security Lake SQS queue.
Policy configuration
Take into account that the policies below follow the principle of least privilege to ensure that only the minimum permissions are used.
Configuring the role
Follow these steps to modify the Security Lake subscriber role. You have to associate an existing user with the role.
In your AWS console, navigate to the Amazon IAM service.
In your Amazon IAM service, navigate to the Roles page.
In the Roles page, select the Role name of the subscription role notification that was created as part of the Security Lake subscriber provisioning process.
In the Summary page, navigate to the Trust relationships tab to modify the Trusted entity policy.
Modify the Trusted entity policy with the following updates:
In the stanza containing the ARN, attach the username from your target user account to the end of the ARN. This step connects a user to the role. It lets you configure the Security Lake service with the secret access key. See the following Trusted entity example:
{
    "Version": "2012-10-17",
    "Statement": [
        {
            "Sid": "1",
            "Effect": "Allow",
            "Principal": {
                "AWS": "arn:aws:iam::<ACCOUNT_ID>:user/<USERNAME>"
            },
            "Action": "sts:AssumeRole",
            "Condition": {
                    "StringEquals": {
                        "sts:ExternalId": [
                            "<WAZUH-EXTERNAL-ID-VALUE>"
                        ]
                    }
            }
        }
    ]
}
Note
<ACCOUNT_ID>,<USERNAME>and<WAZUH-EXTERNAL-ID-VALUE>are placeholders. Replace them with the appropriate values.
Granting user permission to switch roles
Follow these steps to configure the user permissions:
In your Amazon IAM service, navigate to the Users page.
In the Users page, select the Username of the user you have connected to the role (
<USERNAME>).Replace
<ACCOUNT_ID>and<RESOURCE_ROLE>with the appropriate values and add the following permission to switch to the new role:Note that
<RESOURCE_ROLE>is the name of the subscription role that was created as part of the Security Lake subscriber provisioning process.{ "Version": "2012-10-17", "Statement": [ { "Sid": "VisualEditor1", "Effect": "Allow", "Action": "sts:AssumeRole", "Resource": "arn:aws:iam::<ACCOUNT_ID>:role/<RESOURCE_ROLE>" } ] }
Parameters
The following fields inside the /var/ossec/etc/ossec.conf file on the Wazuh server or agent section allow you to configure the queue and authenticate:
Queue configuration
<sqs_name>: The name of the queue.<service_endpoint>- Optional: The AWS S3 endpoint URL to be used to download the data from the bucket. Check Considerations for the Wazuh module for AWS configuration for more information about VPC and FIPS endpoints.
Authentication
<iam_role_arn>: Amazon Resource Name (ARN) for the corresponding IAM role to assume.<external_id>: External ID to use when assuming the role.<aws_profile>: A valid profile name from a Shared Credential File or AWS Config File with permissions to access the service. By default, the integration uses the settings found in thedefaultprofile. For this configuration, we use thedevprofile. Replace it with the appropriate profile defined in your credential file.<iam_role_duration>- Optional: The session duration in seconds.<sts_endpoint>- Optional: The URL of the VPC endpoint of the AWS Security Token Service.
More information about the different authentication methods can be found in the Configuring AWS credentials documentation.
Configure Wazuh to process Amazon Security Lake logs
Access the Wazuh configuration in Server management > Settings using the Wazuh dashboard or by manually editing the
/var/ossec/etc/ossec.conffile in the Wazuh server or agent.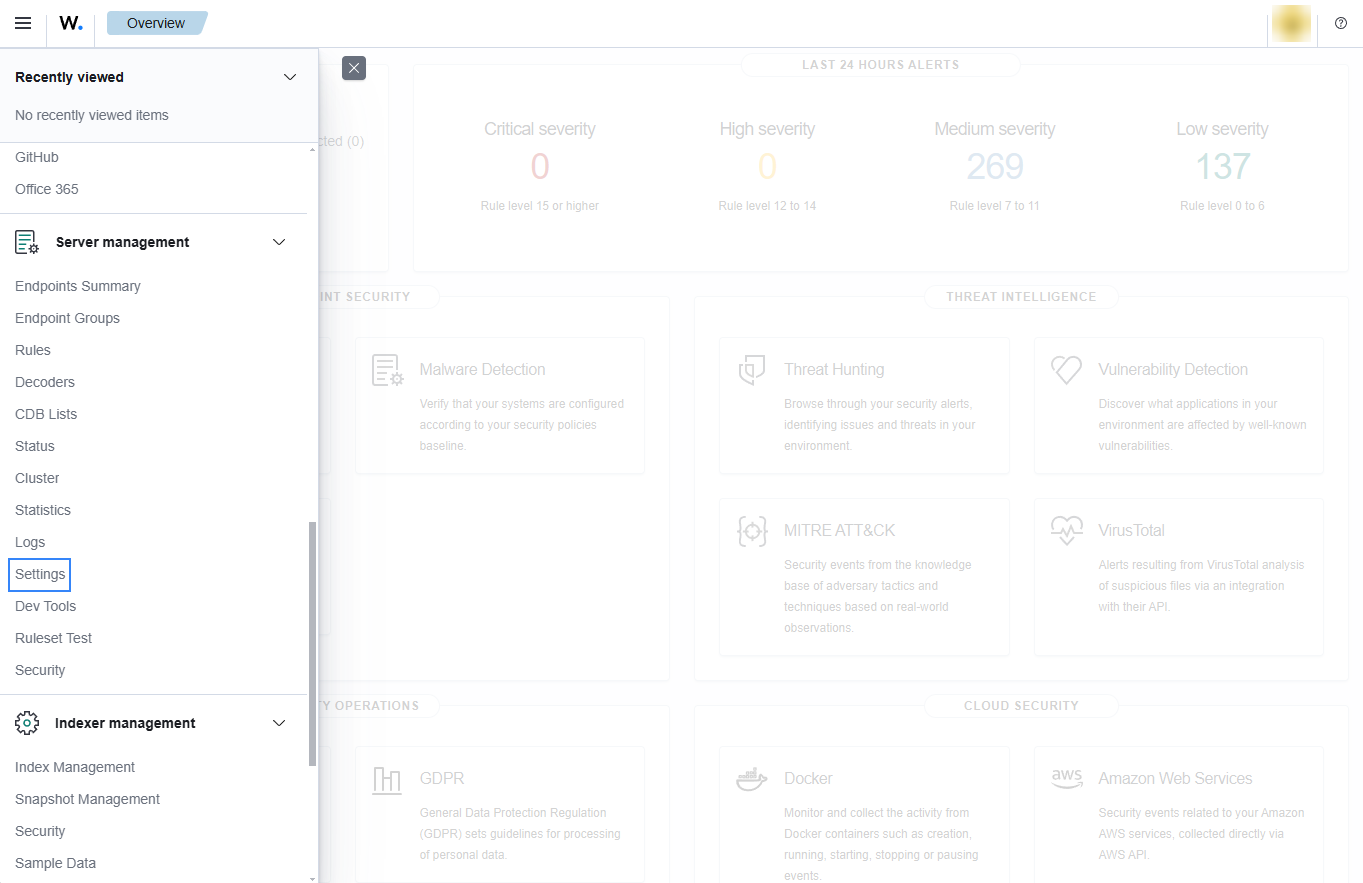
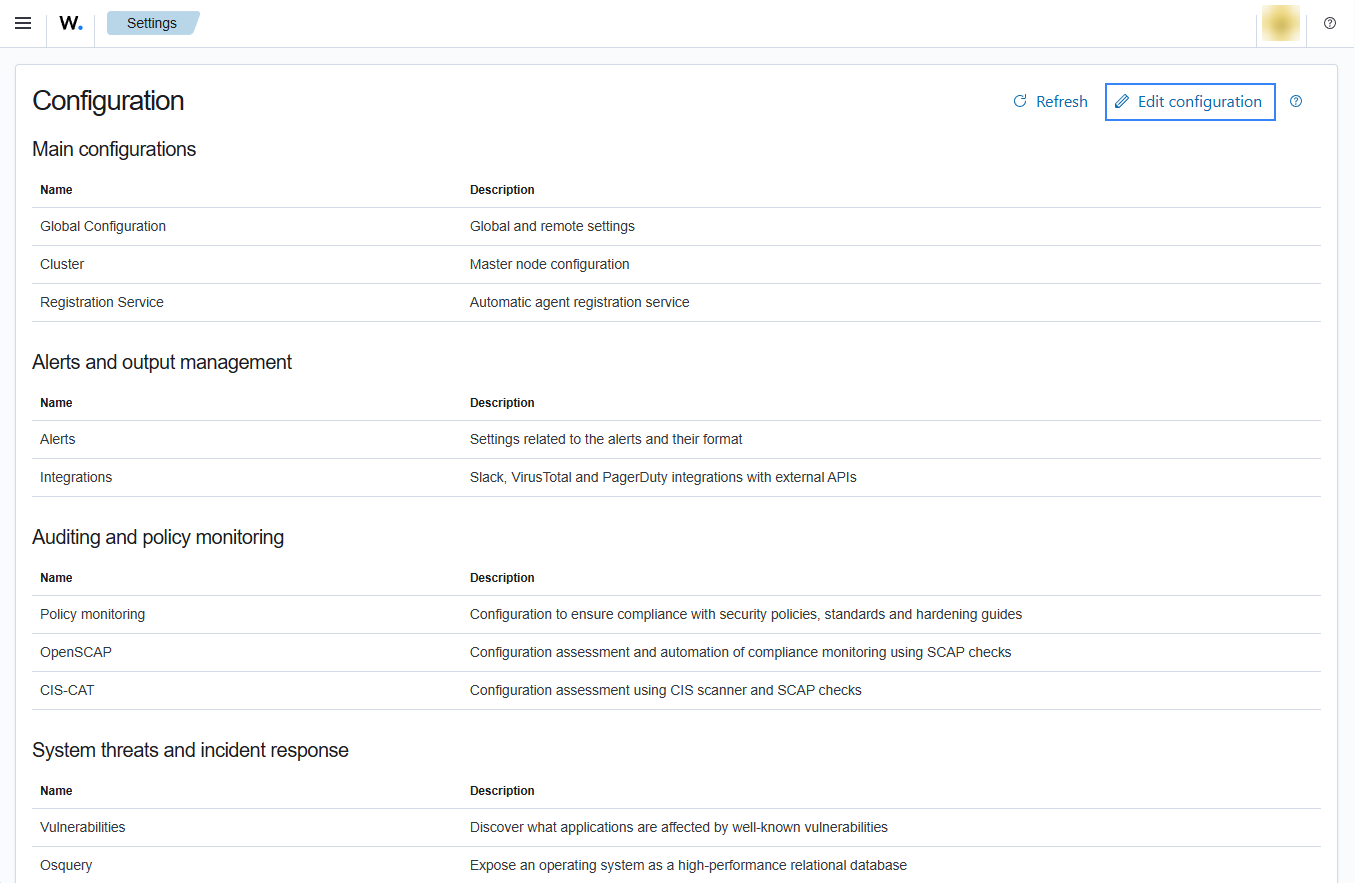
Add the following Wazuh module for AWS configuration block to enable the integration with Amazon Security Lake.
<wodle name="aws-s3">
    <disabled>no</disabled>
    <interval>1h</interval>
    <run_on_start>yes</run_on_start>
    <subscriber type="security_lake">
        <sqs_name>sqs-security-lake-main-queue</sqs_name>
        <iam_role_arn>arn:aws:iam::xxxxxxxxxxx:role/ASL-Role</iam_role_arn>
        <iam_role_duration>1300</iam_role_duration>
        <external_id><WAZUH-EXTERNAL-ID-VALUE></external_id>
        <aws_profile>dev</aws_profile>
        <sts_endpoint>xxxxxx.sts.region.vpce.amazonaws.com</sts_endpoint>
        <service_endpoint>https://bucket.xxxxxx.s3.region.vpce.amazonaws.com</service_endpoint>
    </subscriber>
</wodle>
After setting the required parameters, restart Wazuh to apply the changes. The service can be manually restarted using the following command outside the Wazuh dashboard:
Wazuh manager:
# systemctl restart wazuh-manager
Wazuh agent:
# systemctl restart wazuh-agent
Note
The Wazuh module for AWS execution time varies depending on the number of notifications present in the queue. This affects the time to display alerts on the Wazuh dashboard. If the <interval> value is less than the execution time, the Interval overtaken message appears in the /var/ossec/logs/ossec.log file.
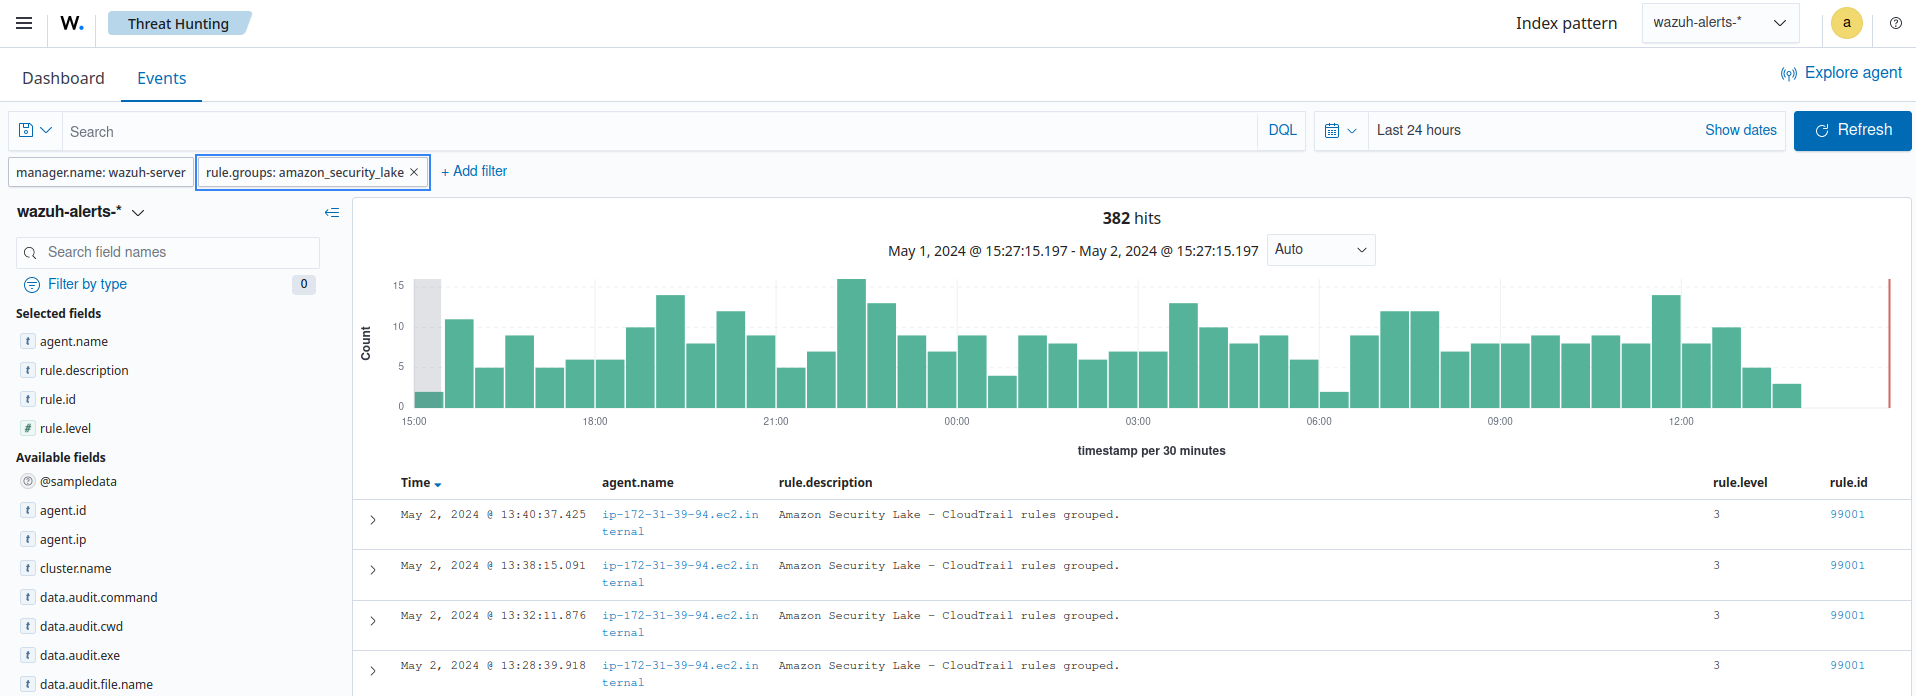
Visualizing alerts in Wazuh dashboard
Once you set the configuration and restart the manager, you can visualize the Amazon Security Lake alerts on the Wazuh dashboard. To do this, go to the Threat Hunting module. Apply the filter rule.groups: amazon_security_lake for an easier visualization.