Getting started
This guide provides the essential information needed to utilize the Wazuh indexer API.
Starting and stopping the Wazuh indexer API
By default, the Wazuh indexer API is included in the Wazuh indexer installation. You can manage or monitor the Wazuh indexer API by executing the systemctl or service commands with the Wazuh indexer service:
# systemctl start/status/stop/restart wazuh-indexer
# service wazuh-indexer start/status/stop/restart
Logging into the Wazuh indexer API
You need to be authenticated to be able to use the Wazuh indexer API service. Users can authenticate to the Wazuh indexer API using various supported methods and can select the one that best meets their requirements. Logging in to the Wazuh dashboard with a user with appropriate privileges gives the user access to the Wazuh indexer API via the dashboard. The sections below describe some options for how a user can access the Wazuh indexer API via scripts or command lines.
HTTP basic authentication
HTTP basic authentication is one of the simplest methods of accessing the Wazuh indexer API. The client provides credentials as a username and password with every request in this mechanism. These credentials are included in the Authorization header of the HTTP request. While this makes implementation straightforward and compatible with most tools and systems, it is less secure as the risk of exposure is high.
HTTP basic authentication is enabled by default, and its settings are specified within the basic_internal_auth_domain section in the /etc/wazuh-indexer/opensearch-security/config.yml configuration file. The default setting is seen below:
basic_internal_auth_domain:
  description: "Authenticate via HTTP Basic against internal users database"
  http_enabled: true
  transport_enabled: true
  order: 4
  http_authenticator:
    type: basic
    challenge: true
  authentication_backend:
    type: intern
The format to authenticate to the Wazuh indexer API using basic authentication is below. In this example, we use cURL to connect and authenticate:
# curl -k -u <WAZUH_INDEXER_USERNAME>:<WAZUH_INDEXER_PASSWORD> https://localhost:9200/
{
  "name" : "node-1",
  "cluster_name" : "wazuh-cluster",
  "cluster_uuid" : "XUqydNCQTuCnvtXobnRZ8w",
  "version" : {
    "number" : "7.10.2",
    "build_type" : "deb",
    "build_hash" : "9fd1835bba77ae04d48550eb4dc9be4787070806",
    "build_date" : "2024-08-30T10:06:03.028357Z",
    "build_snapshot" : false,
    "lucene_version" : "9.10.0",
    "minimum_wire_compatibility_version" : "7.10.0",
    "minimum_index_compatibility_version" : "7.0.0"
  },
  "tagline" : "The OpenSearch Project: https://opensearch.org/"
}
JSON Web Token (JWT)
The JSON Web Token (JWT) is another method of authenticating to the Wazuh indexer API. JWT is an open standard (RFC 7519) that defines a compact and self-contained method for securely transmitting information between parties as a JSON object.
A JWT can be self-generated using validation keys stored in the /etc/wazuh-indexer/opensearch-security/config.yml file or generated and validated through a JSON Web Key Set (JWKS) endpoint to retrieve the key from its location on the issuer's server.
JWT authentication is not enabled by default, and its settings are specified within the dynamic section in the /etc/wazuh-indexer/opensearch-security/config.yml configuration file. Follow the steps below to enable and log into the Wazuh indexer using JWT authentication:
Run the following command twice to generate 64 bytes of cryptographically secure random data and output it as a Base64-encoded string:
# openssl rand -base64 64
# openssl rand -base64 64
Open the
/etc/wazuh-indexer/opensearch-security/config.ymlconfiguration file and update the highlighted settings. Use the first output as a signing key, replacing the<SIGNING_KEY>variable. Use the second output as an encryption key, replacing the<ENCRYPTION_KEY>variable below:config: dynamic: on_behalf_of: enabled: 'true' signing_key: <SIGNING_KEY> encryption_key: <ENCRYPTION_KEY>
Run the
/usr/share/wazuh-indexer/plugins/opensearch-security/tools/securityadmin.shscript to load the configuration changes made in the/etc/wazuh-indexer/opensearch-security/config.ymlfile:# export JAVA_HOME=/usr/share/wazuh-indexer/jdk/ && bash /usr/share/wazuh-indexer/plugins/opensearch-security/tools/securityadmin.sh -f /etc/wazuh-indexer/opensearch-security/config.yml -icl -key /etc/wazuh-indexer/certs/admin-key.pem -cert /etc/wazuh-indexer/certs/admin.pem -cacert /etc/wazuh-indexer/certs/root-ca.pem -h 127.0.0.1 -nhnv
Run the command below to fetch a JSON web token.
# curl -k -u <WAZUH_INDEXER_USER>:<WAZUH_INDEXER_PASSWORD> -XPOST "https://localhost:9200/_plugins/_security/api/generateonbehalfoftoken" -H 'Content-Type: application/json' -d
'
{
   "description":"Testing",
   "service":"Testing Service",
   "durationSeconds":"180"
}
'
Below is an example of an output.
{"user":"admin","authenticationToken":"eyJhbGciOiJIUzUxMiJ9.eyJzdWIiOiJhZG1pbiIsImF1ZCI6IlRlc3RpbmcgU2VydmljZSIsIm5iZiI6MTc2Nzc5Njc1NiwiaXNzIjoid2F6dWgtY2x1c3RlciIsImV4cCI6MTc2Nzc5NjkzNiwiaWF0IjoxNzY3Nzk2NzU2LCJlciI6Illid1JkVGxKVDZWRXdvR2lSZS8rblNNalVyNG9zZFM3SnlSZkg5S09LTlE9In0.oUOVhPB6WCidAIp3O9W6GQnngq0dednQQNtBIHExhMhtJcNw9h1aL6MwZ42kGr4JORbA-a-wc9IpKcrUV2omGg","durationSeconds":180}
Replace the variables
<WAZUH_INDEXER_USER>:<WAZUH_INDEXER_PASSWORD>with your Wazuh indexer username and password.Authenticate to the Wazuh indexer API using your JWT, as seen below. In this example, we use cURL to connect and authenticate:
# curl -k -XGET "https://localhost:9200" -H "Authorization: Bearer <WAZUH_INDEXER_JWT>"
Replace
<WAZUH_INDEXER_JWT>with your generated JWT. The expected output is as seen below:{ "name" : "node-1", "cluster_name" : "wazuh-cluster", "cluster_uuid" : "XUqydNCQTuCnvtXobnRZ8w", "version" : { "number" : "7.10.2", "build_type" : "deb", "build_hash" : "9fd1835bba77ae04d48550eb4dc9be4787070806", "build_date" : "2024-08-30T10:06:03.028357Z", "build_snapshot" : false, "lucene_version" : "9.10.0", "minimum_wire_compatibility_version" : "7.10.0", "minimum_index_compatibility_version" : "7.0.0" }, "tagline" : "The OpenSearch Project: https://opensearch.org/" }Optionally, you can use your JWT as an environment variable.
You can access any API endpoint using the below structure. Replace <METHOD> with the desired method, <ENDPOINT> with the string corresponding to the endpoint you wish to access, and <WAZUH_INDEXER_JWT> with your JWT.
# curl -k -X <METHOD> "https://localhost:9200/<ENDPOINT>" -H "Authorization: Bearer <WAZUH_INDEXER_JWT>"
If you are using an environment variable, replace <WAZUH_INDEXER_JWT> with your environment variable e.g. $TOKEN.
Configuration options
The JWT configurations are specified under the authc key in the /etc/wazuh-indexer/opensearch-security/config.yml configuration file. The configuration parameters are described below:
jwt_auth_domain
Sub-fields |
Allowed values |
Default value |
Description |
|---|---|---|---|
|
true, false |
false |
Defines if JWT-based authentication is enabled for HTTP requests. |
|
Any positive integer |
0 |
Indicates the sequence in which authentication domains are evaluated. This is particularly relevant when multiple authentication mechanisms are configured. |
jwt_auth_domain.http_authenticator
Sub-fields |
Allowed values |
Default value |
Description |
|---|---|---|---|
|
jwt |
jwt |
Specifies the authentication domain. |
|
true, false |
false |
Specifies if a challenge should be presented to the user during authentication. |
jwt_auth_domain.http_authenticator.config
Sub-fields |
Allowed values |
Default value |
Description |
|---|---|---|---|
|
Any Base64 encoded secret or public key |
null |
The signing key(s) is used to verify the JWT token. Where a symmetric key algorithm is used, set the value to the Base64 encoded secret. If an asymmetric algorithm is used, set the value to the public key. Use a comma list or enumerate the keys. |
|
Any string |
Authorization |
The HTTP header that transmits the JWT in HTTP requests. The value typically has the following Bearer schema: |
|
Any string |
null |
Used to define the name of a URL parameter if the token is not transmitted in the HTTP header but rather as a URL. |
|
Any string |
null |
Sets the name of the key in the JSON payload that stores the username. If a value is not set, the subject registered claim is used instead. |
|
Any string |
null |
Sets the name of the key in the JSON payload that stores the user’s role(s). Multiple values are supported by a comma-separated list of roles. |
|
Any string |
null |
Sets the name of the audience that the JWT must specify. Multiple values are supported as a comma-separated list. |
|
Any string |
null |
Sets the target issuer of a JWT stored in the JSON payload. |
|
Any positive integer |
30 |
Sets a time window (in seconds) to compensate for any disparity between the JWT authentication server and Wazuh indexer node clock times. It prevents authentication failures due to misalignment. |
jwt_auth_domain.authentication_backend
Sub-fields |
Allowed values |
Default value |
Description |
|---|---|---|---|
|
noop |
noop |
This value is set to no operation ( |
Note
The JWT values are case-sensitive. Ensure the casing matches to avoid errors
Using the Wazuh indexer API via the Wazuh dashboard
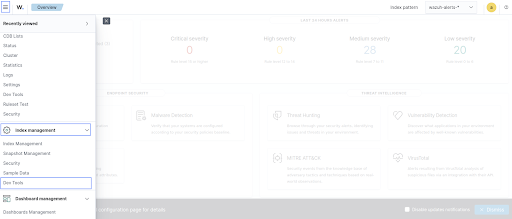
Using the Wazuh indexer API from the Wazuh dashboard enables users to run API requests directly within the dashboard’s Web User Interface (WUI). Through the Wazuh dashboard, users can use the API to perform searches, manage index settings, view document details, and retrieve insights without direct access to the command line. To use the Wazuh indexer API from the Wazuh dashboard, you must log in with a user with appropriate privileges. For example, the default admin user has administrator privileges. To access the Wazuh indexer API, click the menu icon and navigate to Index management > Dev Tools.
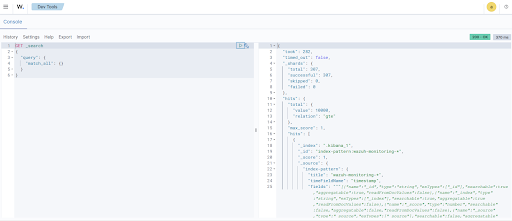
The API Console is made up of two panes. The pane on the left collects the API request, while the pane on the right displays the query result. On the left pane, input the HTTP method, request endpoint, and any query parameters, then click the play button to execute the request. The pane on the right displays the result of the API request. See Understanding the Wazuh indexer API request and response to learn more about the basic concepts.
Using the Wazuh indexer API via the command line
The Wazuh indexer API can also be accessed through a terminal. We use any client that can send HTTP requests to communicate with the API through the terminal, such as cURL. The Wazuh indexer API service listens for incoming requests on TCP port 9200 and requires authentication, such as a username and password, to authorize the API request.
In the example below, we use cURL to check the cluster health status of the Wazuh indexes:
# curl -k -u <WAZUH_INDEXER_USERNAME>:<WAZUH_INDEXER_PASSWORD> https://localhost:9200/_cluster/health?pretty
{
"cluster_name" : "wazuh-cluster",
"status" : "green",
"timed_out" : false,
"number_of_nodes" : 1,
"number_of_data_nodes" : 1,
"discovered_master" : true,
"discovered_cluster_manager" : true,
"active_primary_shards" : 16,
"active_shards" : 16,
"relocating_shards" : 0,
"initializing_shards" : 0,
"unassigned_shards" : 0,
"delayed_unassigned_shards" : 0,
"number_of_pending_tasks" : 0,
"number_of_in_flight_fetch" : 0,
"task_max_waiting_in_queue_millis" : 0,
"active_shards_percent_as_number" : 100.0
}
Replace <WAZUH_INDEXER_USERNAME> and <WAZUH_INDEXER_PASSWORD> with the correct credentials.
Using the Wazuh indexer API via a script
Accessing the Wazuh indexer API with a script is a convenient way to interact with the API when automation is required. The Wazuh indexer supports any programming language that can process HTTP requests. This section demonstrates how to use Python and Bash to interact with the Wazuh indexer API. This approach allows for the development of custom workflows that can integrate the indexer data into broader security operations, automate repetitive tasks, or quickly retrieve data for analysis and reporting.
Using Python
The Python requests library allows us to send HTTP requests to the Wazuh Indexer API endpoints. With a Python script, we can automatically handle authentication, parse, and manipulate the Wazuh indexer responses within the script. In the check_wazuh_indexer_health.py script below, we query the Wazuh indexer health status using Python.
import requests
from requests.auth import HTTPBasicAuth
# Base URL and endpoint
wazuh_indexer_url = "https://localhost:9200"
endpoint = "/_cluster/health"
# Full URL
url = wazuh_indexer_url + endpoint
# Credentials for authentication
username = "<WAZUH_INDEXER_USERNAME>"
password = "<WAZUH_INDEXER_PASSWORD>"
# Disable SSL warnings
requests.packages.urllib3.disable_warnings()
try:
# GET request to check cluster health
response = requests.get(url, auth=HTTPBasicAuth(username, password), verify=False)
# Check if the request was successful
if response.status_code == 200:
# Parse and print the response JSON data
cluster_health = response.json()
print("Cluster Health Status")
print(f"Status: {cluster_health['status']}")
print(f"Number of Nodes: {cluster_health['number_of_nodes']}")
print(f"Active Primary Shards: {cluster_health['active_primary_shards']}")
print(f"Active Shards: {cluster_health['active_shards']}")
else:
print(f"Failed to retrieve cluster health. Status Code: {response.status_code}")
print(response.text)
except Exception as e:
print("Error connecting to Wazuh Indexer:", e)
Replace <WAZUH_INDEXER_USERNAME> and <WAZUH_INDEXER_PASSWORD> with the correct credentials. Follow the steps below to run the script.
Install the Python
requestsmodule:# python3 -m pip install requests
Run the
check_wazuh_indexer_health.pyPython script:# python3 check_wazuh_indexer_health.py
Cluster Health Status Status: green Number of Nodes: 1 Active Primary Shards: 16 Active Shards: 16
Note
When using the script in a production environment, it is advised to use environment variables or a secrets manager to secure the authentication credentials from exposure. See Securing the Wazuh indexer API for more information.
The script is run from the Wazuh indexer node. You can run it from a remote host by replacing the value of wazuh_indexer_url with the IP address or hostname of the Wazuh indexer node.
Using Bash
You can also interact with the Wazuh indexer API using a bash script. A bash script is preferable when you do not want to install additional programs like Python. In the following check_wazuh_indexer_health.sh bash script, we query the Wazuh indexer API to retrieve the cluster health status.
Create a bash script called
check_wazuh_indexer_health.shand paste the content below:#!/bin/bash # Base URL and endpoint for Wazuh Indexer API WAZUH_INDEXER_URL="https://localhost:9200" ENDPOINT="/_cluster/health" FULL_URL="${WAZUH_INDEXER_URL}${ENDPOINT}" USERNAME="<WAZUH_INDEXER_USERNAME>" PASSWORD="<WAZUH_INDEXER_PASSWORD>" # Make the API request using basic authentication response=$(curl -s -k -u "$USERNAME:$PASSWORD" "$FULL_URL") # Check if the request was successful if [ $? -eq 0 ]; then echo "Cluster Health Status:" # Check if jq is installed if command -v jq > /dev/null; then echo "$response" | jq . else echo "Warning: 'jq' is not installed. Displaying raw JSON response:" echo "$response" fi else echo "Error: Failed to retrieve cluster health." fi
Run the following command to make the above script executable:
# chmod +x check_wazuh_indexer_health.sh
Run the
check_wazuh_indexer_healthscript:# ./check_wazuh_indexer_health.shCluster Health Status: { "cluster_name": "wazuh-cluster", "status": "green", "timed_out": false, "number_of_nodes": 1, "number_of_data_nodes": 1, "discovered_master": true, "discovered_cluster_manager": true, "active_primary_shards": 30, "active_shards": 30, "relocating_shards": 0, "initializing_shards": 0, "unassigned_shards": 0, "delayed_unassigned_shards": 0, "number_of_pending_tasks": 0, "number_of_in_flight_fetch": 0, "task_max_waiting_in_queue_millis": 0, "active_shards_percent_as_number": 100 }
Note
When using the script in a production environment, it is advised to use environment variables or a secrets manager to secure the authentication credentials from exposure. See Securing the Wazuh indexer API for more information.
The script is run from the Wazuh indexer node. You can run it from a remote host by replacing the value of indexer_url with the IP address or hostname of the Wazuh indexer node.
Understanding the Wazuh indexer API request and response
A standard Wazuh indexer API request consists of three essential components: the request method (GET, POST, PUT, or DELETE), the API URL, which specifies the endpoint being accessed, and user credentials for authentication and authorization of the request. Below is an example cURL request:
# curl -k -u <WAZUH_INDEXER_USERNAME>:<WAZUH_INDEXER_PASSWORD> -XGET https://localhost:9200/_cluster/health?pretty
The cURL command for each request contains the following fields:
Field |
Description |
|---|---|
|
Specify a request method to use when communicating with the HTTP server. |
|
The API URL to use. Specify |
|
Suppress SSL certificate errors (only if you use the default self-signed certificates). |
|
Used to specify user credentials for HTTP Basic Authentication. It allows you to provide a username and password required by the indexer API. |
The number of documents a single query returns is restricted to 10,000 results. This is controlled by the
index.max_result_windowsetting. If you need more results, you can either:Use pagination by adjusting the
fromandsizeparameters to paginate the result. This must still be within the 10,000 limit.Increase the
index.max_result_windowvalue in the cluster settings. This option is not advised as it can increase memory usage and degrade performance.
All responses include an HTTP status code: 2xx (success), 4xx (client error), 5xx (server error), etc.
All requests accept the
prettyparameter to convert the JSON response to a more human-readable format.The Wazuh indexer API stores logs in
/var/log/wazuh-indexer/wazuh-cluster.logand/var/log/wazuh-indexer/wazuh-cluster_server.json.
Example response without errors (HTTP status code 200)
{
"user" : "User [name=admin, backend_roles=[admin], requestedTenant=null]",
"user_name" : "admin",
"has_api_access" : true,
"disabled_endpoints" : { }
}
Example response with errors (HTTP status code 200)
{
"status" : "NOT_FOUND",
"message" : "actiongroup 'admin' not found."
}
Example response to report a permission denied error (HTTP status code 403)
{
"error":{
"root_cause":[
{
"type":"security_exception",
"reason":"no permissions for [cluster:monitor/main] and User [name=admin, backend_roles=[all_access], requestedTenant=null]"
}
],
"type":"security_exception",
"reason":"no permissions for [cluster:monitor/main] and User [name=admin, backend_roles=[all_access], requestedTenant=null]"
},
"status":403
}
Example response to report a resource not found exception (HTTPS status code 404)
{
"error" : {
"root_cause" : [
{
"type" : "index_not_found_exception",
"reason" : "no such index [testindex]",
"index" : "testindex",
"resource.id" : "testindex",
"resource.type" : "index_or_alias",
"index_uuid" : "_na_"
}
],
"type" : "index_not_found_exception",
"reason" : "no such index [testindex]",
"index" : "testindex",
"resource.id" : "testindex",
"resource.type" : "index_or_alias",
"index_uuid" : "_na_"
},
"status" : 404
}
Practical examples of Wazuh indexer API methods
GET
The following GET request retrieves basic information about the Wazuh indexer API, such as its cluster name, version, revision, hostname, and compatibility information.
curl -k -u <WAZUH_INDEXER_USERNAME>:<WAZUH_INDEXER_PASSWORD> -X GET https://localhost:9200/
{
  "name" : "node-1",
  "cluster_name" : "wazuh-cluster",
  "cluster_uuid" : "XUqydNCQTuCnvtXobnRZ8w",
  "version" : {
    "number" : "7.10.2",
    "build_type" : "deb",
    "build_hash" : "9fd1835bba77ae04d48550eb4dc9be4787070806",
    "build_date" : "2024-08-30T10:06:03.028357Z",
    "build_snapshot" : false,
    "lucene_version" : "9.10.0",
    "minimum_wire_compatibility_version" : "7.10.0",
    "minimum_index_compatibility_version" : "7.0.0"
  },
  "tagline" : "The OpenSearch Project: https://opensearch.org/"
}
PUT
The following PUT request to the Wazuh indexer API updates the Wazuh indexer cluster setting to change the value of search.max_buckets to 75000. The search.max_buckets setting controls the maximum aggregation buckets allowed in response to a single query.
# curl -k -u <WAZUH_INDEXER_USERNAME>:<WAZUH_INDEXER_PASSWORD> -H "Content-Type: application/json" -X PUT "https://localhost:9200/_cluster/settings?pretty" -d '{"transient": {"search.max_buckets": 75000}}'
{
  "acknowledged" : true,
  "persistent" : { },
  "transient" : {
    "search" : {
      "max_buckets" : "75000"
    }
  }
}
DELETE
In this example, we use this DELETE request to remove documents from indexes from a specified time. First, we run a query to list the target indexes:
curl -X POST "https://localhost:9200/wazuh-alerts-4.x-2024*/_search?pretty" \
-H "Content-Type: application/json" \
-u "<WAZUH_INDEXER_USERNAME>:<WAZUH_INDEXER_PASSWORD>" \
-k \
-d '{
  "query": {
    "range": {
      "@timestamp": {
        "gt": "2024-11-25T00:00:00Z"
      }
    }
  }
}'
In the query above, we query the index wazuh-alerts-4.x-2024 using a wildcard * to match all associated documents in the index pattern. We also use a timestamp query to filter and return only the documents with a timestamp greater than (gt) the specified value.
{
  "took" : 23,
  "timed_out" : false,
  "_shards" : {
    "total" : 30,
    "successful" : 30,
    "skipped" : 0,
    "failed" : 0
  },
  "hits" : {
    "total" : {
      "value" : 8,
      "relation" : "eq"
    },
    "max_score" : 1.0,
    ...
In the output above, we observe eight (8) documents matching the query. Next, we use DELETE to remove these documents from the index.
curl -X DELETE "https://localhost:9200/wazuh-alerts-4.x-2024*?pretty" -H "Content-Type: application/json" -u "$indexer_username:$indexer_password" -k -d '{
  "query": {
    "range": {
      "@timestamp": {
        "gt": "2024-11-25T00:00:00Z"
      }
    }
  }
}'
In the output, we see that the query ran successfully.
{
  "acknowledged" : true
}
To verify the documents are deleted, we run the initial query to search for the documents. As seen from the output, no matches indicate that the documents are deleted.
{
  "took" : 0,
  "timed_out" : false,
  "_shards" : {
    "total" : 0,
    "successful" : 0,
    "skipped" : 0,
    "failed" : 0
  },
  "hits" : {
    "total" : {
      "value" : 0,
      "relation" : "eq"
    },
    "max_score" : 0.0,
    "hits" : [ ]
  }
}
Practical examples of Wazuh indexer API access tools
This section demonstrates how to send requests to the Wazuh indexer API using cURL, Python scripts, Bash scripts, and the Wazuh dashboard. These examples serve as foundational knowledge for more advanced use cases you may envision.
cURL
cURL is a command-line tool for sending HTTP/HTTPS requests and commands. It comes pre-installed on many Linux, macOS, and Windows endpoints, allowing users to interact directly with the Wazuh indexer API from the command line. In the examples below, we store the Wazuh API credentials as environment variables and interact with different endpoints. For detailed instructions on obtaining authentication, please refer to the Logging into the Wazuh indexer API section.
Note
When sending a cURL request that contains JSON data, we must set the content type to JSON using the header -H "Content-Type: application/json"
Python
You can use a Python script to retrieve information about documents from any index in the Wazuh indexer. In this example, we query the wazuh-alerts* index to find the top three (3) users with the most successful logins via SSH on monitored endpoints. The script authenticates with the Wazuh indexer API using any authentication method (we use JWT in this example). Then, it makes a POST request to retrieve the required information.
Save the following Python script as top_successful_login.py:
import requests
import json

# Base URL and endpoint
indexer_url = "https://localhost:9200"
endpoint = "/wazuh-alerts*/_search"
url = indexer_url + endpoint

headers = {
    "Content-Type": "application/json",
    "Authorization": "Bearer <WAZUH_INDEXER_JWT>"
}

# Query payload
payload = {
    "size": 0,
    "query": {
        "match": {
            "rule.description": "PAM: Login session opened."
        }
    },
    "aggs": {
        "successful_logins_by_user": {
            "terms": {
                "field": "data.dstuser",
                "size": 3,
                "order": {
                    "_count": "desc"
                }
            }
        }
    }
}

# Disable SSL warnings
requests.packages.urllib3.disable_warnings()

# Execute the API request
try:
    response = requests.post(url, headers=headers, data=json.dumps(payload), verify=False)
    response.raise_for_status()  # Raise an exception for HTTP errors
    result = response.json()  # Parse the JSON response

    # Process and display the results
    print("Top three (3) Users with Most Successful Login Sessions:")
    if "aggregations" in result and "successful_logins_by_users" in result["aggregations"]:
        buckets = result["aggregations"]["successful_logins_by_users"]["buckets"]
        if buckets:
            for user in buckets:
                print(f"User: {user['key']}, Count: {user['doc_count']}")
        else:
            print("No data found for the query.")
    else:
        print("Unexpected response format.")
except requests.exceptions.RequestException as e:
    print(f"Error querying Wazuh API: {e}")
Replace <WAZUH_INDEXER_JWT> with your JWT. An output similar to the one below is observed. In the output, we can see the top three (3) users with the most amount of successful logins recorded:
Top three (3) Users with Most Successful Login Sessions:
User: root(uid=0), Count: 22
User: wazuh(uid=1000), Count: 3
User: test(uid=2000), Count: 2
Bash
In this example, we query the wazuh-alerts* index to find the top three (3) users with the most failed login attempts. The script authenticates with the Wazuh indexer API using the JWT authentication method. In this example, we demonstrate how to export the JWT as an environment variable to avoid putting the token inside the script.
Follow the steps below.
Export your JWT as an environment variable:
# export JWT_AUTH_TOKEN="<WAZUH_INDEXER_JWT>"
Replace
<WAZUH_INDEXER_JWT>with your appropriate JWT.Verify that the token is exported:
# echo $JWT_AUTH_TOKEN
Save the following script as
top_failed_login.sh:#!/bin/bash # Wazuh indexer API URL WAZUH_INDEXER_URL="https://localhost:9200/wazuh-alerts*/_search" # JSON query payload PAYLOAD=$(cat <<EOF { "size": 0, "query": { "match": { "rule.description": "PAM: User login failed." } }, "aggs": { "failed_logins_by_user": { "terms": { "field": "data.dstuser", "size": 3, "order": { "_count": "desc" } } } } } EOF ) # Execute the API request RESPONSE=$(curl -s -k -X POST "$WAZUH_INDEXER_URL?pretty" \ -H "Content-Type: application/json" \ -H "Authorization: Bearer $JWT_AUTH_TOKEN" \ -d "$PAYLOAD") # Check if the response contains valid data if [[ $? -ne 0 || -z "$RESPONSE" ]]; then echo "Error: Failed to fetch data from Wazuh indexer API" exit 1 fi echo "Top three (3) Users with Most Failed Login Session" echo "$RESPONSE"
Make the script executable:
# chmod u+x top_failed_login.sh
Run the
top_failed_login.shscript:# ./top_failed_login.sh... { "key" : "root", "doc_count" : 19 }, { "key" : "test", "doc_count" : 9 }, { "key" : "nobody", "doc_count" : 4 } ] } } }