Agents without Internet access
In many organizations, certain systems, especially those in restricted, segmented, or highly secure networks do not have direct access to the Internet. These systems still generate important security events that need to be monitored by Wazuh.
Wazuh Cloud supports secure methods to ensure that such isolated or private network agents can still send their data to your cloud environment. This enables visibility across your infrastructure, even for systems operating in air-gapped or compliance-restricted environments. The following options are available for this purpose:
Using a forwarding proxy
It is possible to access your environment using an NGINX forwarding proxy.
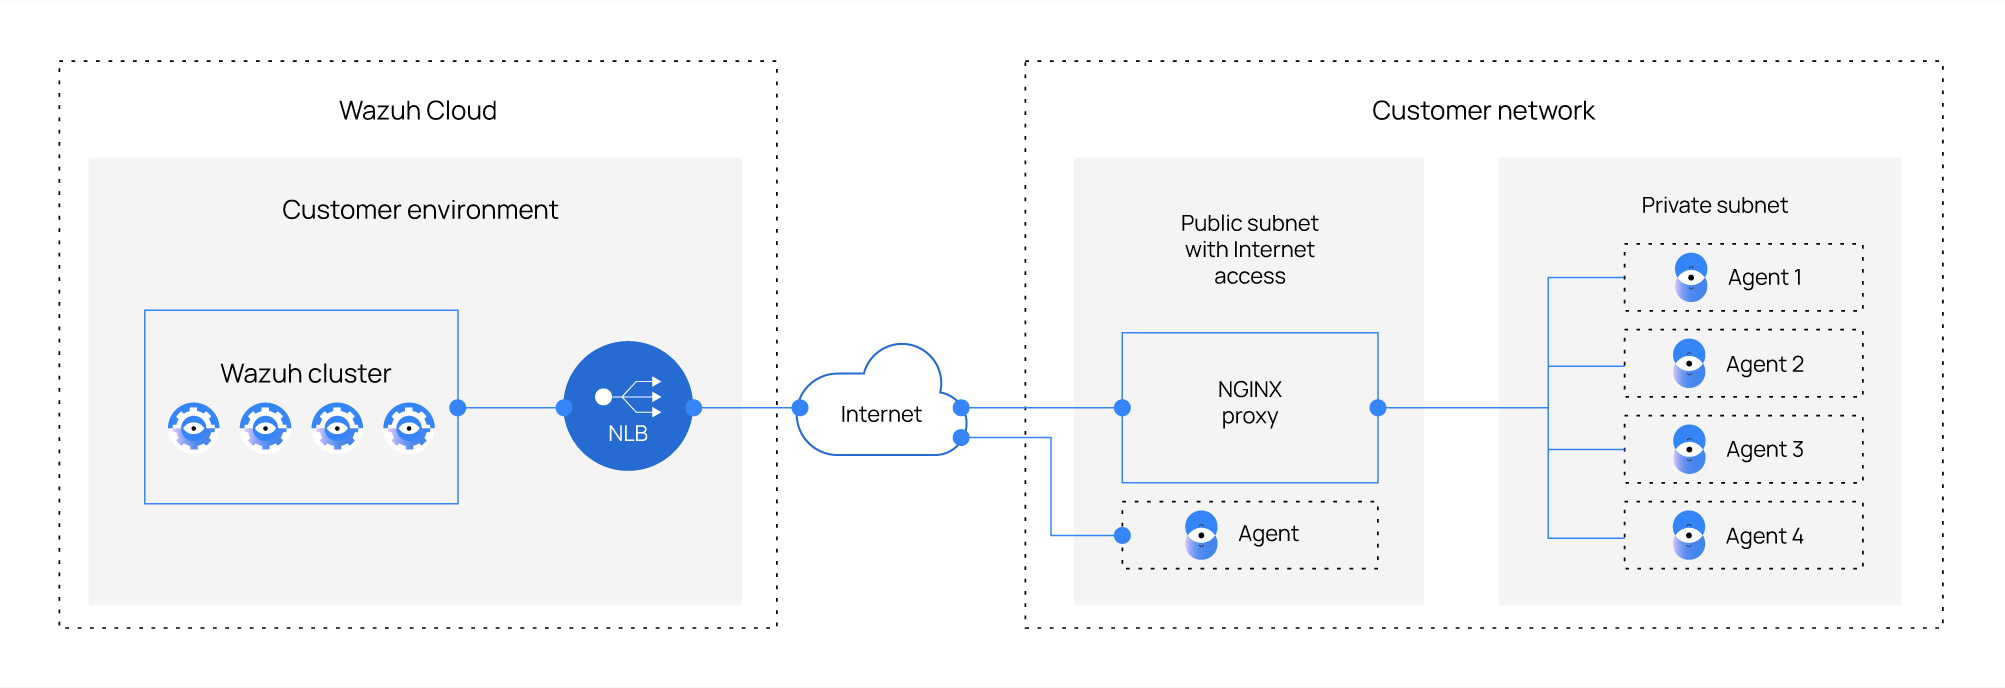
To achieve this configuration, follow these steps:
Deploy a new instance in a public subnet with internet access.
Install NGINX on your instance following the NGINX documentation.
Configure NGINX.
Add the following lines to the HTTP section in your NGINX configuration, located in the
/etc/nginx/nginx.conffile. This configuration enables Nginx to extract and use the real client IP address from theX-Forwarded-Forheader and sets restrictions on which real IP addresses are accepted as valid.http{ real_ip_header X-Forwarded-For; set_real_ip_from <nginx_ip>; }
Add the following block to the end of the NGINX configuration file
/etc/nginx/nginx.confand replace<CLOUD_ID>with the Cloud ID of your environment. This configuration enables stream proxying, where incoming traffic on specific ports is forwarded to the corresponding upstream servers (master or mycluster). This is based on the port numbers,1515and1514specified in the listen directive.stream { upstream master { server <CLOUD_ID>.cloud.wazuh.com:1515; } upstream mycluster { server <CLOUD_ID>.cloud.wazuh.com:1514; } server { listen nginx_ip:1515; proxy_pass master; } server { listen nginx_ip:1514; proxy_pass mycluster; } }
Restart the NGINX service.
# systemctl restart nginx
Enroll your agent with the IP address of the NGINX instance. To learn more about registering agents, see the Enroll agents section.
Example:
# WAZUH_MANAGER_IP=<NGINX_IP_ADDRESS> WAZUH_PROTOCOL="tcp" \
WAZUH_PASSWORD="<PASSWORD>" \
yum install wazuh-agent
Replace
<PASSWORD>with your Wazuh server enrollment password.
Using AWS PrivateLink
If your agents are deployed within AWS, you can connect them securely to your Wazuh Cloud environment without sending traffic over the public Internet. Wazuh Cloud supports AWS PrivateLink, which keeps all communication within the AWS internal network. This approach enhances security, simplifies compliance, and reduces the risk of data exposure.
Follow the below steps to connect using AWS PrivateLink:
Request your Wazuh Virtual Private Cloud (VPC) endpoint service name
Log in to the Wazuh Cloud Console.
Navigate to the Help section and contact the Wazuh Support team.
Request your VPC endpoint service name, which follows this format:
com.amazonaws.vpce.<REGION>.vpce-svc-<AWS_SERVICE_ID>
Create a VPC endpoint in your AWS account
Log in to your AWS Management Console.
Go to VPC, select Endpoints.
Click Create endpoint.
Choose the endpoint service provided by the Wazuh team.
Ensure the endpoint is created in the same AWS Region as the Wazuh service. For more details, see the AWS documentation.
Wait for Wazuh to approve the connection
Once your endpoint is created, the Wazuh team will approve the connection.
You will receive a notification when the PrivateLink connection is ready for use.
Enroll your Wazuh agent
When configuring your agent, replace the
WAZUH_MANAGER_IPvalue with your endpoint’s DNS name:vpce-<AWS_ENDPOINT_ID>.vpce-svc-<AWS_SERVICE_ID>.<REGION>.vpce.amazonaws.com.
If the agents are located in a different region than your endpoint, use VPC Peerings to connect them to the endpoint service. This allows them to send data securely through the PrivateLink connection.
Example:
# WAZUH_MANAGER_IP=vpce-<AWS_ENDPOINT_ID>.vpce-svc-<AWS_SERVICE_ID>.<REGION>.vpce.amazonaws.com WAZUH_PROTOCOL="tcp" \
WAZUH_PASSWORD="<PASSWORD>>" \
yum install wazuh-agent
In this example, make sure to replace
<PASSWORD>with your actual password.