Deploying Wazuh agents on Windows endpoints
The Wazuh agent runs on the endpoint you want to monitor and communicates with the Wazuh manager, sending data in near real-time through an encrypted and authenticated channel. You can deploy the Wazuh agent on Windows systems ranging from Windows XP to the latest versions, including Windows 11 and Windows Server 2022.
Note
You must have administrator privileges to perform the installation.
Download the Windows installer to start the installation process.
Select the installation method you want to follow: command line interface (CLI) or graphical user interface (GUI).
Choose one of the command shell alternatives to deploy the Wazuh agent on your endpoint. Run the command below and replace the
WAZUH_MANAGERvalue with your Wazuh manager IP address or hostname. Ensure the downloaded Wazuh agent installation file is in your working directory.Using CMD:
> msiexec.exe /i wazuh-agent-4.14.6-1.msi /q WAZUH_MANAGER="10.0.0.2"
Using PowerShell:
> msiexec.exe /i .\wazuh-agent-4.14.6-1.msi /q WAZUH_MANAGER="10.0.0.2"
For additional deployment options such as agent name, agent group, and registration password, see the Deployment variables for Windows section.
Start the Wazuh agent from the GUI or by running:
Using CMD:
> NET START WazuhSvcUsing PowerShell:
> Start-Service wazuhsvc
The installation process is now complete and the Wazuh agent is successfully installed and configured.
Note
Alternatively, if you want to install an agent without enrolling it, omit the deployment variables. To learn more about the different enrollment methods, see the Wazuh agent enrollment section.
Run the Windows installer and follow the steps in the installation wizard to deploy the Wazuh agent on your endpoint. If you are not sure how to answer some of the prompts, use the default answers. Once installed, the Wazuh agent uses a GUI for configuration, opening the log file, and starting or stopping the service.
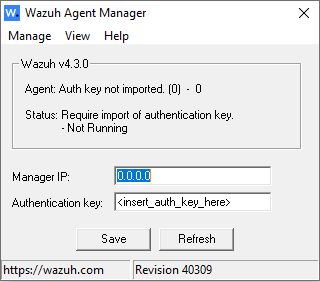
The installation process is now complete, and the Wazuh agent is successfully installed on your Windows endpoint. The next step is to register and configure the agent to communicate with the Wazuh server. To perform this action, see the Wazuh agent enrollment section.
By default, all agent files are stored in C:\Program Files (x86)\ossec-agent after the installation.