Wazuh RBAC - How to create and map internal users
Wazuh RBAC allows access to Wazuh resources based on the roles and policies assigned to the users. It is an easy-to-use administration system that enables to manage users' or entities' permissions to the system resources. To learn more, see the Role-Based Access Control section.
The Wazuh platform includes an internal user database that can be used for authentication. It can also be used in addition to an external authentication system such as SAML, LDAP, or Active Directory. Learn how to create users and map them with Wazuh in the below sections.
Creating and setting a Wazuh admin user
Follow these steps to create an internal user, create a new role mapping, and give administrator permissions to the user.
Log into the Wazuh dashboard as administrator.
Click the upper-left menu icon ☰ to open the options, go to Indexer management > Security, and then Internal users to open the internal users' page.
Click Create internal user, provide a username and password, type
adminas the Backend role, and click Create to complete the action.To map the user with Wazuh, follow these steps:
Click the upper-left menu icon ☰ to open the menu on the Wazuh dashboard, go to Server management > Security, and then Roles mapping to open the page.
Click Create Role mapping and complete the empty fields with the following parameters:
Role mapping name: Assign a name to the role mapping.
Roles: Select
administrator.Internal users: Select the internal user created previously.
Click Save role mapping to save and map the user with Wazuh as administrator.
For the role mapping to take effect, ensure that the
run_asvalue is set totruein the/usr/share/wazuh-dashboard/data/wazuh/config/wazuh.ymlconfiguration file.Restart the Wazuh dashboard service and clear your browser cache and cookies.
# systemctl restart wazuh-dashboard
# service wazuh-dashboard restart
Creating and setting a Wazuh read-only user
Follow these steps to create an internal user, create a new role mapping, and give read-only permissions to the user.
Log into the Wazuh dashboard as administrator.
Click the upper-left menu icon ☰ to open the options, go to Indexer management > Security, and then Internal users to open the internal users' page.
Click Create internal user, provide a username and password, and click Create to complete the action.
To map the user to the appropriate role, follow these steps:
Click the upper-left menu icon ☰ to open the options, go to Indexer management > Security, and then Roles to open the roles page.
Click Create role, complete the empty fields with the following parameters, and then click Create to complete the task.
Name: Assign a name to the role.
Cluster permissions:
cluster_composite_ops_roIndex:
*Index permissions:
readTenant permissions:
global_tenantand select the Read only option.
Select the Mapped users tab and click Manage mapping.
Add the user you created in the previous steps and click Map to confirm the action.
To map the user with Wazuh, follow these steps:
Click ☰ to open the menu on the Wazuh dashboard, go to Server management > Security, and then Roles mapping to open the page.
Click Create Role mapping and complete the empty fields with the following parameters:
Role mapping name: Assign a name to the role mapping.
Roles: Select
readonly.Internal users: Select the internal user created previously.
Click Save role mapping to save and map the user with Wazuh as read-only.
For the role mapping to take effect, ensure that
run_asvalue is set totruein the/usr/share/wazuh-dashboard/data/wazuh/config/wazuh.ymlconfiguration file.Restart the Wazuh dashboard service and clear your browser cache and cookies.
# systemctl restart wazuh-dashboard
# service wazuh-dashboard restart
Creating an internal user and mapping it to Wazuh
Follow these steps to create an internal user and map it to a role of your choice.
Log into the Wazuh dashboard as administrator.
Click the upper-left menu icon ☰ to open the options, go to Indexer management > Security, and then Internal users to open the internal users' page.
Click Create internal user, provide a username and password, and click Create to complete the action.
To map the user to a given role, follow these steps:
Go to Security, select Roles to open the page, and click the name of the selected role to open the window. Alternatively, you can create a custom role by clicking Create role.
Select the Mapped users tab and click Manage mapping.
Add the user you created in the previous steps and click Map to confirm the action.
To map the user with Wazuh, follow these steps:
Click ☰ to open the menu on the Wazuh dashboard, go to Server management > Security, and then Roles mapping to open the page.
Click Create Role mapping and complete the empty fields with the following parameters:
Role mapping name: Assign a name to the role mapping.
Roles: Select the Wazuh roles that you want to map the user with.
Internal users: Select the internal user created previously.
Wazuh includes an extensive list of default policies and roles. Additionally, you can create custom policies and roles to suit your needs. To see an example, check our Use case: Give a user permissions to manage a group of agents below.
Click Save role mapping to save and map the user with Wazuh.
For the role mapping to take effect, ensure that the
run_asvalue is set totruein the/usr/share/wazuh-dashboard/data/wazuh/config/wazuh.ymlconfiguration file.Restart the Wazuh dashboard service and clear your browser cache and cookies.
# systemctl restart wazuh-dashboard
# service wazuh-dashboard restart
Use case: Give a user permissions to read and manage a group of agents
In this use case, we explore how to create an internal user and give it permissions to read and manage an agents group.
This process involves adding a label in the agent group's centralized configuration to identify the Wazuh alerts coming from this group of agents, creating an internal user, and giving it reading permission only for those documents that correspond to the group of authorized agents.
It also involves mapping this user with the Wazuh API, creating a custom policy that includes permissions to read, restart, upgrade, among other actions over a group of agents, and finally creating a custom role and mapping it to our internal user.
As a final result, we will have a new user with permission to manage a group of agents and read the documents regarding the said group.
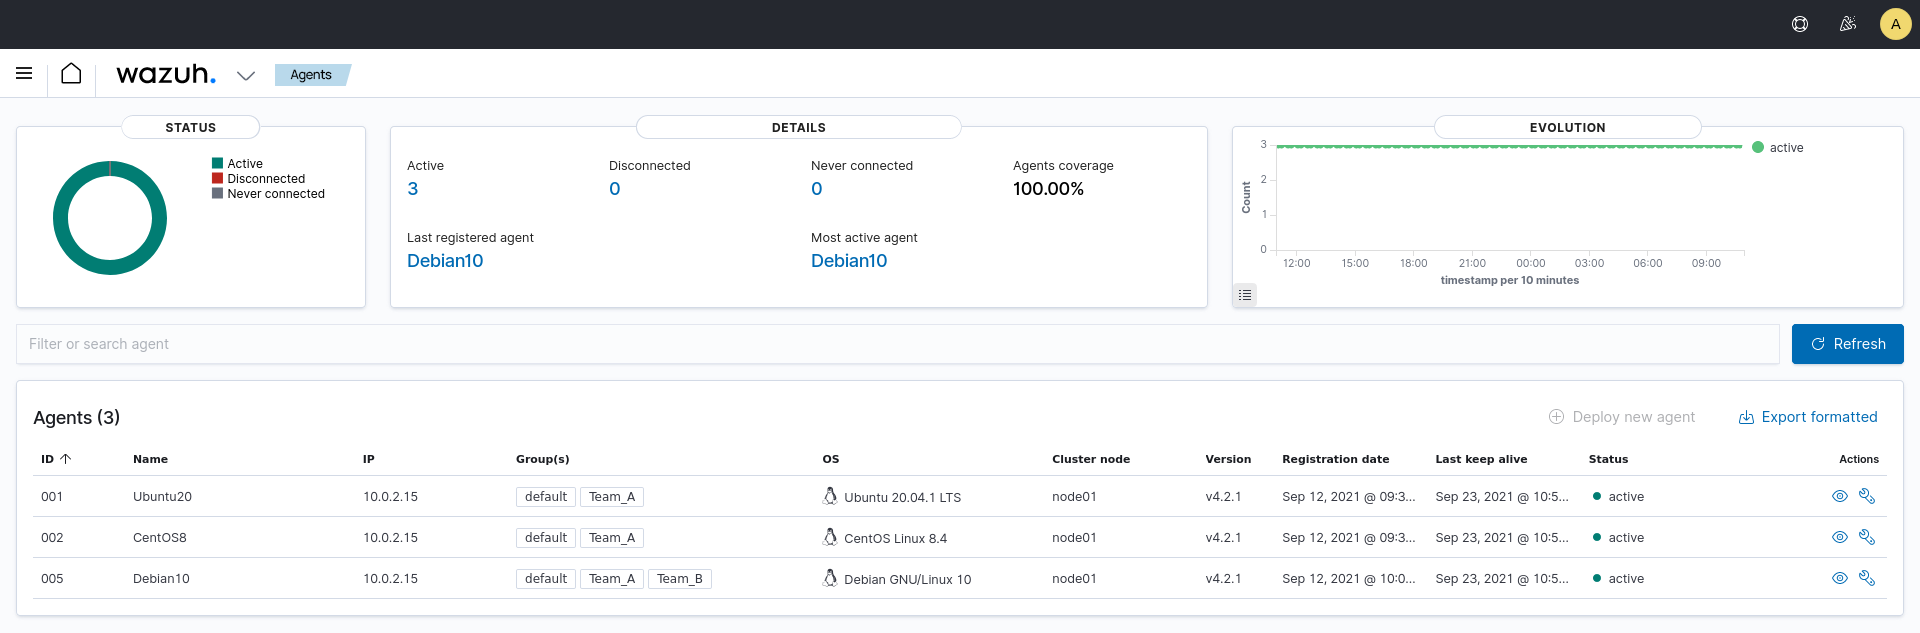
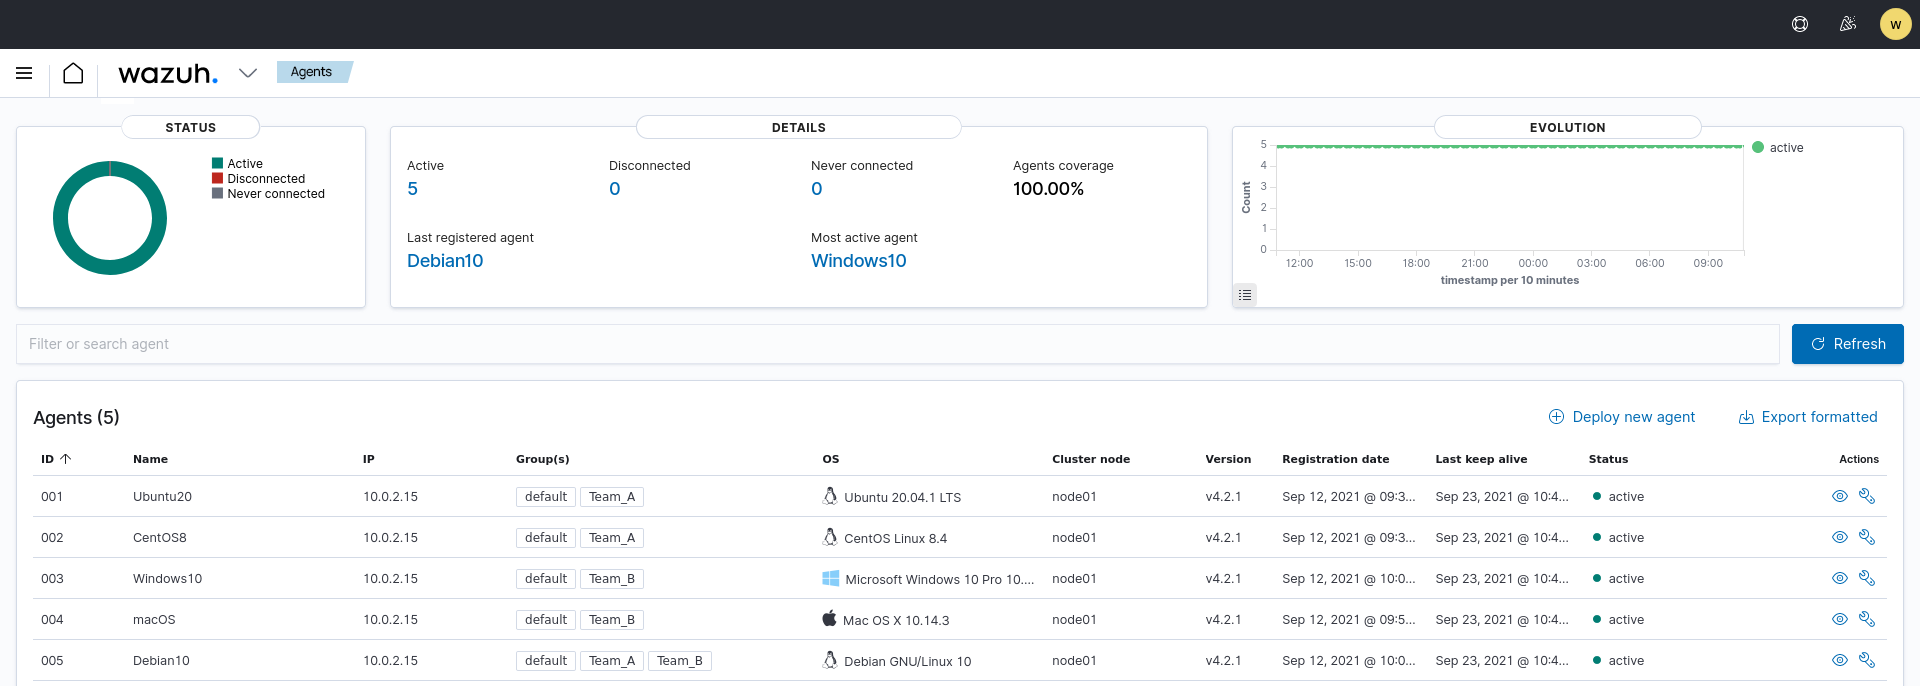
In this example, we have an environment with five agents. Agents 002, 003, and 006 belong to the Team_A group, whereas agents 004, 005, and 006 belong to the Team_B group. To learn more about creating agent groups, see Grouping agents. We will describe how to create a new user and grant that user permission to manage agents in Team_A.
Creating agent groups
Follow these steps to create agent groups and add agents to the groups using the Wazuh dashboard.
Navigate to Agents management > Groups and click the Add new group button.
Enter a name for the agent group, then click the Save new group button. In our case, we name the groups
Team_AandTeam_B.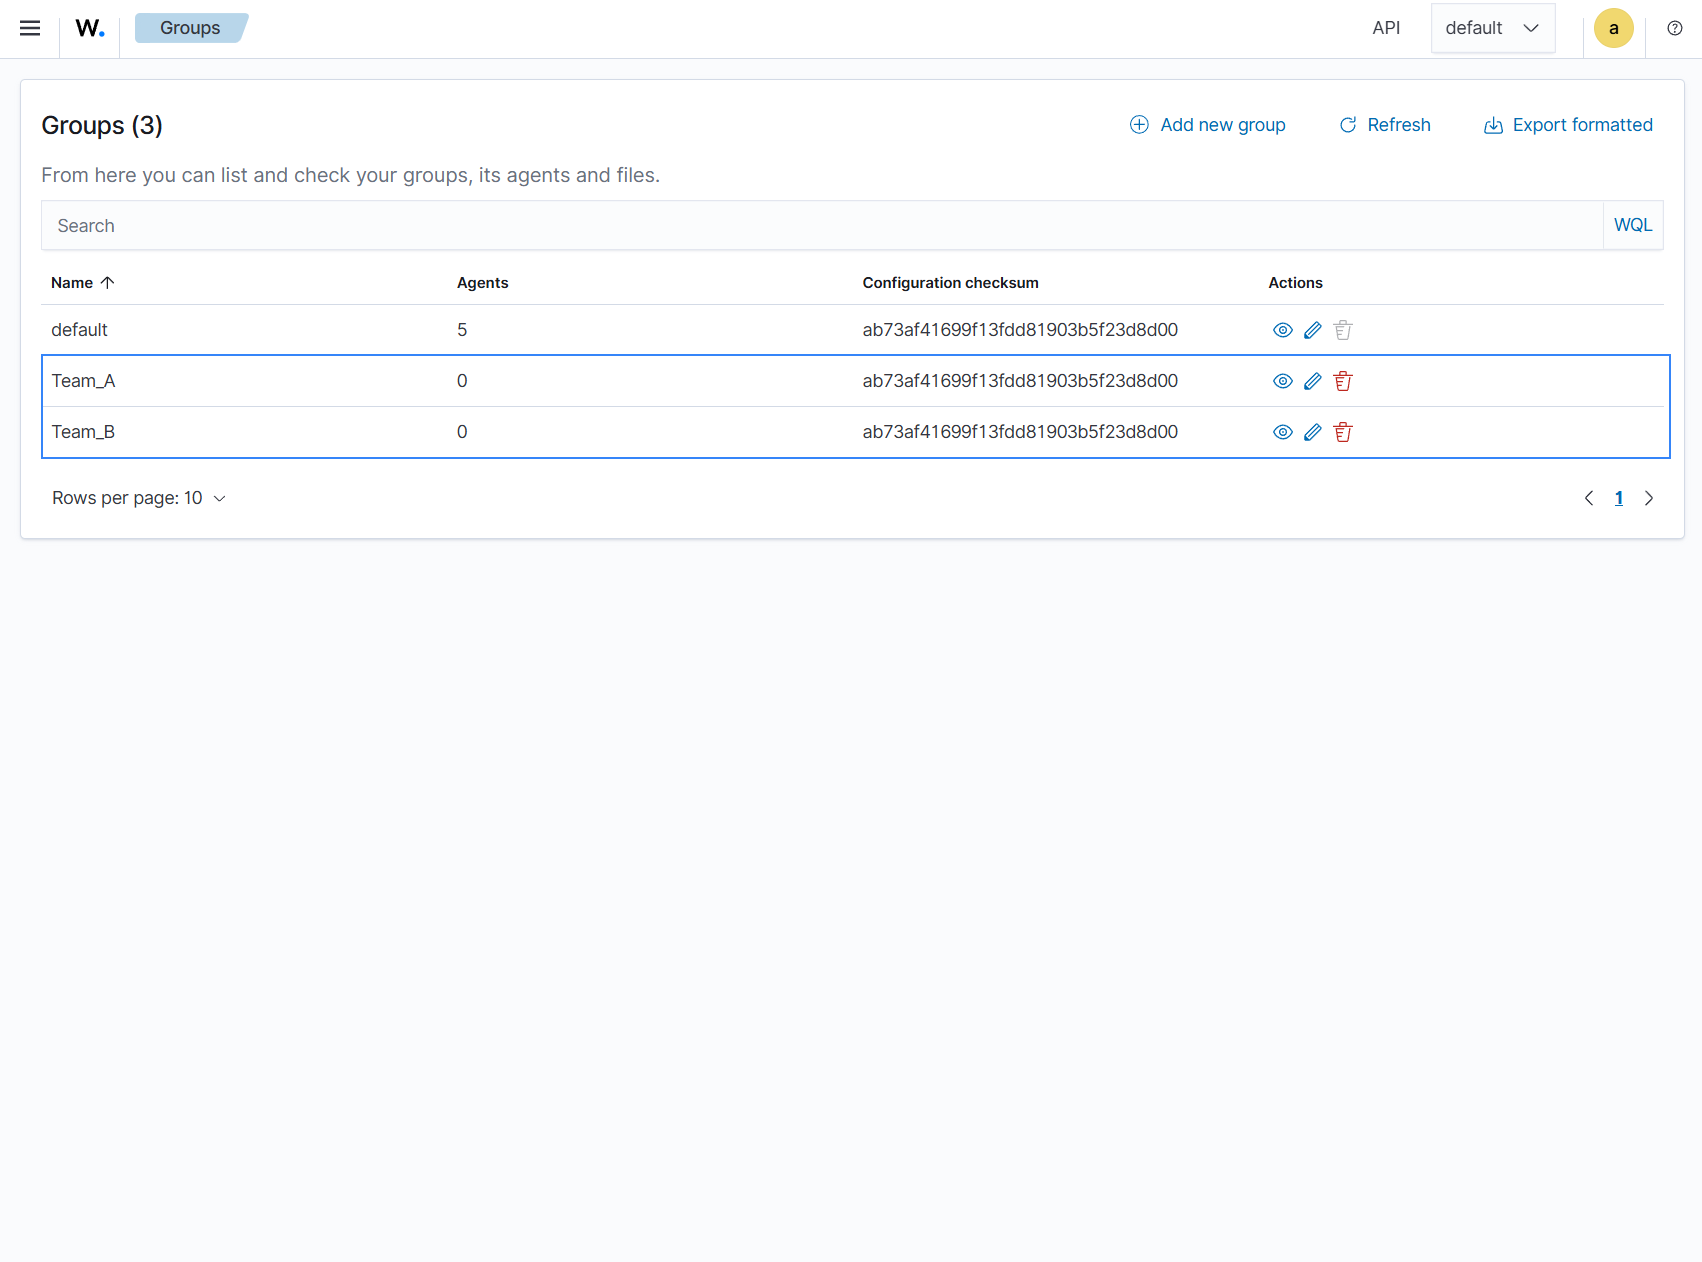
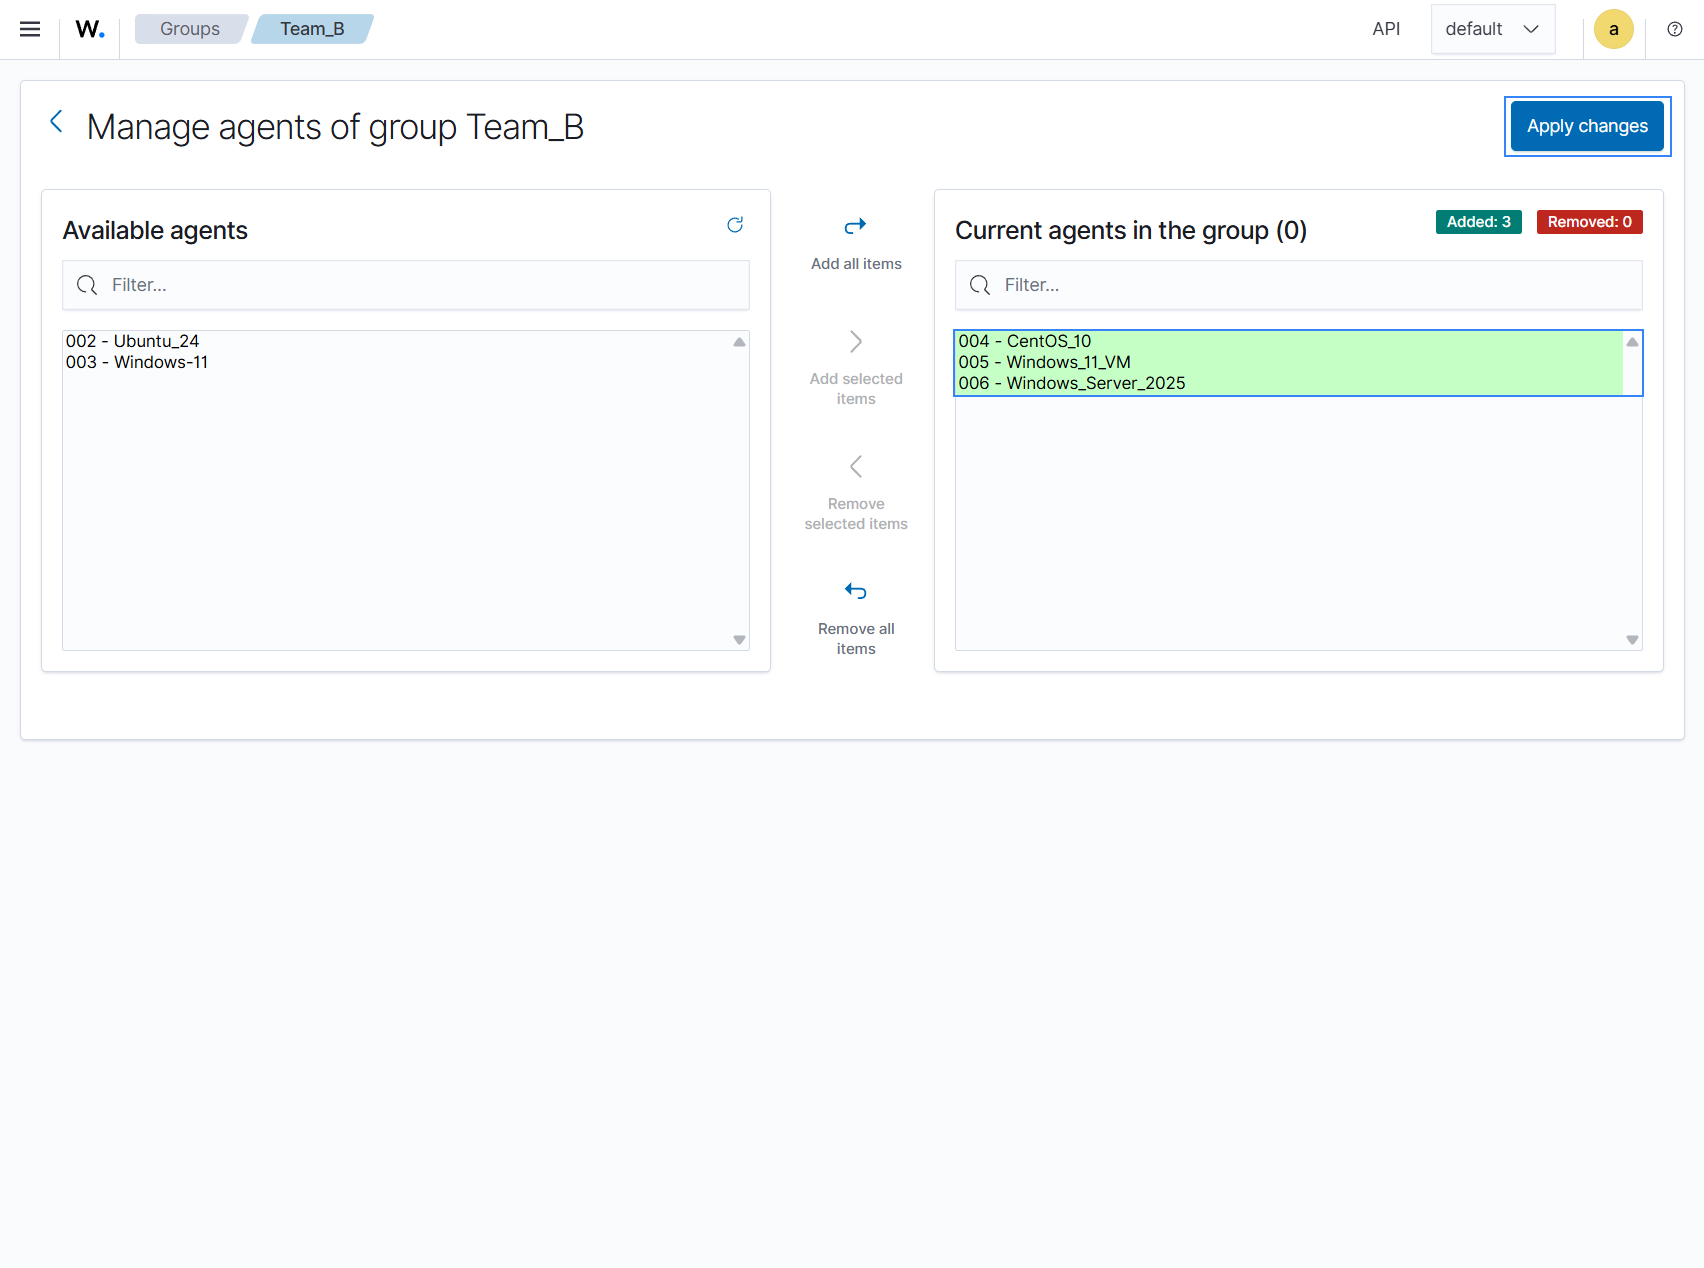
Select your group, for example,
Team_A, and click Manage Agents. Add agents to their respective groups and click Apply changes. In our case, agents002,003, and006are added to theTeam_Agroup, whereas agents004,005, and006are added to theTeam_Bgroup.
Adding an agents group label
To prepare the environment, add a label in the Team_A centralized configuration agent.conf. To learn more, see Agent labels.
Log into the Wazuh dashboard as administrator.
Select Agents management > Groups to open the page.
Select your group, for example,
Team_A.Select Files and click Edit group configuration.
Add a label to identify the group, for example:
<agent_config>
       <labels>
               <label key="group">Team_A</label>
       </labels>
</agent_config>
Click Save to complete the action.
You have now added a group label that allows us to identify all the Wazuh alerts coming from this group of agents. Note that only new alerts will include this group label.
Creating and mapping an internal user
Follow these steps to create an internal user, create a custom role and map it to the new user.
Click the upper-left menu icon ☰ to open the available options, go to Indexer management > Security, and then Internal users to open the internal users' page.
Click Create internal user, provide a username and password, and click Create to complete the action.
To create a custom role and map the user to it, follow these steps:
Go to Security, select Roles to open the page.
Click Create role, complete the empty fields with the following parameters:
Name: Assign a name to the role.
Cluster permissions:
cluster_composite_ops_roIndex:
*Index permissions:
read
Click Add another index permission and unfold the new section Add index permission. Complete the empty fields with the following parameters and make sure to replace your group name accordingly:
Index:
wazuh-alerts*Index permissions:
readDocument level security:
{
  "bool": {
    "must": {
      "match": {
        "agent.labels.group": "Team_A"
      }
    }
  }
}
Click Add another index permission and unfold the new section Add index permission. Complete the empty fields with the following parameters and make sure to replace your group name accordingly:
Index:
wazuh-monitoring*Index permissions:
readDocument level security:
{
  "bool": {
    "must": {
      "match": {
        "group": "Team_A"
      }
    }
  }
}
Under Tenant permissions, select Tenant:
global_tenantand the Read only option.Click Create to complete the task.
Select the Mapped users tab and click Manage mapping.
Add the user you created in the previous steps and click Map to confirm the action.
You have now created an internal user and assigned it reading permissions over the Wazuh alerts and Wazuh monitoring documents from the authorized agents group.
Mapping with Wazuh
To map the user with Wazuh, follow these steps:
Click ☰ to open the menu on the Wazuh dashboard, go to Server management > Security, and then Policies to open the policies page.
Click Create policy and complete the empty fields with the requested information.
Policy name: Assign a name to the new policy.
Action: Select the actions that the user is allowed to perform, for example,
agent:read, and click Add. Select as many actions as needed.Resource: Select
agent:group.Resource identifier: Write the name of the agents' group, for example,
Team_A, and click Add. You can add as many resources as needed.Select an effect: Select
Allow.
Click Create policy to complete the action.
Click Roles to open the tab, click Create Role, and fill in the empty fields with the requested information.
Role name: Assign a name to the new role.
Policies: Select the policy created previously.
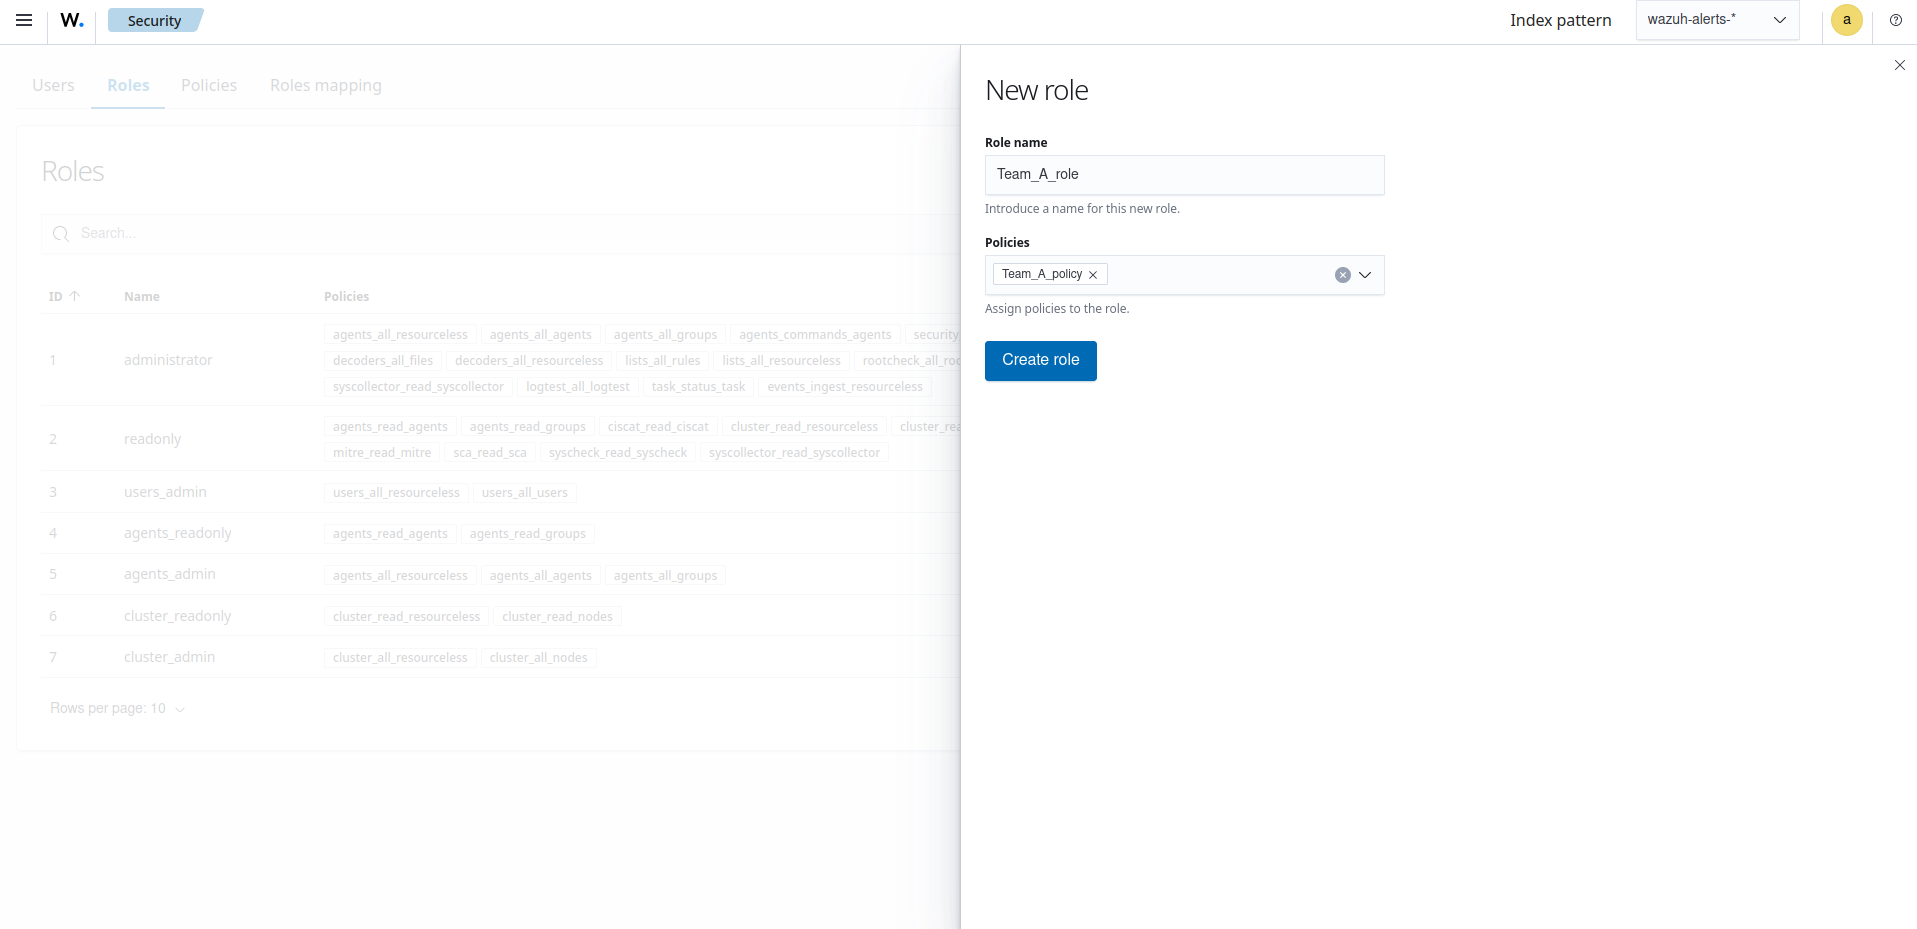
Click Create role to confirm the action.
Click Create Role mapping and complete the empty fields with the requested information.
Role mapping name: Assign a name to the role mapping.
Roles: Select the role created previously, for example
Team_A_role, and thecluster_readonlyrole. The latter assigns the user basic configuration reading permissions.Internal users: Select the internal user created previously.
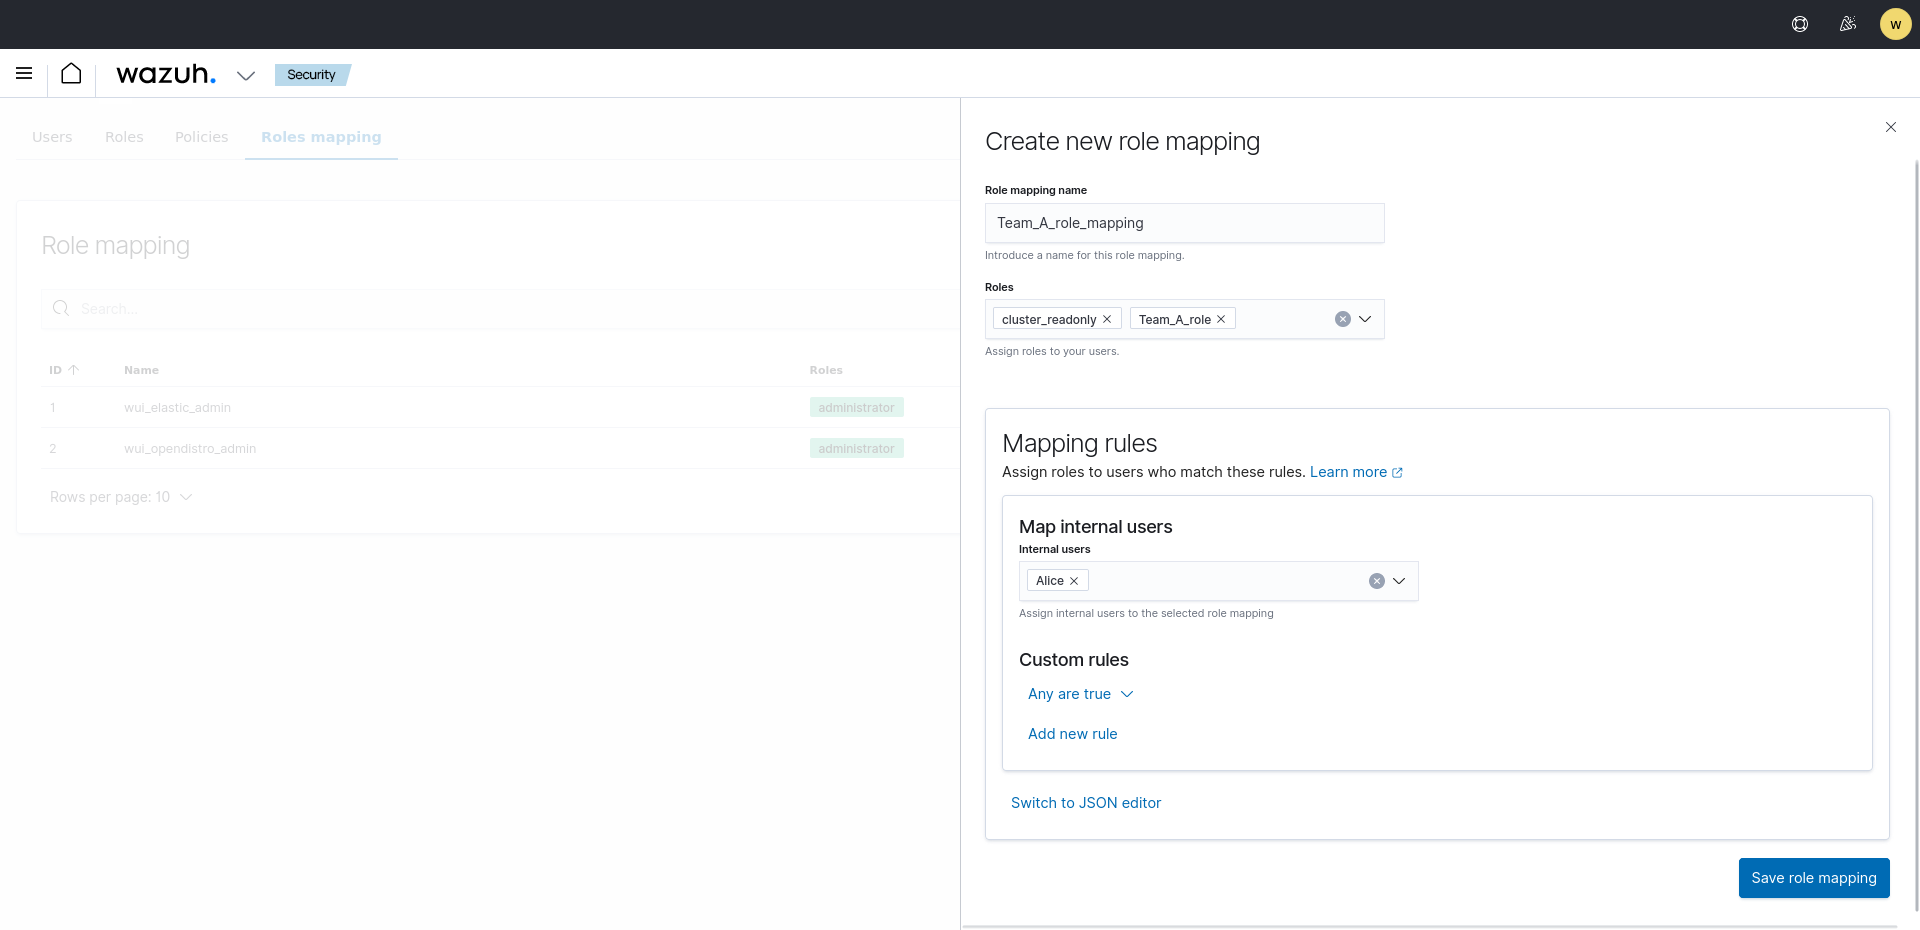
Click Save role mapping to finish the action.
For the role mapping to take effect, ensure that
run_asis set totruein the/usr/share/wazuh-dashboard/data/wazuh/config/wazuh.ymlconfiguration file.Restart the Wazuh dashboard service and clear your browser cache and cookies.
# systemctl restart wazuh-dashboard
# service wazuh-dashboard restart
You have now created a new internal user and mapped it to manage a Wazuh agents' group. Authenticate with the new user and open the Wazuh dashboard, see that only Team_A agents' alerts and information are displayed.