authentik
authentik is an open source Identity Provider (IdP) for modern SSO. It supports SAML, OAuth2/OIDC, LDAP, RADIUS, and more. In this guide, we integrate the authentik IdP to authenticate users into the Wazuh platform.
Learn how to create administrator and read-only roles on authentik and map them to Wazuh roles in the sections below.
Setup authentik single sign-on with administrator role
Follow these steps to integrate authentik IdP with Wazuh for single sign-on and grant administrator access to the authenticated authentik users:
authentik configuration
Log in to authentik as an administrator and open the authentik Admin interface.
Create a new user.
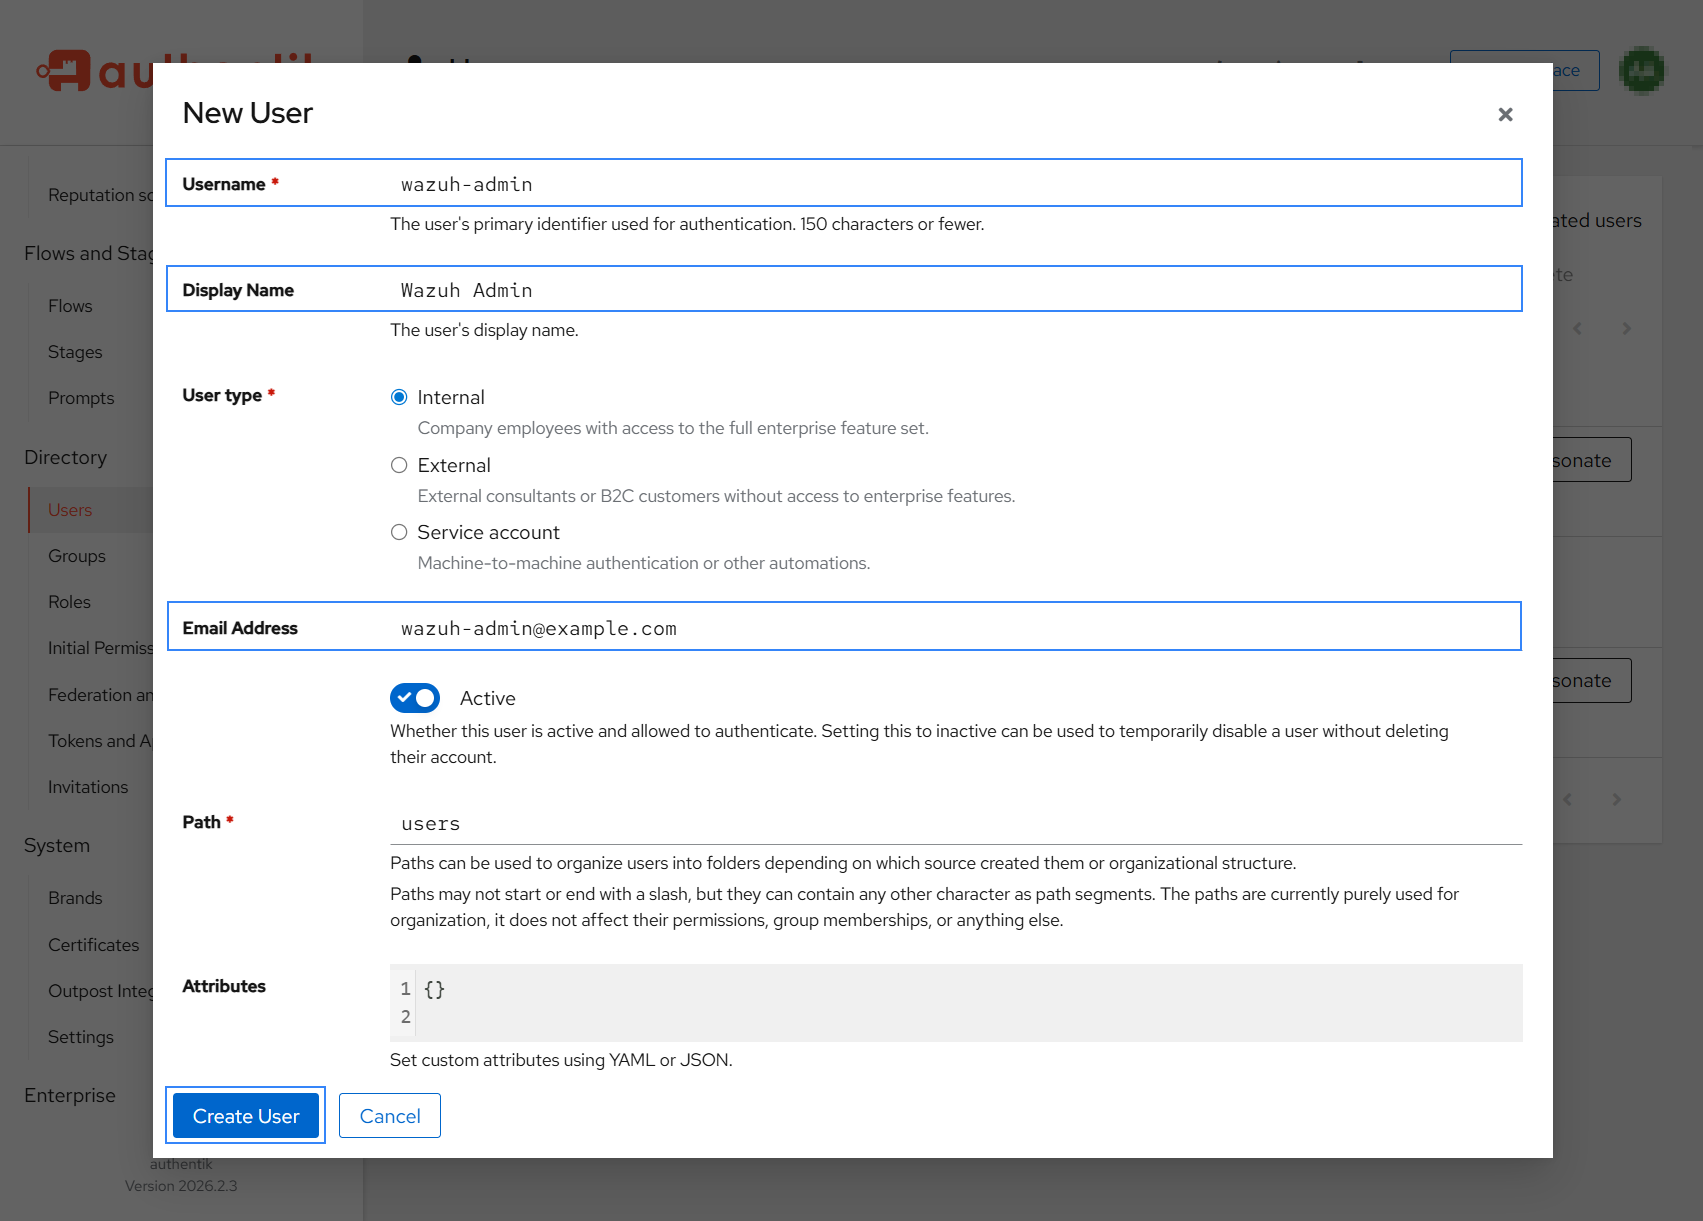
Navigate to Directory > Users and click New User.
Set the Username, Display Name and Email address of the user.
Leave the other options as default and click Create User.
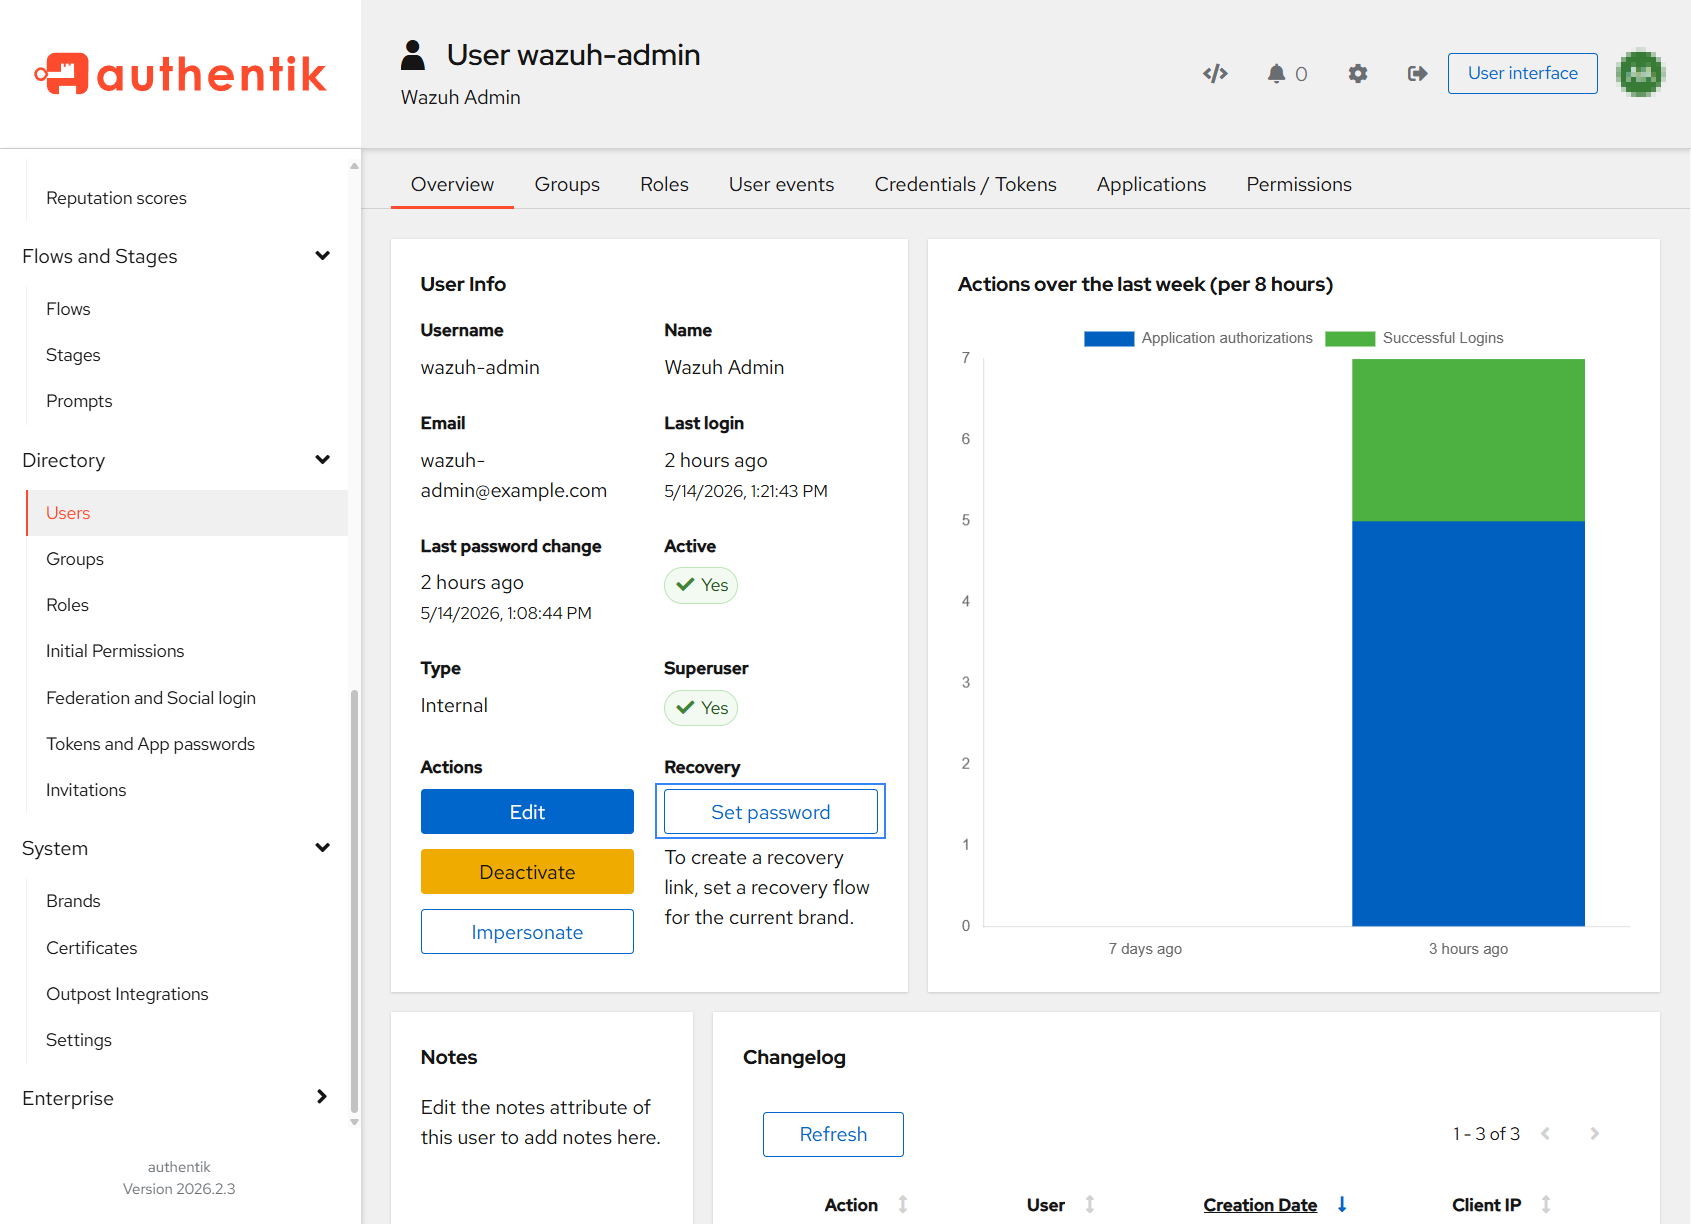
Select the newly created user, click Set password to assign a password to the user.
Create a user group in authentik.
Navigate to Directory > Groups and click New Group
Set a name for the group (for example,
wazuh-administrators) and click Create Group.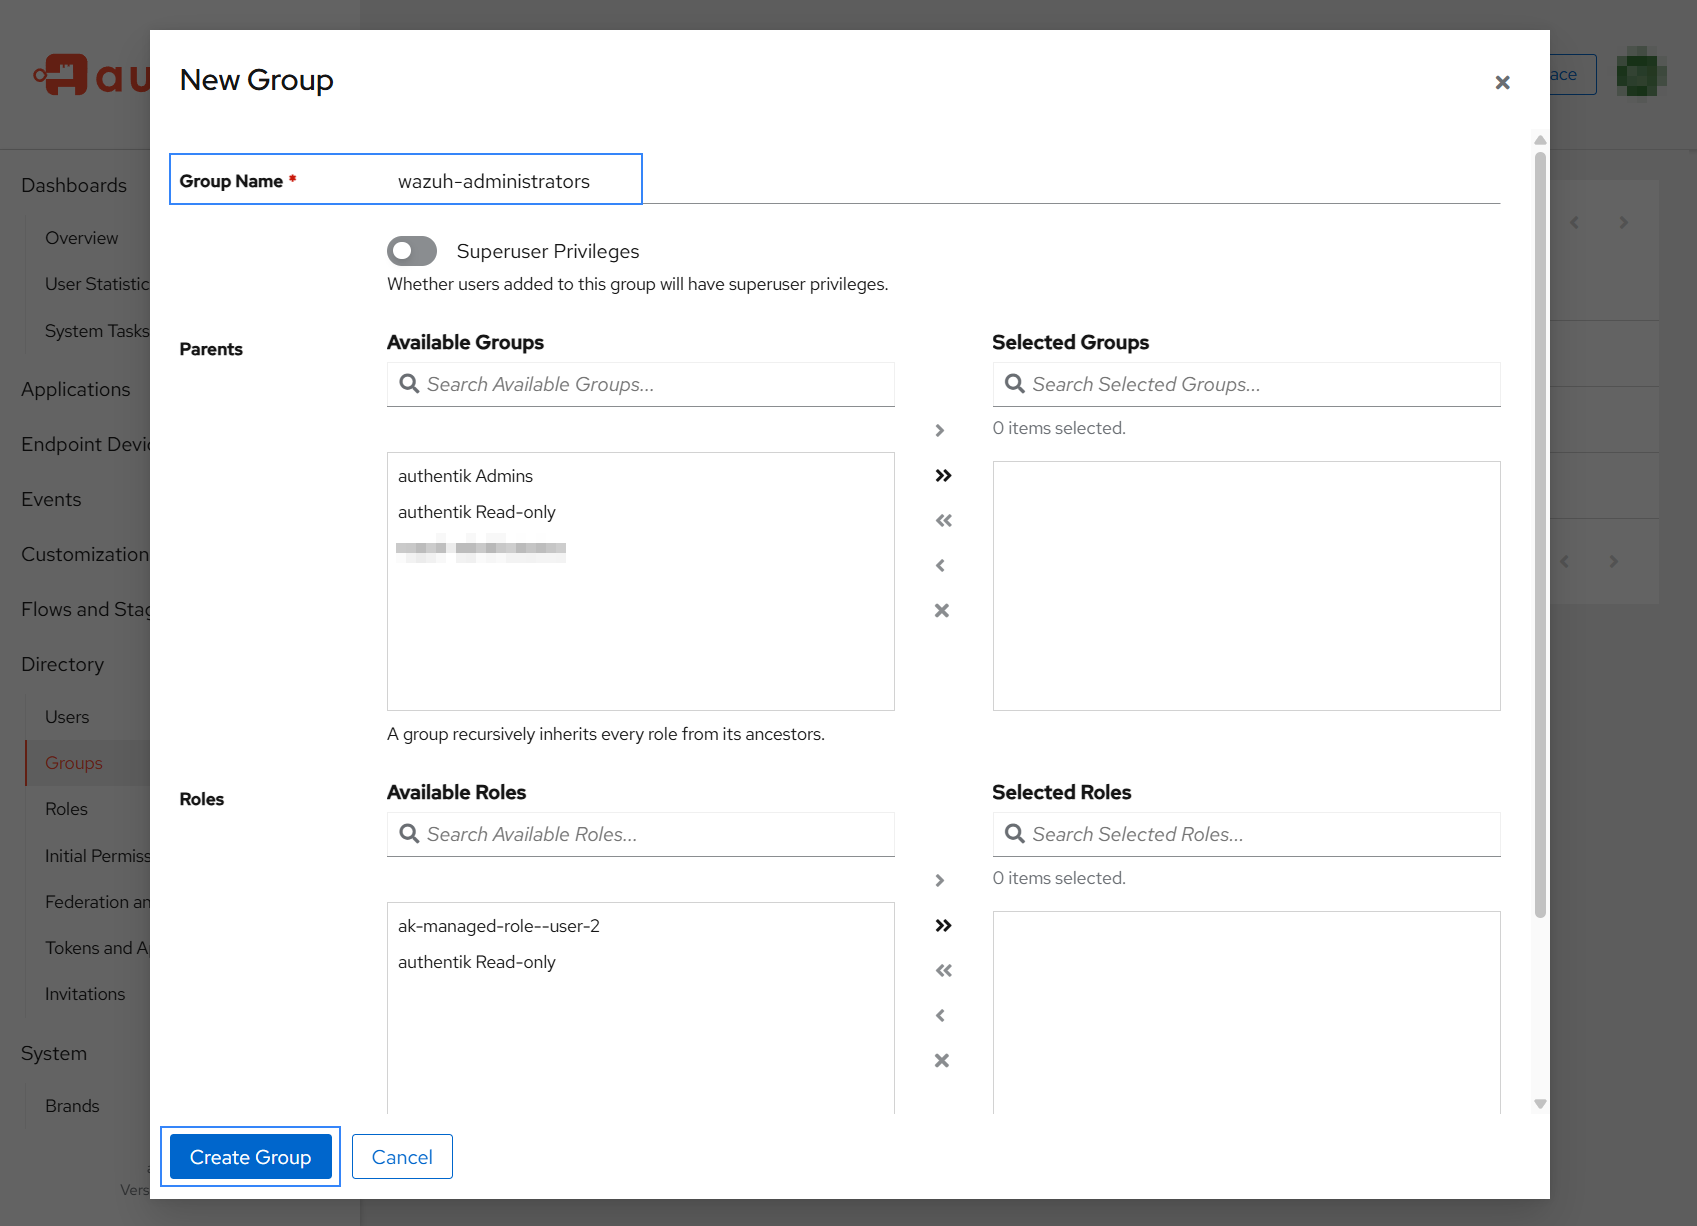
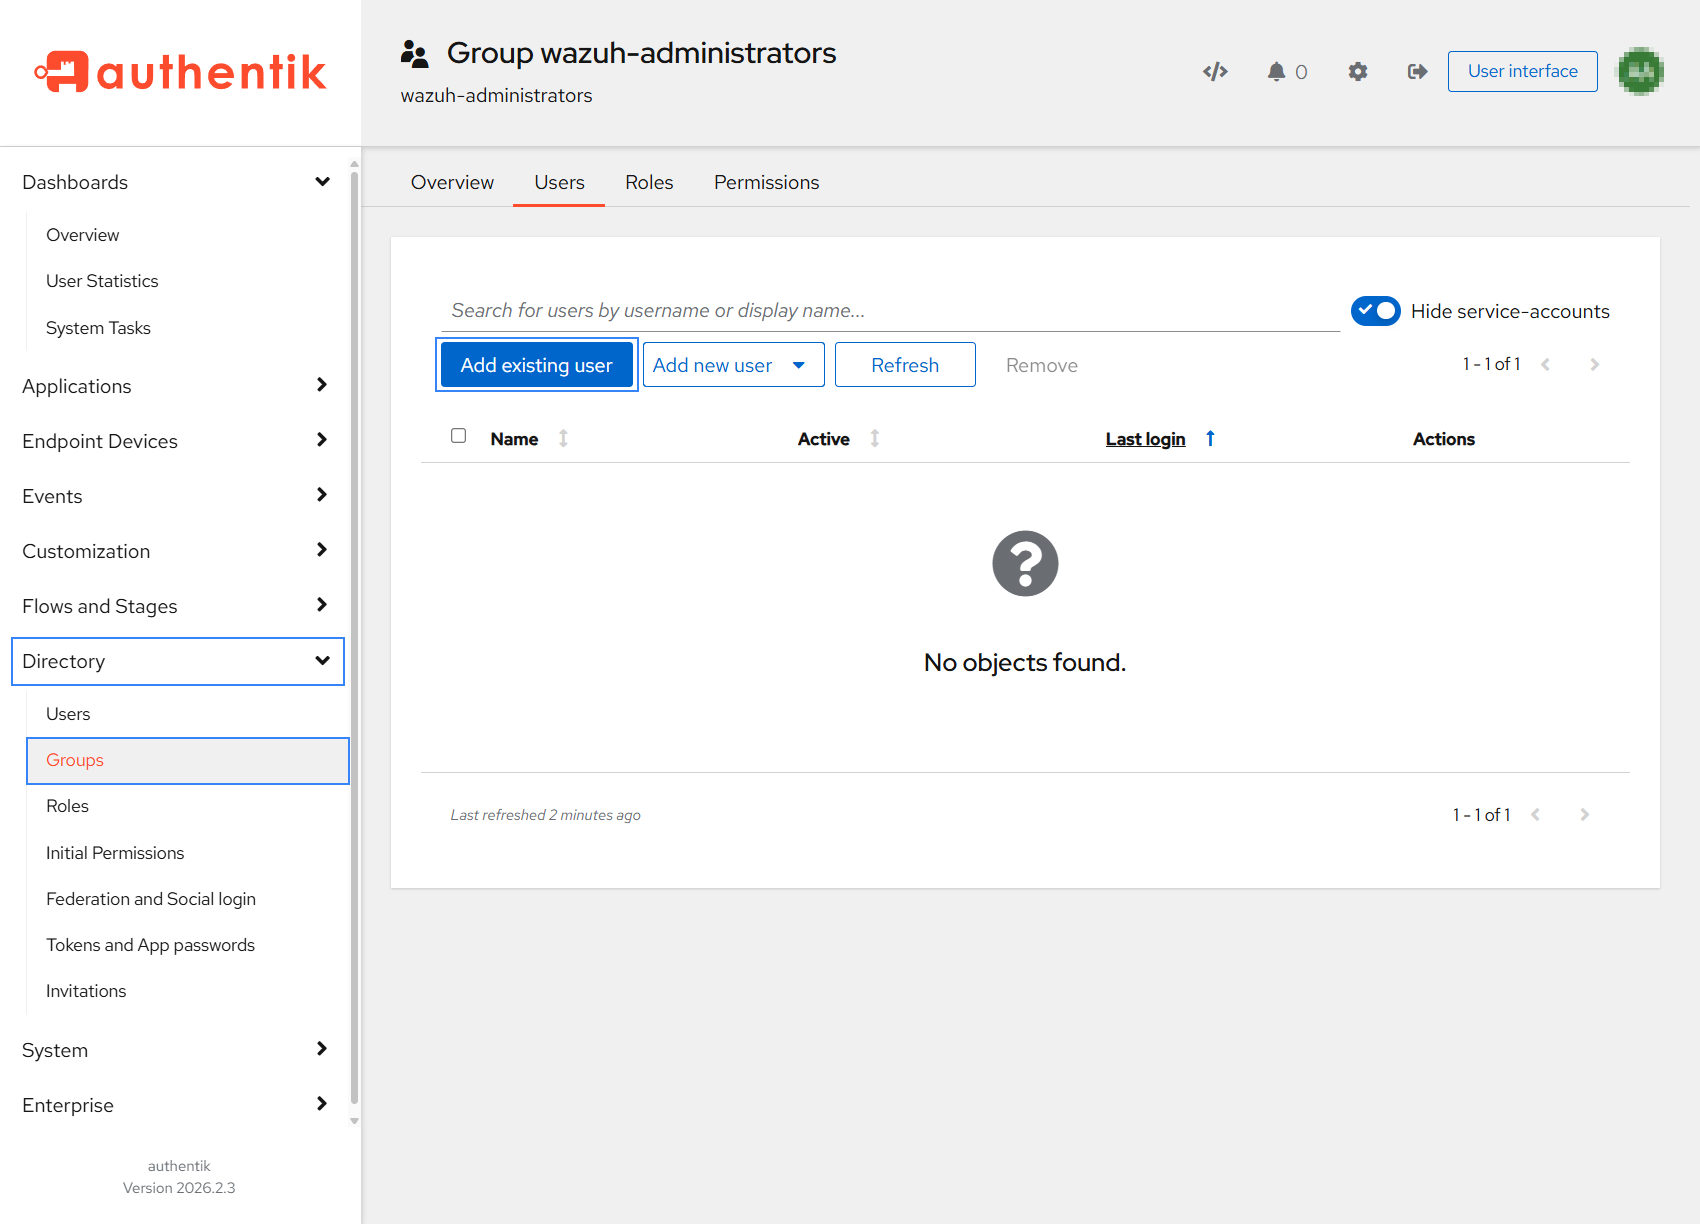
Click the name of the newly created group and navigate to the Users tab.
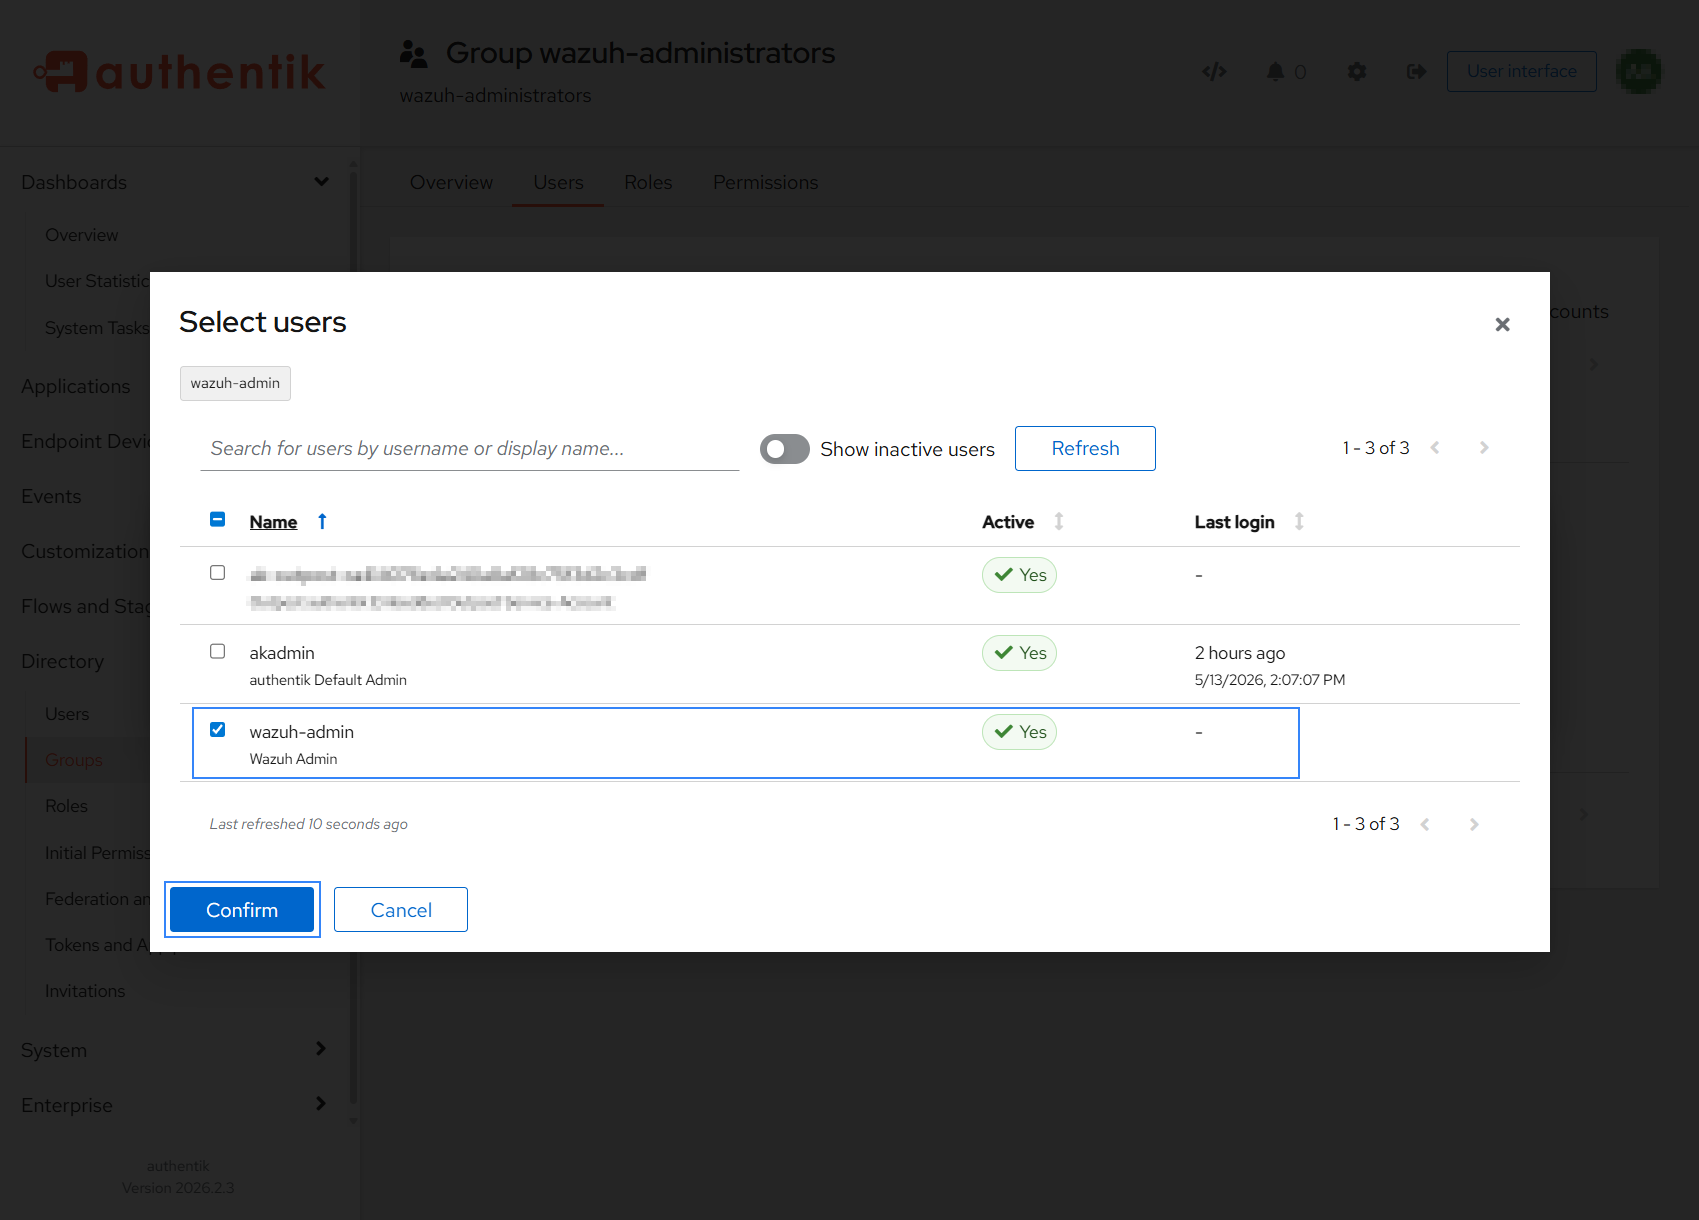
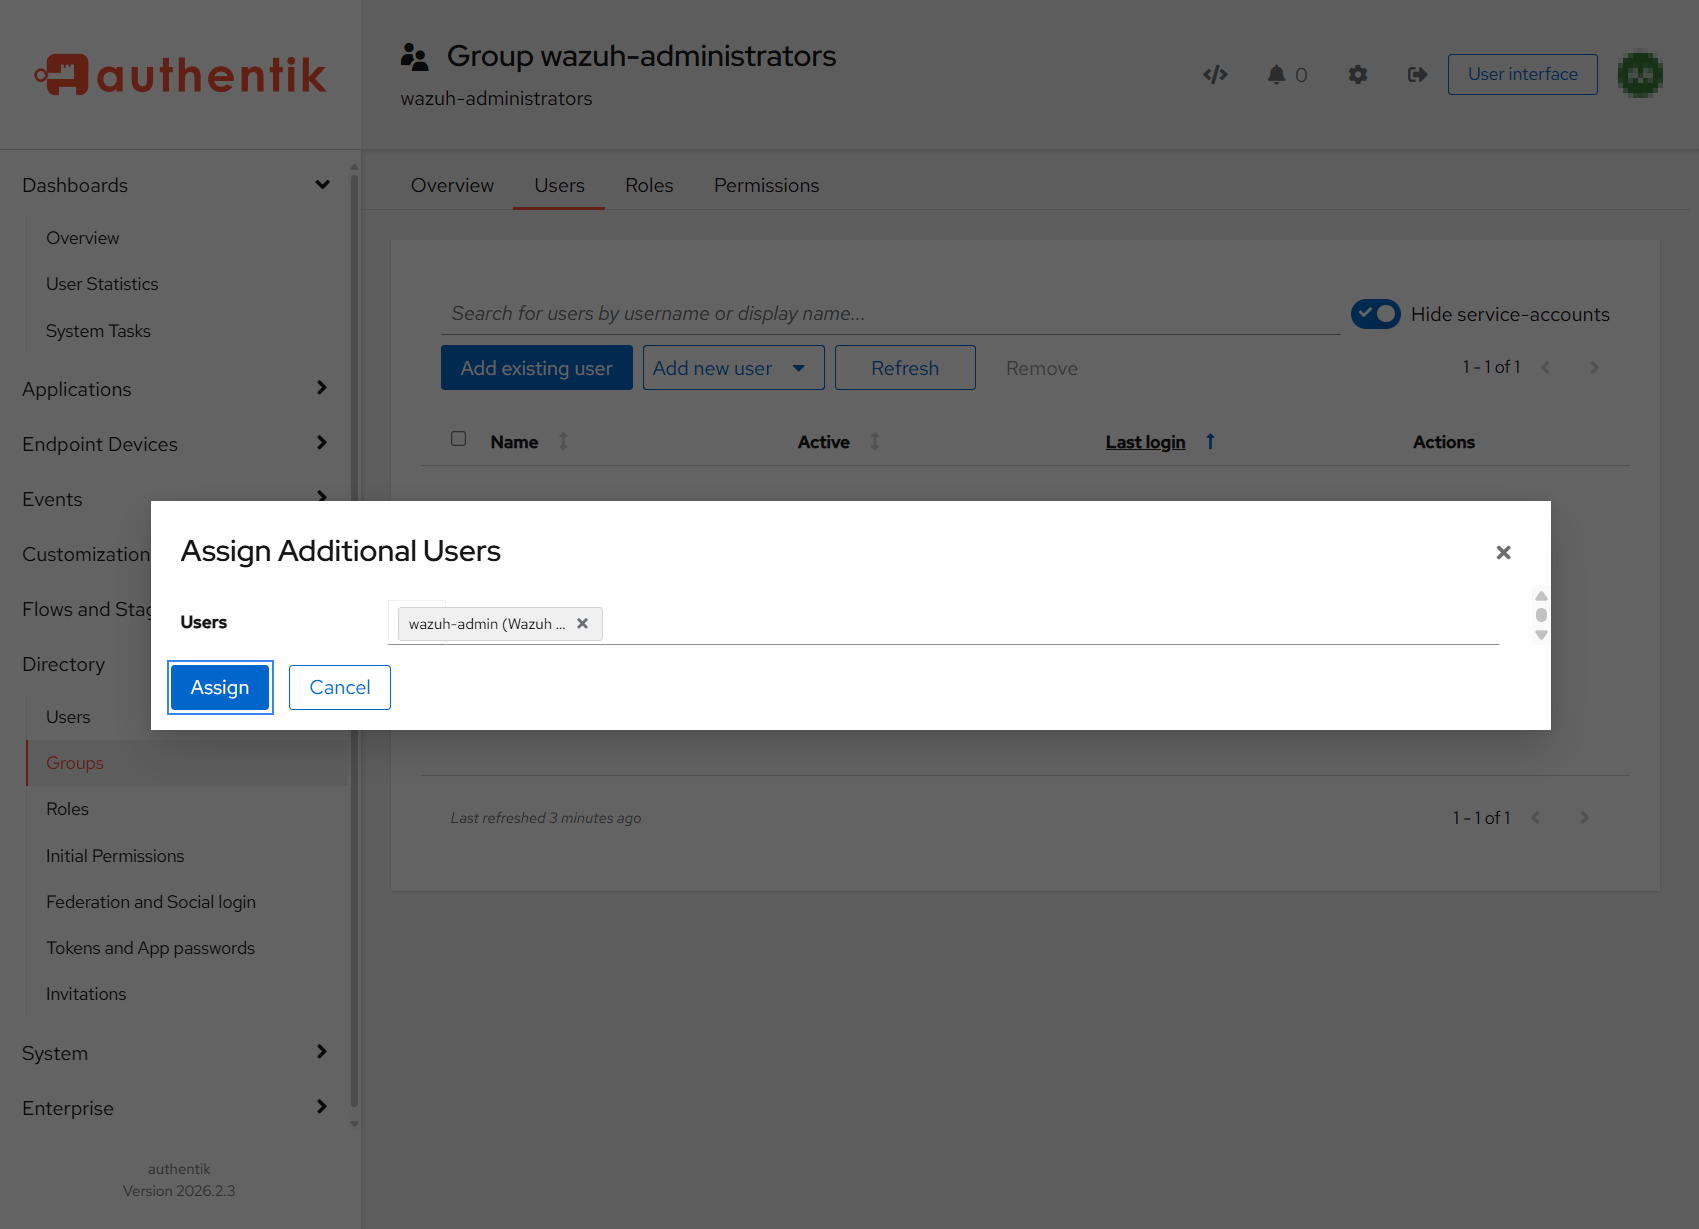
Click Add existing user, select the previously created user, confirm the selection and click Assign.
Create a property mapping in authentik.
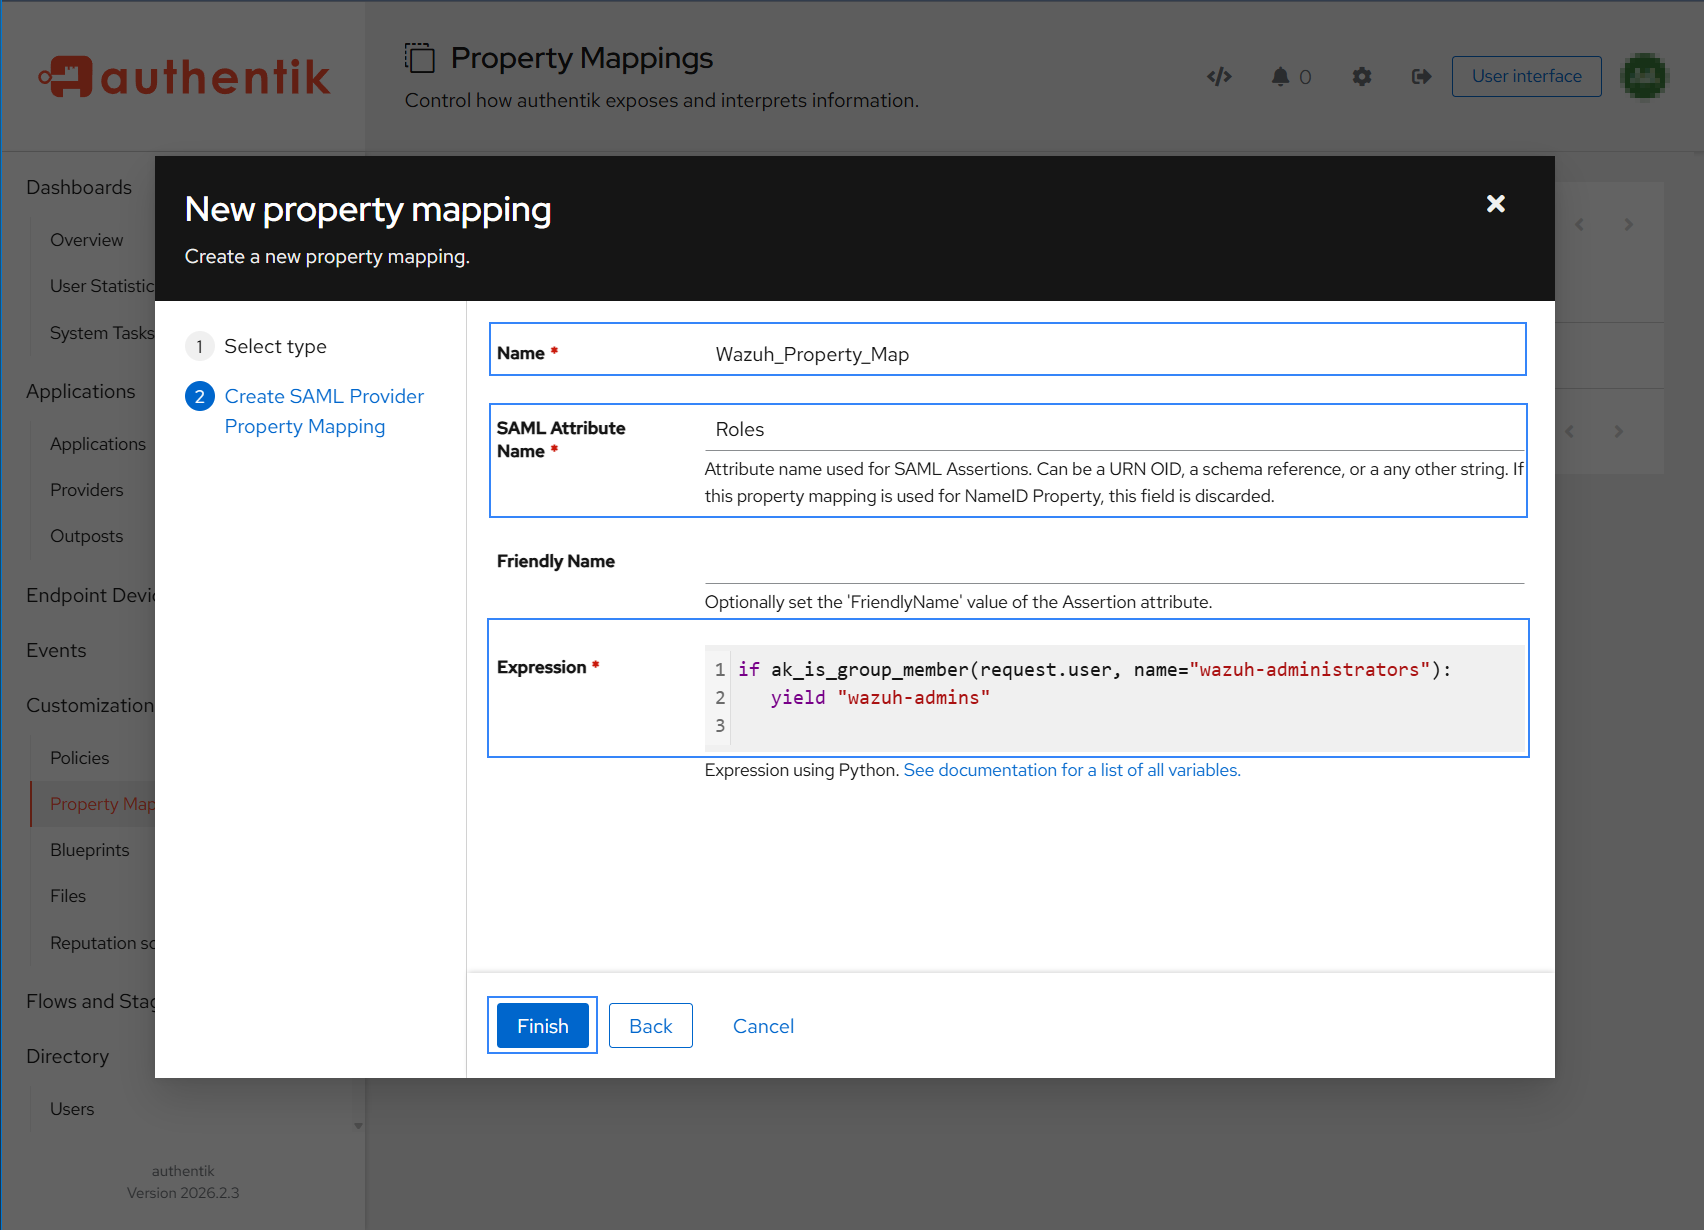
Navigate to Customization > Property Mappings and click Create. Create a SAML Provider Property Mapping with the following settings:
Name: Choose a descriptive name
SAML Attribute Name: Roles
Friendly Name: Leave blank.
Expression: Add the expression below, replace
<ADMIN_GROUP_NAME>with the group name of the Administrator users, in our case, this iswazuh-administrators. The yield value (wazuh-admins) will be used later as the backend role in the Wazuh indexer configuration.if ak_is_group_member(request.user, name="<ADMIN_GROUP_NAME>"): yield "wazuh-admins"
Click Finish.
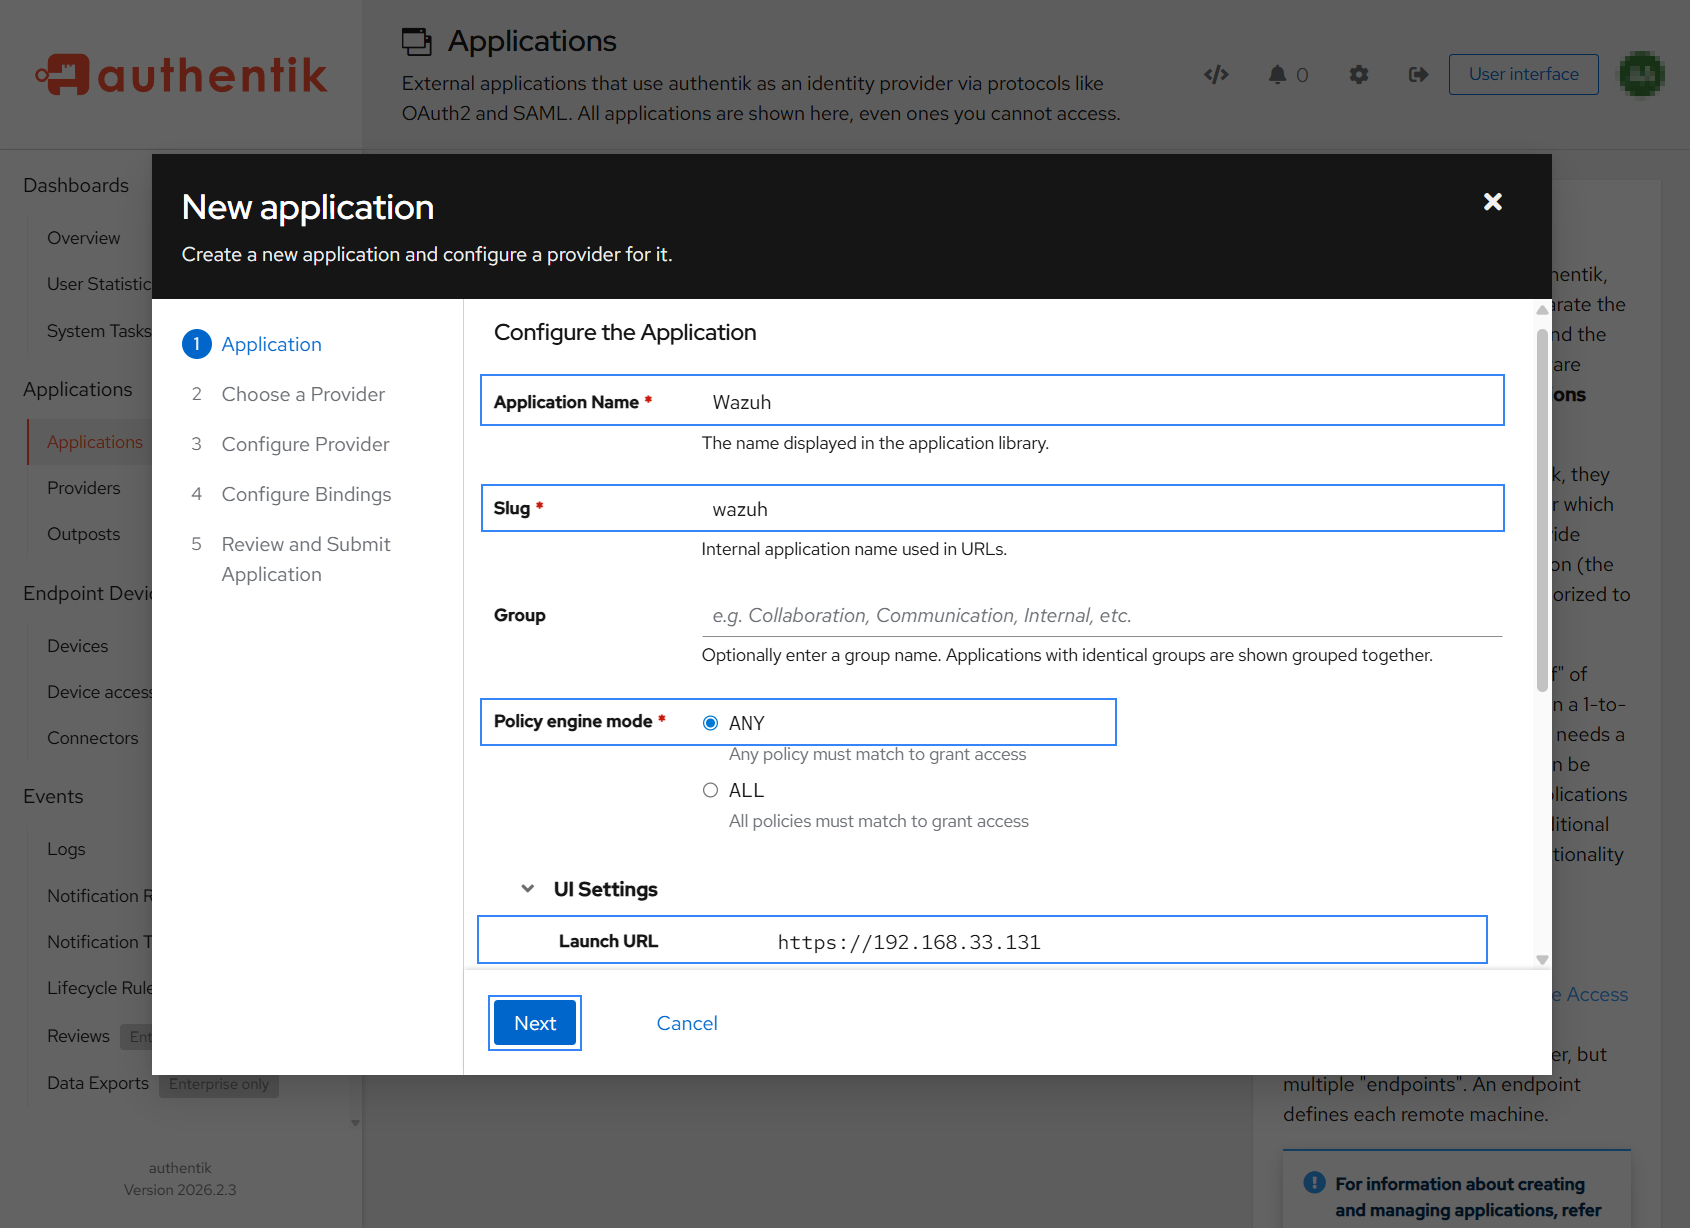
Navigate to Applications > Applications and click Create with Provider to create an application and provider pair.
Application: Provide a descriptive Application Name (for example,
Wazuh) and use the following required configuration. Replace<WAZUH_DASHBOARD_URL>with the corresponding value.Slug: Provide a name or accept the auto-provided name.
Policy engine mode:
ANY.Launch URL:
https://<WAZUH_DASHBOARD_URL>Leave other values as default and click Next to proceed to the next step.
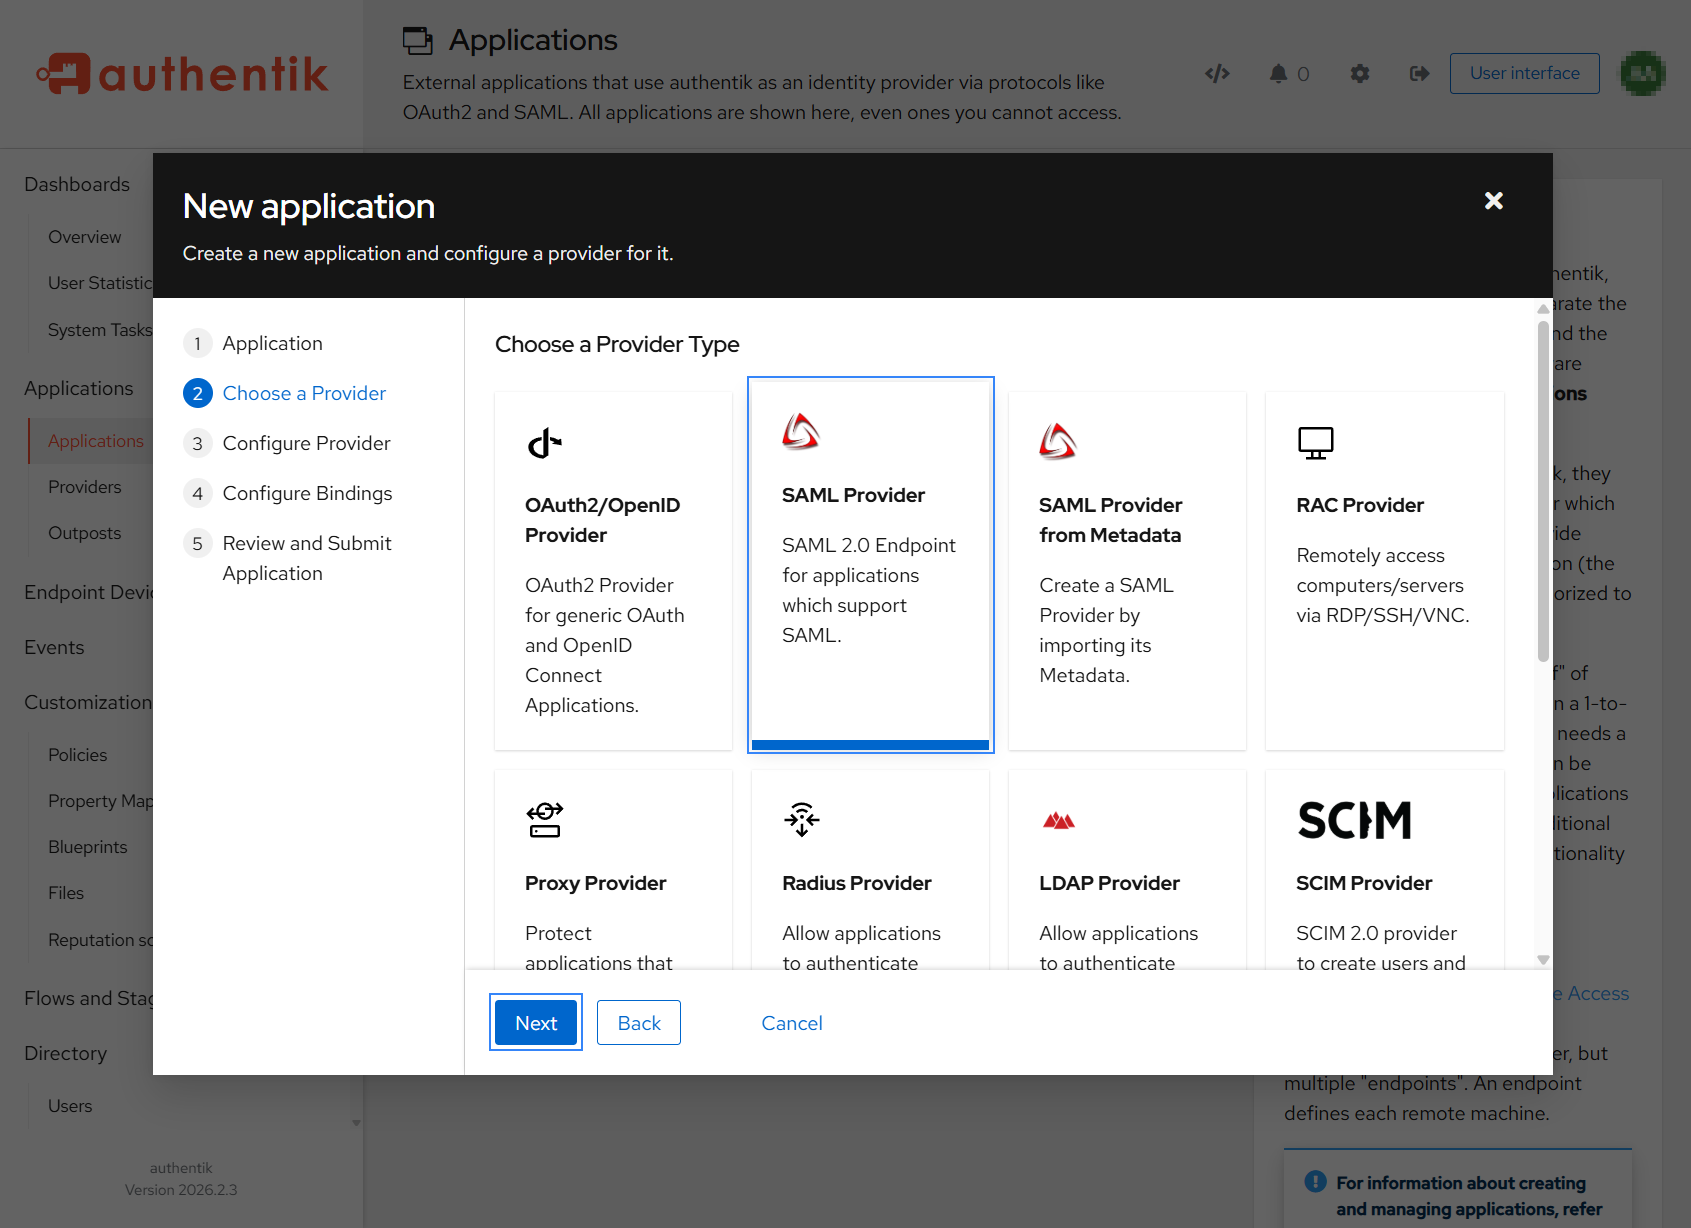
Choose a Provider type: Select SAML Provider as the provider type.
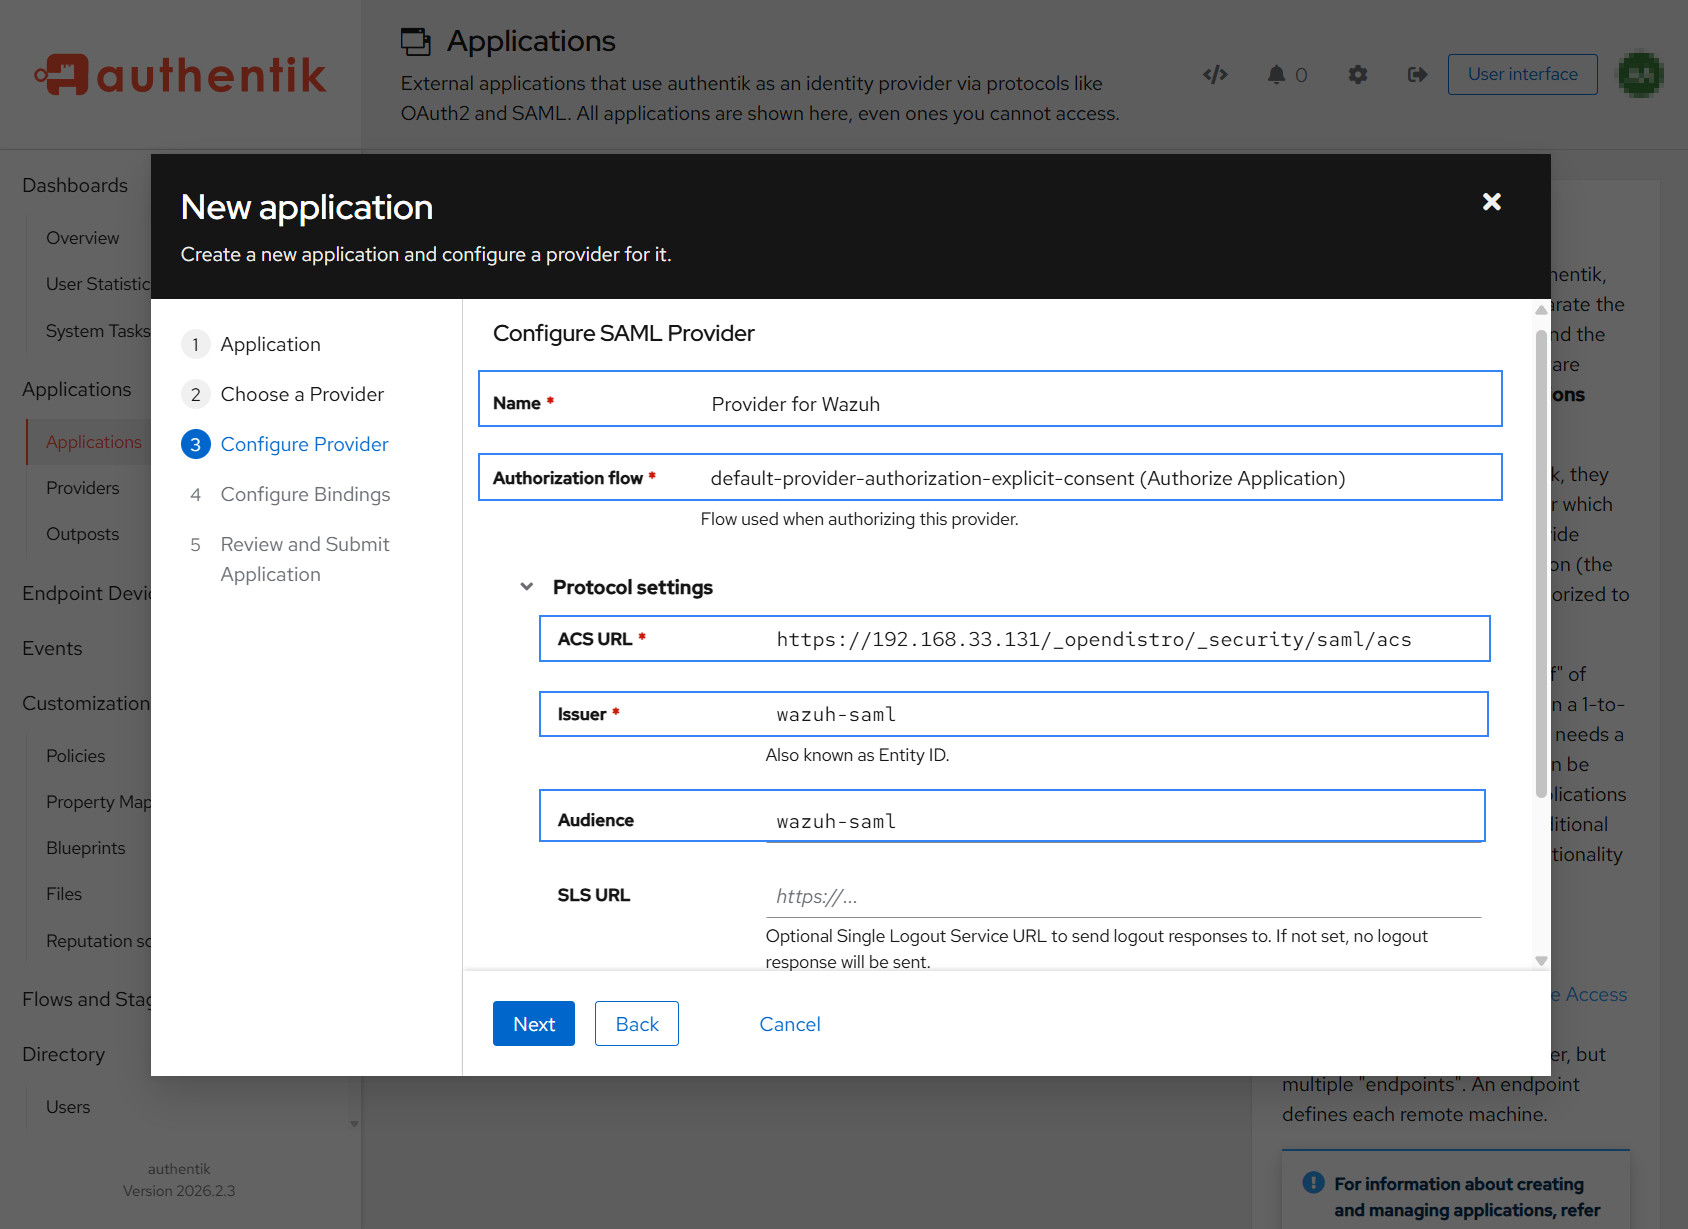
Configure Provider: Provide a name or accept the auto-provided name. Leave the authorization flow as default, and add the following required configurations. Replace
<WAZUH_DASHBOARD_URL>with the corresponding value.ACS URL:
https://<WAZUH_DASHBOARD_URL>/_opendistro/_security/saml/acsIssuer:
wazuh-samlAudience:
wazuh-samlUnder Advanced protocol settings:
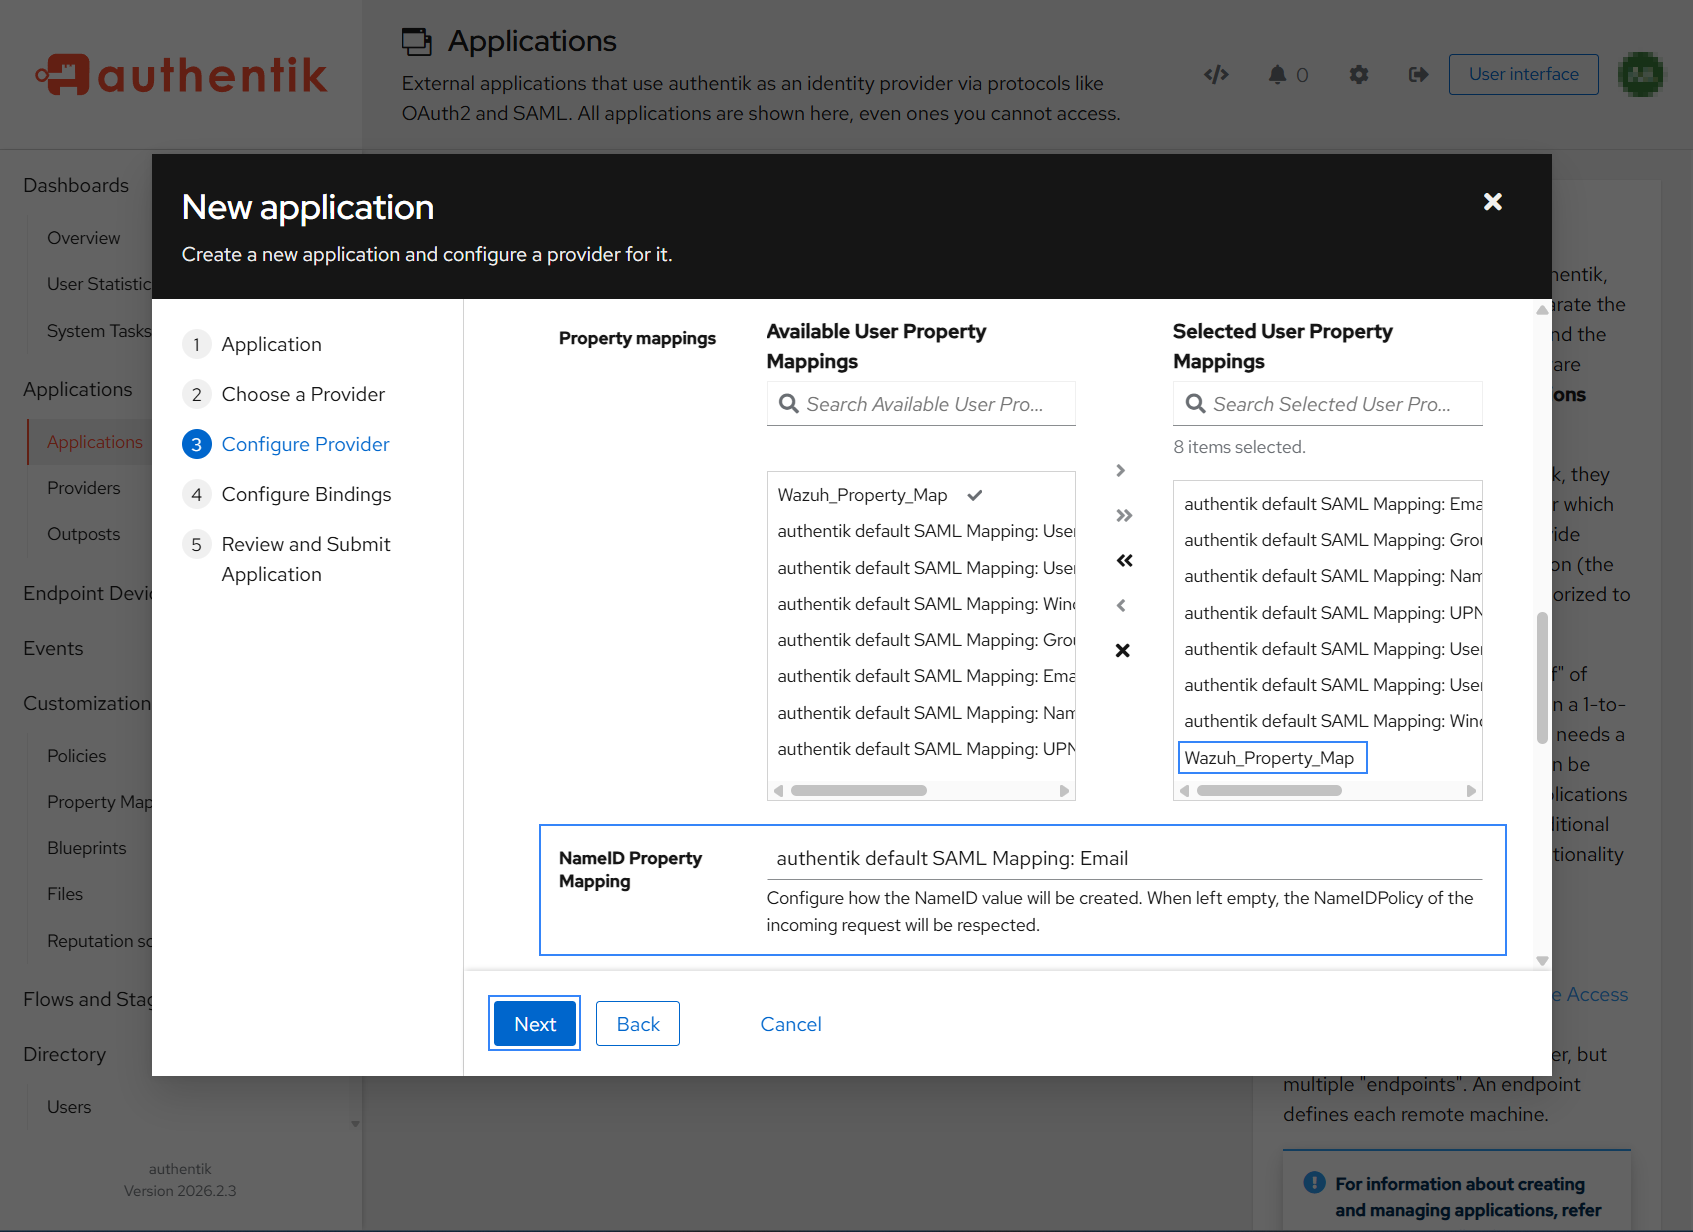
Property Mappings: add the Property Mapping you created in the previous section.
NameID Property Mapping: select a property mapping that will be used for Wazuh usernames (for example,
authentik default SAML Mapping: Nameorauthentik default SAML Mapping: Email). Leave other values as default and click Next to proceed to the next step.
Configure Bindings: Leave as default and click Next to proceed to the next step.
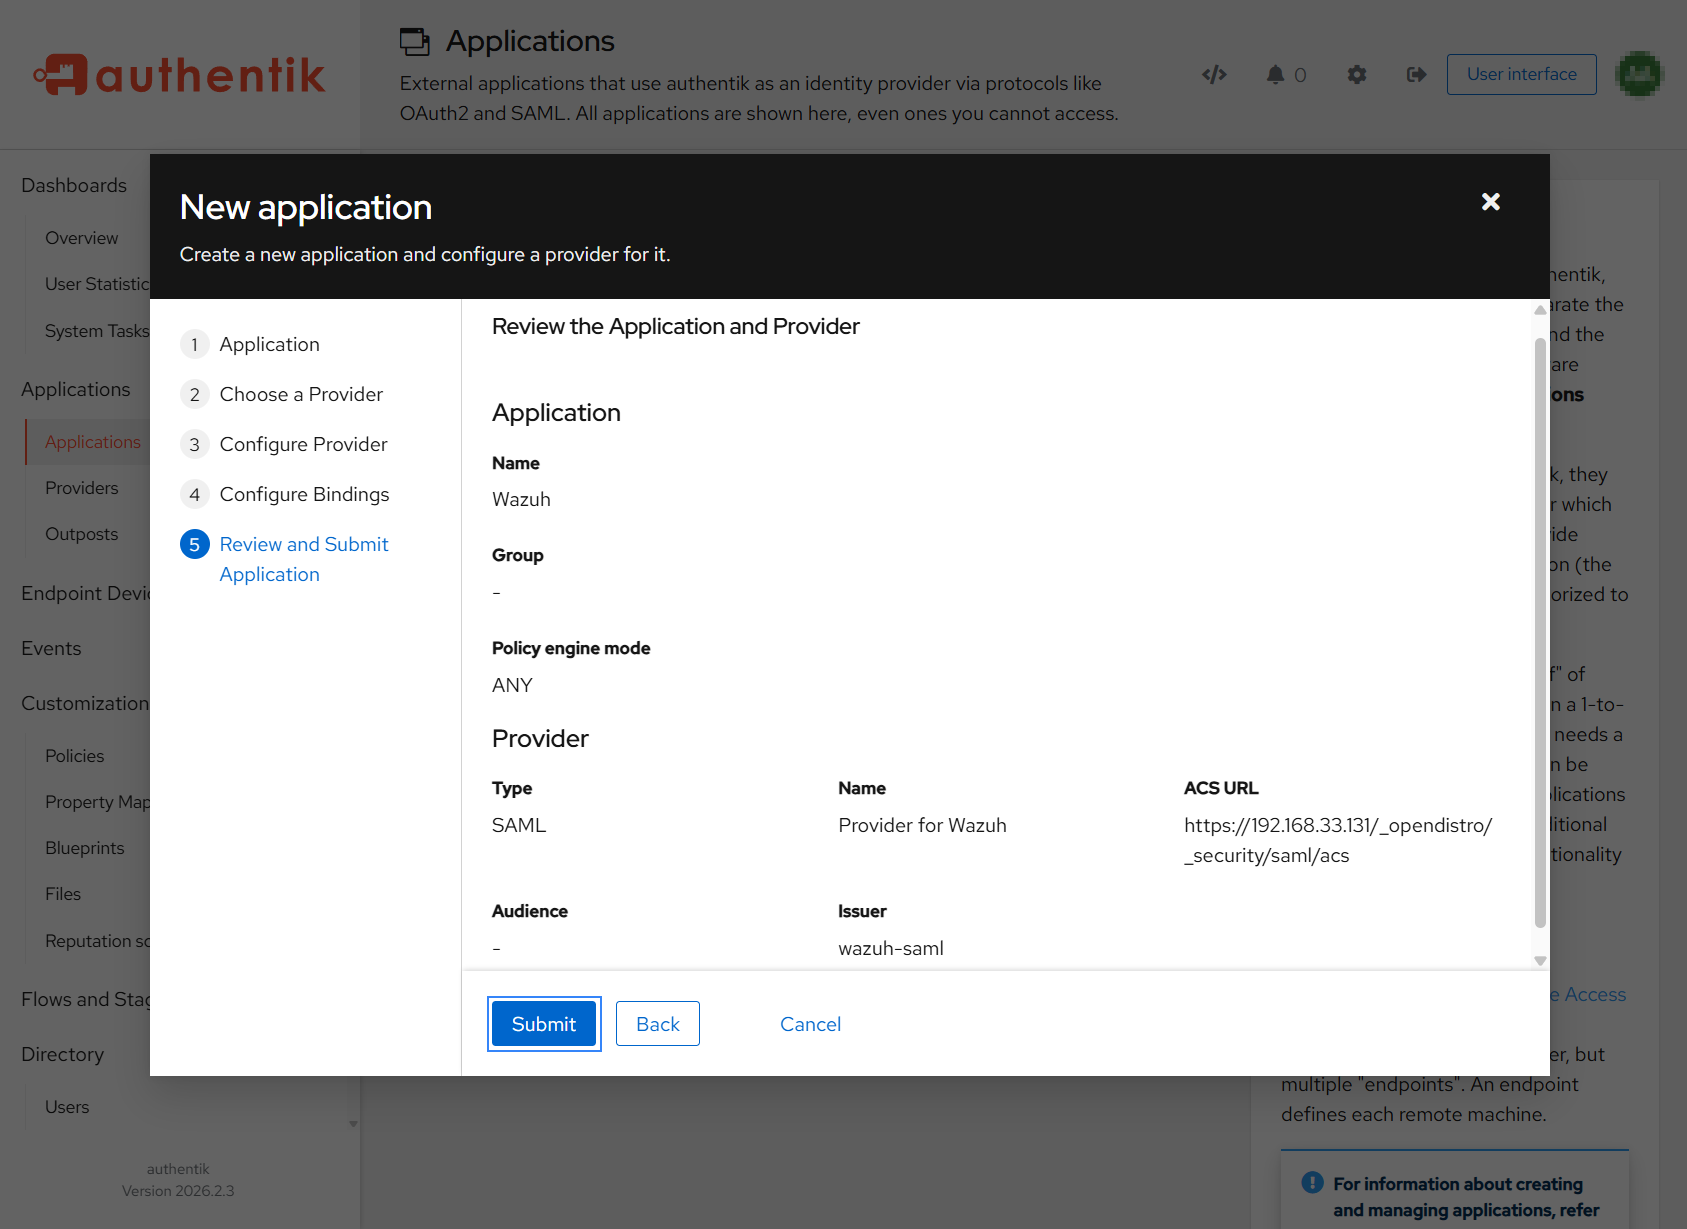
Review and Submit Application: Review the configuration and click Submit.
Download metadata file
Navigate to Applications > Providers and click on the name of the provider that you created in the previous section (for example,
Provider for Wazuh).Under Related objects > Metadata, click on Download. Save the file as
wazuh_authentik_meta.xml. This downloaded file is your SAML Metadata file and it will be required in the next section.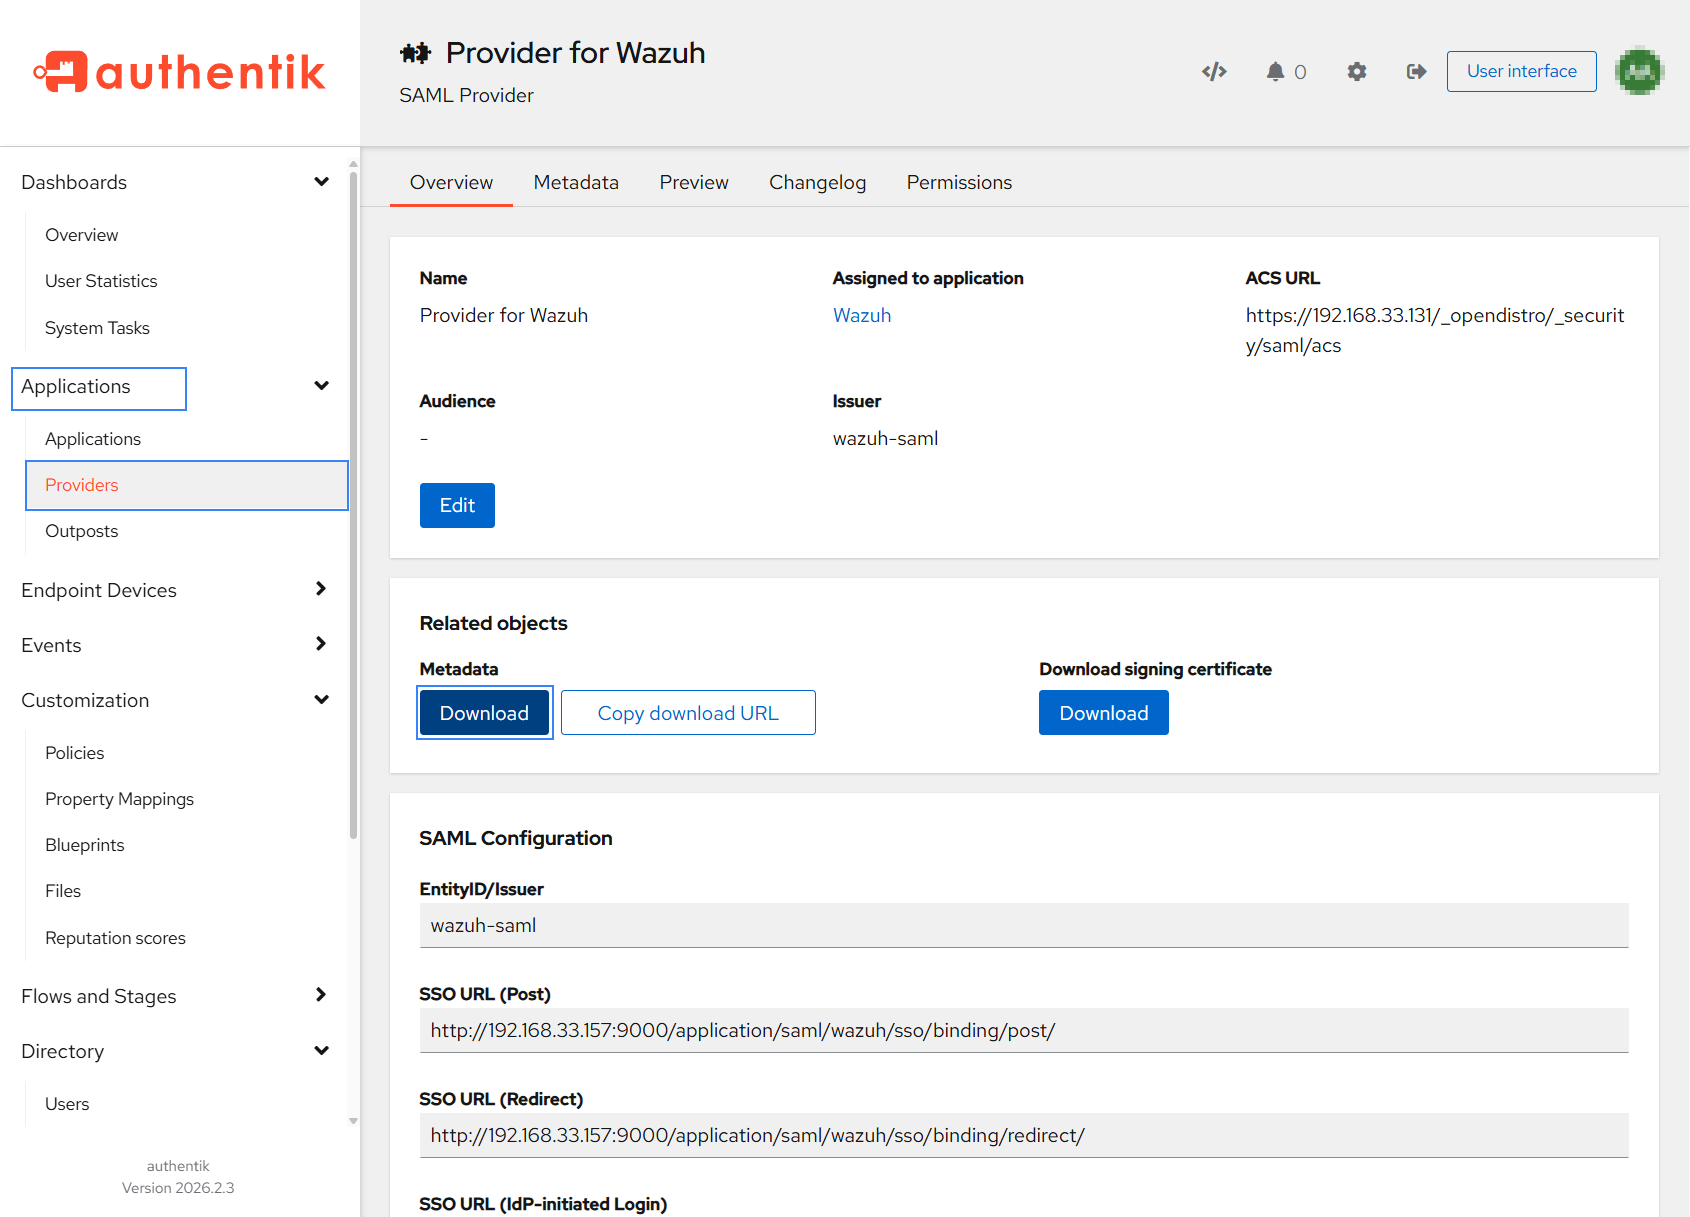
Wazuh indexer configuration
Edit the Wazuh indexer security configuration files. We recommend that you back up these files before you carry out the configuration.
Backup the existing Wazuh indexer security configuration files:
# /usr/share/wazuh-indexer/bin/indexer-security-init.sh --options "-backup /etc/wazuh-indexer/opensearch-security -icl -nhnv"
Generate a 64-character long random key using the following command.
# openssl rand -hex 32
The output will be used as the
exchange_keyin the/etc/wazuh-indexer/opensearch-security/config.ymlfile.Place the
wazuh_authentik_meta.xmlfile within the/etc/wazuh-indexer/opensearch-security/directory. Set the file ownership towazuh-indexerusing the following command:# chown wazuh-indexer:wazuh-indexer /etc/wazuh-indexer/opensearch-security/wazuh_authentik_meta.xml
Edit the
/etc/wazuh-indexer/opensearch-security/config.ymlfile and change the following values:Set the order in
basic_internal_auth_domainto0, and set the challenge flag tofalse.Include a
saml_auth_domainconfiguration under theauthcsection similar to the following:
authc:
  ...
  basic_internal_auth_domain:
    description: "Authenticate via HTTP Basic against internal users database"
    http_enabled: true
    transport_enabled: true
    order: 0
    http_authenticator:
      type: "basic"
      challenge: false
    authentication_backend:
      type: "intern"
  saml_auth_domain:
    http_enabled: true
    transport_enabled: false
    order: 1
    http_authenticator:
      type: saml
      challenge: true
      config:
        idp:
          metadata_file: '/etc/wazuh-indexer/opensearch-security/wazuh_authentik_meta.xml'
          entity_id: 'wazuh-saml'
        sp:
          entity_id: 'wazuh-saml'
        kibana_url: https://<WAZUH_DASHBOARD_URL>
        roles_key: Roles
        exchange_key: 'b1d6dd32753374557dcf92e241.......'
    authentication_backend:
      type: noop
Ensure to change the following parameters to their corresponding value:
idp.metadata_fileidp.entity_idsp.entity_idkibana_urlroles_keyexchange_key
Run the
securityadminscript to load the configuration changes made in theconfig.ymlfile.# export JAVA_HOME=/usr/share/wazuh-indexer/jdk/ && bash /usr/share/wazuh-indexer/plugins/opensearch-security/tools/securityadmin.sh -f /etc/wazuh-indexer/opensearch-security/config.yml -icl -key /etc/wazuh-indexer/certs/admin-key.pem -cert /etc/wazuh-indexer/certs/admin.pem -cacert /etc/wazuh-indexer/certs/root-ca.pem -h localhost -nhnv
The
-hflag specifies the hostname or the IP address of the Wazuh indexer node. Note that this command useslocalhost, set your Wazuh indexer address if necessary.The command output must be similar to the following:
Security Admin v7
Will connect to localhost:9200 ... done
Connected as "CN=admin,OU=Wazuh,O=Wazuh,L=California,C=US"
OpenSearch Version: 2.19.4
Contacting opensearch cluster 'opensearch' and wait for YELLOW clusterstate ...
Clustername: wazuh-cluster
Clusterstate: GREEN
Number of nodes: 1
Number of data nodes: 1
.opendistro_security index already exists, so we do not need to create one.
Populate config from /home/wazuh-user
Will update '/config' with /etc/wazuh-indexer/opensearch-security/config.yml
   SUCC: Configuration for 'config' created or updated
SUCC: Expected 1 config types for node {"updated_config_types":["config"],"updated_config_size":1,"message":null} is 1 (["config"]) due to: null
Done with success
Edit the
/etc/wazuh-indexer/opensearch-security/roles_mapping.ymlfile and change the following values:Configure the
roles_mapping.ymlfile to associate the property mapping in authentik to the appropriate Wazuh indexer role; in our case, we map this to theall_accessrole.all_access: reserved: false hidden: false backend_roles: - "wazuh-admins"
Run the
securityadminscript to load the configuration changes made in theroles_mapping.ymlfile.# export JAVA_HOME=/usr/share/wazuh-indexer/jdk/ && bash /usr/share/wazuh-indexer/plugins/opensearch-security/tools/securityadmin.sh -f /etc/wazuh-indexer/opensearch-security/roles_mapping.yml -icl -key /etc/wazuh-indexer/certs/admin-key.pem -cert /etc/wazuh-indexer/certs/admin.pem -cacert /etc/wazuh-indexer/certs/root-ca.pem -h localhost -nhnv
The
-hflag specifies the hostname or the IP address of the Wazuh indexer node. Note that this command useslocalhost, set your Wazuh indexer address if necessary.The command output must be similar to the following:
Security Admin v7
Will connect to localhost:9200 ... done
Connected as "CN=admin,OU=Wazuh,O=Wazuh,L=California,C=US"
OpenSearch Version: 2.19.4
Contacting opensearch cluster 'opensearch' and wait for YELLOW clusterstate ...
Clustername: wazuh-cluster
Clusterstate: GREEN
Number of nodes: 1
Number of data nodes: 1
.opendistro_security index already exists, so we do not need to create one.
Populate config from /home/wazuh-user
Will update '/rolesmapping' with /etc/wazuh-indexer/opensearch-security/roles_mapping.yml
   SUCC: Configuration for 'rolesmapping' created or updated
SUCC: Expected 1 config types for node {"updated_config_types":["rolesmapping"],"updated_config_size":1,"message":null} is 1 (["rolesmapping"]) due to: null
Done with success
Wazuh dashboard configuration
Check the value of
run_asin the/usr/share/wazuh-dashboard/data/wazuh/config/wazuh.ymlconfiguration file. Ifrun_asis set tofalse, change it totrue. This is required to create a role mapping in the Wazuh dashboard, ensuring the backend role provided by the IdP is correctly mapped to the corresponding Wazuh role.hosts: - default: url: https://localhost port: 55000 username: wazuh-wui password: "<WAZUH_WUI_PASSWORD>" run_as: true
Click ☰ to open the menu on the Wazuh dashboard, go to Server management → Security, and then Roles mapping to open the page
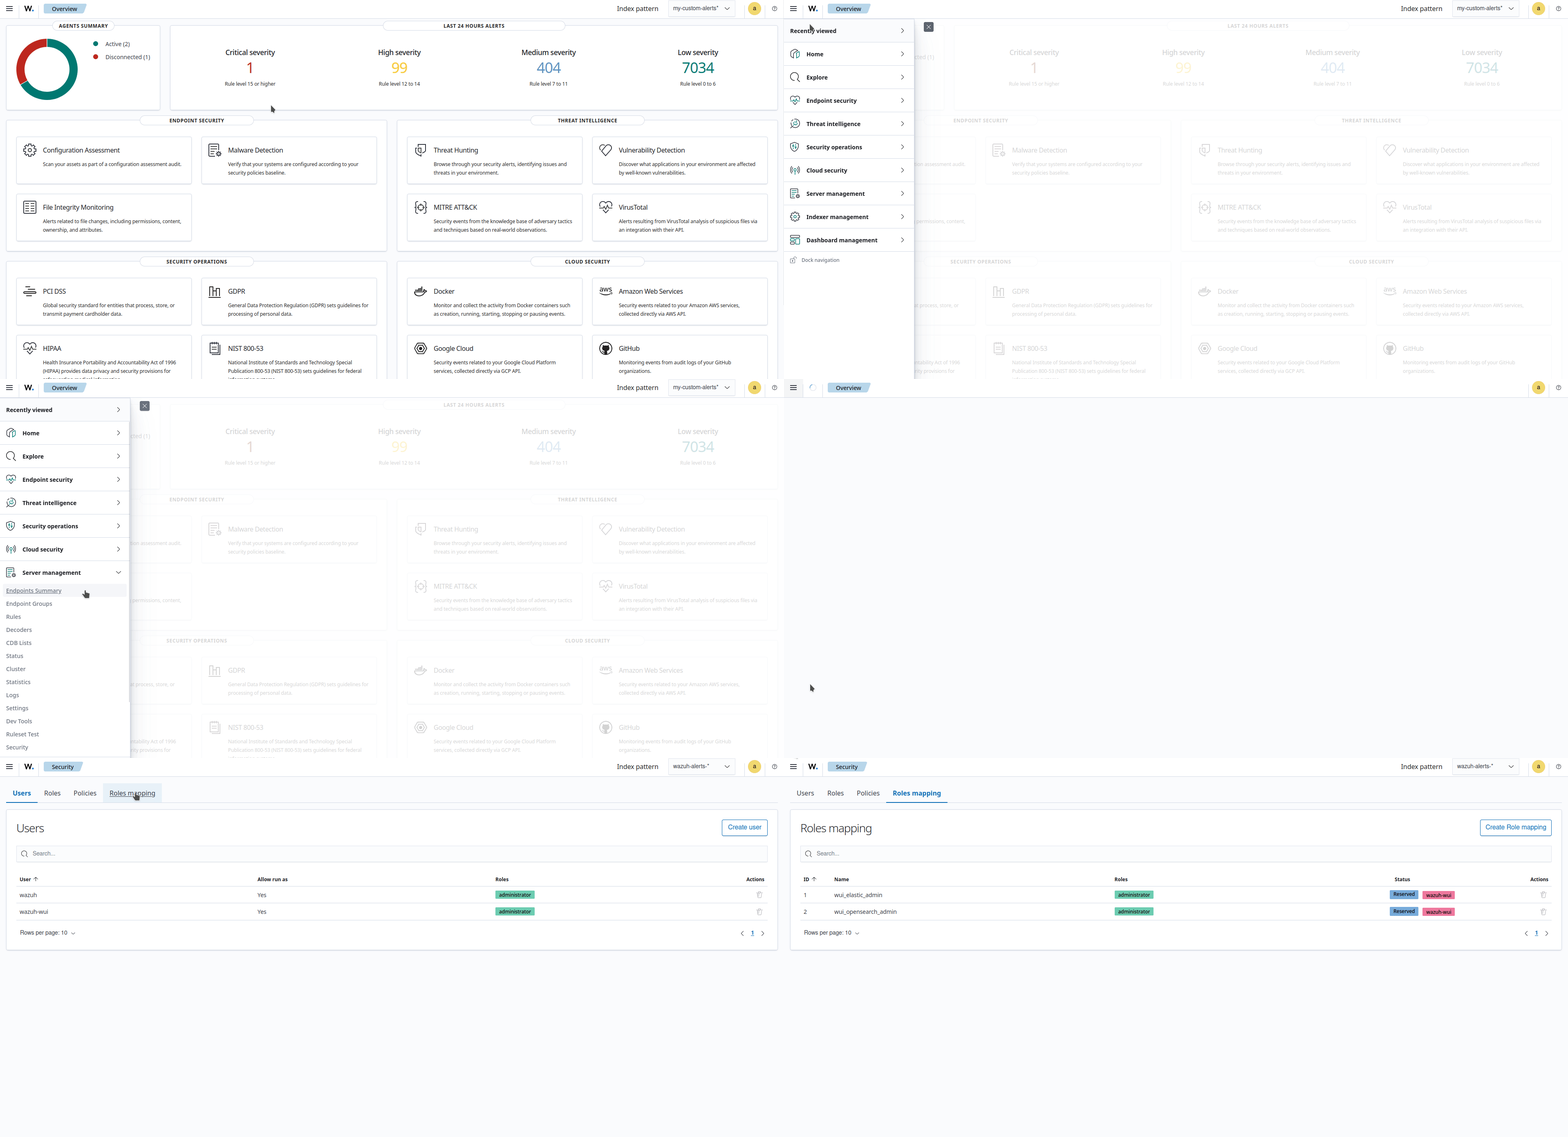
Click Create Role mapping and complete the empty fields with the following parameters:
Role mapping name: Assign a name to the role mapping.
Roles: Select
administrator.Custom rules: Click Add new rule to expand this field.
User field:
backend_rolesSearch operation:
FINDValue: Assign the yield value configured in the authentik property mapping configuration. In our case, this is
wazuh-admins.Click Save role mapping to save and map the backend role with Wazuh as administrator.
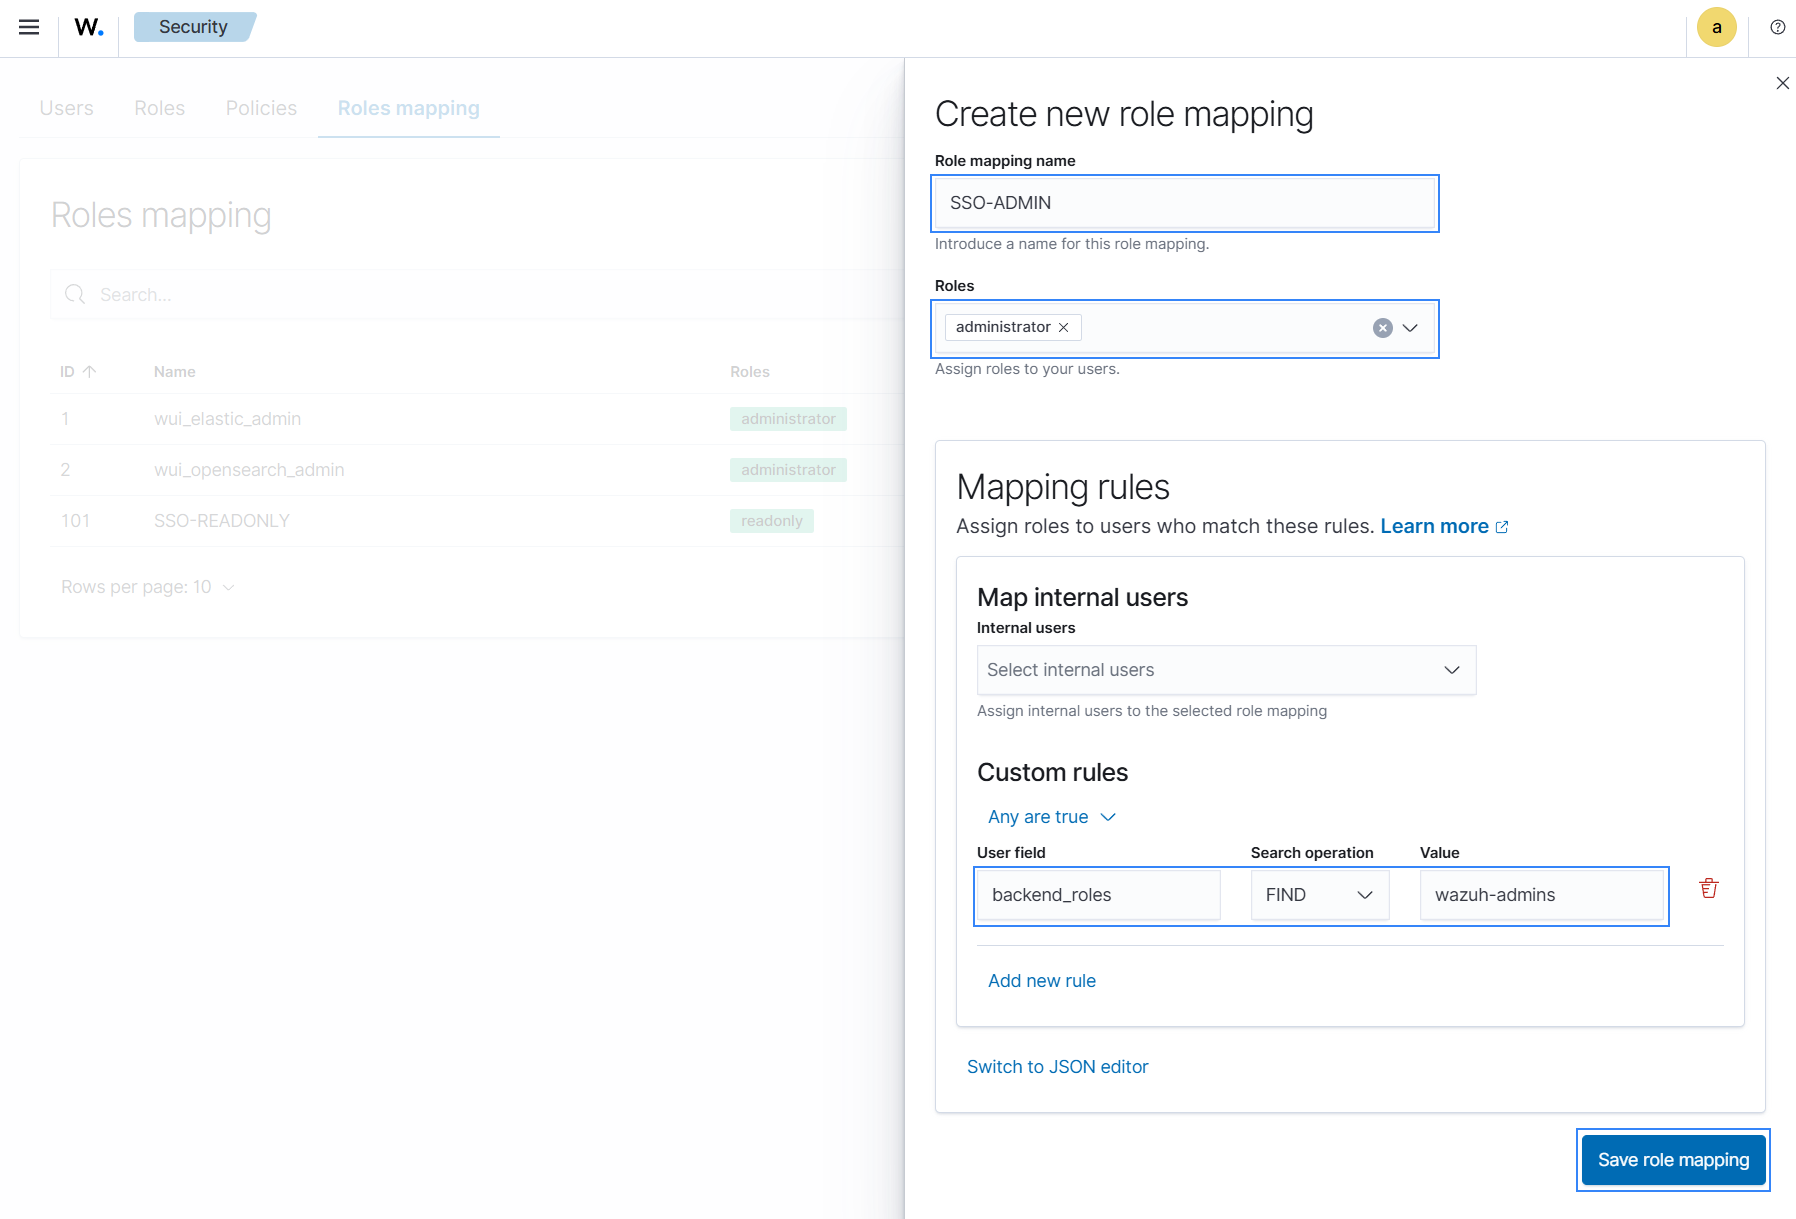
Edit the Wazuh dashboard configuration file. Add these configurations to
/etc/wazuh-dashboard/opensearch_dashboards.yml. We recommend that you back up these files before you carry out the configuration.opensearch_security.auth.multiple_auth_enabled: true opensearch_security.auth.type: ["basicauth","saml"] server.xsrf.allowlist: ["/_opendistro/_security/saml/acs", "/_opendistro/_security/saml/logout", "/_opendistro/_security/saml/acs/idpinitiated"]
Restart the Wazuh dashboard service using this command:
# systemctl restart wazuh-dashboard
To test the configuration, go to your Wazuh dashboard URL and log in with your authentik account.
Setup authentik single sign-on with read-only role
Follow these steps to integrate authentik IdP with Wazuh for single sign-on and grant read-only role to the authenticated authentik users on the Wazuh platform:
authentik configuration
Log in to authentik as an administrator and open the authentik Admin interface.
Create a new user
Navigate to Directory > Users and click New User.
Set the Username, Display Name and Email address of the user.
Leave the other options as default and click Create User.
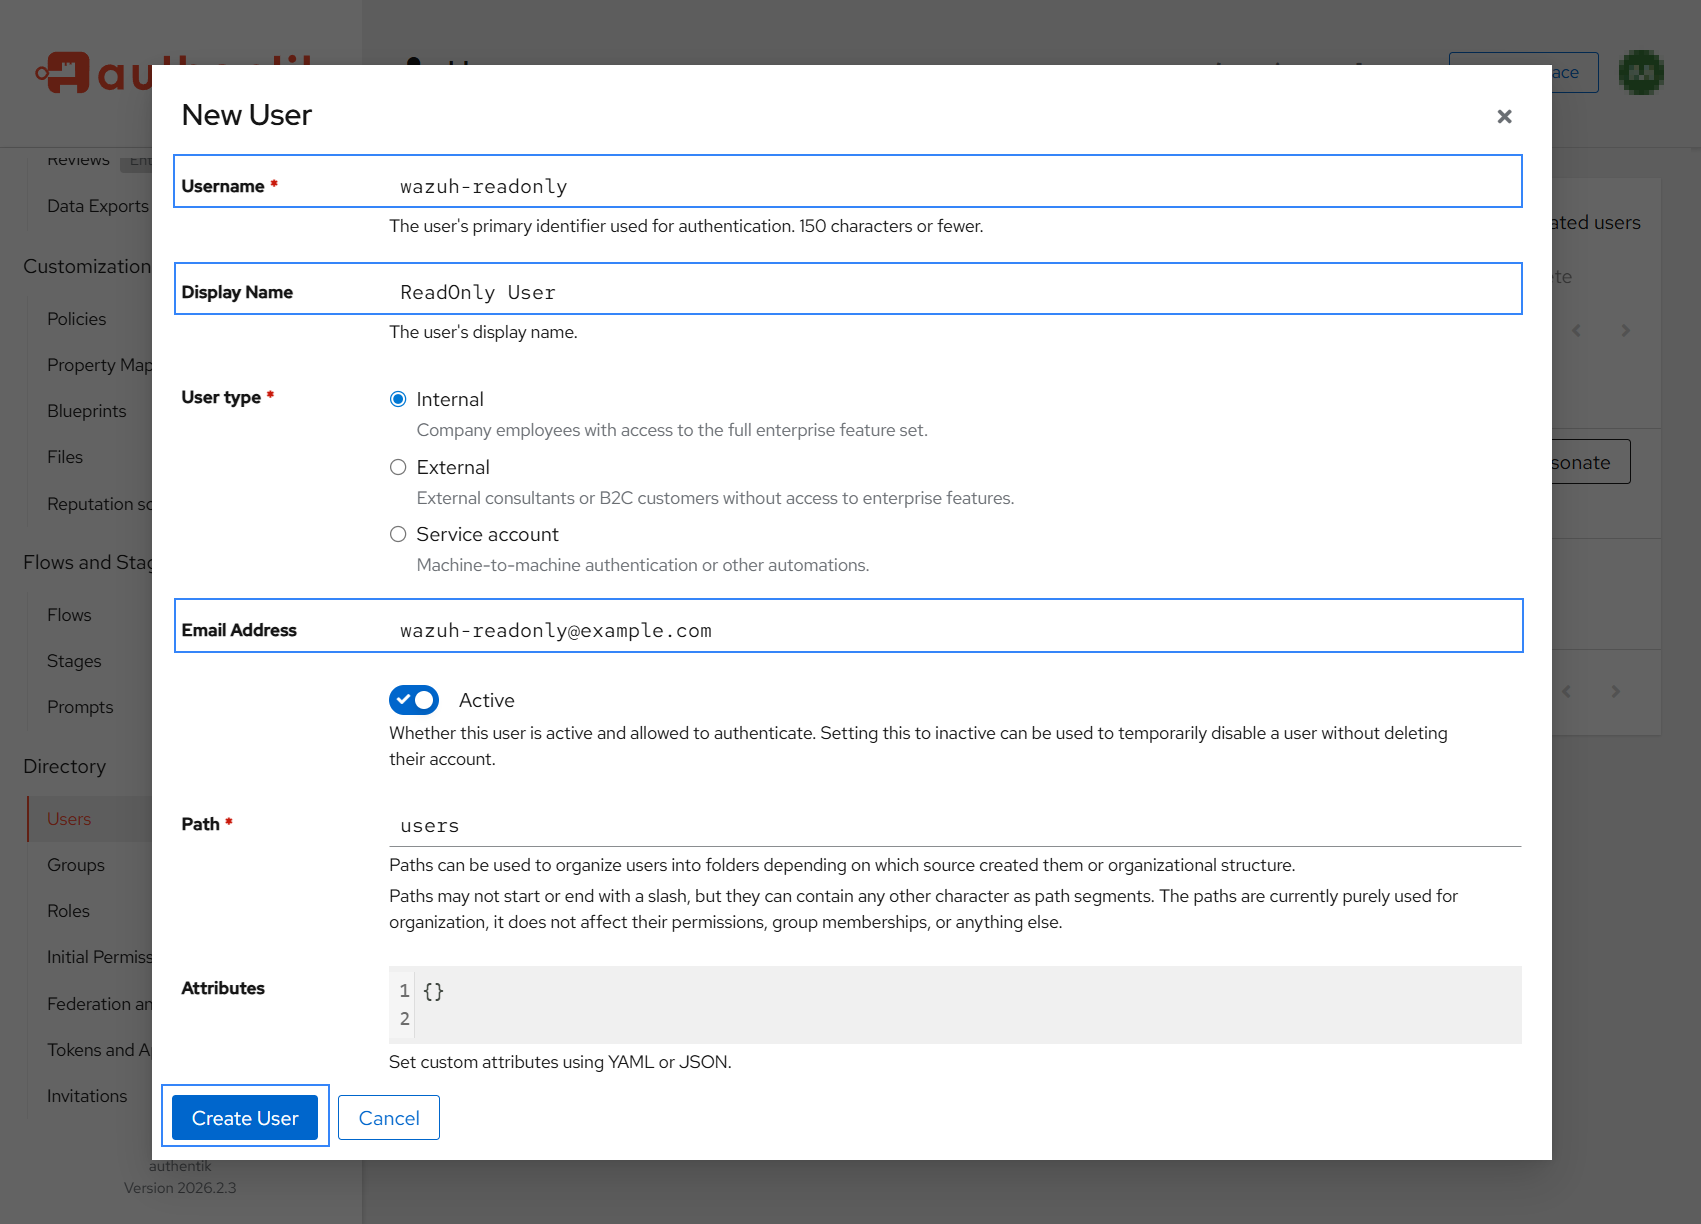
Select the newly created user, click Set password to assign a password to the user.
Create a user group in authentik
Navigate to Directory > Groups and click New Group
Set a name for the group (for example,
wazuh-ro-group) and click Create Group.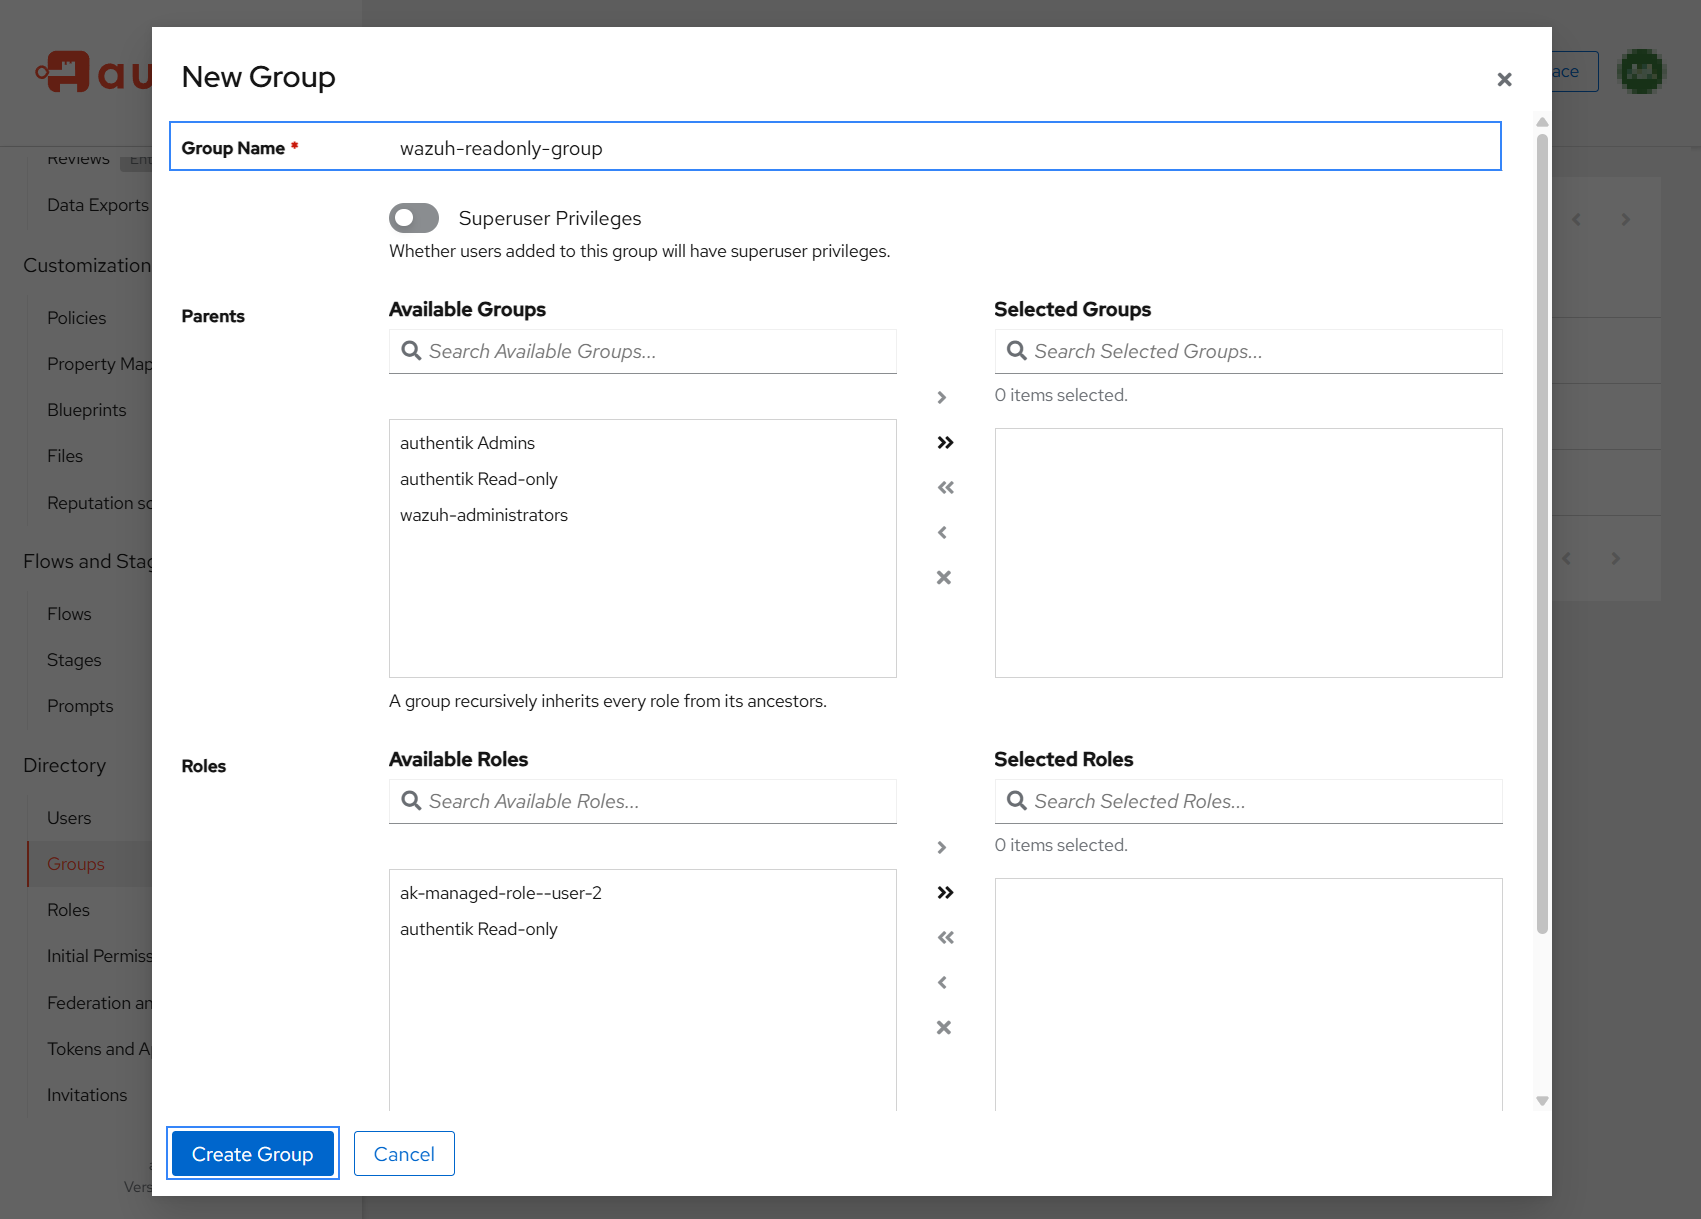
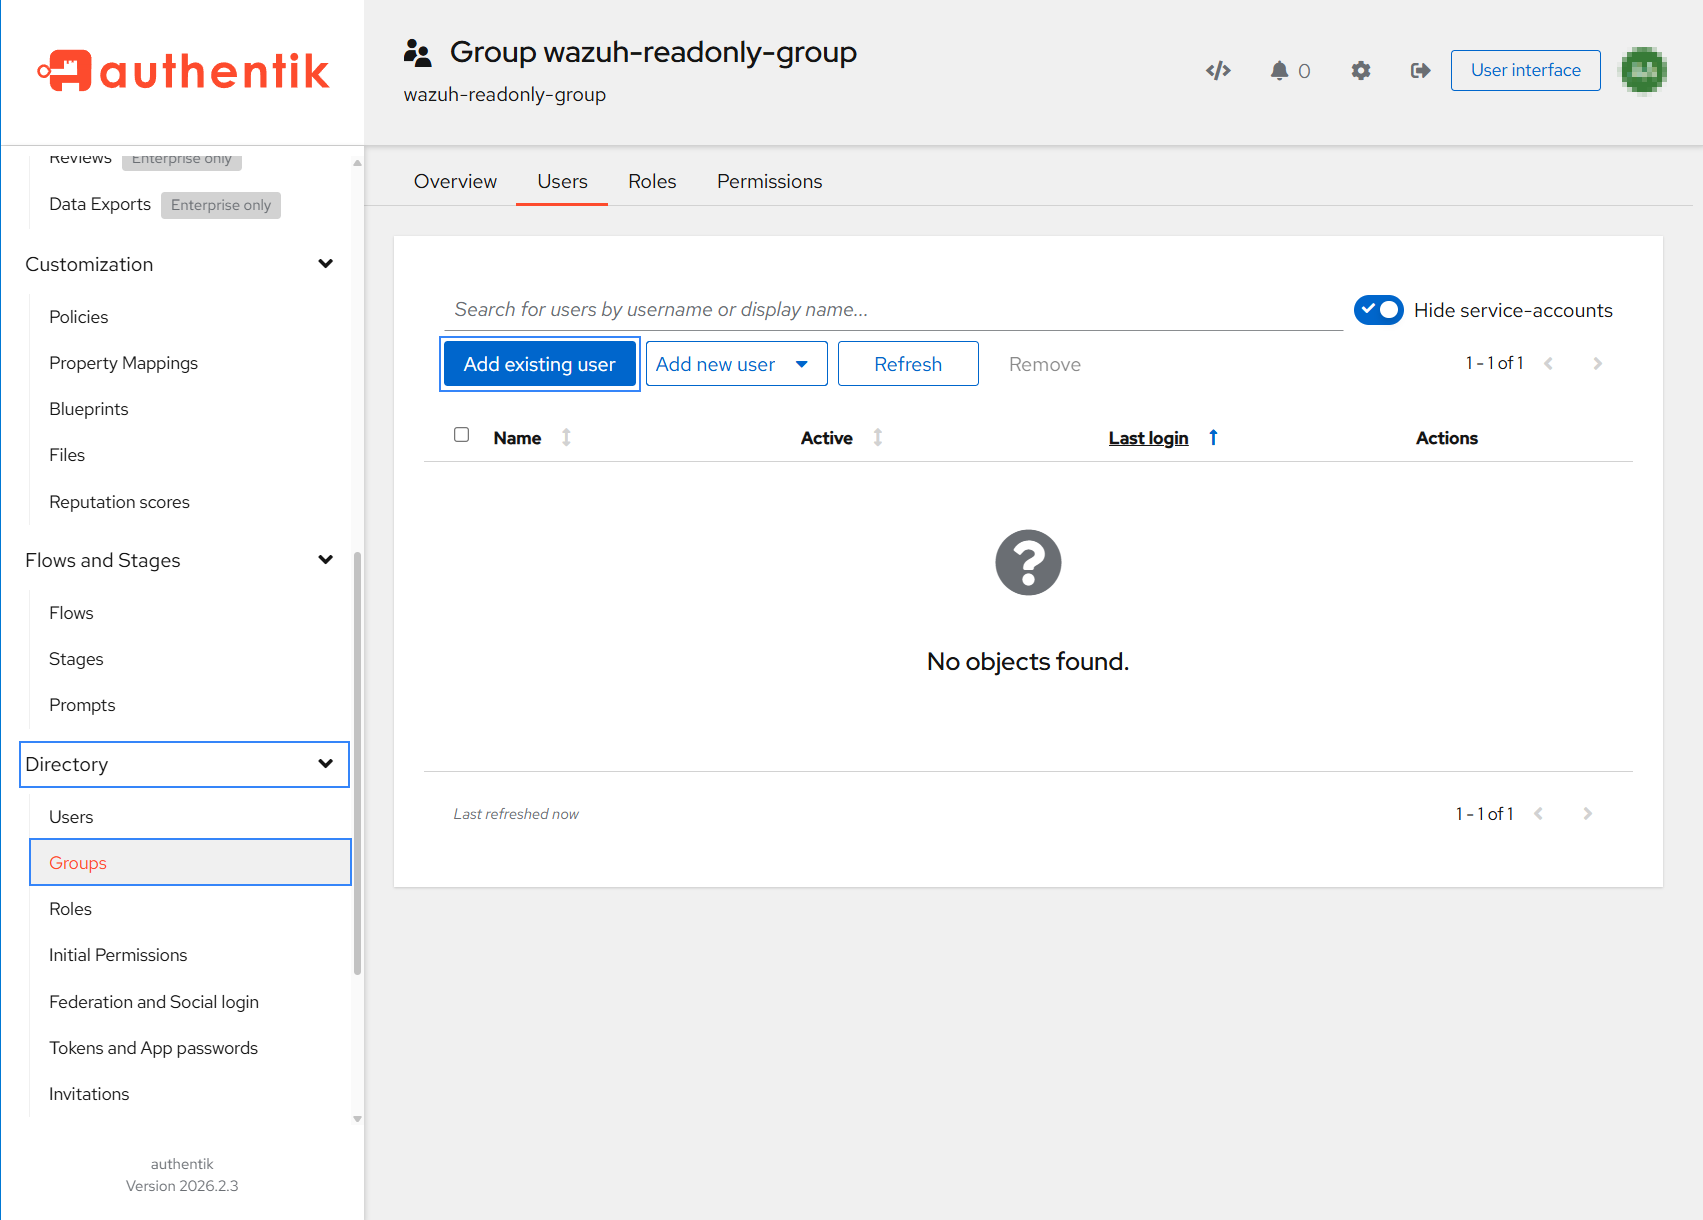
Click the name of the newly created group and navigate to the Users tab.
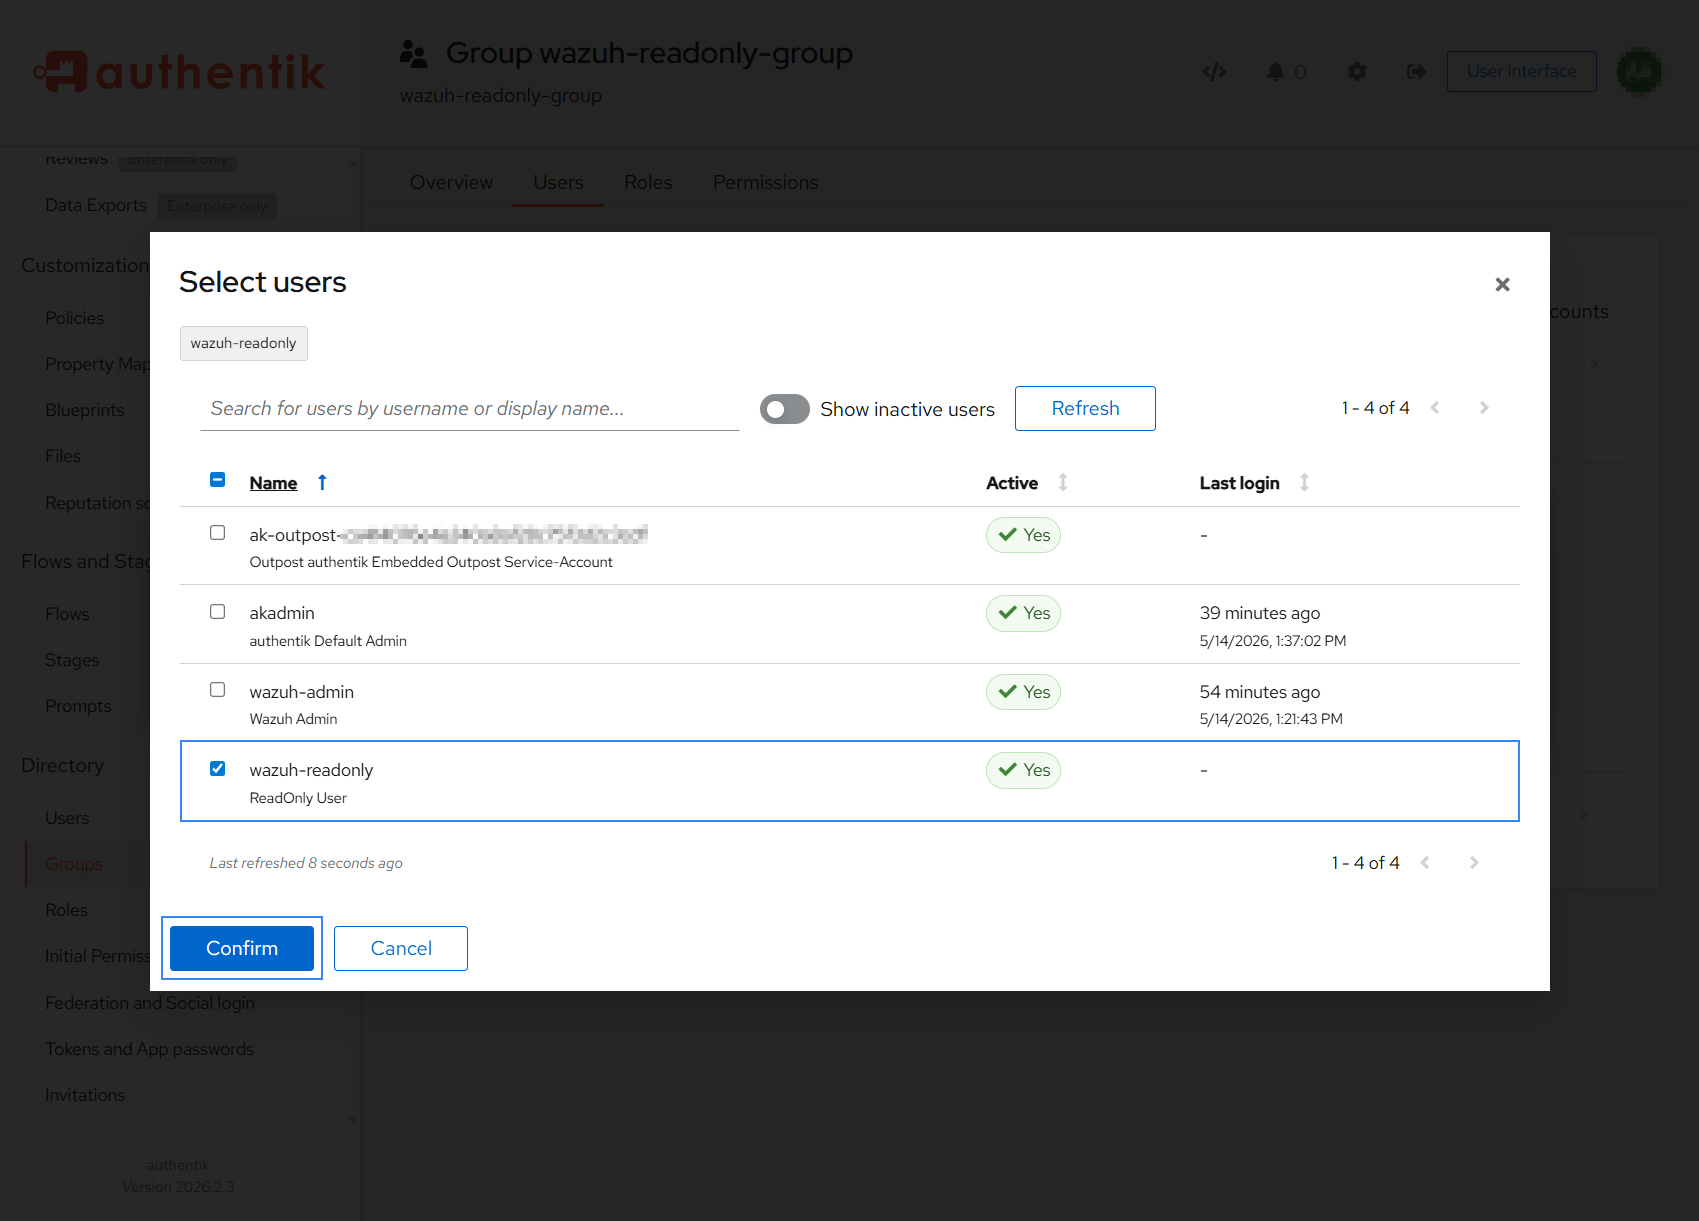
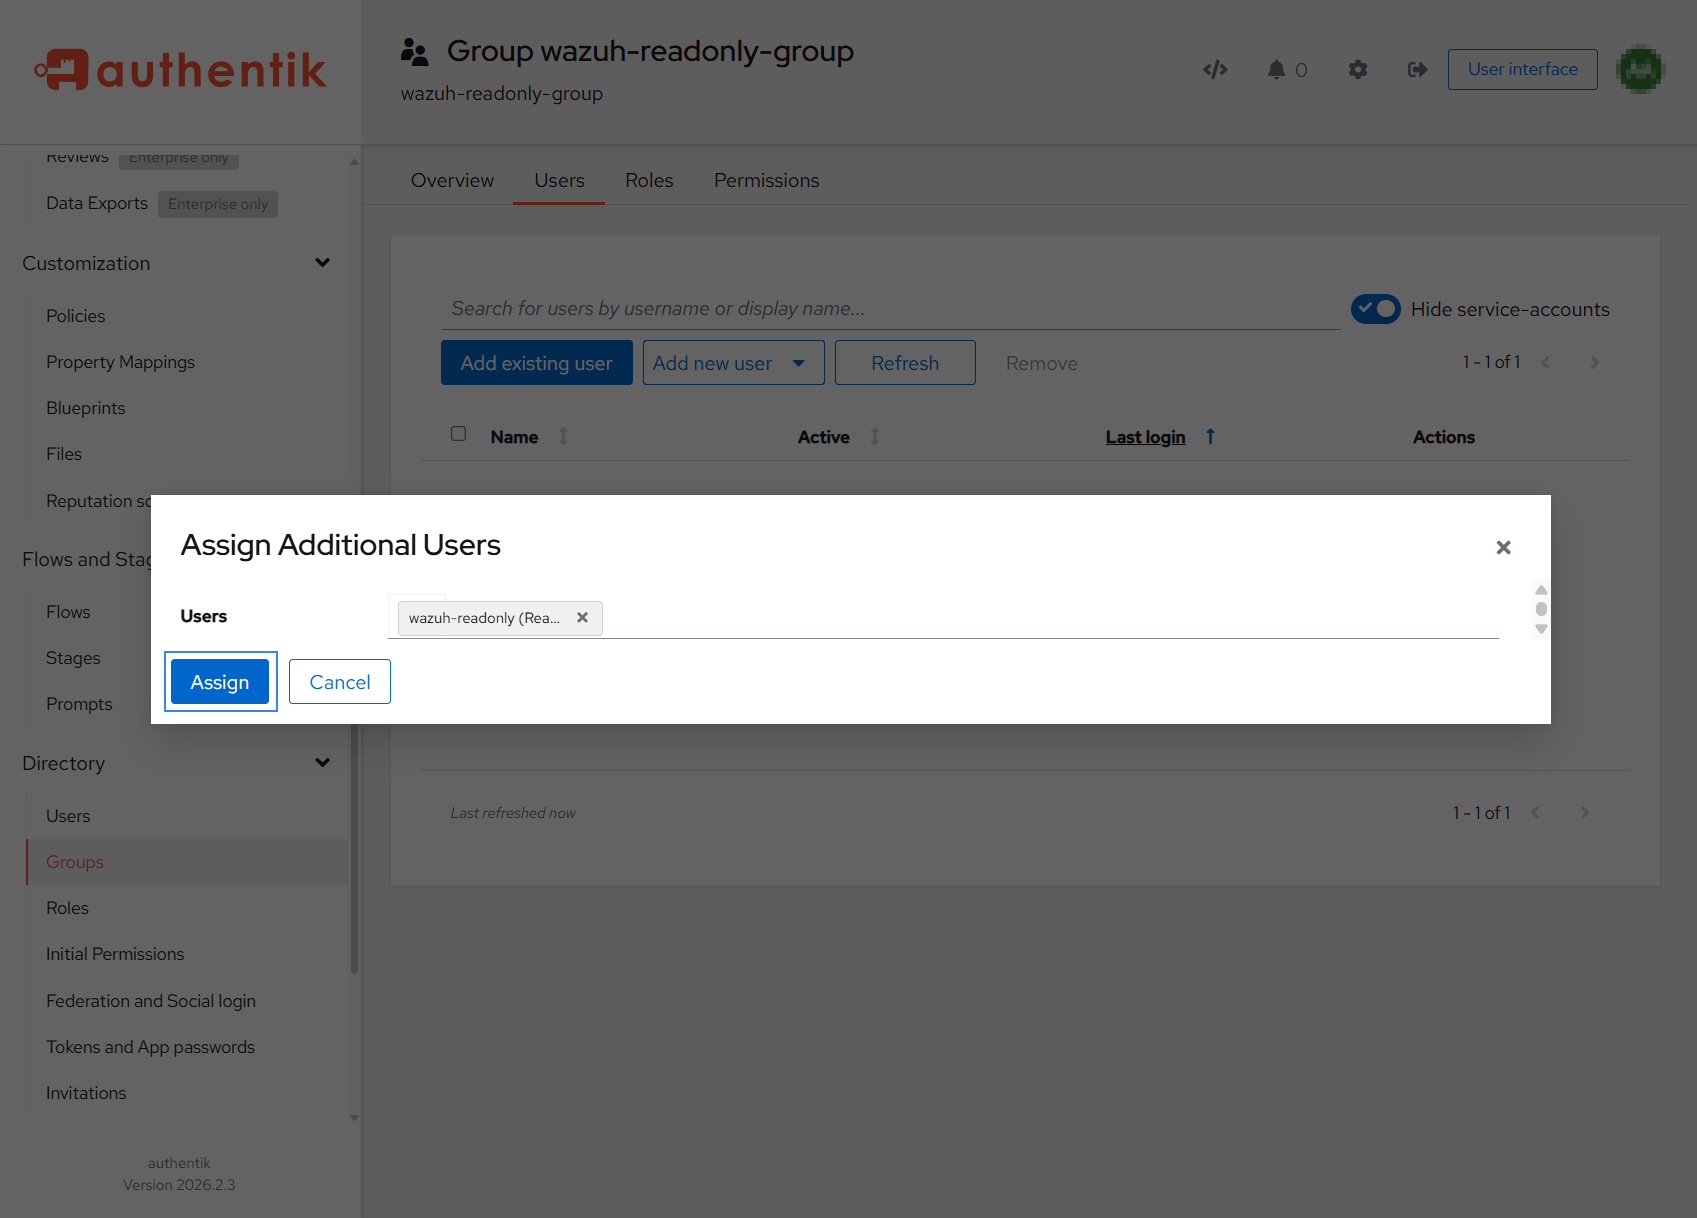
Click Add existing user, select the previously created user, confirm the selection and click Assign.
Create a property mapping in authentik
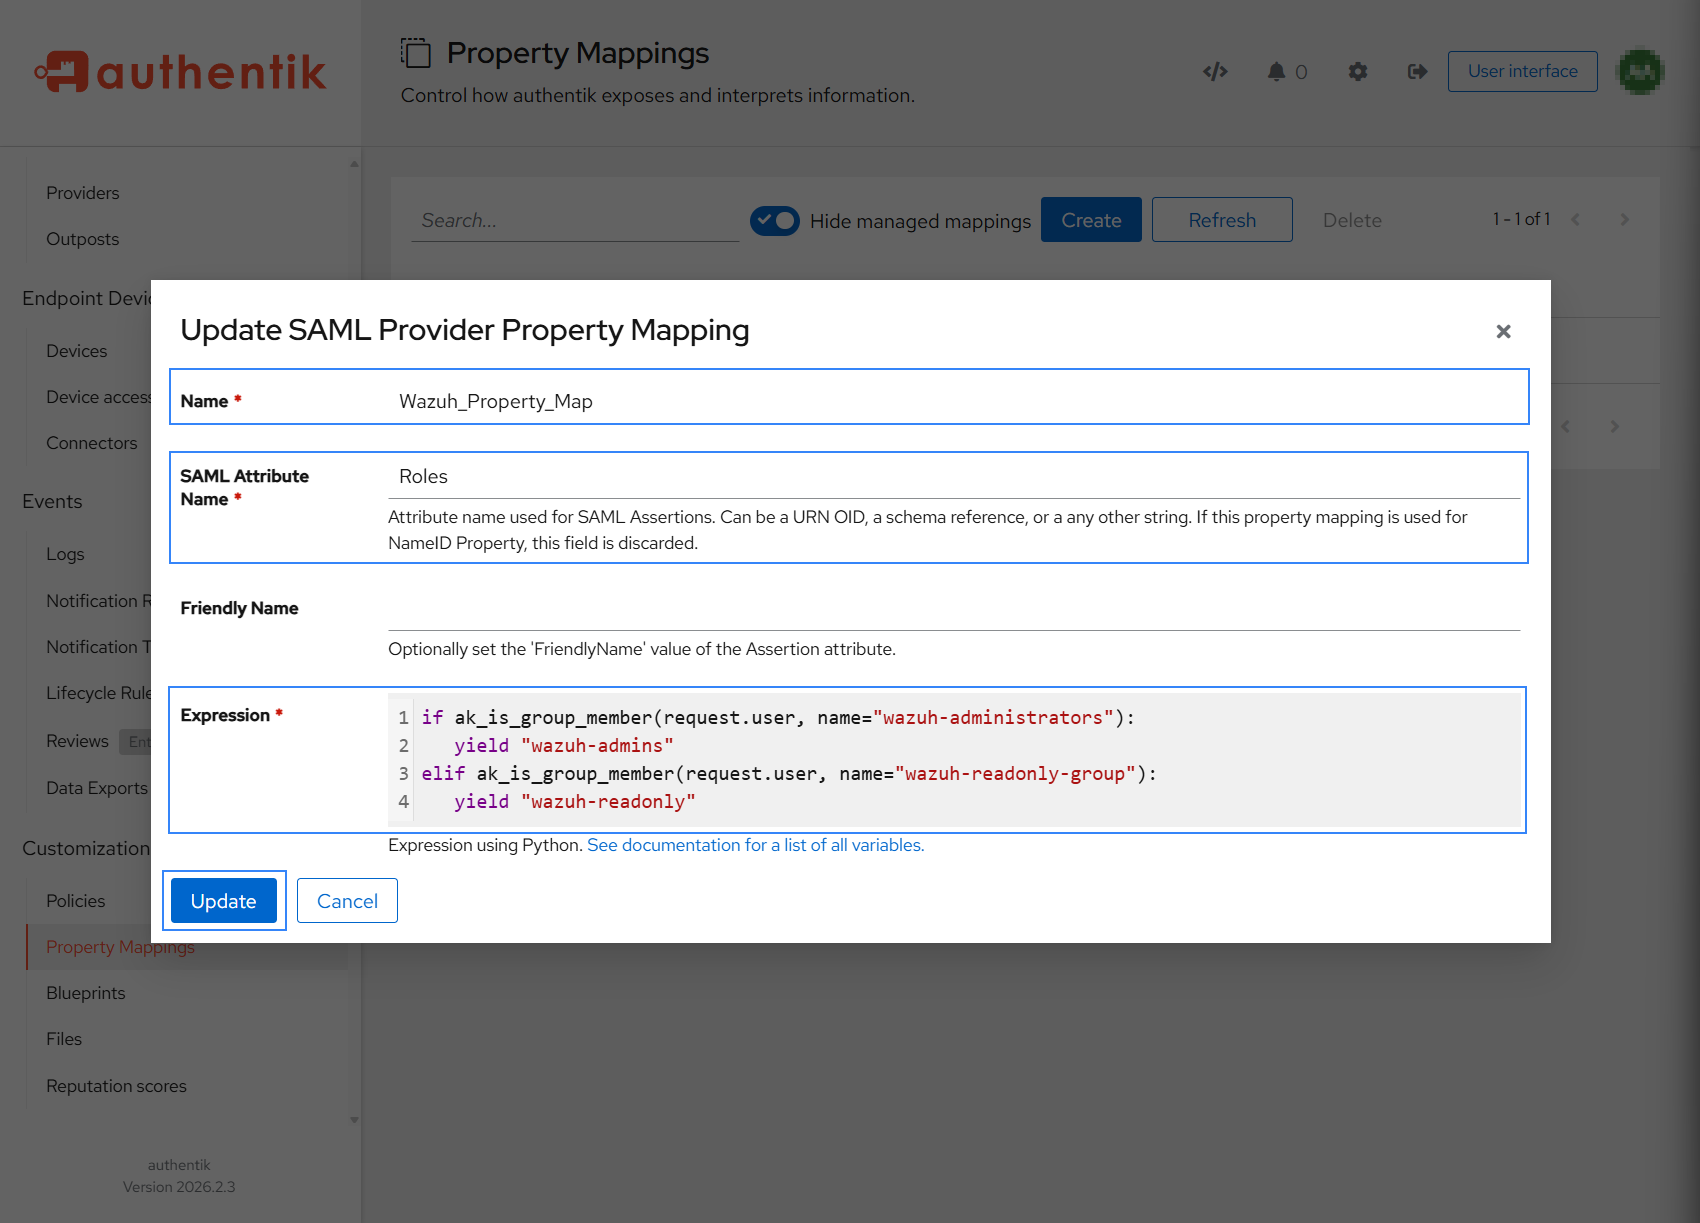
Navigate to Customization > Property Mappings and click Create. Create a SAML Provider Property Mapping with the following settings. If you have previously configured authentik with Wazuh administrator role, update the existing SAML Provider Property Mapping setting:
Name: Choose a descriptive name
SAML Attribute Name: Roles
Friendly Name: Leave blank.
Expression: If you have previously configured authentik with Wazuh administrator role, add the expression below and update the property mapping. The yield value (
wazuh-readonly) will be used later as the backend role in the Wazuh indexer configuration.if ak_is_group_member(request.user, name="<ADMIN_GROUP_NAME>"): yield "wazuh-admins" elif ak_is_group_member(request.user, name="<READONLY_GROUP_NAME>"): yield "wazuh-readonly"
If you are setting up authentik with Wazuh read-only role only, add the expression below and click Finish. The yield value (
wazuh-readonly) will be used later as the backend role in the Wazuh indexer configuration.if ak_is_group_member(request.user, name="<READONLY_GROUP_NAME>"): yield "wazuh-readonly"
Where:
<ADMIN_GROUP_NAME>is the group name of the administrator users.<READONLY_GROUP_NAME>is the group name of the read-only users.
Navigate to Applications > Applications and click Create with Provider to create an application and provider pair. Skip this step if you have previously configured authentik with Wazuh administrator role.
Application: Provide a descriptive Application Name (for example,
Wazuh) and use the following required configuration. Replace<WAZUH_DASHBOARD_URL>with the corresponding value.Slug: Provide a name or accept the auto-provided name.
Policy engine mode:
ANY.Launch URL:
https://<WAZUH_DASHBOARD_URL>Leave other values as default and click Next to proceed to the next step.
Choose a Provider type: Select SAML Provider as the provider type.
Configure Provider: Provide a name or accept the auto-provided name. Leave the authorization flow as default, and add the following required configurations. Replace
<WAZUH_DASHBOARD_URL>with the corresponding value.ACS URL:
https://<WAZUH_DASHBOARD_URL>/_opendistro/_security/saml/acsIssuer:
wazuh-samlAudience:
wazuh-samlUnder Advanced protocol settings:
Property Mappings: add the Property Mapping you created in the previous section.
NameID Property Mapping: select a property mapping that will be used for Wazuh usernames (for example,
authentik default SAML Mapping: Nameorauthentik default SAML Mapping: Email). Leave other values as default and click Next to proceed to the next step.
Configure Bindings: Leave as default and click Next to proceed to the next step.
Review and Submit Application: Review the configuration and click Submit.
Download metadata file
Navigate to Applications > Providers and click on the name of the provider that you created in the previous section (for example,
Provider for Wazuh).Under Related objects > Metadata, click on Download. Save the file as
wazuh_authentik_meta.xml. This downloaded file is your SAML Metadata file and it will be required in the next section.
Wazuh indexer configuration
Edit the Wazuh indexer security configuration files. We recommend that you back up these files before you carry out the configuration.
Backup the existing Wazuh indexer security configuration files:
# /usr/share/wazuh-indexer/bin/indexer-security-init.sh --options "-backup /etc/wazuh-indexer/opensearch-security -icl -nhnv"
Generate a 64-character long random key using the following command.
# openssl rand -hex 32
The output will be used as the
exchange_keyin the/etc/wazuh-indexer/opensearch-security/config.ymlfile.Place the
wazuh_authentik_meta.xmlfile within the/etc/wazuh-indexer/opensearch-security/directory. Set the file ownership towazuh-indexerusing the following command:# chown wazuh-indexer:wazuh-indexer /etc/wazuh-indexer/opensearch-security/wazuh_authentik_meta.xml
Edit the
/etc/wazuh-indexer/opensearch-security/config.ymlfile and change the following values:Set the
orderinbasic_internal_auth_domainto0, and set the challenge flag tofalse.Include a
saml_auth_domainconfiguration under theauthcsection similar to the following:
authc:
  ...
  basic_internal_auth_domain:
    description: "Authenticate via HTTP Basic against internal users database"
    http_enabled: true
    transport_enabled: true
    order: 0
    http_authenticator:
      type: "basic"
      challenge: false
    authentication_backend:
      type: "intern"
  saml_auth_domain:
    http_enabled: true
    transport_enabled: false
    order: 1
    http_authenticator:
      type: saml
      challenge: true
      config:
        idp:
          metadata_file: '/etc/wazuh-indexer/opensearch-security/wazuh_authentik_meta.xml'
          entity_id: 'wazuh-saml'
        sp:
          entity_id: 'wazuh-saml'
        kibana_url: https://<WAZUH_DASHBOARD_URL>
        roles_key: Roles
        exchange_key: 'b1d6dd32753374557dcf92e241.......'
    authentication_backend:
      type: noop
Ensure to change the following parameters to their corresponding value:
idp.metadata_fileidp.entity_idsp.entity_idkibana_urlroles_keyexchange_key
Run the
securityadminscript to load the configuration changes made in theconfig.ymlfile.# export JAVA_HOME=/usr/share/wazuh-indexer/jdk/ && bash /usr/share/wazuh-indexer/plugins/opensearch-security/tools/securityadmin.sh -f /etc/wazuh-indexer/opensearch-security/config.yml -icl -key /etc/wazuh-indexer/certs/admin-key.pem -cert /etc/wazuh-indexer/certs/admin.pem -cacert /etc/wazuh-indexer/certs/root-ca.pem -h localhost -nhnv
The
-hflag specifies the hostname or the IP address of the Wazuh indexer node. Note that this command useslocalhost, set your Wazuh indexer address if necessary.The command output must be similar to the following:
Security Admin v7
Will connect to localhost:9200 ... done
Connected as "CN=admin,OU=Wazuh,O=Wazuh,L=California,C=US"
OpenSearch Version: 2.19.4
Contacting opensearch cluster 'opensearch' and wait for YELLOW clusterstate ...
Clustername: wazuh-cluster
Clusterstate: GREEN
Number of nodes: 1
Number of data nodes: 1
.opendistro_security index already exists, so we do not need to create one.
Populate config from /home/wazuh-user
Will update '/config' with /etc/wazuh-indexer/opensearch-security/config.yml
   SUCC: Configuration for 'config' created or updated
SUCC: Expected 1 config types for node {"updated_config_types":["config"],"updated_config_size":1,"message":null} is 1 (["config"]) due to: null
Done with success
Wazuh dashboard configuration
Create a new role mapping for the backend role.
Follow these steps to create a new role mapping, and grant read-only permissions to the backend role.
Log into the Wazuh dashboard as administrator.
Click the upper-left menu icon ☰ to open the options, go to Indexer management → Security, and then Roles to open the roles page.
Click Create role, complete the empty fields with the following parameters, and then click Create to complete the task.
Name: Assign a name to the role.
Cluster permissions:
cluster_composite_ops_roIndex:
*Index permissions:
readTenant permissions:
global_tenantand select the Read only option.
Select the newly created role.
Select the Mapped users tab and click Manage mapping.
Under Backend roles, add the yield value in authentik configuration and click Map to confirm the action. In our case, the backend role is
wazuh-readonly.
Check the value of
run_asin the/usr/share/wazuh-dashboard/data/wazuh/config/wazuh.ymlconfiguration file. Ifrun_asis set tofalse, change it totrue. This is required to create a role mapping in the Wazuh dashboard, ensuring the backend role provided by the IdP is correctly mapped to the corresponding Wazuh role.hosts: - default: url: https://localhost port: 55000 username: wazuh-wui password: "<WAZUH_WUI_PASSWORD>" run_as: true
Click ☰ to open the menu on the Wazuh dashboard, go to Server management → Security, and then Roles mapping to open the page.
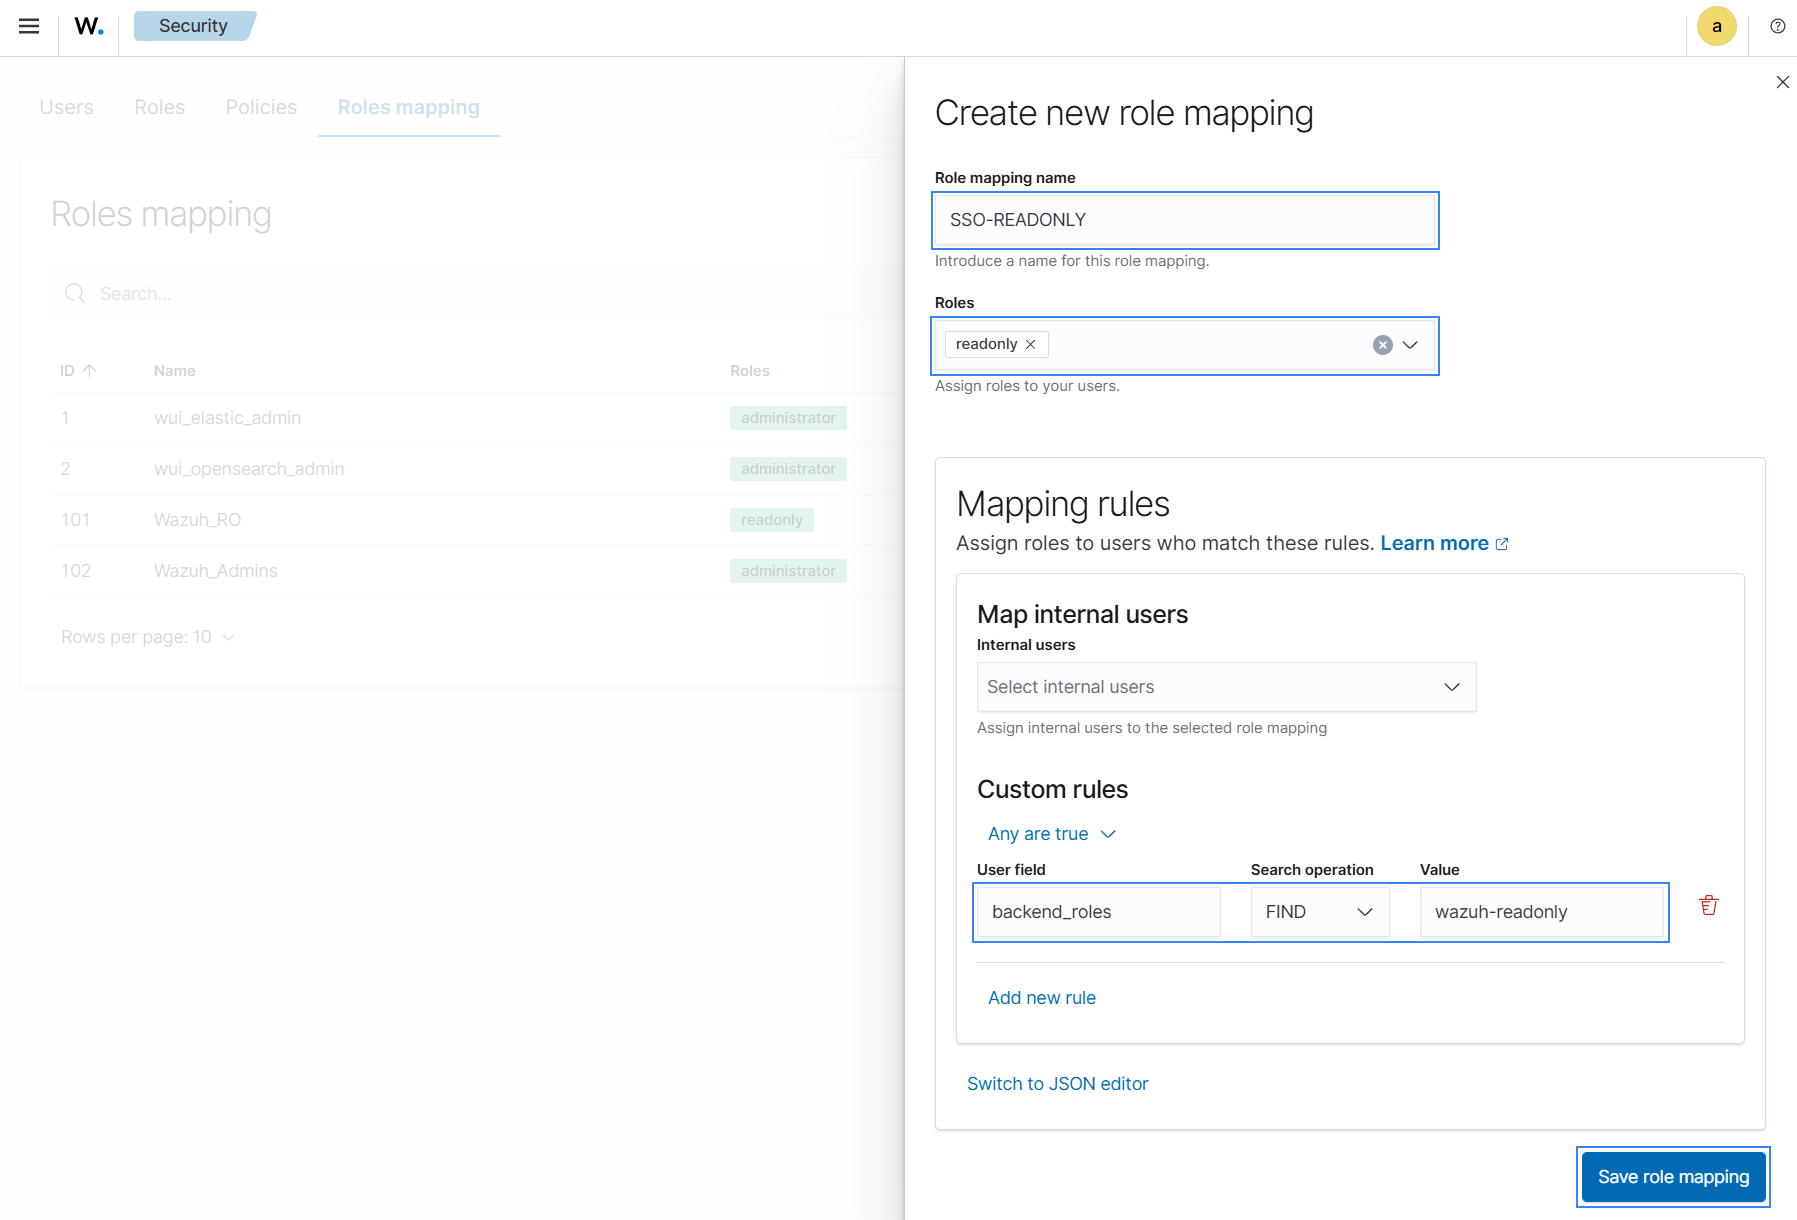
Click Create Role mapping and complete the empty fields with the following parameters:
Role mapping name: Assign a name to the role mapping.
Roles: Select
readonly.Custom rules: Click Add new rule to expand this field.
User field:
backend_rolesSearch operation:
FINDValue: Assign the yield value configured in the authentik property mapping configuration. In our case, this is
wazuh-readonly.Click Save role mapping to save and map the backend role with Wazuh as read-only.
Edit the Wazuh dashboard configuration file. Add these configurations to
/etc/wazuh-dashboard/opensearch_dashboards.yml. We recommend that you back up these files before you carry out the configuration.opensearch_security.auth.multiple_auth_enabled: true opensearch_security.auth.type: ["basicauth","saml"] server.xsrf.allowlist: ["/_opendistro/_security/saml/acs", "/_opendistro/_security/saml/logout", "/_opendistro/_security/saml/acs/idpinitiated"]
Restart the Wazuh dashboard service using this command:
# systemctl restart wazuh-dashboard
To test the configuration, go to your Wazuh dashboard URL and log in with your authentik account.